Lessons
Day 1
1Course Overview
19:50 2The Bad and Good of Nature Photography
28:22 3Cameras and Sensors
17:18 4Lenses for Nature and Landscape Photos
16:42 5Macro and Tilt Shift Lenses
34:56 6Filters for Nature and Landscape Photos
31:41 7Tripods and Monopods
26:10General Camera Tips
16:56 9Exposure and Metering
17:17 10Exposure Modes
16:55 11Exposure Values and Apertures
24:16 12Focus: Modes, Points and Buttons
20:23 13Focus: Advanced Techniques
26:42 14Day 1 Q&A
12:30Day 2
15Mountains and Forests
25:03 16Rivers, Waterfalls and Shorelines
25:45 17Open Land, Flowers and Skies
17:30 18Macro Shots and Adding a Human Element
15:43 19Elements of Design
16:17 20Working the Subject
14:36 21The Photographic Process
27:46 22Timing: Seasons and Time of Day
28:01 23Types of Light: Direct Sunlight
38:31 24Types of Light: Indirect Sunlight
42:35 25Composition: Basics and 7 Framing Tips
16:18 26Composition: Angle of View and Aspect Ratios
29:51 27Composition: Panos and Subject Placement
29:47Lesson Info
Open Land, Flowers and Skies
all right so let's talk about kind of photographing open land areas in this case I'm often looking for someplace a little bit higher to shoot there's a great story that I heard that was uh it was about a new photographer in national geographic and his first assignment was to go where was he coming he was going to kansas he had a story on kansas that he was doing and he's getting all his gear ready at the national geographic offices and the managing editor called called him into his office and he says you already for you shoot ready for the shoot goes I want you to take this out already handed him a two foot step ladder and he goes what he want me to do with the two foot step ladder he goes I want you to get some aerials big crowd for think laugh there thank you and so getting anything up can't help trying to get a different perspective sidelights going to definitely help out to help show the texture of the land whatever might be on the land and giving this the shots and almost always g...
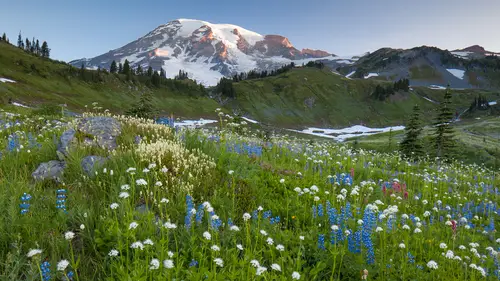
oing to be best very early in the morning very late in the evening and just try to look for anything in the foreground thatyou confined that has a texture or something interesting to it the largest flat spot on the planet the salt the bolivian salt plain it's very just massive expanse and I got my camera down my lens was actually touching the ground so I had mounted on a tripod but the linds was actually resting on the ground in this case and so that's how close I am to the ground to try to get some texture into the shot well known spot in eastern washington steptoe butte and getting up early in the morning getting that sidelight actually this is a tv job this is just before sunset rolling hills out there with their fields going to be able to seymour texture with that sidelight creating some shadows helps it show some depth badwater basin in death valley getting nice and close to the salt flats down there they kind of have these hexagons that push up against each other and they create these ridges those ridges air nice little areas of texture shooting just after the sun had gone down over there horizon down in death valley as well as many other places there's some great deserts I know when we go to morocco I'm excited to potentially shoot the desserts and photographers love desserts because it's a very it's a very clean environment very graphic some great lines out there and this is obviously going to work very good with the sun very low on the horizon so you need to be out there before sunrise so that you are ready to rock and roll when that sun comes up over the the horizon because that's when things are going to be at their very best you get that nice sidelight you can really see those shadows you gotta be really careful about where you walk because you can ruin your shot you can ruin other photographer shots and I had some serious challenges with other photographers popping into shots and causing all sorts of problems in these cases and it's kind of the same thing with mountains it would be ideal tohave a few nice little puffy clouds out there rather than just pure sunlight but then having it totally filled with clouds generally doesn't work real well at all this is eureka dunes in the northern part of death valley it's a place that not a lot of people go to get out to this particular area was about a mile hike so I was out there with a buddy and we were scheduling our time so that we could hike a mile be out there fifteen minutes thirty minutes before sunrise and there's very few people out here so it was kind of nice because we could go anywhere we weren't getting in anyone else's shots and nobody else was getting in our shots and I love these just very simple graphics and it works really well because it is very early in the morning and we're getting just a few of these little shadows which helped reveal that death once again having that dark background it's really really nice I like that it's just kind of a shadow of a background mountain behind it just more area in that same that same location and this is where those little bit of clouds really help out rather than just having a pure blue sky having some texture in that sky helps just helps the overall photograph all right let's talk about photographing flowers so the wind the wind is our enemy wind is something that is really really hard to deal with I know that there are some flour photographers who basically don't shoot outside they grow the flowers they cut him they bring him in the house where they can really control it they could put their light box on it and they can light it properly and they know they're not going to move so photographing out in the wind is really really challenging and so you have to look for those calm days a lot of people kind of get caught up and they stop at the first bright pretty flower that they see and it may not be the best one and they need to really look for the best group of flowers this is one area that I do shoot with shallow depth of field a lot of landscape from nature photography is everything in focus but this is one area where I like to shoot with shallow depth of field from time to time and the sunny days can be really really challenging in some cases here's another example of the fish islands and in this case I kind of like it it's just kind of a fun little playful shot getting down really low and in this case the key was getting low enough so that that first line of flowers we can see sky below it and so that just helps it out and also those yellows and blues opposite colors that work very well together using that shallow depth of field in this case I believe I'm using one on f to lens to get that extremely shallow depth of field and I mean very careful about my camera position so that my background is just a blur of the same color palette at all I moved the camera position a little bit wrongly I'm going to get trees or sky or something else in there so I'm paying as much and into the background as I am the foreground if you go up to mount rainier in the middle of the day when the crowds were there this is where the sun can be really really challenging if you go out there with right time yes there'll be flowers but this is not a shot that I like this is a good example of a bad shot I mean it's in focus it's exposed about as well as you can but being in that same position are under that in those flowers in the morning can make all the difference in the world where the flowers have nice even light on them and the son that is hitting them out the mountain itself is not really strong yet and so it's weak enough that it's a nice little mixture of mixed light hitting the mountain but nice even light on those flowers which tends to work really really well you can photograph flowers in the sun it's just tricky and I have some shots with it but it's very very tricky once that sun starts hitting those flowers because it creates very very dark shadows let's roll into sunrises and sunsets a lot of people love shooting sunrises and sunsets first step is to meet her a little away from the sun and so in this example here I got the son in the photograph which I don't do a lot but occasionally it's a nice element to have and I did not meet her this scene by just pointing the camera and checking the light meter I was actually panning off to the side measuring the light levels to the right of the sun or it could've been to the lab and getting the light reading for this and then I would bring the sun back into the exposure if you leave the sun in frame while you are doing those exposure checks the sun's going to kind of overpower thing and everything and it's going to make your exposure is too dark and so you need to move away from the sun do the light meter and then bring it back in and some people like using the auto exposure lock button on the back of their camera for doing this you could do it manually and just set your shutter speeds and apertures recompose and then take the photographs I'm often shooting a number of test photos you know making sure that I'm having things correct as I'm finding this out for sun rises you're often going to have to scout ahead of time because when you get there at an hour before sunrise you're not gonna be able to see where you're supposed to be and what all is around you and so scouting out is always a good thing to do those graduated neutral density or split indy filters air going tio huge help I would not want to shoot a sunset without my graduated indies I mentioned this before but looking for that break on the horizon where you have clouds above but the sun's going to drop down below that break and be visible just before it goes down or before it comes or as it just after it comes up and so that break on the horizon allowed that little bit of light to hit on what mountain is this I think that might be mount shasta in oregon and so there's clouds above there's clouds below and that's one of the best conditions that I would ever hope for one of the I would probably say the greatest sunrise that I've ever seen was when I was climbing mount rainier is up it around that I was a disappointment cleaver which is around well thousand or eleven thousand is about twelve thousand feet and there was a layer of clouds below us and there was a layer of clouds above us and the sun cut through and was just bouncing back and forth between the two and it was just totally spectacular and so tryingto always trying to look for those conditions at some point again down in bolivia some nice puffy clouds picking up that life and this is that break on the horizon where that light is hitting those clouds and its firstly causing a really nice light in the clouds and secondly those clouds air reflecting great light back down on the land and that's the other reason why it's so nice to have those clouds is their their natural reflector all right this is kind of an unusual shot for me because there really isn't a subject in there at all I just really love the gradation in colors that you get I wish that I had something mohr iconic to shoot you know a nice little tree that was here but this is just kind of one of those I'm just going to shoot color for color say uh at this particular sunset after sunset don't go home stay out there shoot those night shots there's some great night shots to be had I find that there's kind of you know there's this peak of when things get really good at sunset and then they kind of kind of fall off but then they start getting good again depending on what type of subjects your shooting and so you just kind of changed what you're focused on depending on the light levels so first off finding interesting four grounds for doing your night shots is a good thing you may have to find your composition in the daytime because you're just don't you can't see things and can't work as well at night it's obscuring things be very where if you're planning on shooting at night you know where the moon is in its face or you're going to be working with a full moon or no moon because that may change completely what type of subjects that you can shoot when is it going to come up isn't going to destroy a time lapse that you were setting up and if you want to do start trails we're not going to get into that particular in this class but it is possible either by shooting film or with digital stacking and shooting a time lapse I haven't really done too much of that with the new stuff I've done a lot of it with the old film though so finding your composition in the day being out there finding those elements are going to be a lot easier in the daytime it's hard to envision what they're gonna look like a night time but you can look for graphic elements that may work in certain situations I know I'm not really here I was scouting up and down a road roadway where I could find where it was open and I could get a shot of mount rainier and I could have an extra tree in the foreground and there wasn't very many spots on the road and I probably have to spend a half an hour finding this spot you know where could I park the car how far did I have to walk and so that when it came time to shoot this shot I was able to do it very very efficiently and then get on with the next shot's the next few shots are film scans from many years ago I was working on my rainier project and if you remember the tripod section where my tripod was set up with the rock well this is the shot that it was taking all night it was about a ford a six hour exposure and I would want it to get a straight shot of mount rainier with the clouds and the little bit of light that you see in the lower left hand corner that is from sunset and the light in the right hand corner is sun rise slightly blowing out those corners of it and so that's a long as I could leave the shutter open and when I looked at this image and I pulled it up on the light table and I got my magnifying loop out of there I got kind of mad because I I saw scratch and I looked closer at the stretch and realized that it wasn't a scratch and I did was shooting this with a second camera you can see it a little bit more clearly here is that it was actually the lights of climbers illuminating the mountain as they were going up and so in this photo it's not technically a great photo it's just kind of interesting you can see two different light trails one heading up on the left that's the disappointment cleaver route and then towards the middle of the frame is the emmons glacier route and I've actually climbed the mountain from both of those routes and it was just kind of need to see all those climbing groups illuminating the mountain in that manner here's another shot this is far from plumber peek again that's I've shot a couple of pictures up they're a great place to shoot mount rainier staying there up there at night shooting about a this's probably about a three three hour exposure I think up there and this is with film it can be done with digital I just haven't you know dove into that too much it requires a lot of dedication because you've got to have that camera going for many many hours and you often have to kind of sleep out there with your camera at least I don't feel trusting of just leaving it up on some trail more stuff at night for shooting the moon a lot of people want to get shots of the mood and so here you really need to do it while it's very very low on the horizon otherwise it blows out and you're not gonna have any detail in the moon so you don't want to let the moon over expose we want to keep a little bit of texture in the moon just having a white orb in the sky doesn't generally look very good looking for a place to put the moon in this particular shot I was I knew there was a supermoon which is one of these moons that are a little bit larger because the distance is a little bit shorter between earth and moon and I was doing some checks online to figure out where on the horizon the moon was going to come up and then I was checking over maps of seattle to figure out where I could line it up with the space needle and where could I get as far away from the space needle it's possible because I want to use that long lens and a compression effect to make the moon look is biggest possible by using the biggest telephoto lens and in order to get the space needle and I'm trying to get us far away as possible so that I could still fit it in with a really big long lands and so I wish I could have been even further away with an even bigger lands and in case you were ever wondering because I know a lot of people like I want to take a picture of the moon and have it filled the entire frame you would need a twenty four hundred millimeter lens in order to do that so be careful about letting the moon over exposed I know my moon shoot shooting on this particular night was over in a few minutes because the moon is about as bright as I would want it to get in this photograph it still has a little bit of color it's also very hard to include in the sky when it's very high up and so you have to be shooting it as it's very very close to the horizon and so this is a good time there's a number of aps that you can get for your phone that'll help you direct to where the moon is exactly going to be setting I have found that they're not super accurate in dealing with mountain ranges here in seattle we have a mountain range to the east and the west that kind of throws off sunrise times and moonrise times because it depends exactly on where you are and what peak the moon or sun is going to be going down or up behind and as I said take it would take a twenty four hundred millimeter land I don't have a twenty four hundred millimeter lands but I think I had a five hundred and a doubler and then I end up cropping this to fill the frame in this case but there is a rule of thumb if you would like to know how big your moon will be in your final shot and basically what it says is that the moon will be and I'm trying to remember this is it's going to be for every hundred millimeters so let's just say if you have one hundred millimeter lands it is going to be one millimeter in size on negative and so this doesn't translate quite as easily to digital because you have to think about if it was a negative that you're pretty so if you had a thousand millimeter lands it would be ten millimetres across on the sensor and this is why on a twenty four by thirty six inch sensor you would need a twenty four hundred millimeter lands and so if you really want to get the moon a significant size in the frame you usually need something more than five hundred millimeters but if you have a nice frame set up you can get a nice moon shot at around two hundred millimeters in my opinion it's not going to be huge but trust me it will be noticeable and that's kind of all you're hoping for is another nice element in the frame and so you do need a telephoto it doesn't need to be the most telephoto in the world but if you can use them it'll just be larger in there
Class Materials
bonus material with purchase
Ratings and Reviews
Thomas Hamlin
Most of nature's beauty has been photographed by lots of people over the years. However, nothing compares to actually visiting famous places, buildings, mountains, etc. and taking your own photographs. John Greengo provides the necessary equipment information, photographic principles, and techniques in a manner which inspires you to put in the extra effort to take the best nature photographs that you can with the gear that you have. His unique illustrations, actual real life photographs, and easily understood explanations are top notch. I highly recommend this outstanding course. I have several of John Greengo's photography courses, and I highly recommend them all. His vast experience with film and digital photography, gained through traveling and working with some well known photographers, gives his courses a unique perspective.
a Creativelive Student
I love this course, John. It is one of my all time favorites. First of all I loved your effort scale. I knew as soon as you went through the scale that you are a guy that I want to listen to. To me, the effort part IS the fun part of photography. When you asked the question about one wish ... the first thing that came to my mind was that I wish I had more time for photography. I like the technology, but I do not wish for any special powers. To me, that would take the challenge away. Photography is wonderful because every subject challenges the photographer to get the angle right, the light right, the settings right ... I love that challenge. I think you do too, John, and that is why this course is so special. The attention you pay to every detail comes from the drive you have to meet the challenges with every thing you've got. That is why your class is so special. Your work ethic is exceptional. SandraNightski
a Creativelive Student
While delving more thoroughly into Nature and Landscape photography in a smaller format, John Greengo provides us with an amazing companion to his outstanding courses Fundamentals Of Digital Photography and Travel Photography. Here he gives us another necessary treatise to study before packing our gear and heading out in a car, a plane, a boat (or just for a long hike), and it’s as entertaining as the others. Thank you again John Greengo and Creative Live for these expert and brilliantly illustrated programs. I just hope you keep finding more subjects to photograph and provide the instructions for.