Lessons
Day 1
1Course Overview
19:50 2The Bad and Good of Nature Photography
28:22 3Cameras and Sensors
17:18 4Lenses for Nature and Landscape Photos
16:42 5Macro and Tilt Shift Lenses
34:56 6Filters for Nature and Landscape Photos
31:41 7Tripods and Monopods
26:10General Camera Tips
16:56 9Exposure and Metering
17:17 10Exposure Modes
16:55 11Exposure Values and Apertures
24:16 12Focus: Modes, Points and Buttons
20:23 13Focus: Advanced Techniques
26:42 14Day 1 Q&A
12:30Day 2
15Mountains and Forests
25:03 16Rivers, Waterfalls and Shorelines
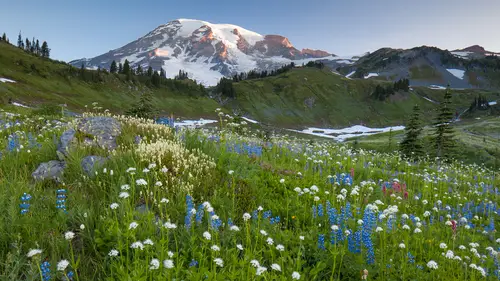
25:45 17Open Land, Flowers and Skies
17:30 18Macro Shots and Adding a Human Element
15:43 19Elements of Design
16:17 20Working the Subject
14:36 21The Photographic Process
27:46 22Timing: Seasons and Time of Day
28:01 23Types of Light: Direct Sunlight
38:31 24Types of Light: Indirect Sunlight
42:35 25Composition: Basics and 7 Framing Tips
16:18 26Composition: Angle of View and Aspect Ratios
29:51 27Composition: Panos and Subject Placement
29:47Lesson Info
Working the Subject
so throughout the rest of the class I'm going to be sharing with you kind of some stories leading up to a shot and so I'm going to be showing you the shots that I took and even sometimes the timing of when I took the shots and what I was thinking trying to figure out what was wrong with the shot and trying to make it a better shot working the composition working the subject trying to figure out what is my subject I know I'm in a potential for a good area but where is the exact spot if you remember back at the very beginning of this class when I talked about my one wish which was the power of record ignition I wish I just knew to go exactly where to stand and exactly what the shot was going to be this is the fact that I don't know what that is and I gotta work through it so this is working the subject this is in your seventy national park it's called a valley view it's a parking lot it's a place where billions of photographs okay maybe that's a slight exaggeration but probably not proba...
bly billions of photographs have been taken by a multitude of photographers for a very long period of time which is why they actually have a parking lot right there so there's a great view of the valley there's a river that runs right in the foreground and there is very often rocks that are visible right there in the river depending on the level of the river and I got here at seven twenty four in the morning or at least I have my first shot by seven twenty four in the morning and I'm got some nice elements in the foreground I got some nice elements in the background but the lighting is not quite right yet and I'm still not sure about the foreground elements are these three elements that I want is this the angle of you I want so I'm going to move around I'm going to say okay well here's more significant rocks and I'm really close to these rocks I'm just less than a foot away from them so that they can fill up a good part of the frame well I don't know that this is right maybe I should be shooting vertically so let's try some vertical shots in the same area you can see the clock down in the lower left corner started at around seven twenty for the son is now up but it's not hitting very much of the valley it's very backlit in this situation especially getting around eight thirty going back to the horizontal sze I kind of like some of the elements here but the skyline along the right hand ridge is getting very blown out there's no good colors there it's just very very white ish a little bit later eight forty six now I did find this one little cove where this one rock in the middle and it was very very still if you can see the river about the middle of the frame you can see that the river is rippling and flowing and there's very few reflections in that but I'm getting a very nice reflection in this sheltered area and I mentioned earlier about shooting reflections you you need to get down low and close and finding that area in this one little area is just you know a few feet across its maybe oh probably four five feet wide by maybe six feet in length and I'm getting down really close right into that area but ultimately I was not happy with the shot at sunrise so I said you know what let's go back for sunset see what change is there sunset the suns in a completely different position and now it's really illuminating el cap and the rest of the mountains in the area we do have a bit more shadow area that's a little bit harder to deal with and so let's hang out and continue taking pictures and I'm continuing to work the shoreline trying to figure out what are the best elements tohave in the foreground and eventually I come back to an area that I had scouted earlier and I had photographed earlier but now I'm getting a little bit better light on the mountains and I'm liking this quite a bit but just to cover my basis I go back and I'm shooting verticals and I'm moving around with different subjects I never really sure what I'm going to end up liking sometimes it comes to you very very quickly and other times you're just not sure and so you got to keep shooting around now the light's starting to really get weak here we're losing a lot of power we're losing a lot of color in the light and now we've gotten really really well and we've kind of gone too far and it ended up that my favorite shot was back fifteen minutes before that shot this point here it's where there was the best balance of light and color on getting that reflection in the foreground and I probably shot fifty different shots in probably twenty different locations trying to figure out what was the composition and where did I like it you know I should know about this stuff I'm teaching a class and I should be the expert I should be able to walk out there and just go this is where I want to get the best picture but it all takes work on you got to shoot your pictures you gotta look at the results and shoot something over and over and even if you think you got it you keep shooting because you don't know it might even get better and so that's how I worked that particular situation let me give you another example mobius arch this was kind of a hidden art but it's well known now it used to be kind of a little secret place that you could go and photograph a mount whitney in the background right through the archway of it and it was it was really funny because when I went there I knew it about where it was at and I knew that you take this road and you park here and me and a buddy were out looking for because we took the trail and we were just hunting all over it it was like we're looking for this treasure chest you know it's gotta be around here it's within one hundred yards and we're looking all over the place and it ends up that if we'd walked out the other side of this gravel parking area there was a map that had directions to get there and you were finding it from the back side but it's ah great great little location to go shoot there's not a lot of room to work with so hopefully there aren't any other photographers out there likely it was just me and one other a friend out there shooting and we decided to stay out there fairly late at night to just kind of see what we could get and so I'm shooting through sunset getting a little bit of sun star in here and then I stayed through till twilight which is one of my favorite times to shit getting this beautiful blue in the sky and that very bright star in the sky it's not a starts the moon and I'm using a very wide angle lands and kind of deceptive on how small the moon looks there but I didn't mind it looking really small I felt it needed a little element and I didn't really have anybody else to work with at the time everybody was off shooting something else so I was doing some self timer shots just trying to get me or a figure up in the frame and then I set up some flash units to see if I could add something to it seemed like a neat place to potentially add flash and I played around with many many different combinations and I've always liked doing this photography but I just wasn't liking the artificial look of the flash and the shot that I ended up liking the most is this one here which I think is a little bit more simple well bit more graphic that nice simple silhouette the moon kind of looks like a bright star it's luke little hard to tell up there so it could be anything that you imagine conjures up and so in this case almost the simple a shot of the group was my favorite and that is one of the things that I do like in a photograph is just clean simple elegance in a photograph and I think this is although I hate to say throwing myself in the shot I think just having a little bit of human element in there I think made it better added another little bit more emotion to it in my opinion one more on the working the subject siri's and so show you some bad photos leading up to a photograph that I actually liked had mentioned this before us we have talked about the forest section not photographing in the bright sunlight it's very very challenging there are elements of this image that I do like you know they're almost these god beams that are coming through if I had a fog machine out there this would've been a good place to have the fog machine going but I didn't have such a fog machine out there and we're getting a lot of blown out hot spots which I don't like down on the bottom which is why you want to get the shots as early in the day as possible when the sun is not as intense it's lower in the sky the forest is just a very cluttered place to shoot and there's a trail going through it there's great looking trees that have fantastic texture to him there's some nice colors with the plants and the trees growing around so there's a beautiful green going on and it's really hard finding these straight shots that are fairly clean without a lot of clutter and things hanging around from the sides and so one of things going on in this photograph that I've mentioned before is finding a little bit of open area so that you can back up to it and so using a little bit of a telephoto lands drawing little elements in the foreground using lots of depth of field and it's just really hard finding that perfect shot in there there is one area that I found that was just kind of open there wasn't any trees for several yards in either direction and there was these interesting trails running through and I noticed that I could climb up on one of the trees and shoot from above so getting up to a higher perspective enabled me to see the area and the kind of the grounds around these trees a little bit more easy looks like a very little perfect walkway and I noticed that on the tree on the other end that it had a very large opening when these trees fall over there so big that kind of rot from the inside out and I was able to crawl into the tree and shoot out of the tree and my favorite picture of the bunch is this one here and I call it the hobbit shot and I think it looks like the inside of where a hobbit would live inside this little forest and having that is a framing element and not showing the entire force just showing a hint of it to give you an idea of what that environment is like and so once again adding that element of mystery by taking away from some of the image showing only a little bit of the image at one time oh actually I have one more here ok so one more to go uh working this subject in yellowstone it was kind of funny because I was on this snow tram going down the road and I was looking out the window kind of scouting areas that I wanted to go and I noticed two areas one that looked like it might be okay but another one that looked really good and so when I went to the area that looked really good it had these very graphic trees in the background and when I got there I got out and I had actually had to hike here and I it's like this look really good I mean the scout the scouting mission the scouting john said this is a great place to shoot and I got there and I shot with a couple of different lenses and I shot it in a couple of different ways and I just couldn't make anything happen and this is one of the times where the scouting report was completely falls I was totally wrong in the scallop and that happens from time to time so I went down to the other place which I didn't think held much potential but you know what am I going to do I got to give it a try and there is these kind of very interesting trees where I believe they have been killed by the thermals in the area and they just had no branches on the sticks coming up out of the ground and there wasn't a lot shoot with and it was very tough to work around I was working in about three feet powder I was working on snowshoes and had to be very very careful about not trampling over any area that I wanted to photograph so I kind of had there was like a stage that I had to stay behind and I didn't want to go off stage two kind of trample into the area that I was going to photograph and so I'm looking for elements in the foreground and there just wasn't anything really strong there was this one little branch of a tree coming out that was kind of nice but it wasn't really strong enough to hold it so I had to hike down a little bit further and there was some trees that I could get a little bit closer to trees are tall so I should be shooting vertical but then I went to horizontal and decided this is the shot that I really like and this is one of my favorite shots from yellowstone it's clean it's colorful it's graphic right at the base of that tree we have a little bit of texture where that light is coming in I normally don't like to shoot him sunlight but here it gives us that really nice color in the sky and there's just enough information in those trees toe hold those shadows in there and one of the things we'll talk about in shooting and so one of the great things is that snow reflects a lot of light and so on that tree it would normally be very very deep in the shadows if it wasn't for the snow on when I say snow can transform a landscape that's part of the transformation is adding in light to those shadowed areas that you normally don't get tohave and so this actually concludes the subject section that we had started quite a while ago and so let's check in and see what sort of questions we might have all right at this point okay let's take a couple because I know we have a lot to get through so just going back tio when we're talking about shooting winter landscape yes and did you say talk about whether you were using custom white balance auto white balance they're several votes on that one I normally just leave the camera in auto white balance and I will switch it if I see a problem and so sometimes auto white balance just gets thrown off for a variety of reasons the ultimate thing is is that I'm shooting raw and I can fix it later and the only problem with that is that I like good feedback in the field I want to be able to look at the back of my camera and have his good of idea of what the final picture is going to come out like because then it's going to affect the way I compose and what I shoot and if I get it right in the field that means I don't have to change it later on but many times the auto white balance is so close it barely needs any tweaks it all and so that's the default position I switch it as needed from there thanks and I just wanted to reiterate for people some folks aren't as familiar with shooting with ross and when you were talking about black and white and showing it on the camera turning that j peg to black and white yes you khun then still get the color version because when you're shooting in broad collects all the data right right in basically this is because when you shoot a raw image when you look at the image on the back of your camera that is a j peg preview of the raw and so you can't be too critical of exactly what you see on that that image as faras color and maybe shadowed areas and highlights and the blacks because you're going to get more than that on your final raw image
Class Materials
bonus material with purchase
Ratings and Reviews
Thomas Hamlin
Most of nature's beauty has been photographed by lots of people over the years. However, nothing compares to actually visiting famous places, buildings, mountains, etc. and taking your own photographs. John Greengo provides the necessary equipment information, photographic principles, and techniques in a manner which inspires you to put in the extra effort to take the best nature photographs that you can with the gear that you have. His unique illustrations, actual real life photographs, and easily understood explanations are top notch. I highly recommend this outstanding course. I have several of John Greengo's photography courses, and I highly recommend them all. His vast experience with film and digital photography, gained through traveling and working with some well known photographers, gives his courses a unique perspective.
a Creativelive Student
I love this course, John. It is one of my all time favorites. First of all I loved your effort scale. I knew as soon as you went through the scale that you are a guy that I want to listen to. To me, the effort part IS the fun part of photography. When you asked the question about one wish ... the first thing that came to my mind was that I wish I had more time for photography. I like the technology, but I do not wish for any special powers. To me, that would take the challenge away. Photography is wonderful because every subject challenges the photographer to get the angle right, the light right, the settings right ... I love that challenge. I think you do too, John, and that is why this course is so special. The attention you pay to every detail comes from the drive you have to meet the challenges with every thing you've got. That is why your class is so special. Your work ethic is exceptional. SandraNightski
a Creativelive Student
While delving more thoroughly into Nature and Landscape photography in a smaller format, John Greengo provides us with an amazing companion to his outstanding courses Fundamentals Of Digital Photography and Travel Photography. Here he gives us another necessary treatise to study before packing our gear and heading out in a car, a plane, a boat (or just for a long hike), and it’s as entertaining as the others. Thank you again John Greengo and Creative Live for these expert and brilliantly illustrated programs. I just hope you keep finding more subjects to photograph and provide the instructions for.