Lesson Info
24. Types of Light: Indirect Sunlight
Lessons
Day 1
1Course Overview
19:50 2The Bad and Good of Nature Photography
28:22 3Cameras and Sensors
17:18 4Lenses for Nature and Landscape Photos
16:42 5Macro and Tilt Shift Lenses
34:56 6Filters for Nature and Landscape Photos
31:41 7Tripods and Monopods
26:10General Camera Tips
16:56 9Exposure and Metering
17:17 10Exposure Modes
16:55 11Exposure Values and Apertures
24:16 12Focus: Modes, Points and Buttons
20:23 13Focus: Advanced Techniques
26:42 14Day 1 Q&A
12:30Day 2
15Mountains and Forests
25:03 16Rivers, Waterfalls and Shorelines
25:45 17Open Land, Flowers and Skies
17:30 18Macro Shots and Adding a Human Element
15:43 19Elements of Design
16:17 20Working the Subject
14:36 21The Photographic Process
27:46 22Timing: Seasons and Time of Day
28:01 23Types of Light: Direct Sunlight
38:31 24Types of Light: Indirect Sunlight
42:35 25Composition: Basics and 7 Framing Tips
16:18 26Composition: Angle of View and Aspect Ratios
29:51 27Composition: Panos and Subject Placement
29:47Lesson Info
Types of Light: Indirect Sunlight
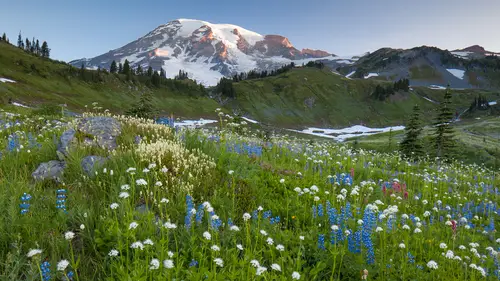
let's talk about indirect sunlight so something other than direct sunlight is illuminating our subject there's a lot of advantages to shooting this type of light and it's very good for a lot of different types of photography the dynamic range that we talked about before in the exposure section this is going to be within our cameras ability so we're going to be able to record the brightest portions of the image as well as the darkest portions of the image which means we're gonna be able to do the most with it once we get it into our computers we're not gonna have those hot spots and we're not gonna have the blocked up shadows and this is going to make the image much easier to see louses I said for a lot of adjustment in post now the disadvantages of this is that it's not nearly as strong as direct sunshine so we're almost always going to be on a tripod when we are in indirect sunlight this cannot be good for certain types of subject that you really want to show the texture on where you ...
need a little bit of light and shadows to help show that texture so it isn't best for everything but it's good for many many different things because it is hiding that death and the color whatever is around your subject is going to be the color that's illuminating this subject so this little fern here is surrounded by a lot of green plants which means it's surrounded by a lot of green light which is kind of adding to the greenness of it in this case I think it's to the benefit but in some cases that's not always what you want and so this is a great time to get the macro lands and start looking for details and intimate landscapes because that's where even light looks very good very good for those close ups so look for those little details little floyd fully edged little flowers and in this case you probably are gonna want to avoid big expanses of blank white sky generally they're not of interest and they're not going to help the photograph out so when it comes to indirect sunlight I'm gonna break these up into further category ours overcast open shade reflected and then basically a mix so let's go through these individually first off overcast this's cloudy okay so we're being illuminated by clouds rather than other subjects that light is hitting and so this is a really nice soft light this is probably the id a deal like that you would want tohave for shooting macro photography it's nice it's a clean even white source of light it's going to be well within your cameras dynamic range you're going to be able to pick out these details very easy with a nice simple lighting like this and for days that are cloudy this is a consistent light that you could be working for hours on really nice light as I say because it's not changing for that macro photography now this is as I said it's going to necessitate working with the tripod because you're going to end up with slower shutter speeds so you're gonna want to get that sharpness using the tripod and it can be a little bit boring it's not the most exciting light because there's no real color to it it's very neutral and color it's it's it's a good documentary piece it's not as I say the most exciting but it's easy to work with and this is probably not what you want to work with for your big grand wide angle landscapes so if you are going to be shooting under overcast light take it from a guy who lives in seattle here's some tips include the sky on ly if it's interesting so only if you have nice clouds in there that have something going on in looking for those details in close ups get that tripod out and this is a good time to be going into the forest and shooting so if you come out here to the seattle region you want to go out to the olympic rainforest you want a cloudy day luckily we got a lot of them around here for you and sell some cloudy pictures in this case we do have some kind of interesting clouds they are kind of dark it is a little bit of a stormy day out there so I'm going to include a little bit of clouds it also kind of hard not to include clouds in this composition but we're able to see the contrast very easily in this image this is a very complicated image there's lots of lines and colors and things going on it works better under a cloudy day down in oregon in the rainforest I was shooting with nice cloudy light and I was as I was refining my composition the sun came out and had a bit of spotlight coming right in to the sun and so as you see these two images the image on the right has the bright sunlight and now we have these bright hot spots if you want to get technical we can look at the history graham notice the history graham on the right it's got a spike over on the right hand side those air pixels that are overexposed and too bright shooting pictures in the forest in bright sunlight is a recipe for disaster so here is possibly the worst photograph in my entire presentation okay I'm not afraid to show you my bad photos I shot this bad photo just because I know that I had shot a photo that I like in this position at a different time so compare this with bright sunlight two on a clock to a cloudy day how much more easy can you see this on a cloudy day than a bright sunny day and so in the forest cloudy days are fantastic great days for shooting those close ups as well soft even light evenly illuminates your subject another great place toe look for shooting photographs is in open shade so essentially our subjects are illuminated by the sky not the sun but the sky itself this is going to make for some very even lighting just like clouds it's going to be available on sunny days because it's the sun orbits the sun illuminating the sky which is illuminating your subjects you're basically bouncing the sun off the sky and this is going to be available almost anywhere that you can be and is pretty predictable as soon as the sun goes down over the horizon you're going tohave open shade to work with for a little bit you can look for cliffs where you know the sun is going to hide behind at certain times today and you know that you can go there and be a nice even light at particular times of the day now oftentimes it's for very brief periods of time that you could shoot especially after sunset years only probably fifteen to thirty minutes that you can really work with this light before it gets to be too dark you have to get you're gonna have to be shooting from a tripod because these are very low light levels and it's not the most dramatic light in the world often times you're going to need that sunlight if you really want the drama but it can work very well for many types of situations and unfortunately because our skies blue when you are reflecting light off of a gigantic blue reflector your subjects become very very blue and so you may need to play around with your white balance you may need to play around with your color in post to get the colors just right and so look for anything tall enough to cast a shadow it could be a big tree it could be an outhouse it could be anything that's going to cast a shadow because in those shadows our nice even lighting so as I said watch your color balance you may need to make some adjustments there and if it's sunny and you're worried about shooting in the contrast just look for that shade and this is a great place for shooting highly detailed subjects and just so that I'm really clear about what we mean by open shade in this photograph up at mount rainier national park the trail that I'm on these wild flowers this is all in open shade it's during the daytime it's just simply being illuminated by the sky and everything else around it and so in that region you can shoot nice even light which you are not going to be able to do once that sun crosses up and gets over that hill and starts shining directly down on those flowers at that wave formation in arizona bright sunlight you could very easily see it but noticed the texture differ since when we should it this earlier in the day before the sun has come up across the horizon and so this is shot with very even light when I was bicycling down in chile we were writing on the coastline right beside the andes mountain range and the sun would come across the horizon for official sunrise I don't know what exact time but let's say seven o'clock in the morning we wouldn't see the sun until about ten o'clock because the andes heir so tall by the time the sun would come up in the morning we were writing in this kind of blue flawed fog and this it really did look like this because it was all illuminated by the blue sky above us it was a gigantic blue reflector in yosemite national park the sun had come up but had not reached the valley yet so I'm ableto work on the valley floor in the shadows with nice even light kind of working off of that the next level is twilight if you are working past sunset twilight is also known by some photographers as the blue hour because we have the golden hour we'll talk about that in a little bit and then we have the blue hour that comes either after that or before heading on sunrise and sunset and it is one of my favorite times of the day to shoot I love the color blue that you get after the sun has gone down or just before it's gone up there is just a really great color that I think work so good and it's just so vibrant and rich a great way to make silhouette and it's a very predictable effect that you khun get day after day on almost any day as long as you have the sun out and some blue sky to reflect that light down and I think they could make for some very powerful images only going to be available on clear days you're not going to get these on any sort of days that are heavily obscured by clouds it only happens for a very short period of time so you got to be in place early and ready to go you are going to need your tripod and you are going to need to be in a fairly open environment not going to work in the canyons it's not going to work in the forest so you need to be out kind of open where you can see a lot of skyline around you so looking for those objects with distinctive shapes I would say in general it's going to be best about fifteen to sixty minutes either before sunrise or after sunset and you're probably gonna need two under expose a little bit your meter is going to want to brighten this up a little too bright so you're going to need to keep these a little bit on the under exposure side to get that really rich color and one of the things I do in my camera I talk more about this in my fast start camera classes I have on individual cameras is I turn off the noise reduction in my camera a lot of cameras pretty much all cameras have an optional noise reduction where the camera will use a longtime exposure and then it will spend another set of time trying to reduce the amount of noise in that image by taking a dark image and what happens when you do this is you'll do a thirty second exposure and then you'll have to wait thirty seconds to take the next shot and I don't use this in camera noise reduction for two reasons number one I could take the standard shot and I can fix the noise reduction in post I can go into light room or photo shop and I can adjust the levels in there and fix it and I bet you can too with just a little bit of practice the camera does it for your convenience I'm willing tto sacrifice the convenience do it myself and do a little bit better the thing that actually upsets me the most is that I'm doing the thirty second exposure and then for thirty seconds after that I can't do anything I'm gonna wait and at this critical time of the day it's on ly like this for about five minutes and so if that's the case you only get five minutes to shoot that means you get five shots one thirty second shot and then it's got a process if you turn off noise reduction you're going to get ten shots rather than five shots and I would rather shoot and fix those later because I could do a better job and I could get more shots in in the field so that's why I often recommend turning off in camera noise reduction for anyone who's willing to take that extra step and fix it on their own and so shooting under these times a day it's really dark out it's hard to see exactly what you're going to get and it's a lot of fun because it kind of reminds me of the days of film where you're shooting and you have an idea of what it's going to come out like and then when you see it on the back of the camera you suddenly get excited because it's starting to get these great colors and so looking for those distinctive shapes the mittens was up well before sunrise in order to get this shot working around the oceans turning off that in camera noise reduction so I could get as many shots in very quickly as possible another type of light reflected light all right so we're gonna have the light bouncing off of nearby objects illuminating our object and so this is kind of like the other types of light we've talked but now it's going to be taking on the colors of the objects around us and this is often going to make for a very even light source it's going unfortunately or fortunately depending on your situation is going to take on the color of whatever object you're photographing and so if bright light was hitting this wall over here I'm going to be getting a big green cast on my subject because we have a huge green riverfront reflector and the fact is that green is kind of dark and it's not going to reflect much life and so it's probably not where I would be looking to photograph because it's not got the right colors and it's dark and it's tonality and so this is where bright sunlight will actually help if you have bright sunlight illuminating an object that's going to be reflecting light and this is nice because it's available if you're keen about whereto look it's available pretty much all day long in certain areas problem is is that we're dealing with reflected light it's never as powerful as the direct light source itself so it is going to be weaker in power you are going to be at slower shutter speeds probably needing the tripod and you need a light colored object when I do travel photography I'm often looking for light colored buildings I love yellow buildings yellow buildings have great reflections coming off of them a great place to shoot a portrait of somebody for instance we don't get a lot of that in the landscape world so there are limited places that we get to work and the reflective colors were mentioned in this green wall example may not be appropriate for your subjects that you kind of have to match up the source of the light with the subject as well if you shoot these tryto avoid direct sunlight in there a swell because it's going to be very hot in the sense that it's going to be blown out pixels overexposed on the image which is not going to look good so you want to look for a light colored object that is in the sun and right near that is where it's going to be good and when I say it needs to be close together it usually needs to be within a couple of meters or a few feet you can't have the sun hitting something way over there unless it's an extremely large light source like a rock wall or something but generally it needs to be pretty close and you may need to adjust your color balance in that situation and just so that we could be really clear in a situation like this we're talking about spotlight but this whole canyon wall on the side what is illuminating it it's this bright spot of land light right here it's bouncing off of one wall and it's kind of bouncing around over and over again but most things are being illuminated by this hot spot right here and so at mesa arch the light hits the canyon and then bounces up to the bottom of the arch which illuminates that and it's reflecting the color of that rock which is very reddish color so the bottom of that arch just glows in red the light from the surrounding forest in this case it's kind of it's got a lot of brown's in there and it's reflecting that light great time for shooting highly detailed subjects for macro subjects takes on the light of the surrounding area alright mixed lighting so now is where we're gonna get some potentially very dramatic stuff but it's very difficult to work with and we're gonna have a mixture of sunlight open shade clouds reflected light so the advantages on this is that it's going to possibly be the most dramatic shots that you will ever get if you get the right mixture of this so this is what you kind of hope for if things are going really well and when it goes good it could just get absolutely fantastic and this is gonna have potentially have a right beam of light highlighting a nice little scene of your section and it's going to give show you some nice textures and depths to your photograph so if you could schedule this type of light for your grand landscapes that's what I would do I wish I had that ability now disadvantages on this is that not all your subjects are going to be evenly illuminated and that's not gonna work out for certain types of subjects you potentially might get some blown out highlights and some blocked up shadows kind of the gist case with this mixed lighting we're dealing with a very wide range of light on it and it's only going to be available for very very brief moments it's ah very elusive type of light to get and so what you want to look for if you have this opportunity is to have the son kind of a soft as possible which means early sunrise late in the day at sunset you want to be careful about not over exposing those highlights we don't want any bright light areas right in an area that we want to see details in this case we can kind of let the shadows go dark a lot of times we want to retain some light in the shadows but in many cases we can just keep them nice and dark and let them because we want to keep maintain texture in those highlights and if it gets too harsh time to stop shooting and so some photos with mixed lighting it's mostly cloudy but you can see just a little bit of shadows coming from left to right on the scene as the sun's just breaking through a few of the clowns talking about earlier being in the redwoods down in california mostly it's reflected light bouncing around in the forest a lot of green light bouncing around but just the hint of sunlight coming in and once you let it go a little too far it's gone too far in this case and so it's gotten a little too bright and we've over exposed areas and we should probably stop shooting at this time because it's too contrast in this photograph and here's a photograph that is just way too busy there's another bad photograph example of something where it's in contrast the lighting and there's just way too much going on I don't know that this would be a great shot and even light I doubt it but it's just way too busy there's too much bright light there's too many shadows in this area kind of a particular type of mixed lighting is this spotlighting that I've been showing you in these slot canyons which is where I've got a lot of nice spotlighting its very easy to get there so getting this narrow beam of light is a highly unusual but it's a really nice effect that you could get we had a question earlier about getting that spot of light in the forest very nice hi dramatic element it creates a very nice unique look to the image and we sometimes call these god beams because it looks like god is casting a lot you are the chosen one on some particular little thing in the forest and so it's nice to be able to have that but it's very very rare and this is going to highlight a nice little subject area and draw your attention to one particular area obviously this stuff is going to be very hard to come by and many environments it's just not going to be an option for shooting you don't really pick this type of light in very many cases it's a very wide dynamic range so it's going to be very hard to capture and you're going to need to be very careful about setting your exposure and checking your history graham and making inger it's balanced in the right way it's going to totally throw off a lot of the light meters and so that's why you have to get in and do things manually and it's just going to be very tricky getting those shots and you will have to shoot several test shots to do it so some tips on this is get your camera out of auto auto exposure no program out shutter priority no aperture priority full manual and this is one of those cases where you can let the hot spots go hot and there's kind of a fine line when you want that when you don't want that but if it doesn't take up much of the scene it could be acceptable in some situations possible time for doing exposure bracketing if you're not completely sure about what you're doing noto knowhow to quickly get your camera into the exposure bracketing mode so that you can reel off three or five or even seven shots and make a decision later because oftentimes these situations change very very quickly now here in the slot canyons is one of the few times that I scheduled my trip there at noontime because I wanted to be there when the sun was high up in the sky as possible so that it could reach through those canyons in many cases lights going to be breaking through clouds and you're not gonna have much control over it it's going to come and go very quickly you're just gonna have to be very observant off the weather patterns and what's going on with the clouds don't worry too much about those hot spots there's going to be a few of them in these cases they are acceptable I don't know that this next picture falls into the landscape category but it's one of my favorite spotlighting photos me and my buddy we're up on a canoe trip up in canada and were lining up all of our gear for a group shot we wanted to get the boat up in the in the shot but we don't have time because I saw this spot of land coming across the sand I said we'd better get that self timer set and run up there and get that shot but that spotlight can really highlight his particular subject now a type of mixed light and this is just a continuation on the mix light is kira squirrel light and I do have to throw credit where credit is due and thank you art wolfe for kind of bringing me up to date and teaching me about this curious girl like because it's a it's a type of light that if you are a painter you will know all about and it's basically a mixture of light and shade which is kind of what we were just talking about but this is the good mix of light and shade and so in this case we have a bit of spotlight hitting the waterfalls but we also have the mountains behind it in the shade and the mountains behind it in the sun and so there's this play off light and dark in one scene and this is very unusual tohave it has a very dramatic effect I would love to be able to schedule this type of light and control this if I had if I had two wishes on photography when my wish thee controlling the light and having like like this much more of the time going to really show depth and texture which is of course nice to have in a two dimensional photograph many times we're just often getting good color I don't know why but it's part of something that comes along with it and it's just a really unique light source that you don't get to shoot with very often now the disadvantage is that it's incredibly hard to predict it can just evaporate almost instantly and so you have to be totally ready to go on this sort of thing it is often going to throw off the light meter's because it's going to be a larger range than most cameras are used to working in and so your automatic exposures are probably not going to work and so you're going to once again want to be in the manual exposure quickly getting off a couple of test shots to try to get this nailed quickly this is going to work best when the sun is lowest on the horizon that way it's not too intense you're not going to get this type of light in most situations towards the middle of the day you have to really be careful of watching where the lightest moving and where the clouds are moving to see what's forming and what's changing some of this stuff can be predicted I remember reading a story about galen rowell who could see the clouds forming in a particular way and he knew that he needed to get in a particular location he grabbed his small little mike on camera his one lens that he knew he needed and he just started running and he ran for about two miles before he got to a spot that got everything lined up exactly the way he wanted it to and so keeping an eye and being aware of your environment very important here they said before using manual exposure on this is very important and here is a case where you don't want to blow out the highlights we want to be able to maintain and see what's going on in the highlights and its better let toe let the shadows go dark and this chiaroscuro lighting is gonna manifest itself in many different areas I was really kind of noticing it back down in the slot canyons and there is a number of areas where you're just getting this very fun mix of light and shadows and I started to see faces in some of these walls and canyons in here with this lighting coming in from the top but I mean it's officially it's reflected lighting but I think the way it's bouncing around creating such bright spots and dark areas it was kind of fun some steam vents in bolivia and then up at mount rainier just having some of the clouds in the right position to cause a little bit of a light dark light dark play throughout it so that's kind of like the ultimate lighting situation in many cases all right let's get on to a lot of people's favorite hour of shooting the golden hour also known as the magic hour of light and so this is when the sun is low and casting that beautiful gold light and there's a lot of reasons photographers like shooting in these situations it's often a very soft light to work with its less contrast he has a very nice color to it and it's easier to include the sun and the frame if you want okay sally nice to have another element in there and that warm light a positive emotion we definitely like that in many of our photos now the disadvantages at least where I live it only happens twice a day your place might be slightly different but I get one sunrise and I get one sunset and it comes and goes all too quickly in my mind changes very very quickly and you may scouted out on one day you know what a perfectly clear sunny day you scouted out you see what the lights like you come back on another sunny day and it's going to be slightly different depending on the air in the atmosphere of that particular day it's not exactly the same in those cases and you're gonna obviously need open land for this you're not gonna have this in some depth of the valley and so you need to be able to get up where you can see a lot of the skyline around you so some tips for shooting with the golden hour keep an eye on those clowns watching for that break on the horizon where the sun is going to come up or go down get on location as earliest possible scout out all the possible options where you might want to be there is some rocks here I want to photograph there's a nice spot over here that I could get out on and shoot with a wide angle lens so think about what the light might be like and where you khun b definitely want to be in manual exposures for this and slightly under exposing if you want to get better colors don't let the dark areas get too dark but a little bit of under exposure is going to give you a little bit more in that lighting all right lots of tips on this so I got more tips this could be really good in all directions don't just think about shooting the sun itself look to the side look what the sun is illuminating because there could be great material all around you don't just get locked into one position you're going to want your split neutral density your grad filters so that you can darken that overly bright sky to match the darkness on the ground now there are several aps if you want to get a nap for your smoke smartphone as faras figuring out what time the sun goes down in what location there's several laps for that but what's your get out there shooting enough you'll start knowing this stuff by heart and obviously you're great colors and these colors can continue even after the sun has crossed the horizon even though it's gone down there still some good shooting to be done and so this is when we're going to get our golden light on our subjects yeah this is a great time for shooting those grand landscapes we're going to have our best lighting typically just after that sunrise and right before sunset mentioned before when I talked about colors that red color and orange great time to be shooting second beach here in washington all right we're down to our final little bits of light here how about some other natural light other than the son there's not a lot to choose from here but going out and shooting at night we've talked about shooting at night that unique look of starlight can give us some very dramatic images in different situations and it makes use of all those evening hours we've got all those hours we're not doing anything with we can now make use of them for getting some great photos and this is one of the things that's only available to serious photographers who is a serious photographer will you get to decide if you are a serious photographer get a tripod because you're going to need it at night time at least with modern equipment and head out there for a few hours now obviously we're talking about like that is very very weak in power so you are going to be needing a tripod to get the shots we're talking generally about starlight and moonlight in most cases and we don't have much color we're working with here it's going to be kind of the same color throughout the night and these are somewhat difficult shooting conditions as we talk about in the night section so tips on this obviously using a tripod you're going to be needing long exposures usually I'm anywhere between eight seconds and thirty seconds very rarely do I go longer than thirty seconds because I start getting the streaking of stars if the stars are in the photograph I have actually special will slide for that coming up in just a moment here's where those fast lenses two point eight in faster are going to be very beneficial so that you can let in is much light and have your s o in a little bit lower level and bring along that flashlight that has the red light so you don't destroy your night vision on and so when I was down in monument valley I had about twenty four hours so I shot sunset I went out and shot in the middle of the night and I went back to shoot sunrise because I'm trying to squeeze as much out of my locations at any one time it's possible so this is just illuminated by the moon in australia our crew is there and we're working and we came across a wild flower a flower not a wild flower ah wild fire and that was just a fantastic opportunity I've never been able to shoot in a fire like that just a slow burning little ground fire and of course shooting lightning that could be a whole nother subject right there but finding a nice safe location I'm shooting this from a hotel room well undercover on this was a very far far away with a with a long lands and I was doing long exposures waiting for a bolt of lightning just kind of watching where it was moving and hoping I was pointing the camera in the right direction I would leave the shutter open for about ten seconds hoping for a lightning bolt during that shot and if I didn't get it I would stop and I would go start a new one and I got lucky on one shot but that's all you need is one good shot some cases now if you are interested in doing star shots there is a one well known rule in the industry called the stars five hundred rule and what it is is that you take the number five hundred you divide it by the focal length of the lens that you want to use and that gives you the maximum amount of time in seconds at your shutter should be so to save you some math let me do it for you for a few lenses twenty four millimeter lands means that the longest shutter that you should have is twenty seconds if you do it longer than twenty seconds you are going to get noticeable curvature of the stars moving with a fifty millimeter lands it would only be ten seconds and with a sixteen millimeter lands sixteen millimeter lens it would be thirty one seconds now there is a little bit of wiggle room in this you can have a little bit higher standards or you could have looser standards I've shot with twenty millimeter lands for a thirty second exposure and in most conditions it looks pretty good if you printed up really large and you get really close you'll start noticing the movement some people who have very high standards call it the six hundred rule and they have a slightly different math formula they follow but in general if you're going to be shooting the star shots in most cases you're going to be shooting a wide angle because you want to be able to see something on the land as well as something up in the sky and so you're going to be probably at least a thirty five millimeter lands somewhere down to a sixteen millimeter lens which means you're going to be in the range of fifteen to thirty seconds as faras the maximum amount of time before the earth's movement are going show itself in the star trails I have a very very short section on artificial light there's probably a whole class in light painting but it's something that I've done in the past and I will occasionally do to fill time in the evenings and so this is where you are adding light to the scene yourself and this is going to create obviously its own very unique look to it unnatural in some ways but very interesting potentially in others and this is where you finally get to control the light you get to put the light exactly where you want it and distribute the way you think it should be done and if you make a mistake you can do it again because you have all night to work in many many cases now the light sources that were working with are usually just handheld flashlights and they're not the most powerful I know photographers that have brought out really heavy duty riggs to illuminate larger subjects but for the most part you're going to be able to do a pretty good job with most well powered handheld flashlights now this is going to require a little extra gear for you to bring out in the field and now rather than just sitting around and doing nothing during your exposures you're expected to be working you have stuff to dio and if you get something that's a little bit tricky and I've been involved in a couple of tricky light painting shoots you'll get it close to being right in one shot and then you'll do it again and you're worse off and you've got to go back and you gotta practice it again you've got to get the technique down just right for how you're painting the subject with a flashlight for instance so some tips on doing this yourself is you're going to need to shoot lots of test exposures to kind of get the background exposure and then to figure out how much light to put on that subject you want to keep the light moving you don't wantto point your flashlight at something and just have it sit on something and then moved to a different area you're gonna have to be kind of painting smooth strokes back and forth so that it's not hard edged in any areas unless that's look you're going for use halogen bulbs they have a little bit better look they've got an orange cast to him and I like much better than the led lights which kind of blue light now you of course could through a gel filter over it but that's going a week in the power of the light and so I still keep around a couple of halogen flashlights because they make really nice light painting devices and bring spare batteries the light that you are using for illuminating your subject might be the same life that you need to find your way back to the car and so you don't want to run out of battery power a long ways off in a very dark environment so a few photographs of light painting this is down at the wave area little side shoot off to the side the toadstools that I had photographed before I had a fun time I was just kind of waiting for it to get really dark cause I had a concept of what I thought was going to make a good photograph and so I just decided to start light painting and so I started playing around and I took the shot and I thought this was really weird because something was moving in the sky and I can guarantee you it was not a plane and I know what most satellites look like and this was not a satellite and it caused a very big streak and I did not know what it was at the time because it was just unlike anything I'd ever seen before and I'm not going quite say it was a ufo but at the time for me it was a ufo and I did a little bit of research and I figured out it was the space station the space station reflect tremendous amounts of light compared to a normal satellite because it's much much larger and if you're in the right areas you can see it and so if you ever see an extremely bright satellite that might be the international space station and so this is kind of a fun shot you can have with it they kind of ruined my shot but I was able to take another one and this is my favorite shot from that evening and what this required of me doing is setting the camera up for a thirty second exposure with a ten second self timer so I had ten seconds to trigger the camera and then I would run off to the right hand side of the camera there was a little kind of rock area where I would stand up and I would paint the light and because the way light diminishes in power I would have to paint the light of this hoodoo on the righthand side for just a few seconds and then the kind of the one in the middle for more seconds and then this backside for most of the time so this took most of life because it was further from me because I was standing way off to the side and this was just with a small handheld flashlights that takes four double a batteries and so it doesn't require a huge light but thirty seconds is inspo jher I forget my eyes so but I'm betting it was probably a so sixteen hundred or thirty two hundred in that case so in this section let me give you a couple of examples of working the light in these other situations so baja rock down in the baja peninsula of mexico there's these rocks that get weathered in a very unusual manner and it's it's a rock that you can crawl inside and see out the sides like you can hear and I found this is a very neat compositional tool for framing up the desert just outside using the shadows and the light and playing around trying to figure out where my best composition wass working on one side and then the other side of the rock I really ended up kind of liking this composition in some ways but it wasn't quite the right light but I'm going to continue to play around at different times a day kind of like that one shows the desert but kind of in a mysterious way you might say and then coming back the following morning when the lights a little bit more evening even working on my composition getting things lined up and I liked it but it just needed a little of color and so soon after the sun came up it gave me that little bit of nice color in there and a little bit of that curious girl lighting that I talked about before the light and dark and light and dark areas throughout but the dark areas are not so dark that you're losing detail in them and the bright areas are not so bright that you're losing detail in them either and so it's just that right mixture and this light would not work in another half an hour maybe not in another fifteen minutes another example with working with light hisses at yellowstone national park place called artist point I had been there about ten years previous and I remember there was one good spot where it looked really good at yellowstone falls the grand canyon of yellowstone and I went there the first morning and I kind of forgot where this one spot wass and so I would drive to one little viewpoint walk out take a look and go no that's not it I have to drive up to the next one and drive up to the next one and I didn't really find it until it was too late in the morning and the light had already coming on but that was the scouting trip I wish I had been there to scout earlier maybe I should have written it down but I eventually found the spot that I wanted to be at called artist point and it was just a little too late in the day with kind of lost are in the sky we've lost our color in our drama so I'm gonna come back at another time I'm going to come back in the evening try it is an evening shoot I know exactly where I want to be maybe we'll have something good I play around with a few different compositions it's one of these tough places because it's a viewpoint that's got walls and it's very limited with what you can work with on your positioning you're foreground and your extra subjects I get a little bit of cloud action going on and right when the sun goes down I get this last little burst of color in the sky I am using a split neutral density filter to kind of hold that density in the sky and be able to balance it with the canyon down below and that ends up being my favorite shot even though I wasn't sure about it at the time so I came back again the next morning and wanted to shoot through another series of shots in the same place but it was from the previous evening that I got the best shot so I'm more than willing to come back even if I think I've gotten a good shot because maybe it could get better and I think this is going to be the final little example here of working the light the bolivian volcano I think I've shown you at least one photo of this before and this was where our crew was working down in bolivia and dinner was set for five o'clock and I said you know I think I'm just gonna eat a cold dinner because it looks like there might be some nice lighting going on out here I hate eating during the magic hour it's just not a good time to be eating dinner or breakfast and so hiked up to get a view of this mountain it didn't look real good there was cloud obscuring it from the sun but I could see often to the west looking at those clouds as you can see here looking to the left which is the west there's a break and as soon as the sun breaks through that area it's going to start bouncing light into the mountain itself has this nice sideline I think we talked about this when we're talking about mountains but then it did something I had not expected that started to illuminate the clouds behind the mountain in this color that I had never seen before it's I don't know it's quite it's a salmon orange color it was just beautiful I was using some wide angles I didn't really have anything in the foreground to shoot there is just nothing really that I could have in there and so I ended up just shooting just a straight shot of the mountain but it's got such a beautiful color behind it this is once again I have not really fussed with the colors on this this is just something that it happened one time I don't know if it happens very often down there but one shot to shoot it and we just have beautiful colors for that one evening and putting yourself in position sometimes I had to skip dinner in this case but it was well worth it I take a cold dinner in this shot anytime
Class Materials
bonus material with purchase
Ratings and Reviews
Thomas Hamlin
Most of nature's beauty has been photographed by lots of people over the years. However, nothing compares to actually visiting famous places, buildings, mountains, etc. and taking your own photographs. John Greengo provides the necessary equipment information, photographic principles, and techniques in a manner which inspires you to put in the extra effort to take the best nature photographs that you can with the gear that you have. His unique illustrations, actual real life photographs, and easily understood explanations are top notch. I highly recommend this outstanding course. I have several of John Greengo's photography courses, and I highly recommend them all. His vast experience with film and digital photography, gained through traveling and working with some well known photographers, gives his courses a unique perspective.
a Creativelive Student
I love this course, John. It is one of my all time favorites. First of all I loved your effort scale. I knew as soon as you went through the scale that you are a guy that I want to listen to. To me, the effort part IS the fun part of photography. When you asked the question about one wish ... the first thing that came to my mind was that I wish I had more time for photography. I like the technology, but I do not wish for any special powers. To me, that would take the challenge away. Photography is wonderful because every subject challenges the photographer to get the angle right, the light right, the settings right ... I love that challenge. I think you do too, John, and that is why this course is so special. The attention you pay to every detail comes from the drive you have to meet the challenges with every thing you've got. That is why your class is so special. Your work ethic is exceptional. SandraNightski
a Creativelive Student
While delving more thoroughly into Nature and Landscape photography in a smaller format, John Greengo provides us with an amazing companion to his outstanding courses Fundamentals Of Digital Photography and Travel Photography. Here he gives us another necessary treatise to study before packing our gear and heading out in a car, a plane, a boat (or just for a long hike), and it’s as entertaining as the others. Thank you again John Greengo and Creative Live for these expert and brilliantly illustrated programs. I just hope you keep finding more subjects to photograph and provide the instructions for.