Lessons
Day 1
1Course Overview
19:50 2The Bad and Good of Nature Photography
28:22 3Cameras and Sensors
17:18 4Lenses for Nature and Landscape Photos
16:42 5Macro and Tilt Shift Lenses
34:56 6Filters for Nature and Landscape Photos
31:41 7Tripods and Monopods
26:10General Camera Tips
16:56 9Exposure and Metering
17:17 10Exposure Modes
16:55 11Exposure Values and Apertures
24:16 12Focus: Modes, Points and Buttons
20:23 13Focus: Advanced Techniques
26:42 14Day 1 Q&A
12:30Day 2
15Mountains and Forests
25:03 16Rivers, Waterfalls and Shorelines
25:45 17Open Land, Flowers and Skies
17:30 18Macro Shots and Adding a Human Element
15:43 19Elements of Design
16:17 20Working the Subject
14:36 21The Photographic Process
27:46 22Timing: Seasons and Time of Day
28:01 23Types of Light: Direct Sunlight
38:31 24Types of Light: Indirect Sunlight
42:35 25Composition: Basics and 7 Framing Tips
16:18 26Composition: Angle of View and Aspect Ratios
29:51 27Composition: Panos and Subject Placement
29:47Lesson Info
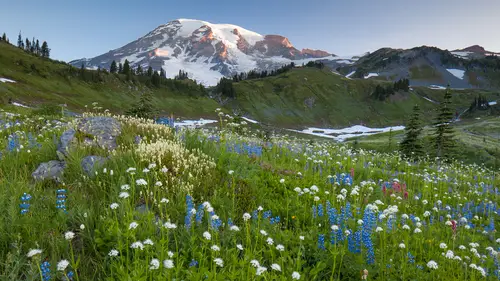
Mountains and Forests
well today is going to be very different than yesterday because yesterday we were doing a lot of technical stuff we had a lot of diagrams explaining how a lot of things work where we set a lot of things and today we're going to be talking about working with different subjects here in the morning and when I talk about different subjects well you're going to see we're going to talk about mountains and trees and forests and each type of subject that you have kind of has a slightly different treatment and a different approach to photographing them and so let's go ahead and get started with what we love here in the northwest which are mountains and we've got some great mountains we have a huge mountain range if you're not familiar with pacific northwest there's a huge line up a volcano it's and mountain ridges here in washington and oregon and the great northwest and we spent a lot of time up there because it's a very beautiful country so of course the icon around the northwest is mount rai...
nier national park and I had five really good days have decided I needed to kind of beef up some of mine photographic collection my landscape collection and so I spent a week down at mount rainier national park and I had in some ways it was fantastic whether it was very sunny which made for the mornings and evenings very nice but the middle of the day wasn't so great for shooting as you will see in these tips that I'm giving out and so let's start off with some mountain tips and the first thing that a lot of people make the mistake of is wanting to take a picture of the mountain and nothing else they forget about adding some sort of four grounds and the mistake that I have made in the past and I see a lot of other people make at mount rainier is they go up to the parking lot of paradise and they're like wow this is a nice picture wait let's hike up the trail a little bit they hike up the tray a little bit away I think there's a better view point up closer and they just keep hiking and hiking about two hours later now there's a little bit of a snow capped but you can't really see the mountain at all and so there's a lot of different approaches and the first thing is finding a foreground and so in this case this is one of those trails that leads up the mountain and we're going to get into a little bit of a composition section towards the the end of the day but leading lines into your subject is always a good thing so the trail leading right up into the mountain helps out in this case using verticals so that we can stretch further from the top to the bottom so that we can have those elements helps out as well now these mountains are often going to be best inside line I'm gonna have a lot of tips like this where it's best in the sidelines that doesn't mean that it won't be good in some other situation it's just kind of that's a recipe that frequently works and a fourth thought on this is that if you are inside light this is when a polarizer works out really well remember a polarizer works best at a ninety degree angle so if the sun's coming up over here and I'm shooting something straight ahead that's where it's going to be a major benefit if the sun's behind me or it's coming right at me it doesn't have nearly as much impact and so here's a couple of good vertical shots mount rainier they're taken in the morning they have foreground elements so not only do you have not re near but you have something else to help tell the story of what's going on at mount rainier this is a volcano down in bolivia and I remember very specifically skipping dinner so that I could go shoot because it looked like it was good conditions and I'll actually show some more photos in the serious on a slightly another section I think when we're talking about lighting but here the side lighting really helps out because you can see the light coming around the front of that mountain and you can kind of see it causing these little shadow ripples over different hills and bumps on the mountain and then really brings out some nice texture also what also what helps out in this one is that the clouds behind the mountain are quite dark and a little puff of little plume of smoke right on the top really is illuminated with that dark background and that's another concept I'll talk about in the composition section is having a dark background and this is one of the challenges of nature photography is you can't just roll up a black seamless and let it fall down and back this is something that you'll have to take advantage of and notice when you're out in the field here's mount rainier again this time photographed from seventy miles away right here in seattle and this is shot in the morning again and we have that sidelight and this is where I am using a polarizer and that's one of the reasons why the water in lake washington there is so incredibly saturated blue that's not from me faking something later in photo shop that's the that's the polarizer working and that really cut through a lot of the haze and so keep those polarizer is out in the morning when you have the sun to your side so let me give you a few more tips on the mountains and it's kind of a weird thing with the clouds because a lot of people think a cloudless day is the best time to go out and enjoy the day and take pictures well cloudless skies are not real interesting and so you would like some clouds in the sky but not too many to obscure everything and so this it's this very mixed bag not too much not too little when it comes to the clouds and then also as they said moving back further away so you can actually see the shape of the mountain this is athabasca falls up in banff canada and there's a beautiful mountain I'm not sure of the particular name of this mountain but I was there for one evening and I was just hoping and hoping that the clouds would clear and break away because this is my one shot I had about a week long of shooting up there and there is only one day that I was going to be in this region to the park and I remember getting there around four o'clock in the afternoon and I just waited and waited and waited for those clouds to break and they never ever ever broke but you know I'm still going to shoot what I can when I can and I guess it's a reasonable shot of the waterfalls but I would love to have had a little bit of those clouds broken up I think the mountains would have really come out from the background much much more easily I was shooting down in mount hood in oregon and I took a bit of a chance that took a very long hi right at sunset so that I could get up to see a little bit closer in the mountain because where I was was stuck in the forest and that's often a big problem is getting stuck in the forest and not having a place to shoot and this is one of those things where I didn't know what I was getting into I've never been on this trail I had no real scouting reports I knew there was a trail I knew it went up on that there would likely be some clearing because trees stopped growing at the tree line wherever that happens to be on the particular mountain and this was just fantastic because the sun was going down over the pacific and there was these clouds over the mountain and over me but there was this opening to the west and I knew that's where the sun could cut in and start bouncing the light off the bottom of the clouds and those clouds they not only look good in the photo because they're adding another layer of texture but they are a natural reflector bouncing light down onto the mountain and so that's one of the reasons that we want some clouds in there is there perfect natural reflectors and then having a little bit of blue sky and they're really helps with those colors because when you have those blues in those orange those air very strong colors that work together nice contrast on it here's a good case of hiking away from mount rainier in order to get a better shape of the mountain and so there's a place called plumber peak and it's due south of not rainier used pike directly away when you're at paradise and it's kind of nice to be able to get up there because you can really see the shape of the mountain in the mountains entirety ahh little bit more and you'll notice that I included the trees and the lower left just to let you know that there's some ridge line in the foreground to add a little bit of depth to that photograph having depth in a two dimensional photograph is really nice to be able to add that element because well we don't have three dimensions in r two d photographs and that's one way of adding that appearance into the two dimensions alright let's dive down a little bit and john into the forest working in the forest we have some questions I would be happy to jump over and talk about this a little bit fantastic I'm just going to jump in sort of when they're on that particular subject matter since we're going subject by subject if that's all right so photo maker had asked when framing a scene and I think you showed one similar to this with a mountain when framing it with a tree trunk and leaves how much should you show of those framing elements does it look weird or do some body to just have a a few tips of trees or branches dipping into the image from the sides or the top of the frame so when you're framing for mountains would think about well when I think what they're referring to is referring to some other element that's may be closer to you that's kind of getting into the frame if something is popping in from the corners and one of the things I'll talk about is the concept of border patrol and it's not what your government thinks of border patrol it has to do with going around the borders and seeing is there something odd poking in from the side now you don't want like a leaf sticking him from the side or a single solitary empty branch if it's got more of it if it's more substantial and you can tell what it is and it seems to make sense and be in place then it's ok it's one of those really really tricky things and I look at a lot of the national geographic photos and these are more travel photos where people artfully have something kind of out of focus in the foreground kind of framing their subject and it looks like a very casual simple shot but it's really hard to do right because that subject that is out of focus in the foreground or is kind of that secondary subject there's a very careful balance being doing being awkward and too much in the frame and being small enough like did they realize that was going on and so there's a I don't know exactly how to put those terms but there is a careful balance to having it big enough so that you can see and understand what it is and also so that it looks good and I hate to be judgmental about nature but there are some things that look good and some things that don't look good and I will actually address a little bit of that in our second section today but there's a sense of order and pattern that just naturally looks good to the eye and I'm not one of those column woo photographers were everything is beautiful point your camera anywhere in its nature its beautiful know there's some things that are better than others so for us sunny day great time to go hiking in the forest that's true for a nice hike you don't have to bring your rain gear you're not going to get cold it's very convenient but you want to go to the forest on a cloudy day sunny days are very very challenging because you have these beams of light coming in it makes it very very contrast and so if it is going to be sunny and you really want to get good photos in the forest you need to go when the sun is extremely low on the horizon just it sunrise or just it's sunset I know I was down in california the redwoods and it was sunny every day I was down there and I would get up really early and I would be in the forest as soon as the lights started coming around and I would shoot for about an hour hour and a half before the sun got too high in the sky and started getting directly and and I was able to get in about two hours of good photography per day and then in the middle of the day there was nothing to do because it was just to contrast in the forest one of things that I'm always looking for wind forest is an open area to kind of back up because when you're in the forest and there's just trees all over the place it's like your china back up toe make sense of it all and it's really hard to do that and so I'm often looking for little openings now the shot that I have on serene here the trick on this shot is that I shot it on an open road and so rhodes will create a natural opening so that you can shoot straight in to the forest to get this side angle you would never be able to get this in a thick forest the polarizer is surprisingly helpful when you are getting in on these situations if you remember the polarizer conversation from the earlier section on filters works very well in force polarizer czar reducing the reflection of light when there is a strong light coming from a very specific direction and on a cloudy day that may not seem like a strong light but it isthe and it may not seem like it's coming from a specific direction but remember when you're in a forest the lights not all coming in from all over direction it's filtering in through those trees and the light is essentially coming in straight down and so it's a very very directional light where the polarizer has very very strong impact so here is about my last shot of the day in the morning down at the redwoods the sun has just come up it's just starting to poke through the tops of the trees and those highlights are just right about at the edge of going overexposed and being clipping and so I have maybe about five more minutes of shooting and then my day was over with until the sun went down and it was nice even lighting this is back down to point lobos in california you mentioned that before and remember walking along and there was about a forty yard stretch of I don't know little just open grassland right in front of the forest and by using a long telephoto lens I was able to compress these trees which were at various distances into a very flat scene and I'm going to talk a little bit more about black and white later I do like black and white from time to time this was a scene that had very very little color in it it was just brown trees and kind of nothing else and I felt like it would turn into a better black and white and that's one of the great things about shooting digital remember back in the days of film I would sometimes have a camera with black and white in a camera with color and I'd have to make a decision at that time what to do and nowadays what I'll do is I'll just shoot color and then turn it black and white but one of the tricks that I do is in the camera sometimes if I think it's a good black and white and I really want to work with it I'll put my camera in the monochrome mode now I shoot raw and when you put your camera in the monochrome owed what happens is that you download your images into your computer and it pops up black and white for a moment and then it turns color because what happened is that the j peg preview is black and white but the actual raw image is color and then I take that color of engine I'll go turn it black and white and it may seem like kind of a useless exercise because I made it black and white but then it turned a color that I gotta turn it black and white again but if it's black and white field now I could look at it on the back of the camera and I can decide well does this make a good black and white and maybe I see something different in the composition that I wouldn't have noticed when it was in color and this is one of the benefits of the e v fc on muralist cameras is that you can put your camera in a black and white mode it's really recording color so if you want it you can get that later but you get to hold it up to your eye and get to see the world in black and white which is one of the disadvantages of the slr is you're always kind of guessing what's this gonna look like in black and white and so I'll mention more about that in the black and white section this photo is kind of a standard photo without polarizer so let's take the polarizer and bring it across and notice how much it reduces the reflections and how much more vibrance we get out of those ferns and that moss one of the things that I'm looking for in the forest is a clean shot something that doesn't have a lot of clutter and stray branches around because I'm not one for going through and cleaning up my scene there certain ethical standards that we might start a whole discussion on but I'm trying to look for something that's clean that tells a very simple story the force could be a very very complicated place and I think this is a fairly clean straightforward shot and so that's what I'm looking for those kind of smooth even patterns this is from ah little forested area down in or again looking for the best part of the tree I'm not trying to show the whole tree it's another mistake that a lot of people make is they're trying to show everything in one shot and that goes through with a lot of different types of photography but especially in nature is they're trying to get the wide angle lens on there and this is a good example of using that seventy two two hundred zoom lens zooming in and just capturing a little sense of that place all right what to shoot a lot and forced so let me give you some more chips in the forest look up look down there's things that our great above you and down below you with that macro lands well I guess I just said this don't try to capture everything once right sometimes I get ahead of myself uh be careful of those bright skies when you are appointed up higher up and if you have a foggy day that is a fantastic time to get out there so this shot is shot with a macro lens it's one hundred millimeter macro and there's a a few weeks in the spring time here in the northwest with the ferns air growing and they're just young and they're busting out and they're great to shoot much later in the season they get well worn and they don't looking nearly as nice going there at the right time is also critical down in california at the red words this is one of my favorite shots down there I know there's a lot of people who love shooting these straight up shots and this one a couple of little tricks to let you know about number one it's a fish islands and I don't really go into fish eyes because I don't use those very much in nature photography it doesn't look natural having all these bendy lines and the secret to having this not have those bendy lines in them is that all the lines that run through the middle of a fisheye are going to be straight in this case all lines lead to the middle of the frame and so none of them are going to be curved it all if I pointed it straight forward you would see trees all bent off on the sides and they I don't really like that type of look but this enabled me to kind of reach down and cia's much of the trees on either side of me the key thing that other that also made this shot work for me is that these two main trees that diagonals are extremely close together they're about six feet apart and they were the closest two big trees that I could find and having those closer means that you can see more of the bark on the trees and they filled up more of the frame this is from yosemite national park and another good example of not trying to capture everything in one shot these extremely old and very large trees are very very difficult to capture in one shot I did see a great shot that national geographic did where they capture one giant tree and one shot I'm sure some of you saw and the way that they photographed it is they spent about a week hooking up a cable system and they had try remember this I think they had six cameras mounted on a trolley system that we're shooting a panoramic and it would they would lift it up they would shoot one shot they lifted up and they would shoot multiple shots bring it up and shoot some more and eventually they shot something like thirty six shots of the whole tree and then stitched it all together and so that was the extent that they had to go to photograph one big tree in one shot most of us don't have those resource is so we're gonna have to work with something else and just showing us a sense of the trunks gives us a nice feel for that type of forest one of things have to be really careful about is the bright sky poking threw in the backgrounds and so this one there's a little bit of I don't know if it's fog or kind of very low level clouds but it isn't quite too bright but those bright spots attract our eyes and if it gets to be too bright it's going to be very very distracting in some upcoming photographs I'll show you where there are too bright it's too bright and it really throws off the entire picture becomes to contrast this is down in california foggy day fantastic time very graphic and simple good time for black and white photography simple lines nice little pattern in there so we have questions on forest we absolutely do john the most voted question right now is from miss hip or m ship forest what if you want to catch the sun beams the sun beams I have been waiting for that shot and I haven't got that shot yet and I think we all know the shot it's where there's a beautiful forest and there's this light streaming down and there's a little fawn right they're standing on a log haven't got that shot yet that's going to require something in the air for you to see the light because you can't see light it's gotta hit something and so that's going to require some fog and so potentially on that foggy day justus it's breaking apart in the late morning if you have that right little mist of it and you're in the right area and it also is going to help if the light is kind of streaming through not one big opening but streaming into a tree that has lots of leaves and so that there's lots of little kind of a little lasers of light coming in and then you get these god beams coming in and it's going to be a hallmark greeting card at that point fantastic ah lots of discussion going on about for us do you find yourself using telephoto more in the forest I find myself using the telephoto a surprising amount in fact I would say that if you're gonna walk into the forest you're probably better off mounting the telephoto on and thinking in a telephoto mindset to start with and then when you find that great one spot where you have a nice wide angle then you can put on your white angle because the white angle shots are actually very tough and if you were to go back to this forest section I think I showed very few pictures that were wide angle I know the fish eye looking up was wide angle but most of them are kind of standard telephoto shots to normal shots it's easier to get a nice clean shot very rare that you get a white angle that really gets to show everything and having that really clean one of the things I try to having my photographs is really have them clean without a lot of clutter and stuff that doesn't is it supposed to be there that's great because I automatically would think like I'm going to the forest I want to get this big wide thing and would think about the whiting lenz first so that's one more question within forest always comes up this one's from keith ormerod why not use hdr for this sunny days in the forest or would you ever use h e r exposure bracketing within the forest because of the dark yeah I know a number of people do that and as I kind of mentioned before I'm not the hugest fan of hdr and I mentioned that a lot of people will try to use hdr when the lighting's not right and so if you do hdr in the forest when it's really bright and sunny it is goingto have a look to it that is very unnatural that we're not used to and at some point in the future we may see this is totally natural and that's the way all photographs or capture but right now we look at that and it's it's kind of weird and I don't know if you folks it are familiar with the uncanny valley you familiar with the uncanny valley now I'm not well it has to deal more with animatronics and humans and robots looking more and more like humans and you start with you know a mechanical r two d two type robot we can understand that but as it starts to look more and more human at a certain point it looks really close to being human but it's not quite there and it just looks creepy and it looks wrong and it just feels wrong and for me hdr falls into the uncanny valley of that doesn't really look right and it's disturbing to me and for other people that I totally love it and there's other people that just that doesn't look right it doesn't look like traditional photography and I hate to be a crumb uh gin and say it's not traditional enough but it it just doesn't have that natural feel to it because it's not how normal photographs come out and it's not really how I see in the forest in the sun as well our eyes are very different than our cameras but it is a perfectly viable option if you want to give it a try you know it's it's free to do it it's an art form and everyone gets to choose their own style
Class Materials
bonus material with purchase
Ratings and Reviews
Thomas Hamlin
Most of nature's beauty has been photographed by lots of people over the years. However, nothing compares to actually visiting famous places, buildings, mountains, etc. and taking your own photographs. John Greengo provides the necessary equipment information, photographic principles, and techniques in a manner which inspires you to put in the extra effort to take the best nature photographs that you can with the gear that you have. His unique illustrations, actual real life photographs, and easily understood explanations are top notch. I highly recommend this outstanding course. I have several of John Greengo's photography courses, and I highly recommend them all. His vast experience with film and digital photography, gained through traveling and working with some well known photographers, gives his courses a unique perspective.
a Creativelive Student
I love this course, John. It is one of my all time favorites. First of all I loved your effort scale. I knew as soon as you went through the scale that you are a guy that I want to listen to. To me, the effort part IS the fun part of photography. When you asked the question about one wish ... the first thing that came to my mind was that I wish I had more time for photography. I like the technology, but I do not wish for any special powers. To me, that would take the challenge away. Photography is wonderful because every subject challenges the photographer to get the angle right, the light right, the settings right ... I love that challenge. I think you do too, John, and that is why this course is so special. The attention you pay to every detail comes from the drive you have to meet the challenges with every thing you've got. That is why your class is so special. Your work ethic is exceptional. SandraNightski
a Creativelive Student
While delving more thoroughly into Nature and Landscape photography in a smaller format, John Greengo provides us with an amazing companion to his outstanding courses Fundamentals Of Digital Photography and Travel Photography. Here he gives us another necessary treatise to study before packing our gear and heading out in a car, a plane, a boat (or just for a long hike), and it’s as entertaining as the others. Thank you again John Greengo and Creative Live for these expert and brilliantly illustrated programs. I just hope you keep finding more subjects to photograph and provide the instructions for.