Lessons
Day 1
1Course Overview
19:50 2The Bad and Good of Nature Photography
28:22 3Cameras and Sensors
17:18 4Lenses for Nature and Landscape Photos
16:42 5Macro and Tilt Shift Lenses
34:56 6Filters for Nature and Landscape Photos
31:41 7Tripods and Monopods
26:10General Camera Tips
16:56 9Exposure and Metering
17:17 10Exposure Modes
16:55 11Exposure Values and Apertures
24:16 12Focus: Modes, Points and Buttons
20:23 13Focus: Advanced Techniques
26:42 14Day 1 Q&A
12:30Day 2
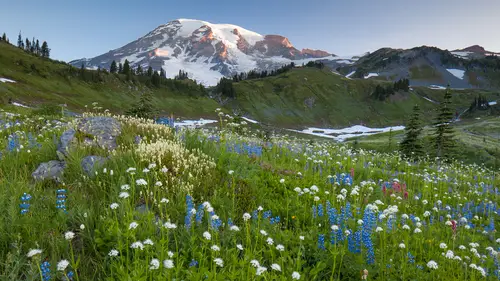
15Mountains and Forests
25:03 16Rivers, Waterfalls and Shorelines
25:45 17Open Land, Flowers and Skies
17:30 18Macro Shots and Adding a Human Element
15:43 19Elements of Design
16:17 20Working the Subject
14:36 21The Photographic Process
27:46 22Timing: Seasons and Time of Day
28:01 23Types of Light: Direct Sunlight
38:31 24Types of Light: Indirect Sunlight
42:35 25Composition: Basics and 7 Framing Tips
16:18 26Composition: Angle of View and Aspect Ratios
29:51 27Composition: Panos and Subject Placement
29:47Lesson Info
Rivers, Waterfalls and Shorelines
let's talk about some rivers okay so any time you got water that's going to be a great place for shooting photos potentially looking for the curves people love curved lines I shot this up in alaska I was in a small bush plane going on a kayak trip and there's just amazing rivers and water everywhere but there was just one nice little lineup we love those curved lines in our photographs and so each river kind of has its own unique character to it maybe it's a slow moving river maybe it's a fast it's wide narrow waterfalls just kind of look for what's unique about those rivers because there are so many different characteristics to them using those shutter speeds longer than one second in many cases to get that were and then look for surrounding elements that helped frame the river in its place when I was in yellowstone this past winter snow had accumulated on these rocks out in the river and just kind of created thes dotted shapes out there which I thought you know it might make a nice b...
lack and white I still have left this one color I should give this one to try and black and white but very careful on the composition around the bottom edge in the right hand side I wish I could have had a little bit more on that bottom right hand side it gets a little thin down there but I just didn't have the framing composition to move it in there was other elements that were just outside this area that would have made it feel very very cluttered especially along the far bank there was a bunch of brush and so forth and so I'm trying to get his much clean white snow and snow is one of the topics that I'm going to go into us there's a snow section and there's also a winter section later on and that snow is fantastic because it just cleans up a world of clutter and so snow is a fantastic time to be out there so we had a question in class ethics or whatever but like that thin part of the snow yeah could you have gotten into photo shop and use a litle content aware phil tio bring that out a little more absolutely could have done it but I didn't understand I felt like was close enough I'm fine with that and you know that's that's one of those areas that I'm sure we're gonna touch on mohr is kind of the ethics of you know adding something and I'm trying to think of any time my photo shop there is a photo that I did quite a bit of photo shop work on in here and I don't know how you guys feel about this but it was a picture of mount rainier and the lighting was really good and there was a cloud that was passing over that was just really nice but if that given moment a airplane had gone across the sky and left a jet trail on this guy and I took that jet trail out I mean it disappeared in five minutes I mean it just it wasn't there at that one time I'm not you know saying this is what the mountain looked like it that time but I just really wanted that jet trail out of there now I don't know if that was wrong or not if people shoot star shots do you take the satellite's out because these satellites leave weird streaks in your sky when you do a thirty second exposure and so jet trails in what's that I've seen john wayne movies john move with jet shells and they wish they could have taken him out in those and so it depends on how you're using your photographs I kind of come up from a journalistic background so I tend to be a little bit more strict but I'm also I think fairly pragmatic for instance okay imagine you drive up to a parking lot and you got this great scene in front of you and there's a rock right there in front of them it's got a beer can on it and there's no other framing but that beer can is in the shop what should you do take a picture with the beer can in there should you take a picture with the beer can in it and photoshopped it out later should you take the beer can out and throw it away and take your picture and what's the right answer you know I think you should take the beer can out throw it away and put it in the garbage can I think that's the proper thing to do but it was there when you got there journalistically you shouldn't touch anything I think you should recycle it john well that's actually that's what I have to say but thank you and so then it kind of comes down to what if there's a stick in your photograph and you don't want it there should you move it out that's a question okay so I have a question for the internet because we're kind of diving off a little bit into ethics I was up shooting at mount rainier national park and I was shooting my pictures and I'm kind of looking for the next shot and I'm like oh this is like beautiful white limb from a tree and it was just kind of really nicely composed with the mountains and I kind of got it framed up like this is like too good to be trill and I went wait a minute wait a minute somebody put this here because this did not naturally fall here there's no trees around here well I mean I guess a bear could have pulled it over here but I'm thinking a photographer placed it there should I photograph that or not I found it there I don't know what happened I suspect a photographer placed it there because it was like too perfect so what should I d'oh I photographed it I didn't end up really liking the shot I think it's very hard for people to place things and make him look natural they just somehow I don't maybe just when I'm taking that they have that feel of it's been manipulated and so moving rocks around and doing things I mean I have done to a very very minor degree because I remember this one time I was photographing the scene and there was a stick that was running sideways which really kind of broke symmetry of the photos so I just move the stick a little bit and I mean I don't know that I really feel guilty about that so continuing to talk about the rivers I'm not shooting just the river I'm looking for something in the river to add something solid for the water to move around using a one second exposure so that I could get that nice blurry flow of the river in zion national park looking for that foreground elements somethingto ad in there and so here's a case where I've let the trees be a little bit of a framing element around the peak in the background so rivers turn into waterfalls of course and so people love photographing waterfalls and so think about verticals you don't need to have everything already kind of mentioned that about the forest that carries through with the water falls as well the polarizer zehr going to help out quite a bit I'll show you some photos that really show that off and using those longer shutter speeds typically going to be a quarter second or longer I tried like to get him down to a full second or so this is a shot that I had in vengeance envisioned months before I went to iceland new there is this great looking waterfall and I knew that there was this type of shot potential it is a very difficult shot to get mostly because of the equipment that we were using but this is one of those cases where I'm not showing you the entire waterfall and by not showing you the entire waterfall it adds a a small layer of mystery to the photograph because you're kind of wondering how tall is that waterfall is it just out of frame or could it be a half mile the world's tallest water waterfall you don't know and that's kind of a good element to have it's one of the things that I like in a photograph now what made this challenging is that this was back in the days of film and I was shooting this with a telephoto lens because I wanted to compress this is a good example of compression compress that's actually me on the right and my buddy tim on the left we were biking around iceland wanted to compress us against the water I wanted to make it look like we're standing right next to the water and we were pretty close I mean we're getting some spray on us but we weren't right next to it and this is shot with a telephoto lands probably about a hundred millimeter lands and the camera was about one hundred yards away and the problem was is that my camera on lee had a ten second self timer and I'm not fast enough to cover hundred yards hundred meters in ten seconds but what I had as I had a little mechanical device that when sprung would give me about seven seconds which would then trigger the ten second self timer which gave me seventeen seconds too run from the camera on the tripod to the bike position so I could hop on the bike and I had to do this several times so I ended up running back and forth several times to make sure that we got the shot and you never knew until you got home because it was filmed but not showing the whole picture okay oh I didn't contemplate this I'm not sure how well this is gonna work uh this picture is shot without a polarizer and notice the big rock in the middle and how much reflection it has I'm not sure if I could go back with this remote but let me go forward and use the polarizer and no good this does work and so we just go back and forth for a moment and so this is the same shot lined up with and without a polarizer and so you're going to have to decide whether the polarizer works or not but a lot of times darkening those rocks is going to make that water stand out even more because where eyes once again go to the brightest elements in there this is a very difficult waterfall to get to its in australia its way in the outback were more income the northwest region of australians called mitchell falls and this is a one second exposure excuse me you're gonna want one second longer this is actually a twenty second exposure this has taken after sunset this is actually one of my last shots before the light completely faded away and I have a bit of a theory on what shutter speeds to use depending on the power of the waterfall and I found that in general the more powerful the waterfall the faster the shutter speed I'm not as big a fan of huge waterfalls with really long shutter speeds I mean I like him to some degree but I think in some cases to really show their power you want a little bit faster of a shutter speed so something like niagara falls yes it can look really good on along shutter speed but I think potentially a master shutter speed might be a little bit better for it and so it's one of those little tricks when the water is not flowing very much you can use a really long shutter speed and that kind of adds another element to it but you'll have to kind of judge yourself to see what what looks best with that particular waterfall all right don't shoot in bright sunlight I was set up for a shot in yosemite and it was looking pretty good and then right as I was ready to take the shot the sun broke through the clouds and we get these hot spots that just don't look real good on the photographs sometimes you're gonna have to move back a little bit so that you can actually show what's going on with the waterfall using the neutral density filter we talked about that in the filter six section yesterday I use that six stop indy filter from b plus w in order to slow down my shutter speeds to a very slow speed and then this can be a very tricky environment so you do need to be very careful because there's a lot of slippery stuff around all the water especially moss and little lichens growing on the rocks and they can be incredibly slippery and you can look at a rock it's like it looks like the perfect stepping stone and if its black and have some water on it it could just throw you into the water very very quickly and so in this first example you can see the bright sun shot and then when the cloud came back over a little bit more even light and so shooting these in the dappled sunlight of the sun coming through the forest is almost always a recipe for disaster and it's just because that strong sunlight is too strong and we're blowing out those pixels and they're becoming perfectly bright do we have a questioning class regarding the neutral density filter if you don't have like a six top you can use the polarizer along with that yeah so what you can do to start with you're probably going to have the polarizer on anyway but if you don't have the polarizer on stop your lens down at sixteen see if that gets it you may have to go down to twenty two or thirty two if that doesn't get you down to the shutter speed you want the polarizer will help out one two two and a half stops depending on how it's put on there so that's what a lot of people used to get down to that slower shutters you can use that along with like a three stop they're shin it really well I don't like stacking those filters and so I haven't stacked those two if I want to get that long shutter speed I'll probably just use the nd filter I could see a potential case where you want to polarize it and you want it much much slower generally I would say you could probably either go with one or the other tryto avoid stacking if at all possible in yosemite national park there's a lot of photographers is this is a very very easy and very common shot there and because it's there's a big parking lot where everyone sees this and everyone notices that one tree and if the right amount of water is flowing over the falls and the wind is blowing in the white way it makes for a nice perfect background so that you can really see that one little tree which is a great element to have in nature photographs is scale and I don't have a lot of humans in my photographs there's going to be a little section where I do talk about that but having that human element for scale or in this case just a tree gives us a sense of how tall that waterfall iss here's a case of using that neutral density filter I wasn't able to get a slow enough shutter speed on my own and so not using a polarizer but just using the nd filter to really get down to a slow shutter speed in this case it's a half second and as I mentioned before these rivers can be very tricky to work around for your own personal safety for walking around on the rocks you got to be very very careful and when you're putting your tripod in there this is where it's very helpful to have a tripod that has legs that has multiple positions that you can put him in because these rocks are very slippery and sometimes you're gonna want to put it almost up and top of the rock and you're gonna have one leg here and one leg there and it takes a little while to get things set up and my suggestion for that is maybe to leave the tripod off to the side for a moment take your camera out figure out exactly where you want it and then what I often do is I'll figure out okay weirdo I want it right here and then I looked down on the ground and I say okay that's where I want it and then I go get my tripod and I come back I find my spot and then I put my camera and I sent my tripod up right there and it's easy way for me to get right back to the spot that I wanted to be in for that exact composition but it's just easier to find it without the camera attached to the tripod because it can get unwieldy operated in that manner all right anything on waterfalls actually the most popular question is is there such a thing as doing too long of a nexpo jher on water and I know we talked about that yesterday but quickly since we're talking about wonderful right well I think at any point when the pixels are starting to blow out and you're clipping and you can see this if you have your clipping highlights turned on or your highlights turned on where the lights blink it you then you have probably gone too long and it's overexposed and that's as I say those words that is overexposed and not necessarily too long too long is going to be simply a matter of artistic opinion of what you think looks good on that particular waterfall and you know I kind of like those really long shutter speeds in many cases on the smaller waterfalls but I think I said that some of the bigger ones a little bit faster one that shows the power of it because the longer shutter speeds are going to show a little bit more elegance but the faster shutter speeds are going to show strength and power and it depends on what you wantto say in your photograph the message you want to send that's great great way to look at one practical one several people are asking about getting here equipment wet when you're close up into those waterfalls what about missed what about getting what do you have anything that you do that could be very very frustrating because I know what time's set the tripod aside I take my camera out and I'm like uh this this would make a great shot and that's just blow in mist in my face and I'm looking at the front lines of the cameron I just it's not gonna happen unless the wind changes I can't shoot here because you can't yeah yeah because it's just going to accumulate on the lands and it's just going to make for a very very blurry photograph and so you either have to wait for the wind to change or come back at a different time or find a new location but we missed on the front element I mean I suppose you can have the dreamy look on it I don't really go for that but that is a possibility that may work so that's a star is getting the mist on there as faras the water on the camera you should know and I'll have a bullet point for this but I'll tell you now you should know your cameras water tolerance and you should know your own water tolerance as to what you find acceptable or not are you going to find it acceptable to drop your foot into the rivers that okay if you could see if you're consciously like I'm ok if that happens or maybe you just say you know what this is worth it I'm taking off my boots and I'm going in the river sometimes you need to do to take those steps okay one more that I like actually from casey jiminy useful tips for capturing a rainbow in the water from rainbow in the waterfalls you know I haven't done the moon bow down at yosemite it's a it's a very popular shot to get its where you could go out and shoot a moon bow which is a rainbow with moonlight so you need a full moon or at least a reasonably full moon you go down by the water and it creates a nice mister you get this nice little night shot with a rainbow but with the with the rainbow sze yu I should probably put on a polarizer and give it a try I have found that it's it's very because you can make a rainbow disappear with polarizer if you want to but you can also kind of enhance it if you get it in if you can turn it the right way depending on where you are I haven't really photograph too many of them you're going to get a rainbow obviously when the sun is hitting the water and that's usually not the best time to hit the water so the son has to be kind of in the right location where it's creating the effect of the rainbow but it's not blowing out the pixels on the scene making them too bright and that's kind of unusual juxtaposition for that to happen but it does happen and so you kind of have to look for things to be just in the right place at the right time alright okay let's continue with the water theme and talk about where the water's eventually end up out on the shorelines and so walking along the short lines it's often a great place for looking for different types of photos where we have our mix of land and sea lakes and so many cases the polarizer is going to help because it's going to take off that reflection of the water where we can kind of look down into the water think about using either ah hi horizon or low horizon rather than putting the horizon line directly in the middle of the frame and then looking for waves trying to time them for their best action sometimes this is going to require a motor drive or sometimes just very carefully timing individual photographs and then depending on the water's movement you're going to need those longer shutter speeds if you do want to blur it our blur it out this is a second beach in washington we have some great see sacks out there nice dark solid elements to put in the composition little bit of rule of thirds going on in this case timing those waves to get the kind of the most amount of splash got to be very careful with your exposure so that you're not overexposing that bright white water which reflects ah lot of light this has taken will after sunset it's a six second exposure and this is uh there's no fog or mist out there this is just water flowing in and out causing that kind of blur around the rocks which could be a lot of fun because our cameras are getting so good at working under lower light and this is where you are going to have to start bumping up those isos toe so eight hundred sixteen hundred and thirty two hundred and you can work far past sunset it's pretty amazing how long you can just keep working the shoreline out there just because the sun has gone down is not necessarily the time to pack up the bag and go home you can keep on shooting it just kind of changes the look of the photograph and what you could be shooting let's talk a little bit about shooting lakes so looking for those foreground elements which is the same tip that we talked about and I apologized for repeating myself but these air important points and they applied to many different subjects but having those foreground elements adding them into something else that's going on obviously looking for reflections when we have still weather and so it's very rare you know when you're driving around in your car there's there's a couple things that most people don't notice they don't notice hills I know this from running perspective you'll drive up a road and you don't even notice it's a hill and when you try to run up that you like wow I never knew it was so hilly out here when you're driving in your car you don't really pay attention to the temperature until you get outside and you also don't pay attention to the wind and this is something that has a huge impact it didn't ever made it into this talk here but I was gonna have a whole slide on who is the nature photographers and nemesis you know what what do we really fight with and very high on that list is wind when is very hard for nature photographers to deal with because it's blowing their tripod around it's blowing the flowers and exploring the trees around and it's roughly enough the lake so we don't get the reflections and finding a truly still day is extraordinarily where the winds are always blowing which is great for the environment but it's very hard on photography in many cases and then doing the panorama and talk a little bit up panoramas I think in the composition section but doing a panorama stitch putting cem elements together so that you can get it from side to side and so this is up in alaska to be honest with you it's not the most amazing scenery in the background but it was just like a perfect reflection and this is one of those cases where I'm not going for a high horizon or low horizon I'm going to put it right down the middle because I have very nice symmetry created by the reflection and this is one of those things there really are no rules and photography there's a lot of suggestions feel free to break those suggestions and go differently anytime you want so looking for those times with no wind look at the clouds see how much the clouds are moving to get a key for how much the wind is blowing at least in that part of the atmosphere finding those foreground elements very helpful to help draw the eye into the photograph lake mcdonald up in glacier national park pito lake it's been banned my twenty four millimeter lens was just not wide enough to get the whole lake in and this is where I was using the shift plans and I told you yesterday previous earlier section about how to do that shift with the tilt shift for putting panorama shifting it to get both of them in there together and in this case in the morning got some nice light on the mountains behind the lake that's a nice color in the lake as well some nice color in the sky so those are actually two images stitched together further note on kind of dealing with reflections finding the still water because there could be a place where quite windy out on the water but you confined potentially still areas that are not moving and they don't have to be that big in order to create a reflection and this is most likely going to occur in many cases in the shade not that shade has anything to do with the wind but there's also just good colors that you're going to be able to get with the shade without bright sun coming in on it most people don't understand how low and close you need to get in order to get these good reflections and it's going to be great in the fall because you're often going to have very good colors up in the trees and so working in the shade is very very easy in this case we're getting some very nice simple colors the bright lights just don't work as well in this type of reflection shot when I say getting low and close I'm talking about usually getting down anywhere from two feet down teo one foot getting your cameras and your tripod down to its lowest position and you're still going to get some great reflections and the difference is is that when you're down here working what you're what you need in a still area is basically this area right here you need that nice and still and that's it and so if you have a little bit of a cove and just some smooth water in here it can be all rough out there but as long as this is smooth you could be working this now the whole lake is smooth well then you can set the camera up to a normal height and you're getting the reflections out there but where your reflections are kind of depends on how high or how low you are and if I wanted to I could take a coffee cup and if I got my camera right down here I can get a reflection in the top of a cup if I'm close enough and so the closer you are the smaller area you need to have for those reflections in the fall times trees turning colors kind of nice to get that this is this picture looks like it's upside down it's just you know all of reflection little artistic there for me and so just getting in filling in on the water getting those uh fall colors
Class Materials
bonus material with purchase
Ratings and Reviews
Thomas Hamlin
Most of nature's beauty has been photographed by lots of people over the years. However, nothing compares to actually visiting famous places, buildings, mountains, etc. and taking your own photographs. John Greengo provides the necessary equipment information, photographic principles, and techniques in a manner which inspires you to put in the extra effort to take the best nature photographs that you can with the gear that you have. His unique illustrations, actual real life photographs, and easily understood explanations are top notch. I highly recommend this outstanding course. I have several of John Greengo's photography courses, and I highly recommend them all. His vast experience with film and digital photography, gained through traveling and working with some well known photographers, gives his courses a unique perspective.
a Creativelive Student
I love this course, John. It is one of my all time favorites. First of all I loved your effort scale. I knew as soon as you went through the scale that you are a guy that I want to listen to. To me, the effort part IS the fun part of photography. When you asked the question about one wish ... the first thing that came to my mind was that I wish I had more time for photography. I like the technology, but I do not wish for any special powers. To me, that would take the challenge away. Photography is wonderful because every subject challenges the photographer to get the angle right, the light right, the settings right ... I love that challenge. I think you do too, John, and that is why this course is so special. The attention you pay to every detail comes from the drive you have to meet the challenges with every thing you've got. That is why your class is so special. Your work ethic is exceptional. SandraNightski
a Creativelive Student
While delving more thoroughly into Nature and Landscape photography in a smaller format, John Greengo provides us with an amazing companion to his outstanding courses Fundamentals Of Digital Photography and Travel Photography. Here he gives us another necessary treatise to study before packing our gear and heading out in a car, a plane, a boat (or just for a long hike), and it’s as entertaining as the others. Thank you again John Greengo and Creative Live for these expert and brilliantly illustrated programs. I just hope you keep finding more subjects to photograph and provide the instructions for.