Lessons
Day 1
1Course Overview
19:50 2The Bad and Good of Nature Photography
28:22 3Cameras and Sensors
17:18 4Lenses for Nature and Landscape Photos
16:42 5Macro and Tilt Shift Lenses
34:56 6Filters for Nature and Landscape Photos
31:41 7Tripods and Monopods
26:10General Camera Tips
16:56 9Exposure and Metering
17:17 10Exposure Modes
16:55 11Exposure Values and Apertures
24:16 12Focus: Modes, Points and Buttons
20:23 13Focus: Advanced Techniques
26:42 14Day 1 Q&A
12:30Day 2
15Mountains and Forests
25:03 16Rivers, Waterfalls and Shorelines
25:45 17Open Land, Flowers and Skies
17:30 18Macro Shots and Adding a Human Element
15:43 19Elements of Design
16:17 20Working the Subject
14:36 21The Photographic Process
27:46 22Timing: Seasons and Time of Day
28:01 23Types of Light: Direct Sunlight
38:31 24Types of Light: Indirect Sunlight
42:35 25Composition: Basics and 7 Framing Tips
16:18 26Composition: Angle of View and Aspect Ratios
29:51 27Composition: Panos and Subject Placement
29:47Lesson Info
Focus: Advanced Techniques
there's a number of advanced techniques for achieving perfect focus and so we're going to go through siri's of things that you can use to get the best focus possible the first is something on your camera called a depth of field preview and this is something that's on almost all the sl ours out on the market muralist cameras may or may not have it depending on how they work when you shoot with a camera sl ours always and sometimes mira listen sometimes not it depends on exactly what mode therein will you just pick it up to look through the lens the lenses aperture is wide open the maximum opening that may not be where you have the camera set but that's where it is for viewing the image when you decide you want to shoot a picture at f sixteen and you want a preview it there's a depth of field preview button that you compress to show you how much depth the field you're going to get in that specific shot so while you might look through the viewfinder and it might be a very narrow depth of ...
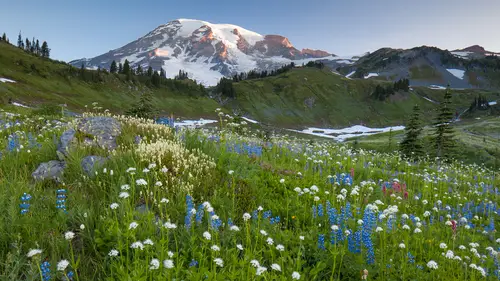
field by pressing down on that depth of field preview button it stops the aperture down to its working aperture so that you can see how much depth of field your camera's gonna get now to be honest with you it's really hard to see because when you close the aperture down it's not letting in much light and so you have to kind of keep your eye in there and let your eye just for the darkness and then you'll eventually to see I'm getting much more depth of field this used to be kind of a big time professional feature on cameras but you know what it's on the entire lineup of canon cameras these days and so it's a feature that they put on all the cameras and it's not nearly as useful as it used to be because this used to be very useful back in the days of film when we didn't know what our exact results we're going to be nowadays another way of doing this is just shooting a picture and looking at the results with image magnification but I have found this quite helpful when I'm out in bright sunlight press down on the button I'll stop it down let my eyes adjust for the darkness and I will see how much depth of field I'll see if it's carried through from the foreground to the background if not then I'll change my aperture all change my position and changed my lens perhaps so if you have that button be familiar with it know how to use it next step let's talk about mere lockup first off let's talk about why near lockup is even necessary and this is on slr cameras because we're locking up the mir so in an slr camera let's go our tow our diagram of an slr camera you know how this works right so in our camera when we press down on the shutter release to take a picture the mere needs to get up on out of the way and that causes a vibration throughout the entire camera that last for a short period of time and that short period of time is often right during the time the shutter is open and so that mere because it's trying to get up and out of the way it hits the top of the mere box so hard and fast it causes a problem now the manufacturers know about this and they've put in all sorts of dampening devices to slow the mere down but it still has a bit of mere slap in there and so in order to get around it we have a feature called mir lockup and we turn near lock up on what happens is that the first press of the shutter will lock the mere up the camera will have the same vibrations it always has but you wait for a couple of seconds for that vibration to settle out and then you press the shutter release for a second time that way your pictures taken when there is no vibrations happening in the camera at all now you might think I'm getting a little fussy here might get a little nit picky on sharpness well let's just take a look at some photos I was in yosemite national park and I was shooting some pictures of some trees and I was at one eighth of a second I was on a thousand dollars tripod and I was looking at my results going wow that doesn't look very sharp at all do I have a bad lenses either smearing my lands what is the ground moving what's going on I checked everything and I thought to myself I forgot to put my camera in the mere lockup I shot another example with the mere lockup and these are just straight out of camera results notice on the picture and left how out of focus it is and that's what near slap and vibration in the camera can do to an image and that sharpness is really something that you don't want to lose yeah I have found that this mere slap problem happens in the vibrations own generally it's at its peak of worse around one eighth of a second so if you had to pick a shutter speed that I don't like I don't like one eighth of a second because you've got to get your camera in mere lockup or in live you everything below a sixtieth down to around one second you're susceptible to mere slap and some vibration in your camera so if you have an slr that's a good time to put your camera in mere lockup some cameras are a little bit hard to get into the menu and put it in your lockup there's a lot of steps a short cut is live view the only downside alive you compared to mere lockup is that you're using a little bit more battery power but if you do it for short periods of time it's not a big issue in my mind and I generally will just put my camera in live you has a shortcut for using mere lockup another little nit picky thing that some of you need to worry about but not all of you is something called micro adjustment and micro adjustment is the ability for us to adjust how are lenses focus they're designed at the factory to to do as accurately of a job as possible when combined with matching cameras but from time to time things get slightly misaligned and they will front focus which means it's focused in front of its end intended target or your camera might be back focusing focusing slightly in back of where you wanted the subject to be and this has to do with just very subtle little tolerance differences between your lens and your camera body in the past we had to send our lenses and our cameras back to the manufacturer to have them re calibrated and in some cases they just couldn't do it for everything and so now they allow many people to do this on their own at home it does require a little bit of testing you need to have a target that you're going to shoot and you need to have a way to measure whether you are focused in front of or behind it and so you need a focusing target and a measuring device now if you want you can spend money and you can buy one of these things so this is a lens online mark to sells for about eighty dollars and you would focus on the target and you could see if you're focused in front of or behind it that's a little bit fancier than I need I've created my own using a ruler and a yardstick and so I simply put the ruler in the vertical position the yardstick going forward two back and then I'm going to shoot the ruler and I'm going to see if I'm focused where I should be in this case on the ten inch mark on the yardstick and so here is the actual results from a lens that I was testing and you'll be able to go into the micro adjust or f fine tune or whatever your manufacturer calls it and you'll be able to make adjustments in increments anywhere from minus twenty two plus twenty and in this case when my camera was at zero it was front focusing by about an eighth of an inch not a lot but just a little bit and so I believe I micro adjusted my lens tow about aa plus three or four setting on here just to adjust where that is focusing a little bit and so we are getting very nitpicky very precise this's for people with fast lenses and if you want to do this yourself this is something that anyone could do in their home you're going to need your cameras your tripods and all your lenses because you want to get all of them set up for doing this you'll need some things to focus on you're going to want to make sure that your camera is in the highest image quality possible shooting in the shallow a step the fields so that you can see this difference as clearly as possible so take all the steps to get the sharpest picture possible what you're going to do is you're going manually unfocused and then let the camera auto focus on your target whatever that happens to be make sure that your cameras and martin mere lockup or in live you so that you're not getting any vibrations play back your image and see how sharp it is see if your front focusing or back focusing and this is something that I have done with all my lenses and some of them have needed quite a bit of an adjustment so that I get consistent focusing now who needs to do this not everyone I'll be honest with you if you buy your standard little kit five hundred dollar digital camera you probably don't need to do this this is for people who own fast glass lenses that opened up quite wide open how wide open generally to eight in faster if you have a two eight lands or faster you would be wise to micro adjust your lands to make sure that is perfectly right on the other thing to do is just keep very good tabs on are your pictures in focus is it exactly focused where you wanted is it a little bit in front a little bit him back and this isn't a huge issue for the landscape photographer because we're so often shooting with maximum depth of field but if you do want to shoot with shallow depth of field you do want it to be spot on and so this is important to have for those of you who have fast glass all right let's talk about one of the favorite topics of landscape photographers who want to impress their non photographer france let's top about hyper focal distance no I couldn't get the shot the hyper focal distance wasn't right and nobody will ask you questions about what's going on so it's a nice little term to throw out there and what does it actually mean it is the distance to focus its the focusing distance to achieve the maximum depth of field and I think we may have had a question on well where do I focus if I'm trying to get everything in focus whereabouts to do I need to focus and this is going to very according to everything else involved in depth the field your focal length your aperture and your subject distance so let's do a little visual example all right so we got the yard stick out and we want to try to get as much and focuses possible let's say we're focused at ten okay let's bring on our apertures now if we shoot with very shallow depth of field the depth of field is going to stand extend in front of her object about one third and about two thirds behind so in general we get a little bit more behind our subject in focus than we do in front now this distance does vary anywhere from fifty fifty two thirty three to sixty six percent and so the closer up you are the closer it is to fifty fifty percent but for a lot of kind of general landscape shots it's going to be a third in front and two thirds and back so if we stop our aperture down a little bit rather than having one inch in front and two inches in about and back we now have two inches in front and four inches and back or we can stop it down a little bit mohr and maybe get three inches in front and six inches in back and if we stop our lands all the way down for maximum depth of field it's going to grow in both directions and at this point you'll notice that we have not extended depth of field to the infinity mark in the background and if we want those mountains in the background and focus well we're going to have to adjust focus the mistake a lot of amateurs make is they focus their lens on infinity and they've just thrown away nearly two thirds of their depth of field because it's behind the limit of infinity and so what you should do is you want to extend the back part of depth of field to infinity but no further and so there's kind of a little magic place to be where that back edge has captured the distance things and the front edge of it has captured as much in the foreground as possible and that is your hyper focal distance in this particular situation I want to make this really clear so I made a second diagrams so that you could see it in a different manner of speaking okay imagine you have a flower and a mountain and you want both of them in focus if you focus on the mountain well the mountain will be in focus but the flower will not you set f twenty two it may not reach those flowers in the foreground all right so you're going to focus on the flower in the foreground well the f twenty two may not reach the mountain in the background but if you focus at just the right spot between the two depending on their distance is there's a good chance that you will be able to get both of them in focus and that is your hyper focal distance now the hyper focal scale on someone's is we'll help you achieve this and do this but there are very few lenses that have the hyper focal scale I'm showing you a like a lens here because they make really nice lenses and they put these beautiful scales on it here's kind of a more standard lands it's going to have a focusing ring and it has a very minimalized hyper focal scale so let me show you more about this focusing scale and the depth of field scale so the focusing scale in this case we're focused at two meters and we're going to bring in our depth of field scales no not many lenses have this and most of them don't look nearly as good as this one in my opinion they don't have nearly as much information so let's adjust our focus where we focus now we're focused at three meters were focused at ten feet we're focused at infinity right here it's that little angled mark if we go all the way we're focused beyond infinity in this case so let's go back to ten meters or thirty feet if we are set at ten meters and thirty feet how much depth of field do we get at f eleven and this is where we go up to the scale and we look at f eleven which has the little blue mark on the left hand side f eleven has a mark that comes over to five meters and on the other side it has a little blue mark that goes up to the infinity symbol so I know if I focus here at f eleven I'm getting everything between five meters an infinity and focus let's change our focus to five meters now at f eleven I'm getting three meters half eleven to ten meters well I just lost infinity here let's stop down to f twenty two f twenty two gets us to infinity and it stretches us all the way to two meters and so when you're looking at these lines you're looking at the distance between those two lines and what it matches up with on the focusing scale and so what I'm doing is I'm a lining the infinity symbol with whatever depth of field that I'm setting and then I'm looking over to the left to see how far reaches towards me is it at two meters or three meters or some other distance and so that's how you use it the depth of field scale in order to set the hyper focal distance and this is really important when you are taking photographs of subjects that are very very close to you and very very far away all in the exact same frame and so in this case I'm using a seventeen millimeter wide angle lens it's set at f twenty two my camera's about six inches off the ground and the front edge of this salt flat in bolivia is probably ten to twelve inches from the front of my lands and so I'm really needing ah lot of depth of field very important for this landscape work so twenty eight millimeter lands f sixteen reaches right there in front of me rockets probably about two feet in front of me and so any time you are trying to get that foreground right in front of you as well as the background and focus you want to be thinking about the hyper focal focussing point weird is your lens need to be at how close and I know that you can't get too close to subject you can't have a subject one inch in front of the lens and keep it in focus with any sort of normal lens that would be very very tough so in this case this is zion national park eighteen millimeter lands f sixteen I didn't need f twenty two I probably shot this at f twenty to one of the concepts I'll talk about is taking multiple shots and kind of covering your bases and in situation like this I would shoot it f twenty two in case I needed the depth of field and I couldn't quite tell him field I might also shoot it in an f sixteen s I know f sixteen is sharper than f twenty two f twenty two as more depth of field and I'll sort it out in the computer later on if I can't tell in the field and I'm rushed in the light's changing role quickly I'll shoot multiple shots with slightly different settings and figure it out later so here's a little hyper focal quiz for youto work on if you have a twenty eight millimeter lands and you have a f twenty two aperture setting set where should you focus to achieve the maximum depth of field now don't bother writing your answers in the cannon we're goingto move faster than that but just think for a moment looking at the screen where would you focus and how much would be in focus f twenty two is going to give you a lot of depth of field twenty eight normal wide angle lens but not especially wide so let's take a look at our answers the correct answer is a did you get that right so that's going to reach us seventy millimeters to infinity if we focus at three meters it's only eighty seven meters to infinity and if that six meters were only going to get a meter to infinity so if you want isn't much in focus as possible that's the hyper focal on this particular lands let's do another lance see if you can get this one right we're going to use a twenty millimeter lands at f sixteen should you focus at a half meter one meter or two meters for maximum depth of field where infinity is still unfocused but it stretches as close to you as possible and here the correct answer is one meter you'll get everything from forty seven meters to infinity infocus going to give you one more now we have a super ultra wide angle lens fourteen millimeter lands at f twenty two you'll be hard pressed to get more depth of field with any lands under any situation but where should you focus twenty five centimeters fifty or one meter think about this for a second and the correct answer is b fifty centimetres you can get everything from nineteen centimeters in front of the lands all the way to infinity all right well this is all well and good but let's take it out in the field how do we actually focus out in the field the question that a lot of you are having is okay well I still don't know where I should focus because a lot of you don't have these hyper focal scales on your lens is well let's go back to the test that I just gave you and look at what kind of a secret bit of information that you might have been able to pick up on one point five meters and seventy centimeters if we take the closest focusing distance and we multiply it by two we get very near the place that we're supposed to focus one point four meters versus one point five so if we know what is closest to us and we double that distance that's where we're supposed to focus let's try it on the next lance we're supposed to focus at one meter and that'll bring us forty seven meters we take forty seven millimeters forty seven centimeters excuse mei and we multiply that gives us almost exactly a meter so what our closest subject iss we double that distance when we take this down to the fourteen millimeter lands the numbers don't add up quite perfectly this is kind of a rule of thumb it's not a perfect science so it tells us that we're supposed to focus at thirty eight I'm supposed to be centimeters and you're really supposed to be at fifty centimetres but that definitely gets you in the ballpark so in this photograph what is the closest thing to us well of course it's those flowers in the very near foreground at the very bottom of the frame how far away are they well might be a little bit hard for you to tell but when you're there and in person photographing them you'll say ok there about a foot and a half away from the lens and so you would look at something double that distance and focus there now one of the common rules that I have heard that I don't like in photography is you're supposed to focus one third into the scene and this doesn't make a lot of sense because what if I'm suiting something that is essentially five miles away what is one third of five miles well I'm not going to focus one point seven miles into the scene that would put me way up on mount rainier some people say focus one third up in the frame well that depends on how you have your camera tilted one third up in the frame doesn't do it a much better system is double the near point it's not exact but it's very very close in a photograph like this what's closest well it's what's at the bottom of the frame and this is really close to the lands it's probably six inches away what's double that well whatever's about a foot away and that's where I would focus and so this is a really good starting point you may need to adjust it a little bit forward or a little bit backward but take whatever is closest you could bring out a tape measure if you want I usually just estimated what's the near point and then double it and that's the place you want to focus to get the most amount of focus now the only time this isn't gonna work is if you choose something too close to the front of the lens you've exceeded the limitations and you're focusing on grass that's two inches in front of your lands generally this is gonna work anytime you're about a foot away or further and so I think it's a great little trick and it's a very very helpful way forgetting that maximum depth of field double the near point now somebody had brought up the phrase focus stacking and this is another way of getting maximum sharpness it does require multiple pictures in order to do this I was down in monterey california and there's these trees that has orange like and growing all over it and said point lobo state natural reserve and I thought this was really cool and I wanted to have everything and really sharp focus and so I shot the picture at f thirty two but I didn't really want to shoot it in f thirty two because my lenses not as sharp and f thirty two as it is at other settings and so what I did at the time even though I didn't have the software is I decided to shoot a siri's of photos as you can see here that I focused on the foreground and then I just adjusted the focus a little bit and a little bit more and a little bit more and a little bit more until I took about eight different pictures that all had different slices in focus well I now have the software towe where I can fix this and get you one final image and so this is the final new image that is super super sharp and if you want to compare the difference between how much does it to shoot it f thirty two versus focus stacking here is my test results and this is through a company that makes a product called hell akane focus there's a number of them out there these guys seem to do a pretty good job and they're fairly reasonable and money the standard shot in f thirty two on the right you can see it's clearly not as sharp as the hell akane focus and there really is no other way to get this type of shot other than focus stacking and achieved this level of sharpness the lenses just are not that sharp at f thirty two given the focal links that I needed to shoot up this also gives us a few other nice advantages in this case shooting a flower straight on I'm only using maybe three or four shots in this case and you can see the final result on the left and I'm just shooting a standard shot on the right just to show you what I might try to do on my own and so the healing can focus works really well and it does a very good automated job of grabbing all of the images compressing them into one finalized image now in this siri's the advantages is that I can get this little flower in perfect focus leaving the background blurry whereas in the f thirty two shot over on the right hand side if I want that depth of field so the flowers and focus the background is kind of forced to beam or in focus and so I have a little bit more control over the depth of field and what is in focus in what is not in focus and so I find this very very helpful when it comes to macro photography I haven't used it too much when it comes to larger scenes but in this case I'm focusing on the foreground and taking multiple pictures that my camera does not have enough depth of field to all get in one shot and then when I get to the mid ground and the background using multiple shots and then one final image where compresses all of them into one sharp image where the flowers in the foreground are just a sharp as the flowers in the background and so this is a way of achieving something that our cameras cannot do on their own and that's a pretty cool little thing to do I don't need it very much but it's a nice tool to go to if you really want to get sharpness that is really really good so here's one where I set the lens at f eleven but I shot five different shots adjusting focus literally as little as I possibly could manually adjusting focus and you will definitely be manually adjusting focus when you do these and so this is called helicon focus it's from a company called hell akane soft dot com you could go check them out they make a variety of other software this is the only piece of software that I used from them of this nature but it does work very very well and for anyone who has uh challenging depth of field needs this is another solution that you can kind of put on the books
Class Materials
bonus material with purchase
Ratings and Reviews
Thomas Hamlin
Most of nature's beauty has been photographed by lots of people over the years. However, nothing compares to actually visiting famous places, buildings, mountains, etc. and taking your own photographs. John Greengo provides the necessary equipment information, photographic principles, and techniques in a manner which inspires you to put in the extra effort to take the best nature photographs that you can with the gear that you have. His unique illustrations, actual real life photographs, and easily understood explanations are top notch. I highly recommend this outstanding course. I have several of John Greengo's photography courses, and I highly recommend them all. His vast experience with film and digital photography, gained through traveling and working with some well known photographers, gives his courses a unique perspective.
a Creativelive Student
I love this course, John. It is one of my all time favorites. First of all I loved your effort scale. I knew as soon as you went through the scale that you are a guy that I want to listen to. To me, the effort part IS the fun part of photography. When you asked the question about one wish ... the first thing that came to my mind was that I wish I had more time for photography. I like the technology, but I do not wish for any special powers. To me, that would take the challenge away. Photography is wonderful because every subject challenges the photographer to get the angle right, the light right, the settings right ... I love that challenge. I think you do too, John, and that is why this course is so special. The attention you pay to every detail comes from the drive you have to meet the challenges with every thing you've got. That is why your class is so special. Your work ethic is exceptional. SandraNightski
a Creativelive Student
While delving more thoroughly into Nature and Landscape photography in a smaller format, John Greengo provides us with an amazing companion to his outstanding courses Fundamentals Of Digital Photography and Travel Photography. Here he gives us another necessary treatise to study before packing our gear and heading out in a car, a plane, a boat (or just for a long hike), and it’s as entertaining as the others. Thank you again John Greengo and Creative Live for these expert and brilliantly illustrated programs. I just hope you keep finding more subjects to photograph and provide the instructions for.