Composition: Basics and 7 Framing Tips
Lesson 25 from: Nature and Landscape PhotographyJohn Greengo
Composition: Basics and 7 Framing Tips
Lesson 25 from: Nature and Landscape PhotographyJohn Greengo
Lesson Info
25. Composition: Basics and 7 Framing Tips
Lessons
Day 1
1Course Overview
19:50 2The Bad and Good of Nature Photography
28:22 3Cameras and Sensors
17:18 4Lenses for Nature and Landscape Photos
16:42 5Macro and Tilt Shift Lenses
34:56 6Filters for Nature and Landscape Photos
31:41 7Tripods and Monopods
26:10General Camera Tips
16:56 9Exposure and Metering
17:17 10Exposure Modes
16:55 11Exposure Values and Apertures
24:16 12Focus: Modes, Points and Buttons
20:23 13Focus: Advanced Techniques
26:42 14Day 1 Q&A
12:30Day 2
15Mountains and Forests
25:03 16Rivers, Waterfalls and Shorelines
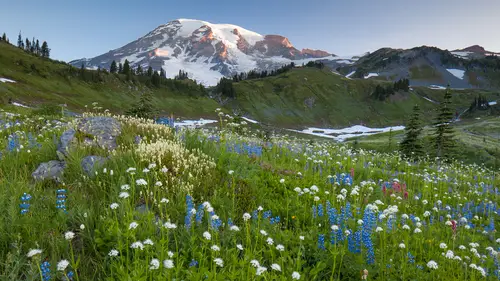
25:45 17Open Land, Flowers and Skies
17:30 18Macro Shots and Adding a Human Element
15:43 19Elements of Design
16:17 20Working the Subject
14:36 21The Photographic Process
27:46 22Timing: Seasons and Time of Day
28:01 23Types of Light: Direct Sunlight
38:31 24Types of Light: Indirect Sunlight
42:35 25Composition: Basics and 7 Framing Tips
16:18 26Composition: Angle of View and Aspect Ratios
29:51 27Composition: Panos and Subject Placement
29:47Lesson Info
Composition: Basics and 7 Framing Tips
all right folks so we're on to the final section have been building up to this we've gone through the technical talked about light and subjects and now the final pieces getting your picture composed in the best way possible and there's a lot of ideas and concepts and rules when it comes to composition so I would like to present you the ultimate rule of composition who sounds pretty serious what is the ultimate rule of composition composition well it is very simple do what looks best whatever that isso que that takes precedence over any other rule or suggestion that you happen to see now the goal of composition in many ways is to reduce the complexity in the scene we're trying to find order within the chaos of the society and the environment around us so those air kind of the mindset that I have when I'm out looking for subjects and finding those subjects and trying to figure out how to render these three dimensional riel world objects onto the two dimensional plane of our sensor and it...
could be rather challenging and there's lots of little tools that we can use to kind of help figure out what works and what doesn't work and to understand this probably the best is to go in and look at how we look at the world our visual perception of what we see what we think is important what draws our attention what distracts us and the more understanding you have of this the better you'll have an understanding whether to put that in the frame or out of the frame so let's take a look at our visual perception this is the concept of what's going to draw our attention what's going to make us look at a photograph or an object in nature movement is probably something more than anything else that you'll see I was walking along lake louise and bam and I noticed this reflection and I don't meditate but this wanted this made me want to just stop and meditate and look at this and zone out it's a very mesmerizing little scene and it's very intriguing and it's I don't know it's just it's just a fun little thing I mean I don't know it's worth anything but it's just a neat little thing but when I took a picture of it it just lost everything he is not interesting at all it is a terrible photograph but it's something that draws our attention from the very beginning we have always been drawn to things that move whether it's a lion in the grass a bear in the woods or a car coming down the street if it's moving we might want to pay attention to it for our personal safety reasons but when it comes to still photographs movement translates in a whole different way and so just because it's moving for instance some wildflowers blowing blowing in the wind that might look very entertaining to your eyes into your brain but that doesn't translate into a still photograph and so movement is something you kind of have to think outside of and kind of set asides next up size the bigger something is the more important it is in the frame and so when the subject is close to the lands it's very big you know that it's the main subject in the frame we also look for what is unique in a photograph what is that one thing that is different and for some reason I go back to her our sesame street program where they show you the pictures in which one of these is different what has something that stands out and this is something that we're very drawn to looking at it's what's that one element that one tree on the horizon that stands out from everything else is because it's unusual it's unique another area that we look at and I've mentioned this before is brightness those flowers in the lower left hand corner I receive a little bit more attention because they have a little bit of sunlight coming in on them versus the flowers around them and so we often look in a photograph at whatever is brightest and so those areas can be distracting or they can draw attention to the right area we like shapes we can see shapes very very easily we can see him in very small sizes we've talked about that with silhouettes is that when we see these shapes we can quickly identify what they are or we can kind of get a feel for what's going on extremely quickly and so we do like shapes in there obviously color attracts our attention when we see color what's going on over there something of interest one of those reasons why we love those sunsets and those bright vivid flowers using our depth of field to control what is in focus and what is out of focus by having something in focus we're demanding attention be drawn to that when it's out of focus it's going to receive far less attention objects that have distinctive contrast a good amount of contrast there could be too much contrast in some of the photographs but having contrast in the photograph is good and that's why we talked about the exposure section earlier on capturing a very low contrast sing but expanding that contrast in post is going to help make that scene look a little bit more vibrant and interesting in many cases we look at what is unusual what stands apart from everything else so using focus to highlight that in this particular case we haven't talked about it a lot but including people in the photographs our eyes are drawn to people in the photographs we want to see do we know that person would we want to do what that person is doing can we put ourselves in that person's position this is something that we want to be doing and so including people and there is not a bad idea at all and it's amazing at how just the subtle ist movements can make the biggest difference and I was I was really hoping to have a whole section on this button frankly I'm sorry I only have one example of this and I really want to do more of this in the field and so maybe that will be a future class at some point but I want to show how much just a little bit of movement khun dio so let's take a look at the first photo here and think about what this photo is of and is there anything in here that bothers you do you like it do you not like it and so we have some trees which have a nice graphical element to it but there are some distracting things going on so let me show you a short video of how I would move the camera to position it for a better shot so let's start the video here and what do we do we got a tree on the right we've got that kind of dark line on the bottom when we've got some power lines on the left we just move it just inches really to re position the camera to get a much cleaner better shot and so now we do not have those distracting elements and so when we did when I talked about border patrol before look over here on the right hand side of this image on the left we have those trees over there poking in off the side that's that's not framing that's peekaboo we don't want to be doing that this river down here we're not seeing enough of that this little stick in the ground we don't like that and these poles back here and the difference between those two shots is from here to about here about a foot and a half that's all I needed to do a slight twist getting down a little bit moving to a slightly better position and it can make a huge difference in a lot of photographs that very subtle precise framing of this shot so some quick tips just on framing framing up your shot start with fill the frame most amateurs don't get close enough and their subject is too small in the photograph if you show somebody a photograph and you have to say c look at what I was shooting over there you didn't fill the frame enough you are not clear enough about what you were shooting it should be obvious to the shooter now in this to the viewer of the image in this particular case I had very little leeway in where I could stand and how I could photograph this tree with pink flowers on it and so there really wasn't much to do other than just simply fill the frame used the longest lens I have and get it as close to the edges of the frame as felt comfortable in that particular photograph next step ad on ly supporting elements and so if we're gonna have a subject in there you've only khun carefully add one element at a time do I want to have in this this in there or not so I'm carefully adding in some tree trunks which I think go well in this mountain side he'll shot of mount hood in oregon having your subject out of the middle will talk more about this when we talk about the rule of thirds but amateurs almost always put the subject directly in the center that's because we're the focusing points are but getting that subject out of the frame is a very very good useful tip and I will have two men have a hard time finding vertical photographs vertical photographs they tend to be a little bit more towards the middle of frame the horizontal one gives me a little bit more freedom of where to put that subject mohr off to the side remember that we don't need to show everything in the photograph by not showing everything we add a little element of mystery and that is always a good thing to have so show only the best part simplicity works really well in photographs very very sensible simple items clean not a lot of clutter in the photograph is something that I personally very prize in the photographs there's a bit of a visual puzzle going on out there and my goal going out there is to make sense of this visual puzzle to find an element that makes sense and flows together finding the order out of the chaos chaotic world I've said that many times and finding a little area that make sense and we can see that pattern and we love those patterns trying to find them and eliminate all the other clutter is very very challenged but it will make for very good pictures let's talk about this from the perspective of point of view which is where you are standing in order to get the shot it as a kind of a working example showing you through some of the bad shots to better shots is unexamined of zion national park I was photographing down there for several days and I'm taking the picture in this case of the watchman which is a quite called mountain but it's it's a rock face it's a it's a tall rock pinnacle and a lot of people's instinct is to try to get as close to their subject is possible because I just told them to fill the frame yes that's the first thing you're supposed to do but in this case the foreground is not all that interesting so let's look for some other places to photograph now in zion national park there is a well known bridge that a lot of photographers go teo you're likely to end up there with several other photographers photographing the watchman tower now from this location you have the river the virgin river down below and you have these cottonwood trees which are quite nice but this is shot no mid to late morning and it's not quite the right time a day we've got a lot of bright sun and are main subject the mountain in the background is kind of in the shadows not the right time of day a little bit earlier in the day we have this lighting a little bit lower in the sky we've got some nice light kind of coming in on the watchman but it's shadowed and broken up light coming in on the river if you get there even earlier in the morning the valley will be in the shadows and now it's at least in very very even lighting and this is not a bad time to be there fairly early in the morning but there's a lot of other areas where you could be framing up this peak and having other elements in the foreground looking for lines looking for colors looking for other things that are of interest that helped draw our attention here using some small cactus plant is drawing our eye upwards to the top of the mountain finding some flowers to add to the color of it so this picture earlier working with the river and elements in the river rock and the river using that slow shutter speed but the best time to go there is probably at night because you get this really nice side light hitting the side of the watchman very good lighting on that eye I wish that little cloud off to the left was a little bit bigger and more prominent wish we could place some more clouds in the sky would make it even better bouncing some light reflected down but on the day that I had to shoot it I would just shoot the best that I can and take it I'm fairly happy with that result but that's a heck of a lot better than just trying to get close to the mountain and just get a straight shot of the mountain with nothing else in it so we talked about this when we were talking about shooting the mountains adding those foreground elements so this is just a matter of working that composition shooting that same subject over and over again not just taking the first shot that you get another example of working with the composition and looking at the same subject from different angles of you is ohh homo bridge this is in let me get this right uh natural bridges national monument in utah and there is a stunningly beautiful paved road that takes your health this park and it takes you to three significant natural bridges and at this particular parking lot they got a little sign there that I photograph and it's a very short walk to get out to the viewpoint and if you're not willing to put out the time or the effort and you simply go to the viewpoint here is the most wonderful picture that you can take in the middle of a bright sunny day do you notice the bridge kind of hard to see it's right there it's not a very good look it allows you to see the bridge but it doesn't give you very good photographs let's go back to the map and take a look well are you willing to put out some time you're going to spend a half an hour how about an hour how about two hours exploring the area well you know what there's a trail that goes right down below the bridge and if you're willing to walk down the trail you're probably going to get better photographs and so if you're going to photograph a bridge you're going tohave you want to get a little bit of blue sky below that bridge to actually show that that landis separated and it has a cut underneath it now a bridge is a element of land that has been worn away by water and it's been worn away by water that means there's probably a river nearby and there's going to be ellen elements of water a great time for reflections so I'm not looking for a big lake I'm just looking for essentially a mud puddle so that I could get down really close to it and if you get down really close you can get a reflection and in this particular case there's water on either side of the bridge and in several different locations and that water ads for a nice reflection which adds a nice foreground element which this area didn't have a lot of didn't have a lot of plants and wild flowers and neat looking rocks and so I'm using a reflection to kind of add to the elements that I already have I'm going to stick around until sunset to see whatthe light does to see what it looks like because I hadn't been there before I was basically scouting and shooting the same time I came back the next morning to shoot more photos with different lighting I think this photo kind of embodies the concept of mystery if this is the only photo that you saw this you'd be kind of well wait a minute this guy just look that no this doesn't look right at all and I kind of like that aspect of it now the final favorite shot was this one here a little bit of reflection shows a little bit of the full reg line takes the subject a little bit off center and if we come bharat compared that to the original shot from the parking lot essentially or the viewpoint I think you can see that the time and the effort pays off in getting a more interesting composition that tells them were interesting story for your subject
Class Materials
bonus material with purchase
Ratings and Reviews
Thomas Hamlin
Most of nature's beauty has been photographed by lots of people over the years. However, nothing compares to actually visiting famous places, buildings, mountains, etc. and taking your own photographs. John Greengo provides the necessary equipment information, photographic principles, and techniques in a manner which inspires you to put in the extra effort to take the best nature photographs that you can with the gear that you have. His unique illustrations, actual real life photographs, and easily understood explanations are top notch. I highly recommend this outstanding course. I have several of John Greengo's photography courses, and I highly recommend them all. His vast experience with film and digital photography, gained through traveling and working with some well known photographers, gives his courses a unique perspective.
a Creativelive Student
I love this course, John. It is one of my all time favorites. First of all I loved your effort scale. I knew as soon as you went through the scale that you are a guy that I want to listen to. To me, the effort part IS the fun part of photography. When you asked the question about one wish ... the first thing that came to my mind was that I wish I had more time for photography. I like the technology, but I do not wish for any special powers. To me, that would take the challenge away. Photography is wonderful because every subject challenges the photographer to get the angle right, the light right, the settings right ... I love that challenge. I think you do too, John, and that is why this course is so special. The attention you pay to every detail comes from the drive you have to meet the challenges with every thing you've got. That is why your class is so special. Your work ethic is exceptional. SandraNightski
a Creativelive Student
While delving more thoroughly into Nature and Landscape photography in a smaller format, John Greengo provides us with an amazing companion to his outstanding courses Fundamentals Of Digital Photography and Travel Photography. Here he gives us another necessary treatise to study before packing our gear and heading out in a car, a plane, a boat (or just for a long hike), and it’s as entertaining as the others. Thank you again John Greengo and Creative Live for these expert and brilliantly illustrated programs. I just hope you keep finding more subjects to photograph and provide the instructions for.