Skin Retouching in Photoshop
Lesson 36 from: Powerful Portraits using Mirrorless CamerasMiguel Quiles
Skin Retouching in Photoshop
Lesson 36 from: Powerful Portraits using Mirrorless CamerasMiguel Quiles
Lessons
Class Introduction
11:07 2What is a Mirrorless Camera?
06:30 3Mirrorless Camera Advantages
07:30 4Mirrorless Compatibility
13:12 5Live Shoot: Mirrorless vs. DSLR
07:56 6Live Shoot: A7R II, A6300 & A7ii
29:27 7Compare Mirrorless & DSLR Images
21:37 8Posing Techniques Overview
15:46Lens Choice for Mirrorless
10:59 10Savage Collapsable Backdrops Demo
11:36 11Client Portrait Shoot Overview
04:00 12Importance of Tethering While Shooting
12:40 13Lighting Set-up for Client Portrait Shoot
08:46 14Live Shoot: One-Light Client Portrait
11:58 15Live Shoot: Modifier Client Portrait
14:33 16Live Shoot: Side Lit Client Portrait
11:51 17Communication with Client
12:05 18Specific Portrait Techniques
03:43 19Fashion Beauty Shoot Overview
11:22 20Live Shoot: Beauty-Dish
23:09 21Live Shoot: Octabox
18:10 22Live Shoot: Umbrella
31:21 23One Light Set-Up for Male Portrait
07:33 24Live Shoot: One Light Male Portrait
15:50 25Live Shoot: Two Light Male Portrait
17:54 26Live Shoot: One Light with High-Speed Sync
16:29 27Live Shoot: Two Lights With High Speed Sync
17:39 28Retouching Workflow Overview
03:00 29Culling Images in Capture One
18:05 30Basic Alien Skin Exposure Workflow
17:57 31Image Editing in Alien Skin
12:56 32Add Grain to Images in Alien Skin
04:52 33Skin Retouching in Alien Skin
10:36 34Exporting Images in Alien Skin
06:42 35Cull Images in Capture One
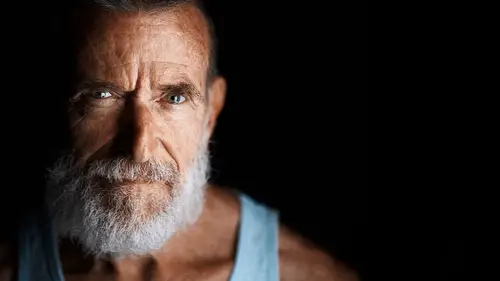
22:51 36Skin Retouching in Photoshop
22:16 37Draw Hair in Photoshop
04:53 38Finish Skin in Photoshop
23:51 39Change Backdrop Color in Photoshop
11:14 40Alien Skin Exposure Overview
15:20 41Sharpen & Add Grain in Alien Skin
09:05 42Exporting Images for Clients
06:09 43Mobile Workflow with Mirrorless
15:51Lesson Info
Skin Retouching in Photoshop
Let's take a look at Photoshop 'cause again, it's another program where there's a lot of tools, and there's a lot of things that you really sometimes are not gonna end up using. So, let's talk first and foremost, the very first thing that I do when I bring this image from Capture One into Photoshop is to basically do my skin cleanup, and this is something that is kind of an interesting thing because when it comes to skin work, you don't want to basically like, blur the heck out of the skin. And so, what a lot of people do is they'll use a technique that's called frequency separation to be able to do their skin retouching, and often times they use the technique incorrectly, and what will end up happening is you take a beauty image, where you basically have tools that allow you to capture detail and texture, and then you use a technique that basically nukes all of the texture, and all of a sudden they don't look like humans anymore. They look like you know, they're animated, or they're c...
haracters from like, a cartoon or something. People like to see texture, they like to see detail. Part of my Powerful Portraits message that I wanna get out to the world is that you know, part of what makes for a powerful portrait is that they still look like people. That they still look like human beings. This whole trend of basically using things like frequency separation to basically blur the skin to where you know, especially if you know what the person looks like and you see them, and you're like, oh, your picture looks like it's not you. You know, I drive through town and I see billboards of lawyers, like the pictures of the lawyers, and you know, it'll be like a lawyer that I know because I've seen the commercials that are like 70 years old, but then you see the picture on the billboard and they have baby soft skin, and I'm just like eh, looks kind of weird, you know? Looks like a cartoon. So, part of the process, this is a non-destructive way of editing your photo and you're able to capture, and keep your skin detail, and it's super easy. You don't have to have any plugins, you don't have to have anything special. I'm gonna show you how you do it. First and foremost, so we have our background layer. I never mess with the background layer. That always stays there. Every adjustment that I have just builds on top of that so that so that if at some point I need to get rid of it, that I'm able to get rid of it. So, first and foremost, down here you can click on Create a New Layer, which is this little page icon here, and it's gonna create a blank layer. So, right away I will go ahead and I will title this skin cleanup, and the only reason that I do this is because I'll have multiple blank layers for different things. So, for example I'll go ahead and make another one, and I'll title it stray hair cleanup, 'cause I use different tools and I want to be able to have a layer where when I cleanup the stray hairs like these, you know, wispy hairs, or any hairs that are, sometimes when they have their head turned, they'll have a hair that sticks out from the back on this side, and it's like, why is there a hair growing out of her face? So, those type of hair cleanup modifications, I want them to be on their own layer, 'cause if I have to bring it back for whatever reason, you know, I can quickly find that. So, we're gonna go to skin cleanup first. It's just a blank layer, so if you picture having like, a transparency on top of an image, this is what that blank layer is. There's nothing, you know, if I turn it off and on, you won't see anything happening. On this blank layer we're gonna select the healing brush tool, which is here in this little panel. There's spot healing brush, which basically kind of has its own algorithms. You can't sample skin it just kinda does it's own thing. You could use the healing brush tool, which is what I personally use to be able to do this, and the very first thing that you have to make sure of when you choose healing brush, is that you go up here to sample, and instead of it being Current Layer, you need to pick either All Layers, or Current & Below. Usually I'll do sample All Layers but in this case, it's basically gonna sample this layer and the one below it. If I pick Current & Below, which is good, because that's what I want. 'Cause all the information of the picture is in this background layer that's below that layer. So, I'm gonna pick that because if you don't, and here's what happens all the time, you'll forget and you're like okay, I'm ready to go. I'm ready to start retouching my image and you'll basically go ahead, and you'll get to the process where you're sampling the skin, and you start brushing, and you're like, Miguel, it's not doing anything, what's happening? The reason why it's not doing anything is because you're sampling a blank layer, like, there's nothing there to sample. So, make sure Current & Below, and now all of a sudden you're good to go. So, if you use your brackets, you can make your brush size bigger or smaller. The other thing you wanna make sure of is if you click on this area up here, these are your brush size, hardness, and spacing. I don't adjust the size from here 'cause it's quicker for me to adjust the bracket or to use my Wacom tablet to make it bigger or smaller, but I do adjust the hardness. And so, if you have the hardness at 100%, you'll basically see the outline of where it's trying to blend the two areas together, which you don't want to see. So, what I tend to do is I go to hardness and I'll actually dip this down to like, usually like 33, just as an example. And we'll go ahead and we'll zoom in here, and this is where I start to work on the image kind of close up because I need to be able to see kind of what I'm working on. On my Wacom tablet if I hit my circle, I could choose between cycling through the layers, changing my brush size, so now when I rotate this wheel on the tablet I can make the brush bigger or smaller. I could rotate the image, which I'm not gonna do, it just basically rotates the canvas, or I can auto scroll and zoom. So, if I wanna zoom into an image I could do that, push the center button and go to brush, and keep going from there. So, basically, if you have the tablet you're able to work in a much, much faster manner than if you were without it. So, let's go ahead and let's start working on this. So, I'm gonna go ahead and start cleaning up the skin here. We're gonna make this brush a little smaller and any time you're retouching, you want to sample skin that is close to the area that you're retouching, just like we were talking about in Exposure X2. So, we're gonna sample this skin and we're gonna go ahead and we're gonna brush, and we're gonna get rid of all these little stray hairs, and sometimes there's certain types of images where I basically don't really bother getting rid of the stray hairs because it doesn't add to the image. And sometimes it actually takes away because you can tell when stray hairs have been cleaned up 'cause it just looks too perfect, and you wanna try to mask the fact that you've done any specific type of like, retouching on an image. So, usually that's kind of like, one giveaway. Where it's like okay, I know that you did something because you know, it just looks too perfect. So, it's definitely something you wanna look out for. So, really quickly, I just kinda go through different parts of this image. I'm just sampling skin that is nearby in texture. And again, this isn't like any type of like, crazy preset or anything, this is just basic skin retouching using tools that are built into Photoshop. So, the other thing that I tend to tell people about when it comes to retouching is, when it comes to retouching moles and you know, pimples, and scars and stuff like that, sometimes I will get rid of things completely and sometimes I'll minimize things. So, say for example this. I'm not quite sure if that's a mole or not. For the purposes of this retouch I'm actually gonna get rid of it, but if she was famous and that was like, what she was known for, and let's say it's like, you know, she's known for that so I'm not gonna get rid of it. I'll just leave it there. If I'm not 100% sure if I should or shouldn't, I'll make a brand new layer and what I'll do is I'll basically get rid of it by sampling an area next to it, and then what you can do is, you can go to this slider here, the opacity slider, and if you start to drop that down it'll start to come back a little bit. So, it's still there but it went from here to here. So, it's not as obvious, it's not as you know, if they come back to me and they're like, oh that's my thing and you got rid of my mole. Everybody knows me for that. I'm like okay, well it's on its own layer, so I can go back to it and I could just do mole. And if for some reason they come back to me and they're like, Miguel, you got rid of my mole I'm so upset. Okay well no problem, I'll bring the opacity down to zero and your mole is back, and you can live happily ever after. So, certain areas of the skin that are like that, I'll put them on their own layer and kinda go from there. So, going back to skin cleanup, again, I'm basically just scanning through the image and I am trying to find different areas that require, that are taking away attention from what I want, which is for you to look at her eyes, and look at her beautiful, clean skin. Kinda going through this and again, when I'm doing my retouching I tend to zoom in and zoom out all the time, like very frequently, because there's things that you'll see when you're zoomed in really close that you may not notice when you're kind of pulled away. And again, all I'm doing is just, I'm holding down on a Mac Option, and when I do that I get these little crosshairs, and that's what I tap on the screen to select that skin. You wanna make sure that that's like, the clean skin, like the good skin, 'cause once you select that skin and then you brush, that's what gets rid of the imperfections, or the hair, or whatever you're trying to get rid of. So, yeah, you wanna make sure that you're picking a good area because if you pick an area that is either a different texture, or it's like a bumpy area, or whatever the case might be; when you brush over the area to fix it, it doesn't fix it, it makes it worse. So, you wanna keep that in mind. So, I'll continue to work through this, and beauty images kinda take a little while because you know, there's a lot of detail. Like, I think I captured this with a 90 Macro yesterday, with Excalibur, and so, while I love capturing that much detail, this is the point in the process where I'm like, man, maybe I should've used something else. 'Cause holy cow, it's just like, a ton of like, texture, and a ton of detail, and it's sometimes more work than what I would like to do. So, let's take a look at it really quick. This is another thing that I do often, where before I get too far in the process, I do kind of before and after so that I can see exactly what's happening and what I've done up to this point. You never want people to look at your image and say, great retouch. You know, you want them to look at it and be like, wow that's a beautiful shot, and part of that is knowing when you've gone too far. So, you have to be able to continue to evaluate your work as you go along to make sure you didn't go too far. So, let's take a look at this here, so... Good. So, the other thing as well, sometimes like, little things, like this area right here with the little highlight circle, this is another thing where you know, when you're looking at it really closely, you see that and you're like, oh that doesn't look good in a sea of you know, the rest of the pores, but if you look at the image from far away, it may not have any impact whatsoever. So, these are the little things that I basically always tell people, you have to give yourself some time to work on the image and keep zooming in and out to make sure that you, you know, don't waste your time on something that's a waste of time. And the other thing, keep moving through the image. Sometimes certain parts of the skin require a lot more work than others. Like, you'll have people that have like, really bad acne on their forehead or you know, scars on their chin or something, and you'll sit there for you know, 20, 30 minutes just working on that one area, and then you know, it gets tiring and it gets discouraging. And so, I tend to basically work on like, one area. Like, I'll work on the forehead and then I'll go to the hair line, and I'll basically fix stuff like this. Like, any weird things that we see up here. Any hair products that maybe is showing on the hair. I'll basically go ahead and just kinda keep moving through the image. I really don't stay in one spot for very long, just because I don't want to tire out my eyes from this process, so keep moving. Here's an area right here where she's got some fuzz, probably from when she was changing her clothes, so there you go. So, like that. The eyebrows are another thing. So, this happens a lot with guys. You know, we don't pay a lot of attention to our grooming sometimes, so our beard will have like, you know, a perfectly groomed beard to the public but then when you see it at 42 megapixels with a 90 Macro, you're like, oh you have hairs coming out of your nose that you didn't even notice. So, this is where this process kinda comes in handy. I usually get in really close when I go to work on the eyebrows because even like, supermodels that I've seen on set, like, you end up having to clean this up. We're human, you know? So, I think that's part of the human experience as a mammal, we have hair, except for me. I have none. Alright so, I always will back out of the image and just like I did before, I'll sometimes make it into a thumbnail just to make sure I didn't screw something up that you can see at a small, small resolution. I'm gonna go ahead and go to the nose 'cause I see there's some little stuff here that we can get rid of. So, again, just kind of alt clicking and trying to clean that up, and we'll go here. And unfortunately, so if you guys are noticing by the way, or if you're really astute, you'll notice that it's kinda lagging a tiny bit, and part of that is because the Mac that I'm using, while it is super beefy, I filled the hard drive up pretty quick. It's only a 512 gig hard drive. So, it does impact the performance. So, if you are using any programs and you start to notice that they're running like, really, really slow; you wanna make sure that you basically clear your hard drives before you do any heavy, heavy retouching like this. Don't be like me, where you're retouching and you have like, 20 gigs left on your hard drive, 'cause basically it will be very, very slow. But no excuses, you can make it happen. So, there we go, again just going through all these little bits of detail here on the nose. Getting rid of anything that might stick out and the other thing as well, is that when it comes to figuring out what to kind of like, retouch, and what not to retouch, especially in an area like this, what the human eye sees as an imperfection is where you have like, a lack of uniformity. So, if you look at something, like if I get rid of this, like, here was the before. The reason why I was drawn to this is that I see a certain texture of skin and a certain skin tone, but then all of a sudden I see colors that don't jive with everything else that's around it. It could be a pimple, it could be a hair, it could be fuzz, it could be anything. So, what I'm trying to do is get rid of those things so that it's uniform. It's just the same color, same texture. So, anything that is not of that same quality or characteristic, those are the things that I'm retouching. So, if you want kind of like, a glimpse into my mind of like, why am I working on the specific thing that I'm working on at that moment, that's what I'm trying to do. I'll see an area where I'm like, oh, it's jumping out at me 'cause it's a different texture, and I clean it up. Some of the times you have to get in very close. So, like these little areas here, make a nice small brush. We'll go ahead and brush these out. So, you can see it's kind of a very tedious process, but in the end it's totally worth it when you can post your image and everyone's like, wow, oh, ah. Gotta put in the hard work. It's like when you go to the gym. You're tired, you're exhausted, your back hurts, but that day that you put on those pants that haven't fit you since high school you're like, yeah, it's worth it. Totally worth it. Any questions from the audience, from the web? We do have a question Miguel about whether you retouch the same for web versus print. Yes, so that's a good question. So, it used to be no. I used to do a retouch that I would assume was for everything, then one particular day I printed my image and it was like, a 20 by 40 print on metal, and it looked beautiful, but as I looked at it really close up I realized that because I wasn't doing what I'm doing now, where I zoom in really, really close, I missed that there were some little fine hairs, and like fuzz, and stuff like that. That when I evaluate the image on my screen it looked great, on the web it looked great, but as soon as I got that in a 20 by 40 print I was like, oh I missed these things. And of course, once you see that you can't unsee it. So, typically nowadays, and this is part of the reason why my retouch takes so long, I retouch with the assumption that at some point it's gonna go to print. Even if it's not at the moment, you'll have a client that says, oh I just want this for my Instagram, or I want it for my LinkedIn, or I want it for whatever, so you edit to that level, but then one day they're like, oh by the way I tried to print this for my, you know, billboard down the road, and there's all these like, weird things on the picture that you didn't retouch. So, nowadays I retouch specifically for prints, even though it's going on the web. 'Cause even though you won't ever see it this close on the web, one day you might print it really big, and you will see that detail, so... Thank you. Good question. Go ahead and brush over here. And so, again, you can see that this method of being able to clean up skin, while it's very time consuming, it's gonna give you a kind of like, a very clean look that doesn't really look so much like you used a filter, or you know, used some kind of preset, or something like that. It's a very non-destructive way and a very concealing way for you to edit imperfections in the skin. So, let's keep going through here. I'm gonna make the brush a little bit bigger. Part of the particular reason that you don't wanna make the brush super, super big as you're retouching, is that, then you really start to see where you retouched, where your brush strokes were. So, you really wanna make sure that you kinda keep changing your brush size as you go around, so that you don't end up having certain areas where you could tell, like, oh you healed, or you cloned, or you did anything. We want it to look very smooth, very natural. Same thing here. That's good. Good. And I just keep movin' around. So, here in this area, we're seeing some stuff here. So, I'm gonna try to clean up as much as I can using this tool and honestly, for my retouching process, this is probably the most labor intensive part of retouching a portrait, is this process of you know, healing the skin. Everything else from this point forward is like, smooth sailing, but yeah, this is the most time consuming part of any retouch for me is just trying to get the skin nice. If you find this process to be very tedious and time consuming, and that it sucks away your life, you could hire retouchers for very little money that basically this is all they'll do for you is just to kind of clean up the skin, and then you could go afterwards and you can do your own, you know, post processing to the image. So, I always tell people that. Like, if you really hate this process, hire somebody to do it. If you are the type that you're really busy and you're finding that your clients are waiting a long time because you take an hour plus to retouch a photograph to get it to look perfect, and it's affecting your sales and your day to day work, then just outsource the retouching.
Class Materials
Bonus Materials with Purchase
Bonus Materials with RSVP
Ratings and Reviews
a Creativelive Student
I want to commend you for hosting Miguel Quiles. He is beyond competent and knowledgeable. Light is Light, but It is encouraging to see incredible minority photographers on your platform and to see diversity in the presenters. It is inspirational for minorities to see themselves on the center stage. I sincerely thank you for that. I am buying this course although I am not a mirrorless shooter because of my support of Miguel and the quality of his instruction of which benefits all photographers. He is a great addition to the Creative Live Family of Presenters that I have supported as well. Kudos Creative Live!
Danae Khan Jones
Wow! As a Newb and someone looking to get into portrait/studio photography, this course was perfect and comprehensive. SO MUCH GOOD CONTENT. Miguel is so approachable about questions, positive, and thorough in his explanations. This course broke down the gear and technical side very well. I recommend going to a class live. It was a great experience with food and beautiful facilities. The facility has a positive vibe and really encouraged me to be creative. Thank you for the experience and knowledge!
Sharon
WOW!!! I LOVED THIS CLASS!!! I learned so much. He made lighting soooo simple, I finally understood. I liked the way he explained the why of his camera settings and how to overcome ambient light. he explained and made everything simple!!! I liked the way he talked about connecting with your clients. I am so happy I purchased this class. I finally understood lighting What a great teacher!! Thank you!!
Student Work
Related Classes
Portrait Photography