Live Shoot: Two Lights With High Speed Sync
Lesson 27 from: Powerful Portraits using Mirrorless CamerasMiguel Quiles
Live Shoot: Two Lights With High Speed Sync
Lesson 27 from: Powerful Portraits using Mirrorless CamerasMiguel Quiles
Lesson Info
27. Live Shoot: Two Lights With High Speed Sync
Lessons
Class Introduction
11:07 2What is a Mirrorless Camera?
06:30 3Mirrorless Camera Advantages
07:30 4Mirrorless Compatibility
13:12 5Live Shoot: Mirrorless vs. DSLR
07:56 6Live Shoot: A7R II, A6300 & A7ii
29:27 7Compare Mirrorless & DSLR Images
21:37 8Posing Techniques Overview
15:46Lens Choice for Mirrorless
10:59 10Savage Collapsable Backdrops Demo
11:36 11Client Portrait Shoot Overview
04:00 12Importance of Tethering While Shooting
12:40 13Lighting Set-up for Client Portrait Shoot
08:46 14Live Shoot: One-Light Client Portrait
11:58 15Live Shoot: Modifier Client Portrait
14:33 16Live Shoot: Side Lit Client Portrait
11:51 17Communication with Client
12:05 18Specific Portrait Techniques
03:43 19Fashion Beauty Shoot Overview
11:22 20Live Shoot: Beauty-Dish
23:09 21Live Shoot: Octabox
18:10 22Live Shoot: Umbrella
31:21 23One Light Set-Up for Male Portrait
07:33 24Live Shoot: One Light Male Portrait
15:50 25Live Shoot: Two Light Male Portrait
17:54 26Live Shoot: One Light with High-Speed Sync
16:29 27Live Shoot: Two Lights With High Speed Sync
17:39 28Retouching Workflow Overview
03:00 29Culling Images in Capture One
18:05 30Basic Alien Skin Exposure Workflow
17:57 31Image Editing in Alien Skin
12:56 32Add Grain to Images in Alien Skin
04:52 33Skin Retouching in Alien Skin
10:36 34Exporting Images in Alien Skin
06:42 35Cull Images in Capture One
22:51 36Skin Retouching in Photoshop
22:16 37Draw Hair in Photoshop
04:53 38Finish Skin in Photoshop
23:51 39Change Backdrop Color in Photoshop
11:14 40Alien Skin Exposure Overview
15:20 41Sharpen & Add Grain in Alien Skin
09:05 42Exporting Images for Clients
06:09 43Mobile Workflow with Mirrorless
15:51Lesson Info
Live Shoot: Two Lights With High Speed Sync
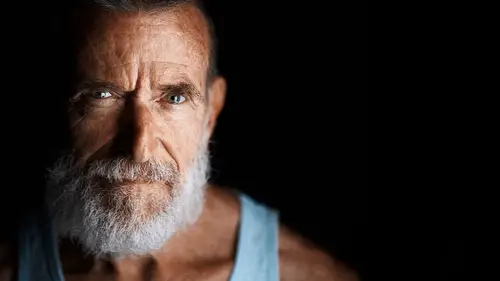
I'm actually going to do the same thing using two lights. Because this is where high-speed sync kind of comes in handy is the fact that if I add two or three lights that I can still shoot wide open and it doesn't blow out the image. So we're going to do the same setup that we had before except with one small adjustment. I'm going to take this light. We're not going to flag it this time. Pull this thing away. And if you remember in the beauty portion of the class I had discussed that I really like taking images where I'm basically trying to mimic window light, so I'm sitting or standing in front of a window and then that light is what's lighting the subject. And this is one of those scenarios where I love to do that is doing this style of a portrait. This is totally like off the cuff, it might not be in the notes for what I was going to teach. But, you know I'm an artist so sometimes I get crazy ideas and I just have to go there and hopefully it works out great. So these modifiers by th...
e way, you notice before it was upright, there are little dials on the back of this that basically tightened the soft box so that I just loosen it and now I could have a horizontal orientation for the soft box. And usually what I'll end up doing to figure out the height of this because I'm going to stand in front of it is I kind of want the strobe head to be at the same level as my head so that that way the light wraps around me. So I'll basically drop this to here. So that's again approximating where I want the light to actually be. And what I'm going to do is I need to position this in such a way to where I can stand in front of it with an 85mm lens and it will still focus. So here's what we'll do. Same exact settings as before and I'm an 8th power on that and I think I'm at an 8th on this one. So, let's see what we got here. So we're going to take a portrait shot. (man speaking indistinctly) Maybe, let me see, let's take this one. Alright. So looking at this particular shot I'm going to make some adjustments here. Because you can see that the hair light from behind is very bright. It's a little too intense for my particular liking. I'm not trying to go for focus here, again, as I'm trying to get the lighting. I always have to say that when I'm teaching these. And also I haven't guided him yet to make sure that he's looking straight. But it looks like the lighting here, our main light is a little on the low side. So I actually want to brighten that and I want to tone down the light from behind. So I'm going to go from 8th power to a quarter power. And then, again, all the settings are the same as they have been, so there's still at 4th power or f1.4 1/2500 of a second ISO 100. I'm going to get rid of the apple box and here we go. And I'm actually using the back of the screen. I'm super pro right now. Every time I do this in photography workshops where there's photographers that, like we're shooting film back in the day they always like scoff like, "Oh, you look like such a noob." but it works. In scenarios like this, it's so great for me to just one hand hold this, look through the Live View. Hold that, hold that, hold that. So I got to figure out how far I need to be to get this to focus, which is right here. Now bring the chin this way. Very nice, just like that. Excellent. Hold on right there. Very good. So now it looks like my light is a little too high. Our main light is very bright, so I'll go down. Still at a quarter power. Quarter and -2/3 power. So we'll dial it down just a touch because now the hair light and the main light are kind of mixing up quite a bit. But now at least we're getting eyes in focus. And look at that. That's me right there. I always joke around and I tell people that that's my watermark. Everyone asked me like, "Do you watermark your images?" And typically the answer is no, unless I'm doing this style of portrait in which case I do watermark them, I'm in the catch lights. There we go, very nice. Hold that. Excellent. So what I want you to do is have your shoulders mirror me and squared, just like that. Just like that, it's awesome. Excellent. There we go, very nice. Love it. Excellent. John, could you bring the light in a little closer to him? It'll give a second here for these images to load up. There we go, very nice. Actually bring it even closer. Curious here. We're baking cakes here, we got to add a little extra sugar, a little extra powder here, very nice. Excellent. Very good, I like that. Excellent. There we go. It's always good photographing actors by the way because they're very good at giving different expressions. Excellent. Now what I want you to do, tilt the head that way and you're like, "Who is this guy?" Yeah, just like that. Excellent. Very good. I like that. You never know what you have to say to somebody to get them to give you the look. And so this is where I kind of I'm always telling people that you have to communicate with the subject. Because I could tell somebody I want you to do this type of character and then you take their shot and it's still like, you're not getting it. And so you have to keep talking because maybe the way you explained it you can't get it out of them but then you explain it a different way and all of a sudden you start to get the shot. So, like here, I told him, I said, I want you to look at me and I want you to basically look at me and say like "Who is this guy?" And as soon as I said that, now he's giving me that type of emotion and that type of intensity where it's like, "Who the heck is this guy?" And if I would just tell him, tilt your head and look angry or look grumpy, he might not give me a look like this. So I'm going to zoom into this so we can see and it looks like both are fairly sharp, let's see. A little sharper. That sharp, I like that. So part of this trick and part of the reason why I like doing this setup where we're shooting wide open is that, if you look at this particular image. The way that in theory that it should look and these kind of vary from shot to shot, you want to get the eyes nice and sharp and in focus. You're going to get part of the face where it's going to be sharp and in focus. You're going to get the nose slightly out of focus where it works really great. And part of the reason why I love doing this with gentlemen who have beards is that you get this really interesting look, where you'll have some of the hairs are sharpen in focus, some are blurry, the lips are sharp, and then you start to get this fall-off around the edges where it goes out of focus and then the ears go completely out of focus. A little bit of the foreheads in focus, some isn't. But if you look at this shot and especially if I crop it in a little bit closer. What you'll end up getting is you have this image that has like a 3D pop to it. So if I shot this at like we did earlier at f11 or f8, you have everything in focus so it just looks like a very static image. But if you shoot it using a wide open aperture, so 1.4, an f/1.2, you start to get that blur and so from the viewers perspective it almost looks like they're coming out of the image, like they're coming out of the darkness or out of whatever color background you happen to have. So that's why I use this particular method of shooting wide open using high-speed sync because I want to be able to get it wide open and have that like, "I'm coming out of the picture to come and get you" type of look. Any questions at this point? We did, Miguel, have a couple of questions come in. And one was a clarification for Shree Photo who says, "I noticed that when I increase my power of light "even when my exposure is correct, I lose detail. "What should I do in this case?" Can you talk about that again, that too bright, losing detail? Yeah. So in that type of scenario they did they say if they're shooting high-speed sync or if they're shooting regularly? I'm not sure. So if you are losing detail then part of the issue could very well be that you're not shooting in high-speed sync. Because if you have an image for example that, I'm presuming this is what they're saying where it's like this. Or maybe even worse where it's like super, super bright and you don't have detail in the shot it's just like white. In that scenario, your flash power is too bright. So you can lower it down, theoretically. I don't know what your settings are, but if you lower it all the way down, hopefully you'll be able to get an image that's not super blown out. But if you have it at the lowest power setting for whatever that strobe is and you still have a light grenade to the face like this, then you have to use either one of two things. You will either use high-speed sync to be able to control the exposure to make it darker and then you will start to come back and get some of that detail in the skin that wasn't there before. Or you can use a neutral density filter if you happen to have an expensive strobe and a regular trigger that doesn't have that ability. You can use either a two or a three stop ND filter, put that in front of your lens and that will knock down the exposure and hopefully be able to get you where you have a little bit more detail in the shot. So either one of those two things. Lower the power, or three things. Lower the power all the way or use high-speed sync or use a two or three stop ND filter and that will allow you to shoot wide open. The ND filter versus this high-speed. It sounds like you prefer this method. Yeah. Is it because it has greater detail or the images come out better than... So it's a good question. So part of the reason why I like doing this style of image with high-speed sync is that you get sharper images. So here's what happens. If you take a two or a three stop ND filter, it's basically like putting sunglasses on your lens. So what'll end up happening is you'll put this dark piece of glass on your lens and you try focusing and your camera will give you the confirmation that it's in focus. And then you take the shot and all of a sudden you evaluate it and you're like "Oh my gosh, it's not in focus." But the camera beeped and said it was in focus. But what it can account for is the fact that you have these sunglasses on the lens, so it's being told that it's in focus but it really isn't. So I started to realize when I shot this style very early on, I realized that when I would use my 3-stop ND filter that I had like two out of 10 that were coming out in focus. If you use a tripod you get a little bit of a higher hit rate. But the camera was basically being thrown off as far as the focus, and this is with a DSLR or mirrorless, it still was the same thing, where it's being told that it's in focus but when you evaluate it, it isn't. So part of the reason why I like high-speed sync is that I don't have to put anything in front of my lens, I can actually get the exposure that I want by playing with the power settings and playing with the settings on the camera instead of obstructing the lens. I'm not going to say that one is better than the other because you could definitely find ways to use an ND filter to do it. Like what I eventually started to do is I would have this on a tripod. And again the ND filters that I would use are on a holder. So what I would do is I would pre-focus, so I'd do one of these numbers. I'd focus and I would have the glass off and then once I hear the beep I would slide the glass down and then take the shot. It's a pain in the neck, but sometimes you got to do what you got to do with what you have to be able to capture the shot. And that kind of takes me to another thing too, which is that, sometimes in your pursuit of trying to capture a certain type of look, you might say, "Oh well, you know this isn't working "and I don't have the right gear "to be able to capture the look that I want." And I think in an earlier part of this I talked about how you kind of need to be like MacGyver. So there's no excuse. Use the stuff that you have to capture the image that you want to capture. You can't say, "Well Miguel, "I don't have high-speed sync, so I can't take this shot." No, you totally can. It's going to be a little bit of a pain in the butt because you're going to have to use an ND filter, you're going to have to slide it out of the way, pre-focus, slide it back in. What I ended up starting to do as well was, instead of putting it on the holder I actually just held it in my hand and I would move it out of the way and then I would just put it over the lens and then take the photo. But you have to be careful because depending on the position of your light sometimes the light kind of comes in from the, in between the lens hood or in between the lens and the glass, some light bleeds in and then it kind of affects your exposure. But again you do what you got to do to get the shot. Like I've MacGyver'ed stuff. I've had images that I've posted online where I'm like, I can't show you the BTS because it's so jerry-rigged that you would look at it and be like, "Dang, Miguel. "You get the stuff that you need to really take the shot?" But you would never know. You'd look at the shot and you'd be like, "Wow, that's great." And you don't know the fact that I'm like standing like this with a fan that's like, I'm holding the fan up with my leg and trying to get the type of look that I need. So good question. I know you talked about this a little bit earlier but can you clarify again what you meant when you said that you're mirrorless camera can adjust dynamic range. Was that possible with DSLRs? Yes. So it is possible with a DSLR. However, you cannot recover as much with a DSLR. So let's say, these are, if you look at your camera and if you look at capture one for example. If you are let's say two stops underexposed with a DSLR maybe even sometimes two-and-a-half stops underexposed. If a shot was this dark with a DSLR you could bring it back up and post and brighten it up to be the proper exposure. The cool thing with a mirrorless camera is you can have a shot, which I'll go back to it. You could have a shot where, like we were trying to negate the light here and you could see that this shot is way underexposed. If you look at the histogram you see there's like no detail in the mids, no detail in the highlights, this is underexposed big-time. This would be a shot that you look at on your computer and you say, "There's no photo there, keep moving." But, with a mirrorless camera because they have extremely high, in the case of the a7R II, the a7 II has great dynamic range. The a7S II is a beast, it has ridiculous dynamic range to where you could shoot pitch dark and you can still get shots that have color which is some kind of weird witchcraft stuff, I don't know how it does it. But you could take an image like this and I can bring it up four stops and all of a sudden we actually have a picture. Now granted this, I wasn't trying to get a properly focused image so I'm not, don't look at this and think like, "But Miguel, it's out of focus." I know that, because I was testing the light. But if you look at this, this is where it was in the camera and because of the dynamic range of the camera I can go up four stops and all of a sudden we have a shot that looks like the other images that we shot where it's properly you know exposed and properly in focus. So it's pretty powerful. And this is something that people use all the time. If you're a natural light shooter, oftentimes people will shoot underexposed to be able to preserve the details and the highlights of an image. And so they'll shoot a little underexpose so they'll expose for the highlights in an image. They go into their post processing software, the software, whether it's Capture One or Alien Skin Exposure and you're able to go ahead and boost up the exposure and now all of a sudden, you have a shot. It's beyond, beyond amazing.
Class Materials
Bonus Materials with Purchase
Bonus Materials with RSVP
Ratings and Reviews
a Creativelive Student
I want to commend you for hosting Miguel Quiles. He is beyond competent and knowledgeable. Light is Light, but It is encouraging to see incredible minority photographers on your platform and to see diversity in the presenters. It is inspirational for minorities to see themselves on the center stage. I sincerely thank you for that. I am buying this course although I am not a mirrorless shooter because of my support of Miguel and the quality of his instruction of which benefits all photographers. He is a great addition to the Creative Live Family of Presenters that I have supported as well. Kudos Creative Live!
Danae Khan Jones
Wow! As a Newb and someone looking to get into portrait/studio photography, this course was perfect and comprehensive. SO MUCH GOOD CONTENT. Miguel is so approachable about questions, positive, and thorough in his explanations. This course broke down the gear and technical side very well. I recommend going to a class live. It was a great experience with food and beautiful facilities. The facility has a positive vibe and really encouraged me to be creative. Thank you for the experience and knowledge!
Sharon
WOW!!! I LOVED THIS CLASS!!! I learned so much. He made lighting soooo simple, I finally understood. I liked the way he explained the why of his camera settings and how to overcome ambient light. he explained and made everything simple!!! I liked the way he talked about connecting with your clients. I am so happy I purchased this class. I finally understood lighting What a great teacher!! Thank you!!
Student Work
Related Classes
Portrait Photography