Live Shoot: One Light Male Portrait
Lesson 24 from: Powerful Portraits using Mirrorless CamerasMiguel Quiles
Live Shoot: One Light Male Portrait
Lesson 24 from: Powerful Portraits using Mirrorless CamerasMiguel Quiles
Lesson Info
24. Live Shoot: One Light Male Portrait
Lessons
Class Introduction
11:07 2What is a Mirrorless Camera?
06:30 3Mirrorless Camera Advantages
07:30 4Mirrorless Compatibility
13:12 5Live Shoot: Mirrorless vs. DSLR
07:56 6Live Shoot: A7R II, A6300 & A7ii
29:27 7Compare Mirrorless & DSLR Images
21:37 8Posing Techniques Overview
15:46Lens Choice for Mirrorless
10:59 10Savage Collapsable Backdrops Demo
11:36 11Client Portrait Shoot Overview
04:00 12Importance of Tethering While Shooting
12:40 13Lighting Set-up for Client Portrait Shoot
08:46 14Live Shoot: One-Light Client Portrait
11:58 15Live Shoot: Modifier Client Portrait
14:33 16Live Shoot: Side Lit Client Portrait
11:51 17Communication with Client
12:05 18Specific Portrait Techniques
03:43 19Fashion Beauty Shoot Overview
11:22 20Live Shoot: Beauty-Dish
23:09 21Live Shoot: Octabox
18:10 22Live Shoot: Umbrella
31:21 23One Light Set-Up for Male Portrait
07:33 24Live Shoot: One Light Male Portrait
15:50 25Live Shoot: Two Light Male Portrait
17:54 26Live Shoot: One Light with High-Speed Sync
16:29 27Live Shoot: Two Lights With High Speed Sync
17:39 28Retouching Workflow Overview
03:00 29Culling Images in Capture One
18:05 30Basic Alien Skin Exposure Workflow
17:57 31Image Editing in Alien Skin
12:56 32Add Grain to Images in Alien Skin
04:52 33Skin Retouching in Alien Skin
10:36 34Exporting Images in Alien Skin
06:42 35Cull Images in Capture One
22:51 36Skin Retouching in Photoshop
22:16 37Draw Hair in Photoshop
04:53 38Finish Skin in Photoshop
23:51 39Change Backdrop Color in Photoshop
11:14 40Alien Skin Exposure Overview
15:20 41Sharpen & Add Grain in Alien Skin
09:05 42Exporting Images for Clients
06:09 43Mobile Workflow with Mirrorless
15:51Lesson Info
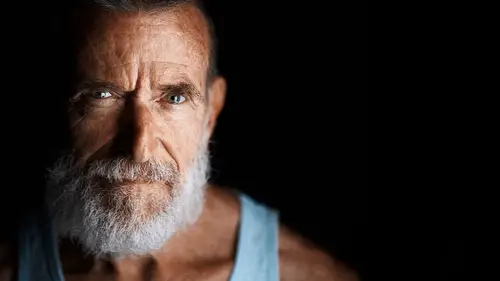
Live Shoot: One Light Male Portrait
We're at F8, 160. I don't know if these are gonna be my settings. Often times when I'm shooting this is what happens. I'll dial in what I think are going to be the correct settings. I'll take a test shot and I'll evaluate from there. And make adjustments from there if necessary. So let's flag it to where it's not throwing light on the background. Yeah. Yeah. That's not gonna get too much light. And we'll do it like this. And then I'll have you stand right in front of me here. Very good. And so, what I want you to do for this particular shot, you're gonna be mirroring me like this. And I want you to tilt the head this way. A little bit more. Very good. And bring the chin up just a touch and down. Very good. And we're gonna do kind of like a blue steel, very serious look right now. Excellent. I'm just gonna test the light real fast. Excellent. This might be a really bad example. 'Cause I was hoping to be way out of the ballpark. And it's not terribly out of the ballpark. Kind of happens ...
after a little while where you kind of, you just know what your settings need to be. You know where your lights need to be. It used to be before that my settings would be way off. And now I'm usually in the ballpark of where I wanna be. So looking at this particular shot, our exposure looks good. Focus is good. I'll check the highlight warning. So, we're getting a little bit of, basically overexposed areas here in the shirt. But it's totally okay because, again, you can go, and actually it looks like our highlight has been modified here. So, you can actually bring up your highlight slider. And this is in exposure or in capture one or in LightRoom, any post-processing software, usually has a highlight recovery. And because it's on the shirt, I'm not really too worried about it. Like, if this red area was on his face somewhere then I would be a little more concerned. And I'd try to make sure that it's not coming out that way. But we're looking pretty good. So, I'm gonna go ahead and actually I kind of like this exposure. It doesn't look bad. I'm actually gonna have you take a little step closer to the light. So what I'm trying to do is right now, we have a very dark area on the right side of the frame. So if I bring him in a little bit closer, hopefully that'll soften up the shadows a touch. So, let's give this a try. I haven't changed any settings. Everything is still good. Very nice. And actually do we have, happen to, let me grab this apple box here. Didn't know he was gonna be so tall. I'm six foot. But, sometimes when you're photographing somebody that's also tall, you're kind of shooting up at them. And you don't really wanna do that. So you wanna make sure that, and this is actually another good thing to mention, camera height. So, typically for this type of headshot I'm either photographing them a touch above the eye level, right at eye level, or a touch below the eye level. I'm never shooting up at them. And I'm never doing the Instagram selfie shooting down type of portrait. I don't do those. For any portraiture. So basically, you either wanna be at eye level, just above, or just below. And, where exactly you'll land, just kind of depends on the person and the mood and what you're going for. And we'll kind of start to work on mood and expression here momentarily. I'm gonna bring this a little closer. And, here we go. Let's take another quick test shot here. See how my height has affected or if it has affected the exposure. So we're looking pretty good. Awesome. All right. So, now that we have our baseline settings of what we're trying to go for with this image and the lighting, now comes the interaction and the storytelling for your subject. Because part of capturing a powerful portrait, you can get it technically correct and still have kind of a dud for a shot. And part of being able to get that powerful portrait is being able to get your subject to buy into this character that you really have to create on the fly. You have to get very quick at coming up with stories and getting someone to play a character. And so, the very first time that I met David earlier this morning, I looked at him and I said, you know, he kinds of reminds me of like a Sean Connery type. Like, kind of like a double o seven, you know, very like, like smooth, but he'll shoot you in the face type of look. Which is great. So, I want him to play that type of character. I want him to play kind of like that double o seven very smooth and dapper. But dangerous like, dangerous type of look. So, that's what we're gonna go for. I want you to kind of harness your inner Sean Connery. And so, I want you to kind of pretend like, you've just met the, your nemesis, your adversary. And he doesn't know who you are. He doesn't know that you have all these skills that you've, you know, you jump across buildings and know how to shoot different weapons and you have a sweet car. So he doesn't know that. And that's me. I'm the photographer. I'm your nemesis. And so I want you to kind of look into the camera. And I want you to have that like, serious, no-joke, like I'm not taking BS. Like I'm, we're talking right now and we're cool, but I know later on down the line I'm gonna have to kill you. That's the look that I want you to go for. So, bless you. So, here we go. So we're good there. Tilt the head a touch that way. Bring the chin out and down just a pinch. There we go. Just like that. Very good. Hold that. Excellent. Love that. Very good. Hold that. Excellent. Here we go. One more. And now I want you to give a little more intensity. I'm scared right now. But I need to be more scared. Very, with the eyes closing down. Just like that. So what I'll tell people with the eyes is, you know if you go to the eye clinic to get your eyes checked, I don't know about you, I go all the time, my eyes are terrible, and you look at your chart. And so you'll start at the biggest letters and it gets gradually smaller. So what I'll do is, if you're looking at that, I'll tell you, go up a line. And that means open the eyes more. If I tell you to go down a line, it means close the eyes just a pinch. There we go. Very nice. Oh, go up a line. There you go. Excellent. Bring the chin down just a pinch. There you go. Nice. Very good. Excellent. One more. And we'll change our focus here. Excellent. Let me take a look at a couple of these. So while I review these, do we have any questions so far from the interwebs or the audience? Well one question, can you just again, for Sunrise, tell us what the size of that soft box was? Or is? Yes. So the Luna Octa. There's only one of these. So if you go to the Phottix website, it's the Luna soft box. I wanna say it's 40. (assistant speaking faintly) 28 by 40 sounds about right. But if you go to the Phottix website and look up the Luna soft box, you'll get the exact specs. I'm not sure exactly what the numbers are. But it's a pretty decent sized, a pretty decent sized soft box. And that's also part of achieving the look is basically getting a large modifier 'cause it's gonna give you this really soft, beautiful light quality. And, I don't know if anybody has asked this yet, but I'm asking this, 'cause again I'm like teacher and student at the same time right now, so somebody might be thinking why am I using the flag to begin with? Like, what's the purpose? What's the point? So, if we look at our image here, and we check out the catch lights. So, you're gonna notice that the catch lights look kind of interesting. You have kind of just this like sliver of light that is reflecting in the eyes. And often times the catch lights kind of make the image look different and it kind of draws attention. If you have for example, let's do that shot without the soft box. Or without the flag. And we'll take the same shot here. Just as a point of comparison. I'm actually gonna change my settings, 'cause without the flag it's actually over-exposed. So, there we go. Perfect. So, I had to take my settings to F to be able to get a similar comparable exposure without the flag. And if you look at the catch light in the eye especially the eye that's closest to the soft box, you see like a huge catch light. And he has these awesome, they're blue or green? Hazel. Hazel. He's got these beautiful hazel colored eyes. But because of the catch light, basically covering a good portion of that catch light, or that color of his eye, you can't really see it as well. You can't really appreciate it. And so, looking at it here, you start to see a lot more of the color of his iris. Which looks a lot more interesting. It's a lot more engaging. So for me, I tend to flag my lights so that I can create those really, almost like, cat eyes. You know, kind of a, just a different type of catch light. Compared to something like this. Where, I don't know, to me, that doesn't look as appealing. Again, if that looks great for you, cool. You know, roll with that. I'm not gonna tell you that, like this is the way to do it. I'm not that photo competition guy that says, no, you fail. 'Cause it's, you know, catch light isn't perfect. But, this for me, is a lot more engaging than it is to have the whole catch light showing. Yeah, I love how much attention to catch lights that you have and I know earlier in the class you were talking about studying catch lights in magazines and how important that is. And I think that's really what makes, these subtle things make such a difference. And what Photopha had observed was wondering if you were mimicking using a strip light in that vertical position by doing that flagging? Yes. Yes. Very much so. But to where a strip bank, you know, basically you have that strip bank size and you can't really do too much with that. Using an actual soft box and using the flag you have a little bit more control over the shape of the light. So, as an example, let's do kind of like an l configuration. So what we'll do is we'll bring it up to like here. So we'll just flag off the top quarter of the soft box. And I'll show you how the catch lights kind of change up a bit. 'Cause it might be easier to show than to kind of describe here. So, little step closer. There you go. And so, I'm looking, and you can actually see, and this is another one of the cool things having the modeling light on these strobes is you can actually look at his eye and you can see the pattern in the reflection or those catch lights. You can see what it's gonna look like before you actually take the shot. Which is kind of nice. So, I think this is gonna give us that l pattern. But we'll test it. Very good. All right. So, with the strip bank it will be a little bit harder for you to kind of like, do some different things with the catch lights. So like here, you could see, like I can kind of change the shape of the catch light a little bit bigger just by flagging off a portion of the soft box. For me still I kind of just like the small sliver of light. But, if I wanted to get a little tiny bit of an l here, we can kind of flag this off a little bit different. So, let's actually try that. Let's do that same configuration one more time. And then, I'm gonna have you, actually you're standing perfectly. Let's bring this down. And actually let's do this. Put it off angle, just like that. Nice. Perfect. There we go. Let's hold that. Excellent. So, with the strip bank, you could just basically get like that first shot where it just has the small little sliver of a catch light. But using a soft box, and then having the foam core board, you can kind of create some different shaped catch lights. Which again, I mean these are not personally my favorite pics. But, you know, it's something that it kind of adds a little bit of interest and dimension. A lot of the things that, the elements that kind of make for a powerful portrait is the fact that you have catch lights that are interesting. That are different than what people normally see. And especially for studio work, if you just used you modifiers in the same way that everybody else uses them, you're gonna get the same look. And people will just scroll right past your stuff. You know, part of my goal with shooting a powerful portrait is to capture what I call a scroll-stopper shot. And we've seen those shots on social media before. Where, or even in magazines, where you're flipping through and you're flipping through, and you see a bunch of just regular photos, everyday photos. And all of the sudden you flip, and you stop and you see this one image that it's like wow, that looks different. I don't know why it's different. The person's more engaging. The lighting is interesting. It just stops you in your tracks. And that's what I'm trying to do. Now, if you stop and look at an image, and this is another thing that I, I'm gonna get on my apple box for this one, all right, so, there are times where you are trying to capture the scroll-stopper and you take that shot and you've achieved that. And so when people stop and they look at the image they're going to make a decision. They're either gonna look at the image and identify whether they like it or they hate it. And, for a lot of people, people get very, I don't know, they get hurt when somebody stops and comments on their image and says, oh, I don't like, for example, the one thing I get all the time, oh, well the shadow area on the side of his head, like, it'd be great if you added a kicker. Or, you know, whatever the case might be. But the thing is, I actually got the action that I wanted, which was to get them to stop and evaluate. And whether you love the image or you don't, I still consider that a victory as the photographer. Because I got you to stop from your everyday life, and from everything that you're doing, to stop and evaluate the photo. To where you probably saw tens of thousands of photos throughout the course of your week where you don't even remember them. They don't even, they're not even a blip in your mind. But these shots are enough to basically make you stop and stare. And if you walk away from it saying you really loved it, great. If you walk away saying, I really didn't like it for whatever reason, that's great too. But I still feel great, 'cause you stopped, and you stared, and you evaluated. And that's all I want. And that's art. You know, we'll look at a Van Gogh piece and you'll have five people that'll look at it and someone will say, wow, that's amazing. It's this and it's that. And someone else is like, oh it's just a bull. You know. So that's art. And we have to be okay with that as artists that some people will look at our images and love it. And some people will look at it and hate it. And that's okay. And I'll get off my apple box.
Class Materials
Bonus Materials with Purchase
Bonus Materials with RSVP
Ratings and Reviews
a Creativelive Student
I want to commend you for hosting Miguel Quiles. He is beyond competent and knowledgeable. Light is Light, but It is encouraging to see incredible minority photographers on your platform and to see diversity in the presenters. It is inspirational for minorities to see themselves on the center stage. I sincerely thank you for that. I am buying this course although I am not a mirrorless shooter because of my support of Miguel and the quality of his instruction of which benefits all photographers. He is a great addition to the Creative Live Family of Presenters that I have supported as well. Kudos Creative Live!
Danae Khan Jones
Wow! As a Newb and someone looking to get into portrait/studio photography, this course was perfect and comprehensive. SO MUCH GOOD CONTENT. Miguel is so approachable about questions, positive, and thorough in his explanations. This course broke down the gear and technical side very well. I recommend going to a class live. It was a great experience with food and beautiful facilities. The facility has a positive vibe and really encouraged me to be creative. Thank you for the experience and knowledge!
Sharon
WOW!!! I LOVED THIS CLASS!!! I learned so much. He made lighting soooo simple, I finally understood. I liked the way he explained the why of his camera settings and how to overcome ambient light. he explained and made everything simple!!! I liked the way he talked about connecting with your clients. I am so happy I purchased this class. I finally understood lighting What a great teacher!! Thank you!!
Student Work
Related Classes
Portrait Photography