Live Shoot: Two Light Male Portrait
Lesson 25 from: Powerful Portraits using Mirrorless CamerasMiguel Quiles
Live Shoot: Two Light Male Portrait
Lesson 25 from: Powerful Portraits using Mirrorless CamerasMiguel Quiles
Lesson Info
25. Live Shoot: Two Light Male Portrait
Lessons
Class Introduction
11:07 2What is a Mirrorless Camera?
06:30 3Mirrorless Camera Advantages
07:30 4Mirrorless Compatibility
13:12 5Live Shoot: Mirrorless vs. DSLR
07:56 6Live Shoot: A7R II, A6300 & A7ii
29:27 7Compare Mirrorless & DSLR Images
21:37 8Posing Techniques Overview
15:46Lens Choice for Mirrorless
10:59 10Savage Collapsable Backdrops Demo
11:36 11Client Portrait Shoot Overview
04:00 12Importance of Tethering While Shooting
12:40 13Lighting Set-up for Client Portrait Shoot
08:46 14Live Shoot: One-Light Client Portrait
11:58 15Live Shoot: Modifier Client Portrait
14:33 16Live Shoot: Side Lit Client Portrait
11:51 17Communication with Client
12:05 18Specific Portrait Techniques
03:43 19Fashion Beauty Shoot Overview
11:22 20Live Shoot: Beauty-Dish
23:09 21Live Shoot: Octabox
18:10 22Live Shoot: Umbrella
31:21 23One Light Set-Up for Male Portrait
07:33 24Live Shoot: One Light Male Portrait
15:50 25Live Shoot: Two Light Male Portrait
17:54 26Live Shoot: One Light with High-Speed Sync
16:29 27Live Shoot: Two Lights With High Speed Sync
17:39 28Retouching Workflow Overview
03:00 29Culling Images in Capture One
18:05 30Basic Alien Skin Exposure Workflow
17:57 31Image Editing in Alien Skin
12:56 32Add Grain to Images in Alien Skin
04:52 33Skin Retouching in Alien Skin
10:36 34Exporting Images in Alien Skin
06:42 35Cull Images in Capture One
22:51 36Skin Retouching in Photoshop
22:16 37Draw Hair in Photoshop
04:53 38Finish Skin in Photoshop
23:51 39Change Backdrop Color in Photoshop
11:14 40Alien Skin Exposure Overview
15:20 41Sharpen & Add Grain in Alien Skin
09:05 42Exporting Images for Clients
06:09 43Mobile Workflow with Mirrorless
15:51Lesson Info
Live Shoot: Two Light Male Portrait
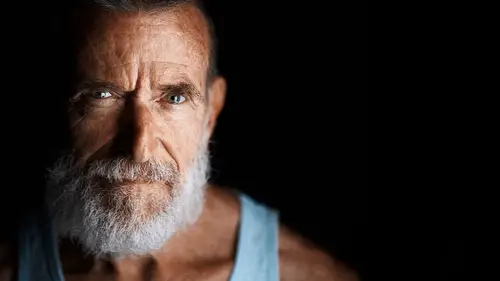
Alright, so, I'm actually gonna do a two light setup here, so, for those people who are wanting to see that kicker light because they don't like the shadows, we're gonna add a second light for this shot. And so what we have is, I've got the Phottix Indra 360, which I had mentioned in an earlier segment. This is the 360-watt head. So, you don't have to have two of the same power strobes to be able to do your work. I often times will mix different powers of strobes. For kicker lights, you really don't need anything that's super powerful. But we'll see what adding a kicker actually does to this particular portrait. What we've also done is, I'm using the Phottix Spartan beauty dish. So it's the same beauty dish that we used for our beauty segment. Has the internal diffusion plate in the center. But I added the grid, and so part of the reason why I added the grid is that I don't want this light to basically come back into my lens and create a flare. And I also just want it to be adding just...
that little highlight to the edge of the subject. So that's what the grid is hopefully gonna be able to do. So again, I haven't tested this setup. Hopefully I'm super lucky. So let's bring that in a little bit closer to him. And just like we did with our last few modifiers, we're feathering this light, which means that we're not trying to light the front of his face. We're just trying to add a little bit of a kicker light from behind. Or a hair light, whatever you wanna call it. We're gonna keep our settings the same. Again, I'm gonna test my flash. And, I don't know, John, can you show the battery pack on this really quickly, too? Because I mentioned this yesterday, that this light is really awesome to be able to travel with. I know, seriously, that thing is like a million pounds, right? Little teeny-tiny battery pack that's powering this 360-watt strobe. So, you could basically, if you have a voice-activated light stand... You could have them strap that onto their belt, and then have this light on a monopod, or on a stick, and they could basically walk around with you all day long and provide off-camera flash, so that if it's raining outside, if it's beautiful weather, it doesn't matter. You can have a 360-watt strobe to light your portraits. So, it's pretty cool. Alright, so with that being said, let's go ahead and let's test out this two-light look, here. And again, I pop the flash before I put the camera to my face. And then... That actually looks good. Let's see, and then bring that chin down. Once again, now you're the bad guy in a James Bond movie, alright. So you don't have a huge scar on your face, but I want you to pretend you have a huge scar, because you got gassed by somebody that you killed at some point. Very nice. Go up a line on that eye chart, very nice. Alright, perfect. Let's take a look and see what we have. So we kept our settings the same. We're at F8, wheel on a 60th of a second, ISO 100. We kept our light power on our main light the same, so you'll notice the the catch lights... Depending on how he positions the foam flag there, the catch lights are gonna change from shot to shot. If you wanted to make sure that they're the same every time, you can mark off the floor. Like, the exact position where they're standing. And you can use a stand to basically hold the flag in the exact place the whole time. When you have somebody holding it, it's gonna vary from time to time, depending on how they position it. But now what we're doing with that second light is we're adding this little bit of a highlight so you can see that detail on the back of his head. I tend to like to have a little more of a brighter hair light. And so, what I'll probably end up doing is... I'm happy with this exposure, I kind of want this to come up. So, John, this 360, what power is this at right now? 1/30 of a second. 1/30 of a second. Let's go to an eighth power. Yeah. So again, this is part of a lighting recipe thing, and you'll notice that I could get a meter and I could do this one by one, and get the power exactly the way I want it, but it's much easier for me, since I know that these lights aren't affecting the exposure. I know this is only exposing this side of the face. So I really only have to play around with this one to figure out how to get that highlight in the back the way that I want it. There it goes. Yeah, if you push the button once, and then twist, and then push it again, that will select it. And then let's pop that one, cool. Alright, so let's take a look and see what we end up with here. (laughs) There we go, very nice. Awesome. Now that's mean right there, hold that. Excellent. I have a feeling like this is gonna be the correct power. Let's see. Alright, so now we're starting to get that nice little kicker light from behind. We still have that nice catch light. And so the exposure seems to be a little brighter, because now we're starting to see the... It's basically losing detail in the beard, and a little tiny bit on the skin. To be honest with you, this is again, because you're shooting with... If you're shooting with a mirrorless camera, and you have the power to be able to play around with your dynamic range, you could go ahead and you can recover, again by bringing up that highlight slider. Whether you're in Exposure or Capture One, or Lightroom, and now you notice you don't see the red outline except for a little bit in the eyes, which is totally okay. There's really no interesting detail in the whites of the eyes, so if it goes white, whatever. You just don't want to really lose it on the face. And so, what it could also do here as well, and I'll get rid of this highlight warning. I basically am just gonna position him a little bit off from the light, cause really that's happening from shot to shot as I'm going back. He'll be closer or he'll be farther. So we'll kind of adjust it to get it perfect. So, let's get back into position, and John actually has done an awesome thing, so he's put it on a stand with an A-clamp, and this is really ideally how you wanna be able to do it. So if I was photographing an actor, or a celebrity, or a CEO, or somebody that their time is very valuable, you don't really want to do all of the test stuff that we're doing with them. You would basically get a stand-in, and you would do something like this where it's already set up, and once you have it perfect, you have your settings, you have your light powers, you write all that stuff down, and then once they get here, you say "Okay, there's your mark, stand there." Take the shot. You could take maybe ten shots and call it a day. So, very simple. So let's take a look and see if this is this is the correct positioning that we want here. Hold that right there, looks awesome. Very good. Excellent, hold that. Perfect. Take a micro-step this way. There you go, very good. If you noticed, or you may not have noticed, I use the word "micro-step" because I've learned that if I tell somebody, "Take a step this way", or "Take a step that way", what I really want them to do, is I want them to do this. But they'll do this, and I'm like, "No, take a step back that way", and they're like this. And I'm like, "No, okay, fine", micro-steps, right? "So take a micro-step to the left, or the right, or whatever," and that way they just move a little tiny bit, as opposed to taking a big step. I'll tell them if I want a big step, I'll say, "Okay, take like a military-style step." Boom. And then that way I can get them to basically position themselves correctly. So, looking at this shot, lighting is perfect. I'm on the a7R II, so 42 megapixels. Lots and lots and lots and lots and lots and lots of detail. And this again is the .RAW file. So as I often tell my clients, and I'll tell students in workshops as well, is if you see this type of detail in the .RAW file, which is basically stripped of contrast, and color, and saturation, and everything else, and the .RAW file looks great, then once you go into post, it's gonna be amazing. So you wanna make sure, you shouldn't have .RAW files that look horrid, that's not a good thing. You're not gonna be able to go into post and save it. You want the .RAW file to look... It needs to be in the ballpark of where you want the final image to look. So, any questions? Ace1World is asking, "What is your white balance setting?" Yes, so right now, it's actually set to daylight. So any time you're shooting with off-camera flash, usually these are balanced for daylight, unless you gel them in some way. So I'll either shoot in auto white balance, or I'll shoot with daylight white balance. And, out of the camera, if I changed it from daylight, this is how it's coming out with auto white balance. So, that's not terrible, because it's actually adding a little bit of warmth and saturation to the skin. But I actually would rather start at daylight, and be able to selectively warm it as I need it. So, like, his shirt to me looks a lot better with that cooler color, and I'll show you when we get to the post-production side of things, how I can basically selectively warm just his face, and keep the shirt exposure and the white balance the same. Great, thank you. And, another clarification from photofa, he's saying that earlier in the class, John was changing the power of the lighting on the light itself, directing the flash, but are you now controlling it from the transmitter? And he says, "With the transmitter from Godox I think you can control the power of the light from the transmitter". So, I have him changing the light for me, the power of the light, which I believe this light has been the same the whole time. We just changed that one. Yeah, so we're still at a quarter power. We haven't changed the power there. We've just been dialing this power up or down to basically intensify that light from behind. But there are triggers where you're able to actually change the power of the actual light, up or down, from the remote. I believe Godox does let you do that, and if it works, great. That actually saves you having a John in the studio to basically go back in forth, so. Yeah, definitely. This trigger allows you to change the power, if you're using a... Let's say, if you're shooting in TTL, you could use flash exposure compensation to basically change the intensity of the flash. But you can't do the manual power setting from the remote. So, kind of something to keep in mind. So, we have our settings, this looks really great. I wanna keep exploring expressions, alright. So, I want you to keep thinking different characters. Think heroes, think villains, and we'll keep taking some shots here. And I want to make sure that I have a couple of options to work with, because the lighting is on point. Oh, I like that. Very cool. And again, I'm shooting just a little bit ahead, or a little bit above eye-level. Very nice. Didn't you say you played Julius Caesar, too? You want my Julius Caesar? Yes, give me the Julius Caesar. Let slip the dogs of war. Oh, I love it. I love it! Let's see, so kind of like... Let's go back to the beginning shots here. Ooh, that's kind of smug right there, I like that. It's a smug look. Alright, so I'm actually gonna try one more thing here. Let's see, how am I on time? We're good. We're good? Alright, so let's try one thing here. So, I'm shooting these as horizontals. I actually do a lot of portrait orientation as well. And I've got my handy grip on here as well, which I talked about earlier. For those of you who say that the camera is too small for you. Okay, no problem, put a grip on it, and this will help you to easily take portraits in that mode. So that you don't have to do one of these numbers. Do the homie lean. (laughs) So, here we go, we're gonna take them in portrait orientation, so I want you to mirror me and stand straight, bring the chin out. And now, for these shots, you could tilt this way or this way, but don't do this. Keep the nose always pointing directly at the lens. Chin down just a pinch, there we go. And we're gonna go ahead, we're gonna move our focus point right above the eye. Excellent, here we go. Very good. I like that, hold that. Awesome, very good. Excellent, bring the chin this way, a bit, there you go. So you notice I can hold the camera, use the Bill Clinton, still look through the eye piece, direct everything. There's no chimping... Have I chimped, hardly at all? Other than just looking at the tether on the... The image on the computer? I don't think I have. Nice, hold that right there. Go up a line on the eye chart, there you go. Nice. Now give me very smug, like you're a badass right now. There you go, nice. Very good. Let me see if I can kick in a little tighter. For my portrait style, I love getting in very close. Very good. Nice. Excellent, love that. Very good, let's get a little lower here. Perfect, bring the chin back this way, there you go. Very good. Alright, I don't know how these are coming out. Hoping that they're great. What lens are you using this morning? So I have the Sony 85 millimeter 1.4 G Master lens. For a lot of this type of close-up portrait work, this 85 is my baby, it's my go-to. Yeah, for most of these types of shots, you basically want to go with either a... Basically 85 and up. So, if you have a 70-200, try to get to that 85 millimeter focal length. You could even shoot at 135, and that makes for a kind of more interesting look as well. But 85 is just my go-to, it's my personal favorite. So, we got a lot of different expressions. We've got some more traditional style of head shots, which could maybe be something that they use for social media, for their acting, for their IMDb page. And then we have the more, like... Serious character-driven style of portrait. So, got a couple of different options to be able to work with. Now, since we were talking about the lens, and I'm not sure if you talked about this earlier in the class, Billy Bombay was asking if you ever use filters on your lenses, and if so, a UV filter, or other filters? Yes, good question. So I don't have any filters on this at the moment. I typically don't use... Say, UV filters or anything like that. I don't use any of that, mainly because... The main reason people use a UV filter is to try to protect the glass. I have this hood, and the hood does a really good job of keeping my fingers and any other craziness from getting into the lens. The filters that I do use are filters like neutral density filters, or graduated neutral density filters. So, before I started to shoot with high-speed sync, I actually used to do this style of portrait, shot wide open, and I would use a two or a three stop ND filter to be able to keep the exposure from being way bright. So, that's basically the only time I used to use it, but now that I have high-speed sync, instead of using the ND filters, I actually just use that feature to do the dramatic portrait style which, I'll show you guys here momentarily. So, I do use them. The ones that I do use, and I guess I should've mentioned that as well, I use a set from a company called VU, so VU filters, and... They basically make a set where you buy a ring, so it's a ring that basically fits whatever lens, 49, 77, 72, whatever it is that your lens is set up for. And then you put this holder on that ring, and then you put the ND filter, or you could stack two or the ND filters on top of one another, and so those are the ones that I do use. I don't use the screw-on style that a lot of people find in regular retailers and stuff like that. So, good question.
Class Materials
Bonus Materials with Purchase
Bonus Materials with RSVP
Ratings and Reviews
a Creativelive Student
I want to commend you for hosting Miguel Quiles. He is beyond competent and knowledgeable. Light is Light, but It is encouraging to see incredible minority photographers on your platform and to see diversity in the presenters. It is inspirational for minorities to see themselves on the center stage. I sincerely thank you for that. I am buying this course although I am not a mirrorless shooter because of my support of Miguel and the quality of his instruction of which benefits all photographers. He is a great addition to the Creative Live Family of Presenters that I have supported as well. Kudos Creative Live!
Danae Khan Jones
Wow! As a Newb and someone looking to get into portrait/studio photography, this course was perfect and comprehensive. SO MUCH GOOD CONTENT. Miguel is so approachable about questions, positive, and thorough in his explanations. This course broke down the gear and technical side very well. I recommend going to a class live. It was a great experience with food and beautiful facilities. The facility has a positive vibe and really encouraged me to be creative. Thank you for the experience and knowledge!
Sharon
WOW!!! I LOVED THIS CLASS!!! I learned so much. He made lighting soooo simple, I finally understood. I liked the way he explained the why of his camera settings and how to overcome ambient light. he explained and made everything simple!!! I liked the way he talked about connecting with your clients. I am so happy I purchased this class. I finally understood lighting What a great teacher!! Thank you!!
Student Work
Related Classes
Portrait Photography