Batch Process in Photoshop®
Lesson 31 from: Volume Sports PhotographyMatthew The Body Kemmetmueller
Batch Process in Photoshop®
Lesson 31 from: Volume Sports PhotographyMatthew The Body Kemmetmueller
Lessons
Class Introduction
11:44 2What is Volume Sports Photography?
06:41 3Volume Sports Accounts & Agreements
18:30 4Preparing for a Presentation Bidding Round
19:21 5Setting Up the Contract
19:09 6Know Your Numbers
05:40 7Order Form Design & Layout
03:11 8How to Price Products & Packages
06:28Products to Offer in Packages
13:34 10Different Sales Methods
09:27 11Online Ordering
13:03 12Day-of Photoshoot Sales
12:44 13Transporting Your Gear
06:20 14Prepare for Photoshoot Day
10:36 15Crew for the Photoshoot Day
07:03 16Photoshoot Day Workflow
17:12 17Photoshoot for Smaller Jobs
23:45 18Team Photo Posing
11:25 19Convert Volume Clients to Portrait Clients
07:30 20Email Marketing
17:56 21Building Client Relationships
12:24 22Simple & Consistent Lighting
05:13 23Demo: Team Photoshoot
06:24 24Demo: Individual Photoshoot
20:13 25Demo: Banner Photoshoot
12:40 26Tips & Tricks for Photoshoots
12:15 27Processing Orderforms
13:31 28Digital Workflow in Lightroom®
17:11 29Set Up Files in Lightroom®
18:38 30Organize Files in Lightroom®
13:39 31Batch Process in Photoshop®
20:13 32Demo: Banner Design
18:33 33Custom Retouching Workflow
13:34 34How to Design Products
06:00 35Order Sports Products From Labs
12:25 36Sort & Deliver Products to Clients
10:49 37Importance of Community Involvement
05:51 38Video Vs Still Images
25:05 39Build Community Relationships
04:26Lesson Info
Batch Process in Photoshop®
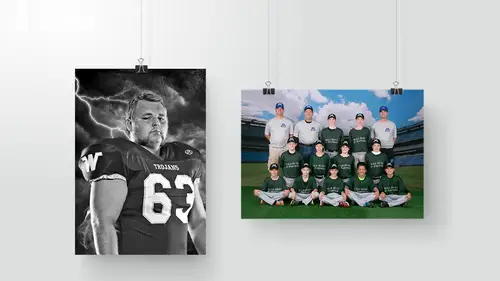
Let's get to, we're doing most stuff in Photoshop and Lightroom for this segment. So we're gonna be kinda bouncing between those two worlds and how they play well together. I think that having an effective digital workflow is just so important in general to be successful in any type of photography. I think that Photoshop is an awesome, awesome tool that many people just get lost in. And it's easy to start kinda messing around and playing and not realize that you're spending half an hour editing one kid's senior photo that they spent $75 bucks on and you're wasting half an hour, 45 minutes, an hour retouching these files 'cause you can get lost in it. So everything we do with our digital workflow we have a vision, we know where we're headed with our stuff. We also speed up our processes as much as possible through the use of actions, droplets, and presets. So, let's talk about the basic batch retouching. The process that will happen on all of our files. So let's just go to this image, w...
e're gonna do this as a sample. It's gonna export that to a sub-folder. I'm going to export that full size at 300, and I do not want anything to happen to it. Ah that's not true, show it to me in Finder. Okay, so now we're just gonna export this file. All right now as we export that file, just a standard JPG that came out. I have through our high school senior business and our family business, we've found a couple of actions that we like from my buddy Kevin Kubota, that really helped my images. I liked the way they looked. And so we use one action that's called Pow Wow. And you click on Pow Wow and you run it and you see that difference? Back and forth. Everything just gets a little snap. Just like it. Little bump in contrast, little S curve, it's nice. We go in and they also have an action called the KPD Magic Sharpen. And you apply this just does a little sharpening on the file. See the difference? Before, after. You can see it really in his beard if we look like right down, right in here you'll see it, so. Before, after, okay. So, so what I'm using right now this is called the action dashboard, it's a product from Kevin I think it's like three bucks a month. You load it on to your computer and it loads up all the actions that you have purchased from him or any actions that you have made yourself that you bring in. So it's just a, I have like a ton of actions. A lot of stuff that we use. And this is just an easy, easy way for us for our high school seniors to search through 'cause like for this to show off this piece off a little bit more like we can just go black and white. And it'll go through and show me all the black and white actions that I have, just pulls 'em up for me. So, there's a lot. So there's stuff like this that's what this tool is really cool for. But we don't really use that in volume stuff, we don't have time. It needs to be an automated process. So we would run that Pow Wow though, made it look better. Sharpening made it look better. You guys know what portraiture is? Portraiture is a filter that does skin softening. So how it works is it'll go and soften the skin of, but it doesn't hit your eyes or teeth, it only hits skin tones. So you go in and you pick right here. I have it on, by default it's gonna have none so you have to pick this little clicker and you're just kinda clickin' and hopin' you're hittin' the right sample on it. But if you click black, whatever's black is not being impacted by the filter, so we click that. Run it. And you'll see his skin is smoother. Before, after. So this picture we took from here, to here, and we didn't do anything that required our attention. It was all passive. Before, after. It's a better picture. The idea of us going through and implementing this on each image by hand it's not feasible, it's not realistic. It doesn't go with the idea of it. So I thought well we can go in through Bridge and we could make, and we could like batch 'em one at a time, but that doesn't really work. It's just again you're doing like four batches on the same pictures. So what I figured out was you could go and just run, you could record a new action running those actions. So what I did was I went in, I just got, it's called gotta go now 'cause we're always in a hurry. So what we did is we recorded our own action of running those actions and it became one super action. So then my super mega action here. So as I run this, as I run this one you'll be able to see it just did everything we did there. I don't know why I can't see the bottom of that. Anyways, it runs everything we did over there in one step, okay? F2 runs it. So run the whole thing again. So we started looking at batching that through Bridge and I thought still there has to be a better way. And I'm trying to figure out how to even make this more automated. So one of the things we did was after I went and recorded my action of running all that stuff I looked up and found out that we could make a droplet. So what we're gonna do is go into File, we go to Automate, we go to Create Droplet. Now all we do, you have to make that action first. That action has to be a thing that's already done, but we go in and we're gonna make this, we're gonna call this CLsports, we're gonna save that onto the desktop, and we're having it run that gotta go action. That one that I just showed you that we made where it did those three steps, right? So we're gonna click OK and on the desktop we now have this little file. Now as we go back to Lightroom, hit Export, go to the very, very bottom, okay? There's Go To Export Actions Folder Now. Click that. This folder here is where we have to put that file we just made. So I'd literally, I'm just gonna take, put it in there. Okay? Now I go here and I have in my droplet at the very bottom something named CLsports. For our sports photos that we're doing, like the team and individual stuff, I export my files at an 18 inch on, 12 inches on the long side, okay? We export them 300 DPI, 12 inches on the long side, we just don't need we aren't selling 20 by 30's we don't need it. So it's smaller, it lets the computer process those files and run those actions faster. So what I would do now that we've got that droplet made, we're gonna create a preset to export. So now we're gonna name this one TNI for team and individual. We're gonna export full size, JPGs, resize to fit, long end 12 inches, you're not gonna do any of the sharpening or the watermarking and we're gonna have this run. So we click export, right? Wrong! It's in Lightroom and we're gonna do this a million times, every time we do a sport. We wanna save this export window as a preset so that we never have to go through and make these dimensions, this action set, we don't wanna do this job again. This is exactly how we're gonna treat all of our files. So add this, CLsports. Create, okay? So now we click export, right? No, we don't even wanna do that. 'Cause there's a way, way, way easier way to do it. All we do now, select our files, let's go through all these, yeah. That's good, that's good. Okay, we're gonna select the individuals, and you go file, export with preset, and CLsports. So now what's gonna happen is it's exporting these files. The eight that we got selected. And you're gonna see as this bar is kinda going across the top. Eventually Photoshop is gonna pop open and all of those actions are gonna run automatically on all of those files. Which is a huge thing for us to have a final image that looks like there's more work and attention done to it than our competitors. And we're able to do that without sacrificing our time living in Photoshop. And this is a cool thing that you could do on wedding files if you wanna offer a pre touch look on a wedding file or anything else, this isn't specific to volume work. This can be applied to anything. And you can run any actions on it. Cool? I think it's cool. So all of those are done. We exported them, the actions were run. We go back here to our desktop, into our raws, into our dodge ball, and you'll see that we have a TNI folder that has all those JPGs, okay? You still have to do the team photo from that. Never did anything with that so let's just go in, go to the develop mode, we're gonna bump that right in the middle. That looks good. We're gonna straighten it out. We can even try the auto leveler. That did a good job. Click that, you guys know all the tips for leveling your photos too, right? So if you're in crop you can always twist and drag and do all that stuff. If you go in and hold down, you go in right here you can actually just click and drag on a straight line and it'll work too. Okay? And the other thing that's big is this auto feature they added is actually pretty good. It does a pretty solid job going through 'em. It's not perfect but it's better than what I get when I'm not paying attention. Take a picture! So, that's cropped and done. We need that one. Export with Preset, CLsports, done. So that's gonna kick that print into that team and individual folder. So let's talk green screen stuff now. These files, like I said we're gonna go through and talk about how we would treat these. What's interesting that we aren't gonna go over today in the class but the green screen action that we use, you can actually run that as a droplet too. I don't have enough time to go through setting that up and demoing that today with showing you the poster design, but it's a really cool process you guys should check out. So, green screen ones are done. We need to export these. We still want these to have the filter and everything run on 'em but we do want more information out of these files. We don't wanna run these at a smaller 12 inch one 'cause we're making a four foot by six foot banner. So we're gonna export these files, we're gonna put them in a poster folder, okay? We want them full size, running that droplet, export. So now these are gonna run through and kick out with that same process and then I'll be able to show you our green screen extractions. Does that make sense? Does this seem a lot faster than what you guys are probably doing with your treatments like, and again it's like I wanna focus that this is not a custom portrait full retouch, that's not what we're doing on this. But this is taking a picture and taking it to a higher level of quality, quickly. And that's something that we can do. 'Cause when we're talking about going in and doing full on custom retouch and all that stuff, we do have to charge for that. It's not that much it's like 10 bucks but for me to take your kid's picture in and spend time on just that image, costs 10 bucks. Otherwise everyone gets this. All right. So when these are all done I'll pull them open and there's a lot of software out for green screen extractions. I know that there's a lot. There's a ton of options that you can go out and invest in. I've tried a bunch of them, I don't, I've never found a system that I really, really love until I started messing around with this action. So I went off this background. We're gonna run this action right here. Click, play, boom. All you're gonna do click this plus, pick the green, right, Enter, you're gonna see it go, bada bing bada boom, done. But, you'll see it messed up I didn't get this part up here. So what I could do is go in and go in to the layers and I could go into my layers and like paint it out, and do all that jazz. I don't wanna do that though, it just seems just, it's another step. I don't like to do that. So what we do when we're starting all of this on an image like this going all the way, way, way, way, way, way, way back to the start. Is I actually just take pick, and do the brush before we even run it, and I just paint it green. Done, right? Then you run that action. Now it's gonna pick it up and do a perfect job without us even doing anything after the fact. Literally this is all I'm doing for my green screen extractions. You'll see that he has a, the way this is set up there is a layer that causes a color shift. So as you look right in here we got a little bit of that green. We can take that out. So I'm gonna zoom way in there for ya. So there's the green is out, green is in. See that itty bitty little cast? What I don't, you have to be aware of it 'cause sometimes that layer being on can actually change the overall color of their jerseys. It'll like cause a color shift in the whole thing. That'll make it not great. So know that you gotta pay attention to that as you're using this action. Flatten it, save it. We're gonna save it as a PNG. Oops. Save, move on. All right so the poster setup for us, the banner setup for us really goes pretty quick. A lot of people will outsource their green screen knockouts and stuff, I don't really see a need to. 'cause this stuff is going so fast with the workflow that we have, that going and spending the money and uploading it and waiting for it to get back, I don't see a huge time savings in that for us. So again, run it, click, Enter, Enter, save it, done. Boom. And that was not, like we did not do super fancy, complex lighting setups. In the diagrams I gave you literally if you just put your lights at the settings I told you, at the distance that they're at, it's going to work exactly this way. So again, boom, done. Enter 'cause it's in the refine edge tool. Which I'll show you guys on the next one, what that is. And everything we do in Photoshop, you guys will notice that there's not a lot of clicking menus and changing tools and going down through boxes, it all takes too long. So what we are focused on is keyboard shortcuts. So it's literally just how we save, how we close, how we open, navigating the tools, learning your keyboard shortcuts, that alone will save you so much time. Op I was gonna show guys that refine edge. So there's a refine edge section when you run this action. That's that second thing when we're hitting Enter on. So as you go through, pick the green, hit Enter. You'll see that this comes up right here. So if you wanna go in and tweak this you can go in just brush over it. Photoshop's gonna think and it'll get rid of, it'll redo that edge. So if you have issues with it not going, like if it's going over too far, if you have issues where that edge isn't right that's what that second window is. But obviously it looked better on the first one. Run it, pick it, Enter, Enter, and with that layer that's gettin' rid of that green we don't have any issues with that green cast. Save, PNG, done.
Class Materials
Bonus Materials with Purchase
Bonus Materials with RSVP
Ratings and Reviews
Brian T
I've watched Matthew before, on Creative Live, and in person. He never fails to entertain and his knowledge is great. This class on high volume sports photography is the best one I've watched. I'm trying to break into this are of business, and he does a great job of breaking down each area. He is a great public speaker, and does a great job explaining what I need to know.
a Creativelive Student
Fantastic class! Matthew is not only a great teacher who easily gets his ideas and thoughts across but he's fun, funny and engaging. I keep coming back to watch again, and again.
Isaiah Salazar
I cannot full express my gratitude for this class. I have done T & I work before but just little aspects of it have evaded me.this class so far has been extremely helpful and it isn't even over yet. Thank you for not just being open, but being kind. Making it a point to say to "Play by the rules" and to emphasize "Run an ethical business" is refreshing. Don't Be Valdemort! ha ha.
Student Work
Related Classes
Portrait Photography