Lessons
Lesson Info
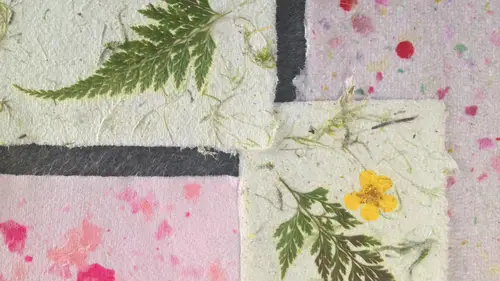
Making Your Own Paper
So the first thing we want is going to do is take just a variety of these papers in front of you and rip them up and fill the container I would say roughly halfway full it doesn't need to be and you don't want to be pat down tight and really it doesn't even have to be any smaller than this um we're just gonna toss those right in there kraft time robert sure does it matter it's a wood or metal frames where there should be wood you know what the reason I go with the would is because I can use the staple gun with it if it were a metal frame, you would have to get a little creative in the way that you attach the screen to it on by certainly think that there would be a work around perhaps you could use duct tape or some other adhesive now these are inexpensive frames were not going to be soaking them long in the water but they're not a tool that's going to last forever. Eventually those will start to break down. My only concern with the metal frames is that they may rust over time so just s...
omething to keep in mind is asking is that such a thing as too big a frame or two smaller frame puny you know it is really up to you were working obviously with a very small manageable size frame some of the projects that we're going to be tackling the next segment I've made a little bit larger sheets. The only thing you want to keep in mind when you're working with a larger frame is that you'll need a water bath that can accommodate it so we're using it is just a standard dish pan you probably all have them in your sink already if you were going to graduate to a larger size, I might recommend going to your local house where store to the organization section and perhaps getting larger storage tubs and those could certainly be used to accommodate the larger frames. So I think this is probably going to a question from a ll the mother's watching this I know that a lot of washing with their children today can this just be should you use your blender just for papermaking or can it be used as a food blender afterwards? You can use it for food blender as well afterwards really it's glass it's not going tio there's nothing that's going absorbed into it that would be harmful to you in the preparation of food afterwards. Obviously you just want to make sure to wash it really well like you do with any of your dishes, so once you have placed your paper pulp in, I think we all have some water at our stations and I'm going to fill this roughly about halfway full yeah should we feel it all the way up or you know you want to fill it just about halfway the pelican will be more or less covered but can kind of see I may be just a little bit more than halfway through and not too dense like can you pack it down no you don't want to pack it down you want to leave it a little bit of room to move around we don't want to impair the blades when we turn the blenders on so we're going to place the lid on this is an important step I had a little sitcom moment in my kitchen not long ago where it just really wasn't on their tight and I spent the afternoon cleaning paper pulp off of my kitchen cabinets so which is going to turn it on? Excuse the noise you can see it only takes a few seconds and what you're going for really is a consistency you take this off so you can see it's a consistency that looks a little bit like ah watery oatmeal honestly you don't want a lot of large chunks in there you can kind of you know see it on my fingers there it's it's pretty much almost instantaneously pulverised so once we have done that and we've got our basis of our pulp this is a time when you can add in coloration or additives now for this first batch I'm just taking some scraps of solid color wrapping paper, and I think for this I'm going to take a couple different shades of pink, all of you at your work stations have a variety of colors that you'll be able to choose from, um, when we get to that step and I'm just going to tear them up in a rough fashion similar to how we did with our white text wait paper and this is all the paper making is all really a process of experimentation, which is really the fun part in my mind, seeing what you put in on how it turns out in a final sheet of paper so you can see I just torn up this couple of pieces, I'm throwing them back into the top of my blender, I'm going to replace the lid, and this time I'm just going to blend it for a few seconds because with this, I want it to be pulverized, but I want to see some flecks of these great colors in my final sheet of paper, so let's do that a little noisy again, ok? And you can kind of see just those few seconds have colored my pope so that it almost looks like a strawberry milkshake, and there are some still some visible flex, especially of some of the the darker pink paper in there. It is going to pull my water bath over here, and at this stage you're simply going to jump all of this mess down into your water bath. And these we have filled roughly between halfway and two thirds full. I'm going to run my fingers through just to see if there's any really large, perhaps unmanageable pieces. You can kind of see that I found a couple that just didn't quite get, um blended down enough, so I'm just going to set those aside, um, because we want what we want there to be flex in there. We don't want it to be so chunky that it kind of affects the structural integrity of the sheet once we've pulled it. So what's gonna happen here, let me pull up my paper towels were going to be going through a fair amount of paper towels today, but I have to tell you, you can recycle these right back into your paper pulp, which is kind of a nice way. Tio recycle some of your crafting materials now, um, you want to make sure that your screen is on the bottom with the screen side face up and you're going to be taking your dekel. And you're going to be paced, placing that face down on top of your screens, that those two pieces are flushed together now, with a small paper making screen this size. It's really quite easy just to hold those two stationary and dip it down into the pulp. Once you start working with some of the larger frames you might want to consider, maybe using rubber bands toe hold the two together, so that it there's not a lot of shifting that goes on during the process of pulling the pulp out. Andrea lee. Again, this is just to kind of help maintain thiss the thie outer perimeter in the shape of the paper. So we're going to do this. I'm going to actually get in serious. Now. I'm goingto take off my my card again here and roll up my sleeves, since we're gonna be dealing with some water. Um and out of this pulp mixture with the quantities that we used today, you typically can get at least four to five good sheets. You can continue beyond that and sort of, like tip the basin a bit tio continue to get that pulp up onto the screen, but you will notice that the sheets of paper will continuously get a little bit thinner as you go along. Just obviously, because you're depleting the amount of pulp in your water bath. So all right, now that were set to go, so I'm just going to kind of agitate the water a little bit with my fingers, and I'm gonna take my frame and just kind of slip it down underneath, let the pulp settle for just a second and slowly pull it up. You can see we've captured a lot again. Some of these chunky pieces I'm goingto set aside, and that really is just an indicator to me that, you know, I probably should have let it sit in the blender for a few extra seconds, just to kind of really, you know, chew up those bits of paper, and that probably could have been accomplished by just taking off the lid and maybe with the blender off, obviously swirling around the top layer, just to see if there was any of those large pieces, so once we do this, we're going to move it over, and you all have large trades at your table. I'm going to be working with this this wooden tray for a moment and replacing here, and when you lift the dekel off, you can kind of see it's, a lovely rectangular shape. You go ahead and set your dechellis side, and then everyone has a second piece of screening at their table, and what we're going to be doing with this is simply laying it over the top of our paper pulp, and we're going to be taking a standard kitchen sponge and just very gently pressing down on to the top. Now, you don't wanna press hard because you don't want to warp the screen on the top of your paper making frame. You really just want to start to absorb some of that excess water from the paper to do this a couple of times, and as you do this, then obviously you can kind of squeeze that excess water back into your water bath just do that a couple of times, gently pressing, and this is just our initial passed to expel some of that water. Now, at this point, what you want to do is you kind of want to gently lift up on the corner of the screen to see if the paper pulp is sticking. I find that often depending on the type of paper have used to create my pulp and the additives that I've put in, sometimes it immediately sticks to the screen other times that needs a little convincing to come off, so what I'm going to do is I'm going to take it with the second piece of screen still on top and I'm going to flip it over on my work surface onto a piece of paper towel again, I'm going to take my sponge and just gently kind of press on the back encouraging it to come off of the frame sometimes it will need a little bit more convincing, but in most cases it will come off for you. Um now at this point I'm going to take some more paper towels and it should mention too that if you're concerned about using a number of paper towels and you're doing this at home, you certainly can use rags, dish towels things that you can then just throw into your washer and reused for the next time I'm going toe, place it over the top and just gently press it down. Um this is again our second past to expel s'more of the water in a peel it off and you see it's going to come right up on my paper towels so at this point I'm going to take away that second sheet of screening and I'm gonna lay it gently back down onto and you can see at this point it's pretty solid it's it's a little limp like a piece of fabric but I'm going to place it back onto my surface and I'm going to put the let's get one more paper towel and put that on top of there it's this stage of the game you really can take your paper and I often will dry on pieces of felt the paper will not stick to the felt during the drying process and what it typically will do is I'll start a stack I'll put a couple of pieces of paper on it once I seem to have covered most of that surface lay another one on top and I just sort of build a stack of the paper as I make it and then when I'm finished at the end of the day with my project I will take that and I'll generally stick it under say, a heavy stack of books just to kind of help keep it flattened drying time on the paper will vary I would normally let it sit overnight check it the next day if it still feels a little bit damp, you might just want to let them sit out individually, air dry a little bit and it may work the paper a bit, but I'll show you how you can flatten that back out but before we get to that stage, I'm going put one more piece of paper towel on the top and I just want to show you a quick method to speed up the drying time and that is essentially taking a standard household iron you want to make sure that is not on esteem setting, you're going to be producing enough steam as it is and you don't want to do this with an ironing motion you really just want to press it down and and the steam that you can see coming up is really just the evaporation of some of the water that is still trapped in that paper pulp um this is not a necessary step, but it's sometimes nice if you're a little bit of occasional impatient crafter like I tend to be in want things to dry much faster than nature would normally have happened. Ok? Is it just the standard like polly felt isa standard polly felt obviously wool is going to be a little bit more absorbent um, but I found that this standard craft store felt doesn't work that at all like I've had pretty good results with it, okay at this point obviously it's going to be a little warm so just be mindful of that on dh then you can take it and lay it out on your surface on dh we've made our first piece of paper which is kind of magical, I have to say the way all of that comes together, so I'm going to do one more round with this water bath just to kind of reiterate the steps that we've covered, and then we're going to go into a second step where we're all doing it together. So again, just to reiterate we're taking our screen and you don't really have to worry much about rinsing them between uses, but our screen is face side up, our deco is face side down so that they're flushed together and agitate the water slightly. I'm going to dip my screen down underneath the pulp, allow it to settle for just a second gonna lift it up you could see again some of those huge chunks could I missed from earlier. We're just going to get those out of the way squeegee off some of that excess pulp you allow it to just hold it over the water bath for just a second to allow some of that excess water to drain off again. Place it over top of your tray, remove your dekel to reveal your lovely piece of paper, and then we're going to take our second piece of screening and place that right over top of the pulp again at this step, we're going to go back to our kitchen sponge and very lightly add pressure to the top um, again, this does not need to be heavy pressure. You want to avoid a lot of water in that one you want to avoid pressing so hard that you warp your paper making screen because you want to be able to use this for a good long time? Yeah, of course to three. Same with a rolling pin work to press out the water. Is that going to be way too heavy? You know, that is a really good question that might be worthy of an experiment. My concern within that stretch, the paper that's exactly it was going to say my concern would be that it might distort the paper sheet in the process. Um, but again, like I said so much of the paper making process about experimentation and I totally encourage you to kind of go off on some experimental tangents like that to figure out, you know, maybe you're going to come across from some shortcut methods that work for you and our genius. And I really I love that part of crafting it's really an ongoing experiment. If you do use the rolling pin, let us know because she's also asking can she used the lint screen dryer from her trap from her? You know what drives you know what? Yes, you absolutely can you absolutely can, and that's actually kind of jean genius because that's a lot of paper fiber I'm sorry of fabric fibers in there and it's going to add a really interesting quality to her paper good question yeah you absolutely can finally found a use for that let me write something tio come straight out the one they like it my apartment complex it's like the basket one uh I scoop it out put it in the basket I don't know I was in college I remember using on we had a printing press and so he had the wool felt when we would run the paper that we made through really like squeeze it all out yeah and that didn't really deformity at all it's almost like there's old wringer washing machines to kind of expel all of that so you see I have pressed out more of that water with a piece of paper towel I'm removing the second seat of screening now I love this one even kind of really see on there some of the beautiful specs and there we've got both shades of pink and you could see how the dough dies from the wrapping paper have really affected that white paper pulp that we started with. There are little flecks of white in there which I think a really beautiful but it's a really simple way to add color to your paper so in on this one I am just going toe lifted off into my hand and I'm going to skip the ironing for this particular piece and go ahead and place it on top of our felt so now that we have done that were going to dio a little swap out with my water bath and we're going to continue on with you guys and exploring some additional additives. So ladies, have you ever experimented with a papermaking before is his first time for you to have a try I did it with and it was this is this is interesting similar technique was something similar with the blender and everything, but I can see now where I'll make use of it more when not do my cards and my scrap booking is I'm putting on the pages and on the cards that would be beautiful it's funny I have talked teo I know that this is a project that often is tackled in elementary schools I've seen classrooms of kids kind of being introduced to paper making and so it's it's obviously not a new technique a lot of people have done it, but the goal with a little bit of what we're doing today is to kind of show you howto bring it into more of the adult realm and utilize some of these sheets for invitations and party making decorations were going to do all of that in our next segment so comes the lovely kate with my clean blender thank you so much and so if you bear with me just one second, I'm going to tear up a few sheets of paper to get back to the stage. Where you all in the studio are. Get a couple more in here. Paper. You just need to stay away way from rome, because it just doesn't work. Really great question. J k o. They recommend that you stay away from any glossy paper. So anything, like magazines that have a glossy finish on them really don't tend to bind together as well as matt papers that don't have whatever sort of finishing on them. That some of those glasses, a glossy rags deal, so a little bit more. I also x experimented a little bit with adding and primarily. White paper and then adding in some vintages, book pages towards the end just, you know, volumes that had been discarded, maybe from, like, the library sale stuff that's on their last leg, it's not going to remain on the library shelf and put them in the very last minute, sort of like we did with the colored paper, and if you are mindful not to pulverize it down into a fine pulp, when you screen the paper out, you're still going to see those little flecks of those pages and occasionally little letters and words which, depending on the type of project, could really fit lovely into a certain kind of aesthetic. So I have got this about halfway full of paper, and I am now going to cover it with water again. The paper in the blender is loose, it's not packed down tight. We don't want to impair the blades of the blender. I'm gonna put my lid on, all right, so why don't we all do our blending together on this one and try and consolidate it? So with just the white shades of paper in there right now, we're going to go ahead and blend it down, as is for the moment, all right, forgive the noise at home, here we go way, how we doing? A little thick. You, if you do feel like it's having on the paper, absolutely add some more water. It certainly cannot hurt, and it will not affect the final outcome. It's a little bit, obviously, of an inexact science, I would say the number of pages that I ripped up to place into the blender. We're probably between six and eight, and again the water level. For that amount of paper, it was about two thirds full.
Class Materials
bonus material with purchase
Ratings and Reviews
Reverie
I really enjoyed this class. I always wanted to learn how to make paper by hand and watching this class on Creative Live just got me so excited about paper making. My mind is brimming with ideas that I want to go out and try. Robert is a lovely instructor and I loved learning from him. I also like his pace and that he didn't rush through it all, he gave me time to think and absorb. It was a very calming and really pleasant experience. I can't wait to see what other classes he's going to be teaching.
Holly Morris
Loved this class and the instructor. Robert makes is so easy to understand and offers a lot of useful information, tips, suggestions along the way. Can't wait to give it a try. Loved the ideas for using handmade paper, but not crazy about the lettering in the last segment. Doesn't really show off the handmade paper that well.
Aranka
Nice class. I got some inspiration on how to try out some new things with my paper making tools. Very nice tutor.