Lessons
Lesson Info
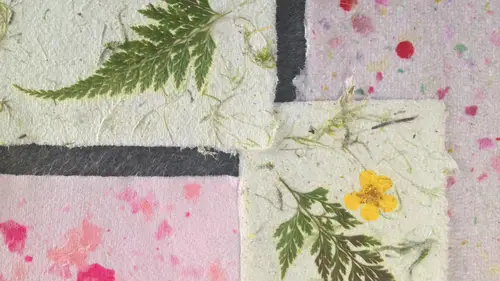
Intro to Making Your Own Paper
I am so pleased to be here today. Thank you so much for joining us. I have to tell you that this paper craft in class is really the culmination of several months of conversations and planning and designing and researching and sourcing products. And I honestly could not be happier with how it has all come together. So I want to start by extending a warm welcome to our online audience who are joining us around the globe today. Thank you so much for being here with us and and especially warm. Welcome to our in studio audience. The's for creative souls are about to go on a very crafty marathon with me over the course of the next two days on dh all centered around the very versatile, very malleable, chameleon like material of paper. And I want to talk a little bit more about that in a moment. But first, just by way of introduction to help us get to know each other a little bit better. I want to tell you a little bit about my background and how it is that I've ended up here today. I am sure ...
that like many of you, I was a crafty kid. I was the artist in the family, and I was also the one that would much rather stay indoors and bake shrinky dinks, and we've potholders on a loom, then run around in the backyard and honestly, that's a sentiment that holds true today, I occasionally have to do a little gratitude with my check triple gratitude check with myself, and I'm just be like, dude, you are a full grown man and you are designing and teaching arching graphs for a living, and I honestly, I couldn't be more grateful for that. Um, as you can imagine, when time came around to choose a college major, I gravitated immediately toward studio arts and, uh, whether or not my parents winston, that I don't know, they didn't let it show thankfully and let me do it and somewhere along the line in my academic career, change direction a little bit and became our history major at graduation, much to my surprise and my parents utter delight, I actually landed a position within my field of study, and I became an apprentice to an appraiser of modern and contemporary art in los angeles, and I studied under her for seven years, and I went through all of the testing and certification became a full fledged appraiser, and in totally did that for about thirteen years. I'm really grateful for that period of time in my life just because I really honed in some amazing research skills and I got to spend a lot of time with my nose in our history books, which I think gave me this really do deep well of imagery and inspiration to draw from and through all of the research I felt like it became intimately familiar with a lot of artists and designers who have since become very influential in my design aesthetic. In two thousand five I decided I wanted to take a little bit of a career detour and just by way of context that was the year that etc launched so a lot of online businesses were starting and I started an online shop called mahar dry goods and the gist of it was is that I partnered with about fifty artists to collaborate with them and all of their various amazing skill sets to put together a product line for children. So it was everything from special furniture, too costumes for dress that play to limited edition toys, tio decor in art for the wall and honestly with such a passion project for me I really loved that and what I loved most was the introduction to this contemporary crafting community I met so many amazing artists and designers and crash people and woodworkers and I'm thrilled that today I call a lot of those people my friends now in twenty ten, when we were at the height of the great recession, a lot of small businesses got hit hard, mine included, and I ended up closing my doors and started looking for my next career move. And honestly, I have to tell you, I am a big believer in more than one career in a lifetime. I think it's a terrifyingly wonderful gift from the universe to be able to start over fresh and go down a new path. And during this time when I was trying to figure out what my next move was, I started teaching kraft workshops around southern california. They were just projects that I was really passionate about and excited to share with people and through that in a series of wonderful conversations with friends and friends of friends, I ended up accepting a position with a digital media digital entertainment company in southern california, and they brought me on to start producing all of their d I y and crafting segments for their youtube channel, and it ended up being this amazing fit I, as I kind of grew into the position and my responsibilities expanded, I eventually became this odd hybrid of producer and talent where not only was I producing the segments, but I was also developing the projects and eventually presenting them on camera and that's in large part how I've ended up here today that in partnership with the fact that I have to tell you one of my greatest joys and passions is really researching vintage craft projects and vintage craft traditions and really dissecting them and trying to break them down into manageable bite sized pieces so that you and I can sit in our dining room tables or standard our kitchen counters and tackle these projects that might otherwise seem a little daunting are overwhelming a lot of these projects that we're going to be approaching, have wonderful histories and come from great craft traditions, but we're going to master them in our own small way today is really about papermaking and ornamented, so we're actually gonna be making our own paper from scratch and paper is, I need to mention in the midst of all of this, we're actually going to throw a little party. We've got a segment that air going to show you how to take some of these crafts that were making and transform them into really fun and festive decor for your next party or celebration. So I'm looking forward to that, I think that's going to be a lot of fun, so paper is really where it started, we are it's going to be exploring it in depth and it's papermaking has an amazingly long history, we're not going to go into it, too, in too much depth. But needless to say, archaeologists have actually found as far back as the second and third century b c e that the chinese were already using paper not only for righting but for packaging and wrapping, and by the sixth century they had developed toilet paper. And I know that since that time, toilet paper has come leaps and bounds, but the art of paper making is honestly very similar there's some very simple standard steps essentially you're starting with separating the fiber from the raw material and that's, usually a paper or wood or cotton, your pulverizing those fibers, your beating them down into a paper pulp, you are adding them to a water bath, your screening them out, and then you're pressing out and expelling that excess water to create the actual sheets. And that really is where we are going to start today in the nineteenth century, in the machine age, they came up with amazing machines that were able to create paper on rolls and create long continuations of it, and that really entered the modern age of paper making. But we're going to go old school today and are first segment is actually in a start with building our own paper making screen, and you can buy professional papermaking screens, but I always love when you can take, ah, household item or something that's readily accessible and hack it into a tool or material that you can use so what? We're going to be using our just a couple of simple picture frames really inexpensive there about two dollars apiece we got him in a local housewares store and one thing to keep in mind in your selection of photo frames when you're doing this you really want them to be a flat front surface no beveled frames, no decorative ornamental frames because at one point we're going to be placing them face together and you really want that connection to be flush on dh that's important as far as maintaining the shape of your paper so what we're going to do is when you start by dissecting these each of you has a pair of these at your table a cz you know there are these standards stays in the back you can just kind of go ahead open that up remove the backing oftentimes their glass these air plexi and we'll just pull those out and you should also have a pair of pliers at your table in your work station and you can just kind of use those to pull out those stays what we really want to end up with are just a couple of naked frames so go ahead pull this out of the first one to be careful with these stays on the back they can be a little sharp to just be mindful of that when you're opening them up will move those backings the backing in the plexi glass can be discarded or safe for another craft project I'm just going to go ahead quickly and remove the stays out of this second frame three and four there we go all right go ahead and get rid of these guys the next material that you will need is some fiberglass screening now this is something that you can purchase at any hardware supply store you've got a couple of options when it comes to picking screening this is something that would normally be a window screen or a door screen I really prefer the fiberglass only in that theo old school metal framing tends to be a little bit more difficult to work with and once you cut it the edges are a little bit sharpe this is just a little bit more forgiving it's incredibly soft it's really just like it cuts just like fabric which is fantastic now what we're going to be doing is we're going to be covering one of our frames with the screen and the other frame is going to end up being our dekel and we'll talk about that in just a moment so what we want to do first is lay your piece of screening down on your work surface and you're gonna take your frame and you're going to lay that face down on top of that and we all have some staple guns at our station now for those of you for those of you at home please forgive us for these sound effects in this segment we're gonna have a little bit of staple gun and we're gonna have some hammering and we're also going to be using a blender so I'll give you a heads up when that's going to be happening essentially what we want to do is we want to fold the screen across the top edges of the of the frame and we're just going tio give it a good stable now honestly depending on the type of staple gun you have in the material that you have that your frame is made of you can see it didn't go all the way in don't worry about it we're going to use the hammer for that you can flip it around now and you want to work from side to side um and so you pull it a little bit taught not so much as to distort the frame but really just to make sure that you got a smooth flat surface so I'm going to do it on both sides work the other side's over and then kind of go along the edges so why don't we all kind of go ahead and do that I know you're sharing staple guns but we'll try and consolidate some of the noisy steps about doing this for just a second you kind of see em working from side to side now on the corners. I'm just going to full this over a little bit and tuck it and it's almost a ziff you were maybe doing the corner on a presence when your gift wrapping and again don't be concerned about the staples not going all the way in. We're just gonna hammer those down in a moment and finish off the back of the screen. J k o have you had a class that's been this noisy pass hasn't great crafting? Yeah, last year, some of them very noisy and some of them just being the marketing that they've seen a lot of fun, but I think it's fun to be noisy. It is it's nice to get your hands dirty every now and then because you could end up with some pretty amazing results. How you all doing with stapling? Yeah, so you also have a handy hammer at your work station and forgive me, I'm working on a metal surface. This is going to be perhaps a little thunderous, but I'm just going to go through and give all of my staples a tap on the back just to sink them down, flush into the wood and really secure the screening onto the paper making frame. Now, if you look at the back of my screen, you can see there is really nothing perfect about the way that this was stapled or hammered in really, as long as it is holding that screen taught on the surface, we're good to go and it's going to work perfectly well, a basic tool kit you sort of need to do in this cover, but I think this is very standard household, I think it's a very commanding, there are a lot of bases, obviously a good pair of scissors, a craft night, a hammer um, a ruler, you know, a good set of, like, small pliers with different heads on them are really helpful when you're doing these kind of projects, and we'll actually is we're going through the's project over the course of the next two days are really try and be mindful about calling out some of the materials that I use on a regular basis and some of the tools that are probably the most used in my tool kit. Um, how are we doing like this? Was it nowhere actually just going to do the one? Yeah, so which really leads us into our next step, which is interesting, so this is the paper making a screen this second piece is really what you call a deck in the process of paper making this is laid flush on top, we're going to be creating a paper pulp mixture, pouring it into our water bath, and this is going to be dip down into it and slowly lifted out, and the purpose of the dekel is really just to help the sheet of paper maintain its shape. Now, if you've ever I had to deal with high end invitations if you've been married and had to look through all of those catalogs for wedding invitations, you know that a lot of them have what's called a beautiful deck allege and it's this lovely sort of irregular edge, which is actually pretty highly sought after because it indicates that the paper was handmade on it's, usually a really lovely quality. So now that we've gone ahead and made our papermaking frame, we're going to set that aside for a moment, and we're going to get started on our paper pulp. Now, this is a wonderful project because you can recycle all manner of materials into new sheets of paper, and I have spent a lot of time over the last couple of months recycling all manner of paper pieces just to kind of see what the results were, and you can do it with recycled newspaper, you can use the junk mail envelopes that you see in your mailbox every day. Receipts, anything along those lines, I've just started keeping a little been, which would normally be my recycling bin and it's, not my paper making bin and putting that all together a couple of notes on that when you're dealing with, say, recycled newspaper that has a imprinting on it that will affect the color of your final sheet. So if you use just primarily printed newspaper, your and sheet of paper is going to be a little grayish in color it's still really lovely, but for our purposes today, because we're going to be focusing a lot on coloration in different additives that you can make in your paper, we're going to be using just some standard recycled papers. You've got three different varieties at each table, there's some standard copy paper. There is some construction paper and then a little bit heavier sort of card, stock, paper, and they're all basically in lighter shades that will readily except the the color and the additives that we're gonna be adding in. So to do this, we're going to be using a standard household blender. It doesn't need to be high powered. It really is just going tio pulverize our papers down to a mushy pulp now there are a lot of paper makers that will say or recommend that. Once you put your papers into your blender, you cover them with water, and you allow them to soak overnight. I really don't find that to be the case, especially when you're working with text. Wait. Paper. If you're going to be using some heavier papers like I know papermakers, that will create sheets out of, say, corrugated cardboard, the work apart boxes. Those I probably would recommend, at least soaking for a half hour just to really soften and loosen up those fibers that once you turn your blender on it's going to readily create a pulp from them.
Class Materials
bonus material with purchase
Ratings and Reviews
Reverie
I really enjoyed this class. I always wanted to learn how to make paper by hand and watching this class on Creative Live just got me so excited about paper making. My mind is brimming with ideas that I want to go out and try. Robert is a lovely instructor and I loved learning from him. I also like his pace and that he didn't rush through it all, he gave me time to think and absorb. It was a very calming and really pleasant experience. I can't wait to see what other classes he's going to be teaching.
Holly Morris
Loved this class and the instructor. Robert makes is so easy to understand and offers a lot of useful information, tips, suggestions along the way. Can't wait to give it a try. Loved the ideas for using handmade paper, but not crazy about the lettering in the last segment. Doesn't really show off the handmade paper that well.
Aranka
Nice class. I got some inspiration on how to try out some new things with my paper making tools. Very nice tutor.