Lessons
Lesson Info
Patch Tool
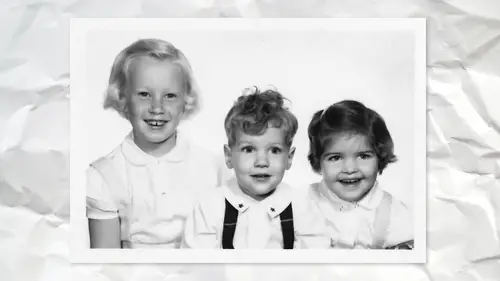
So the patch tool. I used to look like this patch normal, and it wasn't the greatest. So a lot of people gave up on the past will never looked at it again. If they did, they missed something really important because a few versions ago I don't know, I think have been Photoshopped CS six. At this point, two very important things happen. The first was content aware and at the same time sample all layers because before you couldn't do the past two on a separate blank layer. Now you can. So, for example, this whole area here, instead of relying on the healing brush, I make a selection. And then I drag. And as I drag around, I could say, Should I use his ear? Probably not, No. And that you're getting a preview of where you want to choose now, Even in here, I can deliberately pick a spot that's too dark. So you think that's not gonna work, but it's still adjust itself so you don't have to pick the perfect tone. Like if using the clone stamp tool, it's all on you to go. That color matches that...
color or else is not gonna look good. The whole premise of content aware hell and patch is it automatically blends in, and most the time it's pretty darn good. In fact, I'm trying to get it to not work as well, so I can show you another technique. But I don't know how successful I'll be. It's just going to get a job. Okay, maybe I can No, I hate it when it's just, like work. So Well, actually, don't hate it all. It's great, but, um okay, so that one see how it does doesn't look quite as good. The texture isn't quite as good here. The other really important, You know about the patch tool. It's one of a very small handful of tools in Photoshopped that does this most tools. In Photoshop, you choose the options in the options bar. He used the tool. If it doesn't work, you undo and you change the options in the options bar and try it again. The patch tool is one of I would say maybe three. I think three tools in Photoshopped that if his long don't do anything else, So I moved the patch. I haven't anything else these options up here, you can change them and it re does the patch. So it's one of the few tools most people don't realize that because they're so used to the settings in the options bar Onley effect the next time used the tool. This is one of the few that you can change the settings after using it. So if you ever use the patching like that didn't work quite as well. There are two factors. You can change structure and color, and as you move them around, you can see if you hire you put the color, the more it's gonna match. And the structure is a scale of 1 to 7 on a why 7/10 did not get quite as much detail. One is typically better detail, so that's another big advantage. That the pastoral has over almost any other of these retouching tools is the fact that you could be moving along doing its on the go. Oh, that one doesn't look as good, so just don't do anything yet. The problem is most of have a habit of patch, patch, patch, passion and go. That one back there was too late now, so you have toe move the past will wait. Look at and go. Well, I'm not quite sure. Let me try this instead. Okay, so that's a big big Plus, I would say that, frankly, I probably used the patch tool much more now than content. Aware fill just for those two reasons. Well, actually, three. You can do it on a blank layer. You can pick, have the preview, and you can change the settings now the other ones that do that or the content aware move tool and the content aware with the two officers content aware, move. But from a restoration standpoint, I can't think of too many reason why. Probably use that. I mean, you probably could, but not as commonly used for sure. So needle say, I'm not gonna do all the patching on here because it's a lot of it is just repetition. Got to do more of that. Gotta fix that. And that's the reason why it takes hours. Not just a few minutes is to do it right. I'm doing it sped up for the purpose of demonstration. But this something like this, I would want to put a lot more time and effort into, um, one other little tip that I will suggest to you. I scan this at a pretty high resolution, can remember how much, but okay, it's pretty high because I want the ability to zoom in and see what I was doing. However, most people are not gonna look at it this close unless, except for my aunt who has a loop that she always looked, um, most people were not gonna look at it that close up. So one of things we have to think about is don't fool yourself by zooming into, like, 400% ongoing pixel level editing. Remembering that the human eye it'll be this big and no one might even see it. So one way to keep that in mind. Eso You're not distracting yourself by putting in all this effort and then realize once you look at it back at a smaller size that did, I cannot even see. The difference is you can create two views of the same document and the way you do it because you go window arrange and then new window for whatever the name of your file ISS. So it's not duplicate document. It's a second view of the same document, So at first it doesn't look any different. Except if you look closely you'll see now there's two windows. They're both exactly the same. So then we choose to tile them. I typically, like do this. If I only have the one document opens. Otherwise you have too many things happening. So then I have tile view, and this is exactly what I do. It happen to do it automatically. But if it didn't, you would change yourself. In one view, you say this is kind of the size most people will be looking at it. So when I work over on this one, any change that I make So if we do patch tool over here, it updates on this one and you look at to say Okay, looks pretty good at the zoom give you like Oh, there's a tiny little bit didn't get there. I can't even see it here. So I used to be the worst for this. I'd be zoomed in so far that I do all this work on someone's eyeball and then I go back and look at it and go. I just wasted 45 minutes of time because no one except me knows that I did all that work. It's gonna be printed. The eyes gonna be this big. But if it's not, then this is a good reminder, especially the bigger the monitor have. You should have enough room where you have one view. That's always kind of the reminder. Actual size print kind of you and what most people live I worked with who do this found that they started doing that initially to kind of help him remember, And after a while, they didn't need to anymore, cause they just remembered, I don't need to be quite so finicky about every time little pixel level detail, because it's not going to be seen in the final print. Even it's a high resolution print. We're still talking things that we're looking at someone's nostril this big, and it's gonna be a little tiny dot in the photograph. Okay, it's this way. And some people still continue to use this method because it's really nice to see how they're doing. And any time they can compare original versus the size we're at now. Okay, so this photo okay, Sorry, hasn't one of those things. Oh, who ever thought Scotch taping photos into an album was a good idea, like on top of the photo, not underneath it, but like that, you know, just yeah and everyone else's mom and grandma. So here is a problem that I need to adjust. So let me take a step back for a moment. Many photographs back in those days were this kind of see Peotone look. So the question that comes up often for me is that I want to preserve that look because sometimes see, Peotone just looks like that more overtime or I want to be black and white, so that's a personal choice. What I find I typically do is I converted to black and white so that I'm seeing everything on this with removing color as a distraction. If I want see Peotone, I reintroduce it at the end. Instead of trying to preserve this exact color. All black and white, black and white Justin Layer. So whatever I'm doing and then if in the end, but I still want to have this same look, then I'll use some other kind of adjustment layer, typically like colorize or something and hue saturation. So with that in mind, let's do a black and white, and for now, I'm not gonna worry. Obviously, you can adjust things in here to try and get it to look the way you want. For now, we'll just leave, as is because I really want to talk about this part down here. So now it's still pretty obvious, but it's not quite as obvious because I've removed color. And even if I decide later on to put the color back in, at least now it's not glaringly is obvious and will help me make a better decision about it. So the approach I would take here is because there's a fairly definite edge where that Scotch tape is. I think I should have a pretty good shot at isolating just that, using the quick selection tool. If I really wanted to be more careful, I would get a little closer and use like a bag polygonal lasso tool to make sure I have a straight edge and so on. But for now, this should be pretty good as we know. Hopefully by now, if you have a selection and you add an adjustment layer like levels, it will automatically make a mass for you and Onley adjust the selected area. So if I take the Grey Triangle, I should look at this monitor. So I'm trying not to look at the edge, trying. Look at the middle because I'm not how good my selections chances are. I'll see alliance. I'm not looking at that. I'm looking at this middle part, and when I compare to me, that's pretty darn close. So a simple matter of a little selection and then a mask. So that makes the mask adjust levels. And now I want to try and not see any noticeable line. So a little bit of healing brush will probably take care of that. But it's important to do that first cause. Otherwise, it's not going to give you the desired result. Thank you again. Another thing that's a really good idea. Let's take a pen and write right on top of the photo. I got to give my mother credit. I inherit all these photos in every single photo on the back, often on a piece of white tape. Stuff is written, So there's nothing written on the front of Fogel's, which she had told my grandmother that so needless is a this I mean, it looks like a lot of work, but really, that's the beauty of the spot. Healing brush is once you start working with it. I mean, it's actually pretty fast, especially because this is a pattern in the background that as long as we're getting a fairly close representation, my philosophy is as long as not glaring obvious. Not that many people that they're gonna be looking at the baby not say a my seeing something down there that looks a little off. I mean, if they do that, I'm like, I'm not showing you this photo anymore because you're being way too picky. But it's true people look at if something's distracting, you know, then obviously it needs to be. Which reminds me to say one other thing for any kind of work you do in photo shop that could be considered retouching. A restoration. I realized something a long time ago, and for me it's become a very important philosophy, and that is, I used to show people when I was very pleased with work I had done restoring a photo or retouching someone's portrait or something, I would very happily say, Here's the original and Here's the after and no matter how good a job I did when you show the original first people's eyes were drawn to the difference. It's like those old cartoons used to say spot the difference. He had to circle the things that were different. People are good at that. So if you no matter how good a job it is, if you, for example, took out the writing and I showed them the original with the writing now their eyes gonna go right there and be much pickier. So now my people still want to see the before, but I do it this way. I show them the after first. So if you show the after the finish photo, let's put it this way. If you know the after photo and a local what is wrong with his nose? That suggests to you that you need a bit more work to be done. But if they look at it and go, Oh, cool and nothing jumps out at them, then you show them before they go. Oh, oh wow. It makes such a difference, I tell you, because I didn't use to do that, I'd be so happy with my retouching work and someone say, Oh, I can see we did there and it was like they weren't impressed at all because they were their eyes were drawn to it, It seems silly to say, but to make it makes a huge difference. So in a case like this, the reason I'm saying it is because I'm looking at this and I'm being hypercritical and saying some of the pattern doesn't look quite like it's matching. Yeah, Okay, First of all, it's gonna be that big. And let's look at the cute baby. Not the fact that the ball, I mean, is that. Now we look at it. If you didn't know there was, type there with something, make you look it and go. I don't know. Something looks weird there. I mean, some of you might. I don't know you personally, but most people I don't think they do that. They look and say wow at school. So that's part becomes part of, ah, personal approaches. Instead of zooming into 800% and being super uber picky about every little thing, if it looks good at this kind of you than to most people, it would probably look good
Class Materials
Bonus Materials with Purchase
Ratings and Reviews
Margaret Lovell
While I use Photoshop, I wouldn't consider myself an advanced user. I'm slowly, but surely trying to move in that direction. I've also been interested in learning more about photo restoration techniques to fix some of my old photos. But also because I think it's a useful skill to have, which could function as a side gig. I'm glad that I took David's class. I found his explanations easy to follow, and it's a great beginner's program. I feel as if I can start using what I learned today.
Beatriz Stollnitz
Excellent class for anyone who is looking to restore old photos. Dave's usual clear explanation style makes it an easy and enjoyable class to follow along.
artmaltman
Another superb class from Dave Cross. Well organized, well paced, very clear and extremely insightful! Voice of experience with wise advice. Thanks Dave!