Lessons
Day 1
1Sue's Posing Guidelines
15:41 2Shoot: 100 Poses in an Hour
1:21:21 3BONUS: Constructing V-Flats
13:16 4Mapping the Shoot
33:06 5Shoot: Short Hair (Camille)
41:20 6Shoot: Sisters (Katie and Erin)
42:49 7Shoot: Curvy Friends
31:49Discussion about Curves
13:15 9Portrait Couture
13:07 10Shoot: Glam the Dress, Creme (Alex)
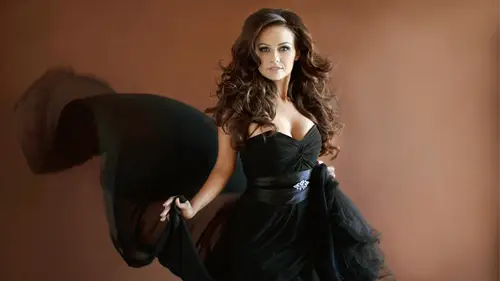
1:04:06 11Shoot: Glam the Dress, Black (Alex)
26:08 12Shoot: Portrait Couture, Black (Kate)
25:42 13Shoot: Portrait Couture, Gold (Kate)
17:30 14Shoot: Different Women, Same Pose (Wall Lean)
1:04:38 15Shoot: Different Women, Same Pose (Couch)
31:44 16Business and Marketing
52:17 17Video Fusion, Seniors, and Marketing
33:29 18Business Discussion with Students
1:02:35 19Shoot: Mother & Daughter
55:42 20Shoot: Boudoir Sue Style
34:34 21Shoot: Film Noir Sue Style
23:56 22Photoshop Retouching
27:09 23Skype Call with Jill Conley
25:41 24Sue Bryce Photoshop Workflow 1
22:50 25Sue Bryce Photoshop Workflow 2
13:40Day 2
Day 3
Lesson Info
Sue Bryce Photoshop Workflow 1
Hi everyone, here we are blending just a little bit of clone. I've always got my stamp on 100 and flow on about 20 or 30. I find it much easier to blend on a nice, soft brush. So, I nice feathered edge and I try not to make my face look too big on the screen. If you're not blending from a distance, you tend to blend in smaller amounts and I think it takes 50 times longer. So, I want to just do an initial blend just so I can sell to my client. Whenever I have a young skin like this without, sort of, wrinkles or shadows too badly around the face, I'm always just going to take the pimples first. So I just clone off around the dark spots around the face and then I do a gentle blend around 10% flow and 100% opacity on my clone stamp just to bring all the shadows in. And I just kind of just do a nice soft blend all the way around. I work on a Wacom tablet because I can't retouch on a mouse and I do this cloning at around 10 to 30. I do this cloning lots of small dots as opposed to sweeps. If...
you find you are sweeping or dragging, you tend to create lots of real soft spots. Try and leave as much real skin pigment, as much real skin tone as you can and as much pattern in the skin as you can. We don't want to just soften everything out. I don't use any retouching software on the face just because I want to have full control over how I retouch to the face. So, you can use retouching software to the face if you want to but I just find it's a little bit too obvious. I always dodge in the eye, always dodge mid tone, anywhere between 10 and 30%. Don't dodge to the outer corners, just make sure you dodge around the iris, it lifts the eye up and looks absolutely fantastic. So there's our before and after. If you feel like you've gone too far ever when you're retouching, even when you're retouching this fast, you can just go back in your opacity and you can either use your history brush to take it back or you can drop your original image back and just drop your opacity down. My next image is a beauty image straight from camera. This girl has very, very, very, very good skin. And really, I'm just going to keep it to only the little parts of her skin that I feel need to be retouched. I don't want to clone over the whole face. What I'm going to do here is just take tiny little bits, go up into this eyeshadow. Again, I'm cloning at 30%. I've got a nice, soft feathered edge. I work my way from the lightest areas down. So, around that nose area down. Around that light part here, under the eye and then, up into that little shadow up under the eye. So, very gently just tapping up and just blending really slowly and gently up into there; do not remove the bottom eyelid. This little shadow under the mouth makes a significant difference as does this little shadow around the nose. I find if you soften those, it just makes the nose look slimmer and it is just a shadow that most people don't like on their face. I would apply the portrait software to this part of the body to save me blending because I don't really blend any skin on the body anymore but because her skin is almost flawless, I'm just going to give it a tiny little whip around. This is only going to take me a minute and a half for this entire image and then, I'm going to make sure that I put a dodge and burn into those eyes. So, always a lift through the dodge and burn in the eyes and remember that little wet line up in the inside of the eyes where the eyeliner goes even for a natural makeup like this does look excellent. A little wee bit burnt in, so I think it just really makes the eyes stand out and makes them really pop. So, I put a little dodge around the iris. I go to my burn, I used my burn anywhere from 10 to 30% and I also burn in these little eyelash bits here. It's a nice small brush, still the same feather brush. I like to put a nice little defined line around the iris because it really jumps the eye out. And what I do here is just a nice little draw around there just to darken it and to make it look gorgeous. When it doesn't look like I'm doing a lot but at the end, you just watch the eyes just absolutely pop out at you and, yeah, it draws you right up into her expression. This image here, she had a tan which can be a little bit of a pain sometimes, the fake tan, it can get a little bit dark and pigmented but because, again, she has young skin and she doesn't really need any retouching through the body. I'll just go and take little areas that I don't like. Little areas like there's a few dots here. Make sure I blend the shadow through here. Just keep it nice and simple. Always blending again, 30% flow. So just keeping it quick and I just tap through, make sure I put a nice blend in there so that there's no lines. Come up to here. Remember, my goal is try and keep my retouching in under two minutes, so if I can prepare all of my images in under two minutes, then I'm producing a nice, fast, turnaround time, not spending my life on Photoshop. So I'm only thinking now, even that looks like I'm dragging, I'm actually just tapping up and down on her neckline. I'm going from that lightest part of her chin, out. So I blend in that little shadow around there. And then, we're going to come up on this line, tap, tap, tap, tap, just keep my tap going, nice and gently. I'm just going to give it a quick brush over. I want to remove any shadows on her face that make it look like she's got more lines on her face than she does. Nice and simple, always come down through through the bridge of the nose, it softens the brow when you take that little shadow that joins the eyebrows. Sometimes, there's a little shadow that joins the eyebrows, makes it look like a monobrow and it's not, it's actually just the shape of the face and it can get a little dark shadow. Up onto that cheek, take that color up and nice, soft all the way around. So, I managed to do a circle all the way around her face, nice and gentle, tap, tap, tap, keep it simple. Always face around the same size on the screen. Always my brush around the same size so that we're doing lots of quick light blending and then, there's a little line here on her forehead, I'm just going to blend into that. So I just go tap, tap, tap, right into that line until I blend it through and then it' no longer something that you look at. Okay there, wonderful, love that. Perfect. Okay, and this one here is at one minute and 10 seconds now. So, I've done a nice, easy tap to the face without overdoing it. Pretty easy to pull back if you feel like you've done too much. Always come around, I always have a look through the body line to make sure there's no little tags, make sure there's nothing poking out, things like that. That one, I'm just going to come up into the armpits. The armpit is a little bit, I hate armpits, I hate showing them in photographs, so I always retouch them. What we've got here? So, what I've done is, I'm just going to look at this hole in her eyebrow, her eyebrows are quite uneven. I have a couple of choices to make here. One of them is I trim down the top of this eyebrow and I can retouch up that other side of that eyebrow or I can fill in the other eyebrow to match. So, I have a couple of choices, I can clone or I can burn in but sometimes, neither clone nor burning in can make hair or eyebrow hair look real, so what I'm going to do is, I'm going to lasso, I've filled in this eyebrow 'cause this eyebrow has got a beautiful shape and I'm going to flip it, so I'm going to copy and paste and then just free transform and then I'm going to flip it. And then I'm just going to line it up because I always want to use real hair because I'm transplanting her right eyebrow because she had some issues with her eyebrow and I'm just going to make it a little bit darker. And with an erase tool, so just with my E for erase, nice small brush at about 20%, I'm just going to erase the edge; so I'm just going to fit her other eyebrow on top of there. And I'm just going to erase it back. This is not something I would really do until my client has asked me for it unless they had an eyebrow malfunction at the shoot and said could you fix my eyebrow. So, I'm always copy paste, using a real eyebrow, making sure I've got real eyebrow hair in there so that it's not something that looks artificial. That's done; when I'm happy with that, I erase it back. Remember, there's no such thing as exactly perfect eyebrows, so you just want to make it look real and make it look not noticeably filled in. So, once I get done there, when I'm happy, I'm going to flatten that and I'm just going to use my burn tool and, I'm sorry, my clone stamp and I'm just going to fill that in, make sure I do that shadow and then, up to here. I'm just going to hit the top of this makeup line. So, watch the top of that makeup line and... I'm just going to come back, hang on. I haven't quite got it, so I'm right on the back of the light, so I'm going to take a little bit from the dark, a little bit from the light until I put them together, yep. I'm happy with that, and then I go to my dodge tool. Just going to go in here first. What I'm going to do is I'm just cloning through, making sure there's no gaps in here eyelashes. I'll go to my dodge, just put a little 10, 20% dodge around her iris, in the bottom of her iris. I kind of just do a sweep, sweep. Then I go to my burn tool and I'm just going to flick up through the lashes. So I'm just going to make sure I fill up through the lashes. So I actually use my burn tool like mascara. And so, I'm creating a little bit of a, sort of, a little bit of a false eyelash and I just go under there. Nice, small brush to do that and then I fill in this line here which is the wet line for the eyeliner. So, that's the line that everybody blinks off when you're photographing them when they get a bit hot or sweaty, I fill in the areas like this because it makes the makeup look beautiful and I just make sure I define that beautiful black line, that beautiful wet line. Nice lashes, simple, perfect. Around the iris here because it makes the eyes pop. Looks absolutely fabulous. There we go, done, beautiful. Love it, doing that. This image here, I shot straight with absolutely no front light. So the only light source is coming from behind her. And as she was actually walking off the bed, I saw this shot 'cause she's actually leaning on both reflectors. And I saw this shot and I made her hold a pose here. Now, even for a lean body like hers, when the side wrinkles like that, we don't want to see any side wrinkles or anything like that because people don't like it. So, I just clone them through, so exactly the same as what I've been doing on the face. We're at 20%, I'm just cloning up into the line just to remove it. Then, what I do is just come down there, make sure that that's blended beautifully. Okay, now, I still feel like this is poking out of the back and I do sort of gauge whether or not it's going to draw my attention down there, so I lasso and copy and paste. And I right click warp and I'm just going to bring that little line in because now it's no longer a point that you look at. I'd rather just take a little, I call them muffin or a little roll or whatever it is and just remove it. I always want to remove something that I think the girls won't like. I go up to my clone stamp and at 20%, I just clone up into that eyeshadow because she didn't have a reflector in front of her, so obviously, there's going to be shadows on the face. Make sure I hit around the nose line because it just looks so much better when you do. Take that little shadow around the mouth. That's call puppet mouth, so you don't want it to drag the mouth down, so it's really easy to hit that. And then, I always hit that little shadow under the lip, on the chin because I think it looks really good. Same again, up and down the nose, highlight, and then I work my way around the forehead looks good but not flat. So do not work too far to the outside of the forehead around the hairline because you don't want to flatten out the face. I don't think she needs any retouching, so far, on her body. She has absolutely beautiful skin, so I just go around and any bits that bother me, I'll take that and I'm very happy with that. Right, good, good. Let's get a look up there. And then I want to work my eye highlight. So straightaway to my dodge tool. I'm at 20%, nice little dodge just to lift the eye up through there, perfect. Make a little pop in the eye. When I can't dodge it, when the eyes are really dark, I go to my brush tool and I go to white at 01% flow. And I just put a little highlight brush through but it's very subtle. Here, we have the twins, it's a great shot but I'm just opening it in raw. Now, I actually did the twins sitting on a box with their legs curled up around each other. It was a very, very difficult pose to do. Because they are young and flexible but it's quite a hard one to replicate, so if you do have two young girls, it's definitely worth it. Again, we're on young skin today, this section, so, it's pretty easy just to take anything that stands out like a main pimple. People always ask me if I remove moles, I try not to ever. I do lighten them though, if they're really strong but I try not to every remove them, unless the makeup covers them. So, a very basic blend, just for pimples only, just through large spots that you get on teenage skin. Over here and then blend that little shadow there because there's a little highlight around the nose. Now, take that over to this side. These girls have, again, such flawless skin and we don't want to lose the actual skin patterns, so I'll just take nice, small little taps and blend them through. And any shadows up under the eyes, like that, we'll take down, always around the nose and then, I go up through my forehead line. Make sure I clear out that forehead. Nice, flawless skin. Then, after I finish that, have a look through the face. And I want to just make sure I've got a good blend. Under this eyes still, it's a little bit dark to me. Nice and fast, again, I'm on 30% flow. 20 or 30 is all I ever stay on. Every now and then, 10; 60, if I'm working on a background. But I just keep it really simple. Down into the neck line, quick blend there. Big brush, soften that. And I can use a little bit of gentle sweeping when I'm on the body just never on the face. I don't want to sweep on the face. Make my brush a bit bigger, just blend into this line here. Perfect, but keep a neck line just at the top because we want it to look real. Okay, wonderful. When I'm pull back, I make sure I do just a general blend on any area that I feel is still holding shadow and I do come down on the tan lines using my clone stamp just nice and simple, just tap all the way down. Make your bush smaller and clone all the way down, so make sure that that clone stamp follows you. And try not to go into any lines, just soften those. Sort of dots out the area there. I actually cropped this image, sort of more square and then I shot it to be cropped. So, the idea was that as I was photographing the image, I knew it would look beautiful cropped. So, I took it to about here. I realized when I got here that I had not pulled back far enough in the camera, so I actually allowed some cropping room at the top here and I just extended the background, again, with Photoshop just really simply. I wanted to make it a nice, large square canvas just so it looked really contemporary and I was really happy with that. I also put this image into black and white. It's one of my favorite images in my studio. The twins are so beautiful and just the way they're wrapped around each other in their togetherness. Whenever I remove stray hairs, I use the healing tool. Shortcut for healing tool is J. So I just the J and I go through and I remove stray hairs. I'm not actually that big on removing stray hairs. I do if they bother me like this, stick up, otherwise, I just use my clone stamp on about 60%. I'll just come up and just clone down onto stray hairs but I don't actually get to stuck on removing stray hairs. I just don't see the point unless, obviously, they bother me. And I'm happy with that. Alright, this next one, beautiful image, again, young skin, so easy photographing these teenagers with the young skin. They have such beautiful skin even though they might have pimples, the rest of the skin is beautiful. So once you remove the bits that you don't like, it's so easy. Something like this, when there's light through the hair, I have to decide whether it's a distraction or not. I always kind of make that call on whether it's going to bug me or not. And then, I just whip through my main dots, of course. I don't want to be blending the whole face 'cause I want her to still look like she has young skin. So, I'm just going to go through and just hit any dots that I don't like, again, I'm cloning nice and easy, 30% on the flow, just working my way through the dots first. Just to even out her skin tone. Here, here, through the bottom of the chin line. Going to come up to here. And before I start doing a larger blend and blending out through that shadow, I'm just going to take those dots and I go bigger here. And here. And then, I come down onto this line, so really, there's only about three dots on her forehead that bother me. This little brow here, the shade, this is what I have to remove because this can look like a monobrow from a distance; this is just the shadow that comes up under the forehead when you haven't got a good reflector. 'Cause we're outside with no reflector right now in this shot; so I'm just going to clone down and up from her nose and down from her forehead until it meets in the middle. And just take that little line which is a horizontal line off the bridge of her nose at the top. I'm going to come into that shadow on the cheek so I blend that cheek out nicely and I'm going to come up into the shadows around the nose. So, first of all, I took the dots and now, I'm just doing a general blend and keeping it simple. I'm going to make sure I keep it smooth but I don't overdo it 'cause it's really fast overdoing it from here on in. Like that. Alright, so there's two little stray hairs coming in through here, I'm just going to use my healing tool, so I'm just going to go down. The trick here is a nice, tiny brush, the width of the hair. You can do a nice tiny little brush and just remove those hairs. Remember, the healing tool can be fast and it can also be a bit fickle, so you have to watch it. Make sure you're getting right down that hair line, release, wait for it to process and sometimes you have to do it twice and if it fails, you're crossing a line, then, obviously, sometimes it doesn't work, so you just have to go with a clone stamp. And that pretty much removed any hair so fast. Right through the eyebrow, let's see if this works because it's very hard to cross a line in the healing tool. But it's going to let me do it, I think, not bad. I'm just going to do a short sweep; perfect. Too easy. Bless Photoshop, so easy. A hair used to take us about 10 minutes with a paintbrush, one hair, if not more. Beautiful. I don't want do too much on this image, remember, my client wants to view it so, I don't want to spend hours and hours on it and I also want them to look as good as possible when they see them but without wasting the time on doing to much. I'll just go straight for the stray hair using my healing stamp still. I'm just going to go down, draw down the hair, let it go, wait for it, perfect. Just that little bit there, I'll do twice. And that little bit there, finish that off so it goes all the way down. I shot this image right on sunset, it was getting dark, the sun was actually behind her; it's shot a little bit underexposed but it's good, I've got enough black in the darks to keep it nice and sort of grungy. I decided right from the beginning when I shot this image that it was going to be, I'm going to take the highlights right down and make it kind of dark and gutsy and both color and black and white. I couldn't decide on the final process of color or black and white. I'm just going to clone around here. Again, I'm cloning at 30%, nice and easy, just going from my highlights out and just blending, tap, tap, tap, around there. Don't flatten out the face, so don't remove the highlights, otherwise the chin becomes very flat and we start losing the shape of the face too quickly. Let's come up to here. I want to remove those pimples, I want to remove her dark spots but I don't want to remove her freckles or that little natural freckle bridge on her nose. So just really gently clone through there, just takes necessary but don't take too much. Now, it looks good. A little hair through here. Perfect. And another one coming this way. Done. And just up under here, I'll take that. And perfect. And put this image into black and white.
Class Materials
bonus material with purchase
Ratings and Reviews
a Creativelive Student
Deeper deeper deeper on women beauty, how to keep connection and create intimacy moment on the pictures you take ! This is perfect suite to the sue bryce workshop. After a few weeks of practicing the workshop I bought this inside glamour session. An d i continue to improve my photographs and have more efficient and better communication with models. Thank Sue and Creative Live for that. I definitively a great fan of CL ! Roland Grall http://www.rolandgrall.book.fr/
Zoomer-Photography
Absolutely love her... the first time I saw her on creative live I was inspired just by her clips... Made sure I watched her everynight after work on the re-watch.. and I loved everything that I saw.. I just had to buy it.. I also put a plug for this in a portfolio building group that I belong to as well... Told this is a must buy.. with the posing guide.. and Sue's enthusiasm is so inspiring...
a Creativelive Student
I purchased this course (actually the collection) for a few reasons. First, the amount of experience you can pick up by studying and practicing these poses is overwhelming. You cannot get this on the first watch, it will take subsequent watches and practice, practice, practice! Just the PDFs alone make this worth it. But the other reason is that Sue has to be one of the most inspiring people in the entire industry. Plus she's a smart cookie, a business woman and her experience in that area is priceless. Lastly, Simona Janek is an awesome lady as well. Her knowledge with make-up has already expanded my appreciation and knowledge of the area and it's key importance to the final image. Thank you CL for bringing this to us!!
Student Work
Related Classes
Portrait Photography