Creative Ways To Photograph Elements
Lesson 1 from: FAST CLASS: Creative Composites Using Your Own Photo StockKaren Alsop
Creative Ways To Photograph Elements
Lesson 1 from: FAST CLASS: Creative Composites Using Your Own Photo StockKaren Alsop
Lesson Info
1. Creative Ways To Photograph Elements
Lessons
Creative Ways To Photograph Elements
08:48 2Capture Usable Stock Anywhere You Go
04:14 3Storing And Organising Your Stock Collection
12:01 4Focus Stacking Small Elements To Make Them Look Large
04:25 5Focus Stacking In Adobe Photoshop
10:34 6Photograph Atmosphere
07:49 7Create Photoshop Libraries, Brushes And Overlays From Your Photographs
11:58 8Create Continuous Photoshop Patterns And Pattern Brushes
19:51Lesson Info
Creative Ways To Photograph Elements
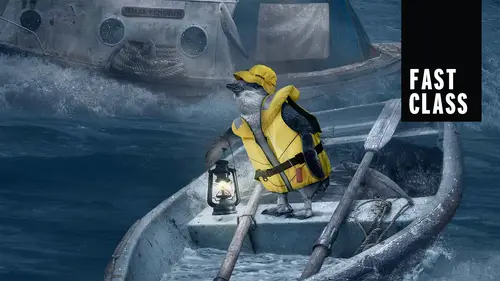
let's start by taking a look at some of the elements that I used in my composite of homeless penguin. Now you can see there's a lot of elements in here and some of these are used and then took away. I wasn't happy with them, some of them I used and kept. So as we go through this class, there are a few aspects that I'm going to take you through physically, like how to photograph costumes. Um So you can see that I've got a mannequin in the studio that I dress quite often and you want to make sure that when you're photographing your costumes and things that you're putting onto your subjects, that you take a few different angles and you make sure that it's sort of gonna fit as best as possible onto your subject. Now there are quite a few lanterns and various elements that I also photographed and these were on location at a what you would call a thrift store or an op shop, a second hand shop. I highly recommend you connecting with people that run these shops because I've got some great rela...
tionships with local shop owners and I can go in and photograph at my leisure all the different things and they've even got a room that I can take elements into. If I'd like to. If you look really closely at this lamp for example, you'll find that the focus area is sort of in the middle and that anything a little bit closer and a little bit further back is slightly blurry. Now when you're compositing you have the freedom to make a decision if that's going to make a difference. I knew these lanterns were going to be very, very small in the final piece and that you wouldn't be able to tell that these aspects will be able to focus because of how small they are. Now, if they were filling the frame then I would definitely focused at them because you would see that difference in depth of field. Now there are elements that I photographed in the studio that I did use but then I took them away again. So, um I thought that I wanted them in there and you can see I use a green screen and behind me, I've got a green screen. I love using green screen because it just makes things so much easier to cut out later. Now let's take a look at the penguins that I used in this view here. You can see, I've got the original one, it's a DMG. It's a raw file. It's a cropped in file. So this shot was a larger shot. So the file size Is not really very large. If we look at the dimensions, it's 2033 x 2579. Now, I needed to make that bigger to fit into my high resolution composite. So I used a new feature that is found in Photoshop and Lightroom CC that's super sized it. Now you can see there's some other elements like the rain photo which is photographed in the studio using water spray and I've used that in the image to create that rain atmosphere. But you will notice if you look really closely at the homeless penguin piece, it looks like the rain is coming down on an angle and that can be achieved with motion blur. We're in my green screen studio and one of the things I quite often use in my composite photography is this little mannequin here. Ah this is a child size mannequin and it works really well for the most part when I'm creating pieces that are in that child like look and also for animals. Now I actually used the life jacket that I photographed for the pink and as something that beefed out all of the other clothes as well. So this life jacket, you can tell it's actually quite fluorescent. It's it's quite a bit brighter than what it is in the scene. It's always very easy to change colors in Photoshop. If you've got something black and you want to change that to white, that's a little bit different. But something that's colored like this definitely be changed to a different colored yellow. So I put the life jacket onto my mannequin. Yeah, and photographed this without the amazon. This is a great thing about the mannequin mix. I can remove the whims. And I was able to then take a number of different photos, different angles. The key for, you know, compositing and being able to use the right images. You want to make sure that the angle and the height is correct. I'm going to bring this down so more level with Yes, the subject now in the photograph in the penguin is just a little bit down below the horizon because it's the penguin that is right at the front. We have the mannequin facing this way and let's stand up. And I photographed the mannequin at the angle that I knew would work for the penguin. It's leaning over a little bit in the boat. That's okay. Now I'm going to adjust my settings so you can see the settings that I'm going to use. I'm going to turn my eyes onto manual so that I can lock it down exactly as I would need. I can make my shutter speed slower. I'm hand holding it, nothing's moving so 100th of a second does work. I'll make my aperture Narrower at F nine. Now, the reason I want my aperture narrower is because I want to make sure that this is in focus from front to back. So if my aperture was on F 2.8, it might be in focus at one part of the life Jacket, but not the rest of it. So taking it off the tripod. So I've got that flexibility down on my knees, photograph down low, a little bit higher and a little bit higher and coming around the side and around To the front. So taking about 10 different photos so that I've got that flexibility. Okay, now this is just a spray bottle. This is glycerol glycerin found at the pharmacy or chemist or whatever it is that call it, where you are. Now, you could use a droplet applicator. I'm just gonna pour a little bit into the water, it's quite thick. And then I'm going to use this to spray onto the jacket to create those droplets. So now all you need to do is use the spray bottle and you can see as you spray, those droplets tend to bubble and they create that really wet look without needing too much water. But I also created a Photoshop pattern to create that same water droplets. So I could add that to any of my elements in Photoshop and do that later on. Um Now penguins don't really have arms. So having this kind of hanging down like that doesn't really work. So what I did do for a lot of pieces of clothing was pulled the slaves back in inside out. So I could later either add the penguins, um wings out the side or sort of have it look like the penguin was underneath the costume again did the same thing as with the other shot, You know, getting a whole lot of different angles so that I had a lot to play with hat in different positions and spraying it with the glycerin to create that wet look. Now you're never going to get it perfect and putting costumes on to animals requires a little bit more work in Photoshop, which will take you through later on how to liquefy and use puppet warp, which is one of my favorite tools to make it fit around the penguin. Looking forward to showing you that.
Class Materials
Bonus Materials with Purchase