B&W Sky Replacements
Lesson 9 from: Black & White Photography Post-Processing in Lightroom CCSerge Ramelli
B&W Sky Replacements
Lesson 9 from: Black & White Photography Post-Processing in Lightroom CCSerge Ramelli
Lesson Info
9. B&W Sky Replacements
Lessons
Establishing Black & White Tones & Processing
06:14 2How to Make a Simple Black & White Conversion
04:06 3How to Leverage Local Tools for Black & White Conversion
11:32 4How to Make a Black & White Panorama
16:03 5How to Master Presets
01:32 6Landscapes in Black & White
05:12 7Black & White Long Exposures
06:08 8How to Add Haze in B&W
10:13Lesson Info
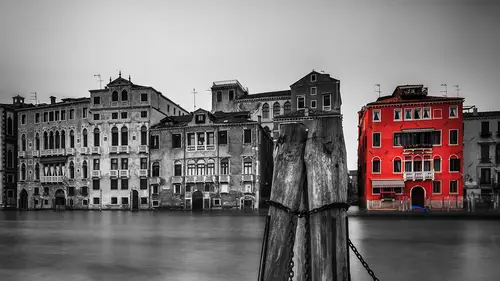
B&W Sky Replacements
I have one more big project off, uh, black and white here, and that's from the same day it was raining. And I'm going to do ah, sky replacement to really make this for the pop even more because because there's a lot of sky, and on this one, I really want the drama. So first, let's play around with our presets, see if we can do something so basic PW Uh huh. To Why not? I'm just going through This one is kind of interesting. You make something interesting. Ah. Now, one thing I want to tell you is like and that's a mistake I did at first when I created appreciate, which was due, including a preset the upright function, that auto function, which is works great on that photo. But when you when you have photo on on the upright on preset, sometimes does really weird things, so you're better off not putting any appreciate and just doing on a one photo per photo basis. But on this one since its replacement, I just want to show you what it looks like with a preset. I'm gonna go from the start s ...
I'm going to reset it because I'm going to do this trick where I need the photo to be a little too bright to be able to put in the sky cause I'm used going to use a blending mole called Multiply where you Can really blending sky seamlessly. So first of all, I'm going to do Ah, the classic workflow off from the shadows. But I'm not gonna bring on the highlights. Cushy. That's kind. There is like, Yeah, there's a bit of sky, but it's boring. Nothing's happening. As I said, I've got to nightmares in life Blue sky, white sky. Because why? Because it's the only skyward. Nothing's happening, a blue sky and I prefer blue over white because white is white and just doesn't stay white. One of the reasons I moved to California was because Paris, December, January, February, March, White Sky, California You get a bit of variation. All of the USA White Skies is the worst blue sky. At least when the sunset comes on to get a nice Grady int at sunset. Where's of the day? Boring. However eso this one didn't have much for, So I'm gonna just a black point. I'm gonna hold on the option key and do the black point, and I'm gonna do my white point. But on this one, I want to sort of overdo it. I really want is to be maybe not. That's black. And so don't we get a bit of color? The blue from the I believe is a Manhattan bridge. I'm gonna go here, and I'm gonna do I look at this. Look how much it's raining under the bridge and if you can see it, but it's we can see it's pouring rain. So my daughter has his big on bread. I'm shooting under the umbrella and, um so let's do some sharpening. Let's do like a full work on this one test. We get a bit of time here, So, uh, I'm going to go to, uh but but I'm looking for the detail, which is Mr Transform. Just I'm not used to this resolution. Here it is. That's the detail panel. That's what I'm looking for. So this one, I believe you press I you can see what it was shot at, Isa 1 25 So for explaining my mistake should be neither 100 I just, you know, went a little fast, so sharpening. I always have been on something that has where you see the sky and when you see a city So it's almost like 100 eyes Oh, so 100 guys who have got this great form and I wear, you know, I go 90 under sharpening about 10 or nose reduction. Okay, Sometimes looks were when you look at 100% but when you do the masking, it helps you see, we have a lot of noise in the sky. So maybe on this one, because it's 100 because I made that mistake on the eyes. So I'm gonna go like 15 85. It's just that when I go over, like if I go 130 sometimes I just get too much. You don't want to have a too much sharpening. It looks kind of fake. Also, just want to bring back a good old contrast like the good old days, you know, and s I'm gonna hold on the option key. I'm gonna do my masking. And so I really don't want to sharpen anything which is black is not gonna get sharpened. So no sharpening here on this guy. And now we got got something good there and let's do our black and white so black and white so you could do black one whenever you want. You don't have to do it, you know, right away. Or it doesn't really matter. So black and white, Um, on this one, I want to keep this kind very white, cause I'm going to replace it. Eso I'm not interested in cleaning year and Drang in it and just, you know, making more contrast. He so on this one, I think I'm just gonna do that. And of course I want to go to the lens correction. We moved Dramatic impression that really doesn't matter was black and white because red fringe is invisible in black and white. So you don't have to do we move chromatic aberration. But I pride, I can go here and click on a photo at home. And now I've got the bridge that's come straight, and now I'm gonna go it it They didn't have to be for the shop CCTV on 15.5, which should be the latest version that writing this to toil and I'm gonna open this into Photoshopped because I like the photo, but I think it could be better. And, um so that's good that I have this kind here, So, uh, we can use that where we can use that sky. That's kind of been using a lot. But so I have had already photo shop open with this guy here. And one thing you need to do if you, our creative club member on I'm gonna give you quite some sky for free. And on my website. If you go the first word that comes less yell, you get a full collection off sky spin years having different type of skies, and I'm gonna give him to you. Once you have the sky, you need to open them up in photo shop and you need to go into the library module here. Now, if you don't see the library module, you maybe not in the white workspace to go it to different workspace, you can go to hear, like, photography, or you can go to essential we're gonna be using essential. You should have that. That is a future I'm sure, is only for creative club member. But just that alone for me is worse. Uh, you know, pain $10 per month to have Leiterman photo shop eso here is you have got a whole bunch of sky, which is part of my It's a little small part of the full collection that you will find on forces that comes in a shell. And ah, so how did I do that? I went here and I'm going to create a new library. So let's call this black and white creative life creates. You see, here nine says dragon drub assets. Now here I have a sky. I can click here, I can just drag and drop it and I should have to do that. It's gonna go up in the cloud and it's gonna be on my photo shop on my I believe even after effect will be premier different abs that that you're going to be using. And let's say that you know, I'm on somebody else's computer and I log in because you can log into your own creative cloud. You you can log in on quickly off app. Once you're logged in automatically is gonna download all your assets. You always have it on you, which I find is really because sometimes I didn't even do scary basement just because, Like Like I had to look. Where did I put my sky in life? We forgot which folder got 200,000 photos. It's a mess here. I have this whole collection and you know, it doesn't have to be just guys, you know, it could be ah, texture. It could be, You know, I have, like, flaring glows, you know, And that's old on on the website. So, um, in this case, I'm gonna go beat up security of life, go in this photo, and I'm going to drag and drop this guy on the photo. And ah, now where would this guy I mean, it was so overcast that I have no idea where the sun is, but for aesthetic purpose. Maybe. Well, we'll keep it here, and I'm gonna press enter and we're done. Now, I'm gonna go here to take my layers and, you know, in the layer you have different options. But one very Q one is multiply Night looks kind of weird because now it's like color, which black and white. But she multiplied is going to make it in a waste of anything that was white on the under in this weather is going to come transparent. So it's gonna blend both and so But I need to make this guy black and white. Now, there's a shortcut for that which you need to remember, And that is command shift. You, I think No. Command control shift. You. Uh oh. They changed it. Okay, I messed up. So you can go to image adjustment. Pepe. Pepe Palm. Um, they have one. They used to have one's called the saturation. We can decide rate decelerate Sisk because Oh, you know what I know why didn't work? Because it's by default. When you drag and drop a sky, it's a smart object. So you need to rast arise to file first and then come in. Chief, you should work. Yes. No, it's a problem. Yeah. So the good thing is, you know, you can a smart of education, you know, make them bigger, smaller, They keep the same quality. So I'm in right there. It's pretty good. And, uh, the only issue is here, right on the horizon line. You can see something kind of weird. You know, I can see the sky here, but you can put it right there. Okay, Now you've got an issue here. That's already better. Eso no. What did you do is you need to blend it, but usually what I do. And the thing is that if I had to make a selection of this between all the lines and it's just like forget it, it's like but a year to do it can be done, but it's almost impossible using blending modes. It's just, like, perfectly there. I mean, we have some work to do, so usually what I do, there's two ways you can make this better. When Number one is, I can create a mask, take a big brush, make sure the capacities like 2030% make sure black is the full run color. She press x to go for background and eso I've got black and I can just go here, and I just I'm just gonna make a slide grade you in here. So it's just gonna blend better. Well, no, you passes to low, let's go a little more and she here Boom, boom! It's like it was over there. Let's see the best ways to go before and after, before and after and I kind of see there so I can take back my brush, make it smaller, and just brush a bit here and especially be there. Okay, so that's one way of doing it the other way, which I prefer is ah gonna shift click delete layer. So I sure you little trick. By the way, if I go here and a dragon drug, the layer on the on the been here is going to do something weird to see. It is gonna apply the mask to my foot. Look at my layer. You see, it's what if you raise to the photo so you don't want that command options easy to go back in time? Yes. So the only way to really the legal areas not to drag in Adana words like that. But you have to shift. Click. Sorry. Right Click and the little your mask and it doesn't get apply. When you do that, I'm gonna put this back into normal mode, and I'm gonna I'm gonna press command J four. I could have dried interrupted here, and I'm gonna press command T or I could go to edit free transform, right click sleep always until shift and I'm gonna bring this down. Been enter. So now I have like, Oh, and I forgot to mirror it. So I mean, we do that really quick Command t shift like flip vertical first. So it's mirrored and then you bring it down and then you presenter, Now, one thing you need to make sure when you do that is, um, on the view option Woeller, that snap is on because snap is gonna help you. You know, like as I'm moving, you see this little orange ing It tells me here, it's not here, is he goes, boom. It's going to snap it there and make it a perfect reflection. If you don't have that option is gonna be really hard to to to the pixel make it there. So now I get this guy that stare, I'm gonna right click, and I'm gonna select both of them and go and go to merge Layer. No, it's merged, and I'm gonna go back to normal, back to multiply. And now it's blending. But now we see which can be kind of cool, but a little too much the reflection of the clans in the water. And so, if only there was something we could do about that. Yes, we can. I'm gonna take the lasso tool. I'm gonna make a week selection of the water here, Just the water, and I'm gonna go to Fintor. Better go. Schindler and Chief, do it a lot. Basically, I'm you raising all that texture. That's their You don't see anymore the clocks, but it's kind of cool to keep a little bit of it. So you see, that's a little bit of it. That's not so much of it. So find a value that do you think it's not just kind of natural to have the clouds to be flight little bit in the water, you know? So I'm gonna go, OK, command D to undo. Now, this guy relax of contrast. So sometimes when you can do is you can just add contrast just on the sky. So there's two ways the best way to do that is you go here and you go and you add levels adjustment. So here is the level adjustment and this one, I just wanted to affect the sky. So if you go between these two layers the level level adjustment and that and you hold on the alky and you click here. Now this is only gonna influence the sky and check this out. Now, let me put this year on the side here as I move this slider, I can make my sky more dramatic or not. You know, usually that's the middle tone slider. That's the dark tones. And that's the height on the highlights so I can bring down some of these highlights. Make this little darker. You know, we see more and more of the picture in the water. That's fine. That's fine, because we can always go back here. We make a selection of the clouds and go to filter, Blur, Go Schindler. And, uh, you know, we blurred until, like, it looks realistic and press OK and voila! And now, so before, after before, After and one time When I when I've added this guy, I like to do a double of Lippman. So I just like to click on command w to just close and save and because I mean, like, you might go back to Truman is gonna reimport the photo Wizard sky, and I'm ready for the second turn because it was kind of hard for me to Ah, no photo selective, Thank you very much. But here it is. I mean, I like the photo, but I want to push it further. So I'm gonna go back here, and at this point, I don't use preset. At this point, I'm just gonna mess around here with the your flowers. I want to open a baby because shadows bring on the blacks. Let's see Highlights. Maybe. But since we added a bit of sky, I'm like we could know we could make it And whether there was a little bit of sun somewhere, just a little bit behind the clouds so we can go through the radio filter. I can go here, and I love to do a few things that, just like our outside of the photo things kind of cool. And I'm gonna go on this one. I'm gonna go to exposure. I'm gonna make sure that feather is on 1%. And invert mask Azzam because I only one effect inside of the mask instead of the radial circle, and I'm gonna boost the exposure. And, uh, I can go even outside and just make it really big and just you know, fake that it was something going on there or put it here. You know, you decide what you want to do, you know, and just make it a little more interesting. I mean, this is kind of like crazy black and white to, you know, make it really over the top. But some people love that stuff, and, you know, and I think it works well on this photo compared to the original, which is that, you know, coming from this to this now, Okay, I'm just gonna do a little, uh, great in here, and I'm gonna go to exposure and lower the exposure here. You know, just to finish up this photo, and I'm gonna do something here and, well, f to go full screen. And that's the final result of the photo. And you see, here there's a bit of stuff left there for Maybe if you don't like that, you could make a lasso tool and just do the go Schindler on the on the clouds. But as a general idea. So if you want to ah, follow me. Not in the street, but on the web. Ah, you can go to photos dot com That's where I have all my presets and things on YouTube. I'm doing a weekly show on light from Actually right now, I'm doing a lot of time to get a little social. Media channels one video per day. Crazy. Um, so my day is not over eso. It's youtube dot com size photo surge Instagram at photo surge and the free, Preset and free skies is photo search dot com slash c l. And on that website, when you come to it, it's gonna look like this you get It's a special for the Creative Life special, 90% off. And so that's my Photoshopped preset, complete back light and present complete texture with all the skies, which is normally like $97 at $9. 70. But did, she says, Here you must be logged into download. When you do that, you're going to get a new box, which is here, and you can download for free the creative life freak and I'm gonna give you like to appreciate skies and photo shop. Is it for free so you don't have to appreciate something, but if you do, you will be amazed. Well, that's it and also there's other disconsolate in use on the entire website. You'll see that if you go to Forrester dot com slash c l.
Class Materials
Bonus Materials