Lessons
Class Introduction
03:04 2Brush Management
12:17 3Brush Options
19:33 4Brush Tools
03:45 5Stamp Brushes
16:31 6Concept Brushes
27:59 7Impressionist Brush
30:03 8Impressionist Brush Settings
03:03Paper Choices, Patterns & Textures
07:11 10Hair & Fur
14:09 11Small Details with Brushes
03:26 12Create Your Own Brush
29:12 13Smudge Vs Mixer Brushes
16:00 14Blender Brushes
08:08 15Mixer with Layer Styles
08:21 16Brush as Mask
10:06 17Leaf & Grass Brushes
23:05 18Lisa's Favorite Brushes
07:25 19Oil Painting Brushes
07:47 20Water Color Brushes
16:42 21Brush on a Path
11:49 22Brush Settings
12:53Lesson Info
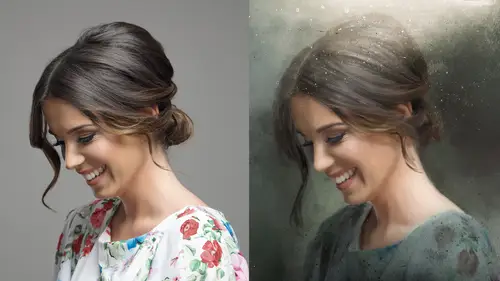
Hair & Fur
We're gonna do specialty brushes and what's a specialty brush versus a concept brush versus a stamp brush. This is my invention, this is just how I think of it there's a few other people like that. Specialty brushes for some of us is, things like painting hair or perhaps grass and it's not just a buildup thing. So the concept brush, let's review this. The stamp brush was click down one. You can do that with the cloud, you can click the cloud once and that's a stamp brush, you could also have a cloud that you're building up and for me a specialty brush is more of a painter thing like you wouldn't do this with chains would you. You wouldn't be building up like this with a chain, but you would with hair or fur. So for me, I call that a specialty brush, alright? And we're gonna talk about hair and fur and this is one of my favorite things to do in Photoshop it's painting hair, I'm not quite as good as some other people who shall remain nameless who are in other classes, who have glorious h...
air themselves but I do the best I can, alright. Now, what have I said the entire time, when you have your brushes for a job, load 'em up. So I have my brushes for my hair separate. I feel like y'all at this point could probably understand a bit why we do this, because I don't know about you but, my head's spinning with how many brushes I have, and this way, you guys can hopefully breath a little. Let me put my brushes back in where you showing, ah you're down here, alright, so. With that what I'm gonna suggest you guys do is say thank you very much impressionist, click on the trash can, goodnight, we'll talk to you later paint, alright, and let's just talk about fur and hair brushes. Alright so, I'm gonna do a little quick sample some hair and then we'll talk about how I re utilize brushes. So painting hair in our line of work is Christ, it's all we do I think. So we often get files like this where we have a shot and you have to start doing hair extension. This is where the tablet conversation comes in. I, you can't, I couldn't even imagine, there's one guy I know, one guy I know, Roman, who is a great retoucher, hi Roman if you're out there, he's a brilliant retoucher, and he's the only dude I know who can actually paint with a mouse. So if you're gonna do this kind of work, I'm gonna suggest you get a tablet, and I'm just gonna make a new layer and I'm gonna call it paint hair, or just call it paint, that's good enough for government work. Now when I paint hair, I'm not gonna use the cesan brush because I don't think Cesan and I are gonna get along with hair, but who knows, you can use it. Can I call attention to something? That, you saw that tip right? Let me do this. That's the Cesan tip. Didn't I just throw all my brushes away? I did, it doesn't matter, the last one is still loaded, I could save it if I want, I have one moment of grace where I can go, (gasping) I didn't save that brush. And I could save this out if I want to, but I'm just gonna not use it. Trying to get your handle on what's going on here folks, alright, so I have some brushes, that I like to save for hair that I use for hair and I'm gonna just pick a color here and paint it off into the side here, just so you can see it. Now the brush is really big, and I'm trying to show you guys how to, reincorporate what other people have made to use for yourself so, I'm gonna click on my brush here and show you what it is. It actually is, it used to be a grass brush. This is a brush I got from another retoucher and he, it was his grass brush, and this is how he built grass up doesn't that look like grass? It's awesome grass, but you know what awesome grass makes? It makes awesome hair, only it's way too big. So what I did is a I just size it down to whatever size I need, I option click, let's go to your layers, let me turn my samples off, I'm gonna zoom out a little bit. I'm gonna click. Option click. Find some hair and then I start painting. Some folks like to paint from the outside in. I like to paint from the outside, I mean, crown out, and Bob's your uncle, you just keep going down. I wanna talk a little bit about this process, hair is a bitch, it's just hard to do, not that many people are great at it, I'm not great at it, I'm okay, I can get by, make a living in it, but I'm not fantastic at it. I have a few tricks that I find are helpful for painting hair, and we have a whole lovely little hair class here at Creative Live, but I'm just gonna give you a few tips. First of all it's to do the gesture drawing. And for those of you used to take live drawing classes remember you start with gesture drawings? So the first thing I was told to do is, (exhaling) alright, what's the shape of the hair, what size do I wanna use? Alright, oh, sorry, I'm new to this application frame and she and I are fighting so, excuse me for one second I'm gonna pull her out and surrender. Oh Martin, you and your application frame, I'll fall in love one day. Alright, so what am I doing? I'm doing gesture drawing. And why I'm doing this is I'm trying to get the feel and the vibe, I'm gonna just pick a new color it doesn't matter, you know what's gonna happen, I'm gonna pitch this, I'm gonna 100% throw this away, because what happens is, do you guys feel this, you get too precious, oh I'm painting the hair, oh I gotta get it, and you get all tight and uncomfortable and it doesn't work. So what I like to do is do this big old, (exhaling) alright, okay, I'm starting to get it. Occasionally I will pay attention here guys, not in a handout I will hit R to rotate and I'll rotate the canvas, it just temporarily moves it it's a proxy thing, hit return, go back to my b for my brush, oh, or maybe not go back to my, hello my friend, hello my little friend. Alright I'm in my brush, I'm painting, I'm happy, I hit R, I rotate. I go back to my brush and I start painting. So some people like to change, this is kinda new to me, I didn't use to change the canvas, I would move my body and it doesn't matter, it's whatever, you hit escape, you hit escape, It comes back out, alright now I feel ready. Do the unthinkable, command a, delete that layer, the contents of that layer and now start painting, okay. And let's call it like it is. There are gonna be some days hunny, where you can't do this. Like, I dunno. There are days where it's just like, aint gonna happen, and I have, in my older years now I've become comfortable enough to say, you know what sweetie, I can't, I'll get that for you tomorrow. And without fail, I come in the next day and in five minutes I lay that hair down and it's done. There's just time where hair's just, no, the answer's no and you just have to be willing to say no. So that quick little brushing hair. Occasionally what I like to do also is, I will do kind of a base layer, base layer of hair, and, because, that's a lot of hair to paint, right? So I will do underneath, underneath the top hair is i will take that brush, and I will make it bigger I am holding the control and the option key and I'm scaling the brush, and I'll reduce the opacity of that brush I don't know, to 30%, I'll zoom out, and I'll block in the hair, I'll block in bigger areas of the hair, just a light transparent, you're gonna paint over it. But. Fill it in a little bit, and the you go in, and then you do your top hair, that way it's not 72 hours of this, right? So hopefully that helps. Generally, it's a rare day, a very rare day that I can lay down a bit of paint for hair and have it look perfect as it goes, so I tend to blur it a little bit after I painted it, Gaussian blur like . .8 whatever and, yeah. there'S a ton of it, we have a whole hair workshop, I don't wanna do a whole thing on hair but, at least this gives you an idea of where to start, and so the takeaways, the takeaways are, use a grass brush for hair, just because someone sells you a brush or Kyle has a brush or you made a brush, brush one day for hair, grass, doesn't mean you can't use it for something else. You just gotta think a little differently. Second takeaway from this, do your gesture drawing give yourself some freedom to figure it out and then paint. Third takeaway is a larger brush and do a really low opacity blocking in so you're not spending a ton of time painting. Cool? Alright, so here's our dog. And hair and fur is really simple, similar. It's the same kind of idea, I just thought we'd look at something different. And what we often get in our line of work, I'm gonna turn this off and on for a bit and talk, we get low res images and they don't look so good. I cannot tell you how often we get this. If you're taking, folks take iPhone photos and they're not shooting through a lightroom and it's really jaggy and you need to make it look a little better, or the hair or the fur just doesn't look, needs some smoothing. You can paint for just like you paint hair. It's the same process. You just might wanna use a different brush. So we're gonna look at a different brush. We're gonna look at a hair, fur brush. And so we've got a Irish Setter brush, and we have another brush that was used on a job that we called a Dragon brush. Doesn't matter what you call it, how you use it. I'm gonna pick that Irish setter brush, and we're gonna take a look at the settings here. You guys having fun? Yeah good. Hopefully you're finding it informative. It's a lot of, it's a lot. Alright. So what we're gonna do on this, is we're gonna just do a new layer, I'm gonna turn the old one off. I'm not even bothered spelling it right. And I'm gonna option click to select my hair and I'm gonna show you this brush. Now this brush is a little different, I think for giggles, I'm gonna do it off here in the corner for a second so you can see it. Do you see that? That's got a lot more detail to it and a lot more different shrouts, can I call them shrouts, little bits. And I'm just selecting the color. You can see that little option button popping up on your screen to show what you're doing. Cool. And here we go, here we go, here we go. So I think you get the idea of what it looks like, of how the brush works. I'm gonna delete that and just turn the after off we're gonna scroll through it and then we're gonna look at the settings. So real quickly I'm just gonna, before and after. Before and after. I mean low res and then, isn't that pretty cool? It's one brush. If you guys wanna see what the brush looks like, the brushing looks like, that's it, it's just that one brush. Now this is a little, you know, this is a little bit of a zen thing. You gotta kinda get into the zone and start painting but it's so much fun and it's just that one brush, that's all it is, so let's take a look at the settings real quickly. Pen pressure, little size jitter, directional, a little bit of scattering, makes it come across, open like that. Color dynamics, here's your friend. This is probably gonna start really, it's all from the cesan brush, let's call it, I'm gonna say the truth. For me, other people knew about this before, I did not. When you start shifting the hue, that doesn't mean, that means, like that blond, I didn't have to keep picking every color of hair, would I? All I would have had to do is shift the hue saturation more and I could've spent less time reselecting the hair, see we're all learning every time. So this is a perfect example of that small shift, the five percent shift means you don't have to pick as much. If you shift that too much it's gonna start going cracker so right, this would be the complimentary colored dog, you don't want that. But again, small, small, small shifts. Alright. We're not gonna be able to go over this but I thought I better review it real quickly, I know this looks a little whatever but this is a great brush, this hair brush is fantastic for drawing hair or masking. I'm not gonna do a demo of it but this brush, look at it, it's all build up brush. So this is like the concept brush. Do you remember the clouds we did? This is like that, only it's hair, so if you can imagine, you have someone who shot on a black background and their hair's not separating, you do this on a mask, and then there's yeah, you get me, you get me, see that's what's going on. And it's an awesome brush. There's a guy named Nagel, he did the brushes you can download them for free, Nagel, thank you very much. Panic. But not only that, you don't have to get his brushes, you know why, you have the settings. All you have to do is take a look at that, I mean maybe you don't want it that curly, you can make it a little less curly, but these dynamic settings will give you that result. I see someone who's happy about that, it's good news, it's absolutely good news. On the handout, I did not use the same girl to show you but I've got the settings for that grass brush setting right there. That brush setting is a regular, do you see there's not tip head? I did not give you a tip head there. There's no picture of a tip head. That's because it's just a regular, it's a zero brush, it's a default zero brush. But if you change that brush to this, you know the regular, circular brush hard or soft that comes default, if you change it to that, you'll get a hair brush.
Class Materials
Bonus Materials with Purchase
Ratings and Reviews
Sean
Knowledgeable Lisa is the best teacher. She makes learning Photoshop fun. Great course. Lisa has a great teaching style. She mixes in a great speech cadence, great voice up and down and pausing, jokes, and is extremely knowledgeable and fun to watch. Awesome course. Really helpful course for getting my feet wet with brushes.
Fotomaker
This is a comprehensive overview of Ps CC Brushes, what they do, how they work and how to control, manage & modify them. I found it extremely useful to learn about the functionality/features that Ps CC brushes can provide even though I'm a photographer and not an illustrator or painter. I will never ever be able to employ everything Lisa explained & demo'd in the class - she covered a wide gamut of info. But she served the purpose, in this class, of being essentially what I'd call an 'idea sparker'. Once you see how she works with brushes and you find out how you can adapt (or create) brush tools to suit your personal artistic style the options for creativity are unlimited. I might re-title this class "Oh the Places Brushes Can Go" (apologies to Dr Seuss and his classic graduation gift book 'Oh, the Places You'll Go...'). Keep in mind a few things about this class (& back away from it and your credit card if you don't note a few key facts...): (1) It is called 'Advanced Techniques' - it is for intermediate to advanced Ps users, not newbies unless you're a child prodigy who picks things up really fast, (2) This is not a 'Paint with Lisa' class - we don't all paint a butterfly like a color by numbers together. Rather we learn about Ps brushes, how they work, what they look like and how to modify them and change their dynamics for different types of artistic/retouching/post-processing uses. Each person will have to experiment - there's no one 'this is it' formula that can be provided, (3) Lisa talks and thinks fast and has a pretty amusing patter too (she's clearly very intelligent!) - so be prepared to hit the Pause button. She repeatedly advises during the class, don't overload your brain with all there is to absorb with regard to Ps Brushes. Take breaks to try the info she shares & see what works for you before going on to a different section of the class. Don't buy this class thinking you'll whizz through it in 15 minutes & figure out how to complete a job you've committed to deliver in 2 hours, (4) There's a large packet of material that comes with a purchase of the class (descriptions, definitions, brush settings, drawing examples, etc.). Item #4 is the only thing I'd ding this class on. While the handout material contains lots of really really useful info it is - sadly - microscopic print. The text is exceedingly difficult for my poor old eyes to read. I value that there's plenty of white space on the pages to write notes as Lisa talks - I've done so prodigiously. But the print in that accompanying brushes class guide needs to be larger. I honestly wish I could enlarge the print in some way (unless it is a PDF that I can alter & I haven't figured it out). If there is a way to re-print with larger type font sizes someone please let me know! Bottom line: I highly recommend this class to more advanced Ps users who want a comprehensive overview of Brushes and working with them. It's definitely not a class for someone who wants a linear, step x step, "do this then do that" type of recipe class. As I've noted above, it's best as a way to learn about richly varied Ps tools you may have only had superficial exposure to previously; and get enough new knowledge to make you dangerous (and, dare I say it, boldly creative!).
Skye Taten
Lisa is the BEST teacher!!!!! Everyone should take this class!!!!!!! This class is utterly phenomenal!!!! Lisa is so knowledgable and so very talented. She is incredibly smart, super funny and so very helpful. This class contains so much valuable information, and at this price it's a complete steal. This class has forever changed my life!!! I'm so happy to have a new skill set. Thank you Lisa from the bottom of all of our hearts you are completely incredible and have touched all of our editing in photoshop lives forever!!!!! You are so very talented thank you so much for sharing your incredible skills and knowledge with us, you are a true beautiful talented soul. xoxo, Skye