Background Plate Workflow
Lesson 3 from: Using Composite Photography to Create a Fantasy WorldKaren Alsop
Background Plate Workflow
Lesson 3 from: Using Composite Photography to Create a Fantasy WorldKaren Alsop
Lessons
Class Introduction
03:01 2Adding Fine Art Compositing to Your Business
24:28 3Background Plate Workflow
22:54 4Setting Up Studio for Shoot
09:04 5Photograph the Rabbit
05:09 6Mock Up of Rabbit in Photoshop™
08:56 7Photograph The Rabbit Costume
34:34 8Setting up the Studio to Shoot with a Green Screen
03:41Photographing the Child in Segments
27:22 10Photographing Hair in Motion
29:46 11Getting a Great Costume Shot
11:21 12Use Lightroom to Choose the Best Images
13:07 13Make Selections in Photoshop™
15:08 14How to Use Photoshop™ Brushes to Mask Out Images
22:36 15Crop Out & Add Costume to Rabbit
27:41 16Warp Techniques to Fit Costume to Rabbit
20:31 17Shading & Shadows on & Under Rabbit
31:50 18Change color of Rabbit Costume
12:00 19Remove Green Screen from Child Image
08:22 20Background Plate Workflow
21:40 21How to Create a Brush
11:25 22Add Layers to Create Full Looking Hair
27:49 23Add Shadows to Image
05:57 24Workflow: Group Rabbit & Child Images
10:47 25Match the Scene with Color
05:31 26Spill Light: Painting with Light to Blend
09:46 27Levels Adjustment Layers: Shading & Rim Lighting
04:59 28Finalize Image Workflow in Lightroom™
08:36 29Export Image in Different Formats
15:44 30Marketing Composite Photography to Clients
17:13 31Presenting Image to Client
23:06Lesson Info
Background Plate Workflow
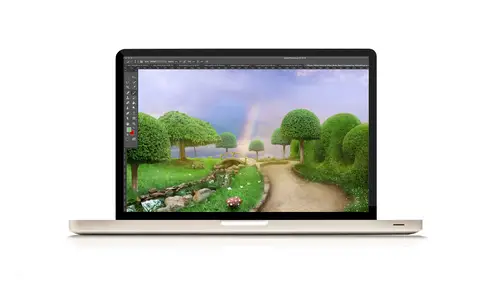
So I'd love to take you through how I created the background plate for this image that we're doing here at CreativeLive. So I'll bring that up on the screen now. This video is a slowed down version of the creation. I'll be pausing it throughout just to work through some of the aspects. But I'll take you through that now, so we'll just bring that up. So before I start this, I'll explain that I think, probably in total, this background plate took me around five hours. I tend not to time my images. I sort of sit down for a little bit, and I work, and then I give it a break, but this whole image was created from one place that I shot at. So there was a place that I went to that was called the Enchanted Garden in Melbourne, and so all of the elements that I've used to create this one scene, are from one location. So they were shot with the same lighting. It was overcast, which is fantastic for background plates and elements. Overcast is excellent 'cause it's soft light, no particular direct...
ion of the light, so you can photograph all these different parts. All of the elements were also photographed at the same angle. So I'm very careful to make sure that my perspective matches. So when you see the images come up and the different ones that I use, I generally get down and shoot at this level. Now my reason for doing that is that a lot of the time I'm putting kids into my images. You know, when you photograph children, you wanna be down at their level. You wanna be shooting them at eye level, not from above. So that's a big reason that most of my background plates are shot at that level. Shooting at the same angle and the same level means everything will match. If I photograph some elements down here, and some elements up here, they wouldn't match. The perspective would be all wrong. So photographing in the same way works for me. Now there might be other times that I have different ideas, and I photograph at different angles, and that's fine too, but it's all in the planning. And it's in the matching. So I'm going to show you this, and I'll stop throughout, and if you have any questions about this, I'd love for you to ask them, so, here we go. So I'll talk you through it. So all of these elements as I said, are from the same place. I'm choosing my images, I'm doing some editing in Lightroom. Lightening up some areas, and then extracting in Photoshop. Masking around using brushes that I've created and that are part of this class. So a lot of my process is just working through bringing it all together so it creates one scene. When I started, I didn't know exactly how it would look. I had some ideas in my mind, but I didn't know exactly how it would look. So you'll see some of the images that I bring in, I end up not using. They don't work quite as well as I thought. So, bringing them all in, warping them, fitting them to the perspective of my image. Then doing a very quick mask. So to start with, because I'm not sure if I'm going to keep it or not, I just do a basic mask, so that I'm not spending forever on it, and then I throw it away. Just doing it quickly so I can check what I want to use. Bringing in elements, and then sometimes duplicating those elements. So you'll see in a moment that I bring in more of the path down below. So I stretch it out. Yep, continuing to bring in different grass elements, all the different parts. So when I'm photographing, I take lots of images. So I build up my stock library, it's my own stock library, and take as much as I can so that I've got the options to use it later on. All of this is masking, what I'm doing here. I'm using brushes to mask, which I'll be taking you through in the class. So stretching that out, bringing in more of the path. Starting to come together. I'm starting to sort of see how that final scene is going to look. But again, it's still very, very quick masking, it's... Once I know that I'm definitely going to use a piece, then I will go in and I'll do a bit more work on it and make sure it's masked in properly. So the trees, using quick mask tool to extract and then bringing it in and fixing it up later on as well. That, I'll just stop here, that brush that I'm using is like a foliage brush and I'm including those in the brush pack that you will get with your class. The benefit of using this as opposed to a normal round brush that quite often everyone sort of uses the round brush, is that you can mask in the texture of the tree. So you can, I've got hair brushes in that pack. I've got dust and dirt in that pack. The pack that you get, I'm using for this class. I've taken away all my other brushes, all the other default brushes, and the brushes that I'm using are the ones that I created. They are the most, yeah, they're brushes that I would use all the time. So, really easy ways of masking which I'm excited to share more with you about. So placing the tree, and then that grass brush, you can see, just painting in grass using a mask. Very, very easy. Again, the grass brush. I thought this was quite cute, but I ended up not using it in the final piece. But I've got it for something else, so always take lots and lots of stock as you're going. It wasn't fitting. You see I'm moving it 'round, no, no it's not gonna fit. These little toadstools, putting them into the scene. I photographed them up close, so sometimes you'll photograph at the same angle, the same distance, but when you've got little objects you might go up close and photograph them. But again, the perspective needs to be the same. Masking in, the grass brush again. Placing my toadstools, duplicating them, resizing them, putting shadows behind them. So everything needs to be considered. So you need shadows for every little part to make it feel, now the sky, I wanted something with a rainbow. I'd taken this rainbow shot when I was just driving along and I saw a rainbow in the sky, and I pulled up on the side of the road, and I got this shot. So you should have your camera with you at all times. Highly recommended. (laughs) You feel terrible when you see an amazing shot and then you can't get it 'cause you don't have your camera. So again, masking out all of the background, so that that sky comes through. It creates that more fantasy sort of look. It looks like I'm doing this really fast, but as I said, this is sped up. But I find this part of it quite therapeutic. I, you can use the pen tool to cut out, but my preference is masking with brushes, and using different ways, like using shift to make straight lines and things like that which I'll show you. And I just find this process works best for me. A few more trees, just duplicating them. Resizing them. In the distance, you'll see those trees that I've got in the background are not as solid. So they're a little more see through, and that's to give atmosphere, the difference between the atmosphere. So the further away something is, the more atmosphere there is in between. So again, a little more refining of the masking, now that I know that that's definitely staying. Then I'll spend a bit more time on it. So quick masking to start with. Using that brush, the foliage brush to go around the edges. Imagine how hard it would be to use the pen tool to do that. Or to try and use one of the different extraction methods to get those fine areas around the trees. It's much, much easier to use a mask and use a brush that fits. Shading and shadows. So again, I'll be taking you through how to shade, how to create shadows. Painting them in using masks. All of that. So we're just about to get some water into this scene. What, wot, water. Water. (laughing) Water. So again, photographed at the same place, stretched a little bit to fit. Yeah, just moving it around. You'll notice, too, where the tree sits there in the corner, I'm moving it to match the reflection that was actually in the water. So instead of trying to get rid of a reflection, I'm just using the reflection and matching it in with the tree. 'Cause it, all of the other reflections there, you can kind of get away with, but that tree one was a very solid reflection that needed to be matched. Some foliage, some flowers. Painting that in. In a moment you'll see me using the stamp tool and a foliage brush. That's another way of using the brushes that I've created and other brushes that you might get. What I do with that it's, I'm about to show you there, so there's a foliage brush. You can take from the other flower area and basically paint it in. So you're duplicating the other areas with that foliage brush. So that gives you all the texture and all of the feel of the bush without having to paint around really carefully with a very small brush. So more shading. More foliage, more grass. It's a time consuming process to get it, to get it to be realistic, but it's fun. It's so much fun. Some more grass around there. So looking at where the rocks sit, and wanting the rocks to stand out, but to have that little bit of grass sort of cutting through. So it's starting to come together. You'll see that the coloring is still quite flat in this. At the end of the process is when I do all of my coloring and toning. So I keep the color quite flat, so that I can play with that later. It all needs to match. The white balance needs to match pretty closely. So you go in and do those changes, but it's best to then at the end, kind of do all those other color changes once you've got everything all put together. See how many layers we've got here. So many layers. So when I work on this image now here, I've got a flattened version of the background plate that I'll be working with to add our people, or to add our Alice, because if I open up this file it's going to go very slowly 'cause it's very large. I think it's about three gig worth at the moment, so, yeah. Here I've actually opened up Painter, Corel Painter, I was having a play with that. So you can go into other programs, too. What I wanted was a painterly feel, so I've gone in, I think I'm about to, so go in and sort of smudge some areas, and do some different effects here. Just to give it that more soft, painterly feel. I then use that as an overlay layer, so it was subtle, it wasn't, you know I don't want it overly smudged, I still want the texture of the grass and the texture of the rocks. So yeah, I just created an overlay. So that is essentially the creation of the background plate. Further to that, I have added some flamingos. Some pink flamingos which are in the image that we're using today. And I've done some more color work and things like that, so. Are there any questions about the background plate creation? Do you have a favorite canvas size when you start out? I actually start with the size of my image, so my capture. So the main image that I'm going to use is generally the one that I start with. This however, is a little bit different because I used lots of different images so, yeah, no I don't, as long as it's at least sort of 20 megapixels from the camera, I'm happy with it. This one was double that, because I had so many elements. I had to actually shrink it down because it got to the point on my computer, my portable computer, it wasn't working. So if it gets too big, if you haven't got enough RAM it can cause issues, so yeah. (laughs) All right, great. Well, we'll go to the folks at home who have a lot of great questions. Just a reminder, as we go through the class, as Karen alluded to, she'll be showing us how to do a lot of these tools and things that you just saw in fast motion. That was incredible to watch and see that all come together, that background plate. We have a question from GreenEarthDream. So in addition to having the same perspectives, when making your own stock photos, is it better to also use cameras taken with the same camera, I'm sorry, images taken with the same camera? Does that matter? It doesn't matter as much as the perspective and the depth of field. So I do photograph on different cameras, and that's not an issue as long as the, you're not stretching out your image bigger. So if you start with a small image, and you try and stretch it out, you're going to have issues and boxy sort of image, so making it smaller is okay. The big thing is the depth of field. So your aperture, and I always, when I'm shooting stock, I always try and shoot with an aperture that gets everything in focus. So generally between f/9 and f/11, and focus on that center point away from me, so that when I come back to editing, I've got all of the scene in focus. So when I'm creating stock, and I'm not sure what I'm using it for, that's how I would approach it. Oh, great, and talking about lighting, Keith Orman asked, do you find it better to shoot your photos on an overcast day so the lighting is more even and you're better able to blend the layers in your composites? If not, do you attempt to keep the sun at the same angle Hm. for all of your shots? So, lighting, I see a lot of questions about creating those shadows as being one of the harder things to do. That's right, yeah, that's a really good question. When I'm shooting for stock, so for this example I didn't know what I was going to use, what I had in mind for this scene. So when I went to this place, I was happy that it was overcast, because shooting on an overcast day means that I can control the light. I can add light from any direction later on. So I do prefer to shoot on an overcast day when I'm photographing my own stock. But if I'm planning an image, and I've got everything sorted out, I often like to shoot with back light. So I like the sun to be low in the sky, very much how I would shoot a portrait. So rim lit, and have, yeah, have the same back lit, and shoot towards the sun, maybe on a slight angle. But I would need to match all of my other elements to that as well. So then when I shoot my subjects, I need to match that lighting specifically. So, yeah, elements, animals, background plates, definitely overcast light if I can, but yeah. Hopefully that answers, yeah. Great, and we'll see the different lighting that you're using as we go through the photo shoot. Which will be coming up in our next segment. Question is, with the massive amounts of adjustments and integration, do you work with hundreds or thousands of layers, or do you flatten the image from time to time, to get fewer layers in the work flow. I don't flatten. What I do, is yeah, I do work with multiple layers. My portable computer is an i7 Wacom Cintiq Companion and it's got 16 gig of RAM, so basically that means I can work quite well up to a certain point, but at a certain point it gets too big and it stops working. I need to move onto my desktop computer which has more RAM, and keep working. I like to work non-destructively, so the only time that I would flatten, is when I get to the end of it, I do a copy, then I do a flattened copy, and that's the one that I finish off in Lightroom. So otherwise, I keep everything going, yeah. Great, thank you. Now, this question had come in from both Mike D., and Photomaker. So you started by telling us about this image and the background plate and what it was going to be plus the bits that we're going to photograph. When you're creating the concept, are you creating storyboards? Take us through that process of before you even start. That's a really good question. When I'm creating, a lot of the time if I'm working with a client, then I will sit down firstly and find out what are their interests. So this is the start, what are their interests? What, if it's a child, what are their hobbies. Getting an idea of the image itself. When then I come up with the concept. So, for example, the one is Alice in Wonderland. I often use Pinterest to get lots of ideas. So I go through, then it's like my mood board, and find illustrations and artwork, and things that are prompting me for ideas. The costumes, I like to get lots of different ideas from lots of different places. That is the start. I can't draw at all. (laughing) My stick figures are terrible. So I find that mood boarding, and then finding, working out then, what's my scene going to be. So I start with my background plate. I don't start with my subjects, I always shoot first with my background plate. So I would then try and source that location generally. So sometimes it's made up of multiple images, other times it's one scene. So I'll find, for example one of the images that I'll show you later on in the class, I found a bed and breakfast that suited a Peter Pan style image. So I actually went through the internet, trying to find a place that I could shoot at that had the right window, and the right look, then I contact them, and I ask if they'd be interested in letting me shoot there. I collaborate with them, they generally are happy to have me photograph there. I provide them a print at the end of it. So I always try and source different things for free. Because that's so much better than paying, but it also means that you can get other people on board. The other thing I do is I need to find my objects to match as well. So props and things like that, I usually collaborate with people to borrow them, and then I provide them links when I post the images. I cross-reference them in my blog. So there's a lot of collaboration that happens when I create. So it starts with the idea, then it comes into how is it going to look, and then the background plate, and then putting it all together. Thank you. I think that this type of work is so comprehensive in that you're showing us again, from concept to photographing, too, then putting it all together. A question, or kind of clarification from Laurie and Davy, did you say that you start and finish in Lightroom? Yes. Is that kind of the process? Yeah, that's right. So you'll see when I take you through it, that I start in Lightroom to choose my images. I start in Lightroom also, I often do some minor adjustments. When I go into Photoshop, I open them as a smart object, which retains those adjustments and makes it editable in Camera RAW. At the end of my process, so this final piece, I'll create a copy, because the reason for that is I can't open a large document format Photoshop file in Lightroom and do any further work to it. I want to be able to export out for web, for print, for all of that, and maybe do some final color adjustments. So I create a copy, and then I open that in Lightroom, do any final little tweaks, make sure it's ready for print, ready for web, and export out in the different formats. Yep. Question from Danielle Cooper, again on the lighting. Do you often have to shoot your locations over different days if the lighting is changing too dramatically? Yeah. And when kinda will you just call it. (laughing) If I'm planning a particular image, then I will, yeah, wait for the right weather, and shoot under those circumstances. I tend to try and keep my camera with me, even when I'm on trips with the family. If I see that it's an overcast day, I'm like, let's go to this location and do that. Or photograph at the end of the day and the start of the day, so I'm getting the best light. Sunrise, sunset, so it's just like every other form of photography in getting the best light. Sometimes you have to work around it. There are occasions where I've had to shoot with the lighting not being correct, and I've had to fix that in Photoshop, but for the most part I try and avoid that if I can.
Class Materials
Bonus Materials
Bonus Materials with Purchase
Ratings and Reviews
Judy Mitschelen
I've found many great instructors at CreativeLive and Karen ranks right up there at the top! With her relaxed, thoughtful manner of presenting, I was immediately hooked. Her organization, clear explanations and demonstration, and on target response to questions are superb. This course covers an amazing range of skills and tricks of the trade. Whether you're interested in getting better shots to work with, better workflow at the computer, or better output at the end, Karen covers it all.
Endigo Rae
This was such an amazing class! Karen is so talented, inspiring, and such an amazing teacher. Very forthcoming and open about all of her techniques. I'm so looking forward to jumping into compositing, I feel like this is definitely something my soul desires to explore and Karen has made it so easy and accesible through her beautiful course! Thanks so much Karen and CreativeLive!
Kim
Karen is very talented and a great teacher and I enjoyed every minute of the course. But what I found to be the best part was seeing what an amazing person she is. The video of compositing the disabled children to make their dreams come true had me in tears. It has inspired me to use my talents to help others and not learn photo manipulation for self enjoyment. God bless you Karen.
Student Work
Related Classes
Portrait Photography