Stitching a Panorama in Camera Raw
Lesson 3 from: Urban Landscape Post-Processing TechniquesSerge Ramelli
Stitching a Panorama in Camera Raw
Lesson 3 from: Urban Landscape Post-Processing TechniquesSerge Ramelli
Lessons
Getting Started with Camera Raw
08:56 2Working with Local Tools
11:01 3Stitching a Panorama in Camera Raw
11:52 4HDR Cityscapes in Camera Raw
09:39 5How to Process a High ISO Cityscape Image
10:02 6How to Remove Tourists in your Images
13:54 7How to Master Sky Replacements
10:06 8How to Achieve an Instagram Look
04:54Lesson Info
Stitching a Panorama in Camera Raw
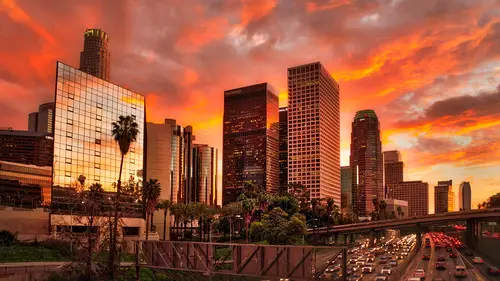
All right, so this one is going to be a panorama. Now, that's something that's amazing with camera. And that's something that came out, I think a little over a year ago where you can make panoramas in camera. But normally that you can make them and still be in the row from it. Meaning this whole known destructive war flu have showed you where you can change the white balance. You know, go back on your brushes is gonna be applying to the panorama. The way it works is you shift. You click your shift Click on your keyboard. Click the last little you right click open in Camaro. By doing that, all the photos up here here and the first thing you should do is select old. So all the photos is selected and then you can go here and Onley Once you settle, you have these two new options merged to Panorama. So by merging to Panorama, what the camera is going to try to do is, you know, just stitch all the photo into one big photo. And that's really cool, because I have not started retouching this ro...
ad. By the way, I sold his photo to National Geographics. So it was on the whole thing that it on course you get This is Bastia in a town on the north, Of course again. And so it was. That was my first work with National Geographics. So, um, projections there is only three projection study can do on this step of Panama. The 1st 1 is spherical. It's just different way off stitching the photos. So Circle is fickle. Cylindrical makes it a bit more sky perspective is not gonna work on this one, because perspective only works if you don't have elements which are closed to your lands. And I have this whole path here, which is to close that is going to say no, I can't do that. It perspective is really good when you make panoramas and you're like, at 50 media meter and further and you're shooting something far away. Nothing is close to you than perspective is gonna work. Fine. And I'll show you an as example weight around on that. Okay, now we have two options. You see, we have a lot off missing pixel here because, you know, I was very sloppy. Six. In the morning. I was not waking up. That's why it's sort of like did this by hand. And so it's really bad. If there was only a software, I could help us in that. Well, there is so to option we have at this point. One is the photo crop Total crap. It's just gonna crop, you know, whatever is going on. But I don't like it because now I'm losing so much time losing a lot of that. So and there is another way here, which is boundary rap battery. Rap is kind of cool. It's gonna try to fit in the blanks for you, and it works on some photos. But on this one, it sort of really makes your eyes and go down and see. Like it's like it's like the mental state I was in when I took the photo. So and I don't like heights Kirby here so I can do a little bit. But I don't like the curve because it's gonna be hard toe correct. I want this to be really straight. So what I do there's doesn't wait. There is another way. I click on Merge and it's gonna propose to save it in the same folder of the region. If I'm going to say, go ahead, save it, please. By all means. And now you know we have a row file A panorama woeful on, if you realize is But this is this is technology breakthrough because before this is how it worked Back to over a year ago we used to retouch each photo. And then we use the stick Jim at the end. The problem is, when you stitch up before you're like oh, should the white balance is not really great. But now you cannot change it. You have to change it. It's not anymore world found chaining the white balance on something that's not right is really hard. And so now it's different. You first do your panel and then you do your retouching, which is a lot cooler. I would say so on this one. I'm going to just send workflow that in the 1st I'm gonna open up the shadows going to go a little faster because I think you guys got it. Highlights blacks, whites I can hold on the option key, but I have a lot to cover, so I'm gonna go a little fast on this one. Okay, As soon as I'm down with that, I always go for the white balance. So white balance. Daylight. I like daylight that I just kind of cool because you get the blue in the sky and you get a little warm. Swear the sunrises cloudy. He could be cool on this one. I like cloudy. Chris would still have the blue and shade shade. I'm losing a lot of the blue, so I think I'm gonna go for cloudy. And don't tell anyone I'm adding a little bit of magenta. It's just on me. That's my signature. Okay? Clarity. I'm not going to do because I I already find that the clowns are a little too detailed. I don't like clowns, which are too detailed. So that's something I really don't like. Um, and I'm not gonna do the great aunt up and down. I'm not going to do it now. I'll do it later on in photo shop. So the only thing I'm going to do for now because I'm going to do a double I'm missing so much information to do a final retouching doesn't really make sense. But I'm still going to do something. I'm gonna take a regular filter that I'm gonna put over the clouds here. And I'm just gonna she boost the exposure and I'm going to do a little minus clarity. The reason I'm doing this is that I find that cloud, which are little diffused, are more interesting than sort of like very hdr looking super clouds are not made to be super sharpened When I seen a jar photo and the clouds are like really super detailed It screams is VR You know, when you have them a little more diffuse. So a little minus clarity helps on. That goes a long way. So I'm gonna click here. I don't want this to be a smart object because I don't want to go back. There's no coming back from this and I'm just gonna click open image. So now I'm in the world of Photoshopped. I'm going out, okay. I want to win the world of photo shop. Here we are, and I want to do something now. I'm missing a lot of information. So here is the trick. You can press W or you can click here. I'm going to take the magic one tool. What I want to do. Is this election off all the transparency in the photo? Make sure that continuous is not on. So because if you think one time here, it's gonna select all the transparency. Now there is an issue with this, um, in photo shop. That's kind of weird, because if you go to edit and you go, Phil and you take this new technology called Content Aware and you click Okay, if I do that as such, it's gonna be all right. I mean, content aware give you a different result every time. So it might be really bad now, but it's pretty decent. The problem is that if I press command de toe under my selection, sometimes when you zoom in and in this case it's not you have a little French, but in this case, it did not. So if you do have a little French is a little work around it, which I want people to show you because it was not on this one. Now that's something else. That's that's not a friend gets. Ah, it's Ah, I think some of the old something in the photo anyways, But we got something weird here. You see, it didn't. It didn't create. I mean, it added pixel, but it's not perfect. But it's a good starting point. I would say. So what I usually do first, I'm gonna crop this photo because this whole part here is gonna be ready. Rough to take care off. Plus, anyway, I wanted I love that sky here. That some wise guy. So I thought it was more interesting. Maybe I'm gonna crop a little bit here. The thing is, content aware is on Lian starting point. It's not a final thing. So, for example, here we have a little bit of issue. It kind of looks were there. So what I do to correct that usually mystery the layers. I'm gonna drive this and duplicate the original layer. Okay. I'm gonna hide the layer we know is he couldn't hide it and hear, See? And I'm using this whole workflow. I'm using the essential the end social were workflow you or you could use photograph e or essential. Most of them works really well. What? You really need these layers for this toe work. So now I've got two layers and I wanted to something here usually what I do is that press ask for stem tool. You can keep here on this local stem tool, and I'm gonna have you see, every tool in photo shop has a capacity. Now, a few. The principle of this temple. I'm gonna put out 100%. I'm gonna undo you. Fight, I think the option key. I've got a target here. I'm gonna click here. And now if I move over here, I'm basically gonna copy and paste whatever. I clicked originally on the out So I can do that. Not bad, but it's quite obvious. Study to something here. Now, if I lower the rapacity like, really know of that tool around 30% and I keep here and I go here, I'm just bring it back. Very so. So make sure you don't do that. You just undo the best ways to make your tool swollen. So unfunny shot to make it will be or a smaller. You hold on the control and the option key. Make it big or small by clicking and dragging your mouse. And if you go up or down, you make your tool. The harness at zero. So very diffused toe or 100% very reptile. So you usually I always go hard at zero very soft in a soft man, You know, no hardness here. And so I'm gonna Klay here. I'm just basically bringing back some texture I know and bring back some of the cloud. But now the clouds has a different capacity, so it looks kind of more natural. And if you don't like it, you can always take stamping as earth seeing year. And you see, because I'm only doing 30% it's kind of blending everything. So come and see if you do something you don't like and just play around with it and show you before and after shape Z, I'm going to zoom out before after natural. This is so great, you can even lower the capacity to sort of blend it too. And, uh, yeah, I kind of like that. So now I'm going to select both layer right click, and I'm gonna merge layer. So it's gonna blame them, And I wanted to something more. I want toe. I want toe redo some Camero treatment on this, like the whole world Floyd showed you. So what I'm gonna do is I'm gonna drag and drop this here, and I'm gonna go to filter Camero Filter. And I just want to do a few things here. I want to do a little ingredient in the sky because I want to die the eyes toward the city and at sunrise. So and sometimes I do too. You know, I do one overall, and I do a kick new, and I do another one just to the top of it, you know? And then, like another one for the bottom. Really getting people toe go here and something here. I want to put more and fezzes here on the sunrise. Make sure inside his own Make sure feather is 100% and ah, minus clarity's good. So a little bit of plus exposure and little bit of yellow Say, Here comes the sun down on Oh, here comes the sun, All right. Overlay before after, you know, just a little bit off, like the sun is here. And, uh, I can continue doing that really fast by you know, I can click here, and I can't watching you when I'm just gonna make it. Just want to make a little one here because I find this town has a little bit too much of the same tones again. So a little brighter, maybe a little bit of plus card in this case, you know, And one here, maybe rightly Deprecate doesn't want here just to make the town a little tiny bit more interesting.
Class Materials
Bonus Materials
Ratings and Reviews
Kat
I loved this class. It was simple and easy solutions to processing beautiful images. I came away with so many ideas on how to improve my photo editing skills. Thank you.
Pleshette Fambrough
Excellent class. Simple to follow, great examples and real techniques to help me take my photography to the next level. Thank you!
Beatriz Stollnitz
Good class for anyone looking for tips and tricks to improve their landscapes and urban photos. This is not an advanced class, but it helps if you have some experience with Lightroom or Bridge.