Lessons
Lesson Info
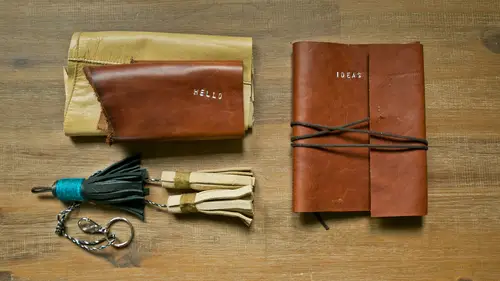
Making a Leather Tassel
So to make these tassels, what I'm going to do is take my cleaned leather and I'm just going to cut a strip and it doesn't matter what size you can see each of these tassels are roughly three to four inches long total from top to the bottom of the tassel I really wouldn't want to make him that shorter than that, because then it turns into a leather pom pom might be too short, so, like three, four inches, you could make him longer, but for this one and because the width of my ruler is three inches, we're going to make a three inch one and it also doesn't matter how long you make the strip, I usually go about eleven inches I'm sorry I used like a seven inches when you get longer, you get into a thicker top, which is not a problem really did you just need to take that into consideration when you're cutting? So I'm going to cut a strip with my rotary cutter and my ruler yeah, heading into I have so that's one thing I didn't mention thank you you need a cutting map to use under your rotary ...
cutter it's a self healing cutting, matt, do not cut directly into your table and that is not what I was doing all right, so I'm just going to cut a straight edge there and sometimes if you're cutting over seems you've got to just take it slow and press a little bit harder I'm going to cut like a three inch by seven inch drip actually stood on the side where there's no scenes I wouldn't do seems on the tassel that's probably not the best way to do it so I'll just make another clean edge here I think I'm gonna make let's say we'll do like seven yeah yeah well dio seven inches that's good okay, so I just cut a little rectangle here let's move this out of the way so you still danger ruler for the next step and I'm gonna work on what I consider on sorry raise legal head I was just wondering are you cutting it twice the length that you want the tassel to be at the end? Not necessarily yeah, it doesn't that's the beauty of these you just cut it to the size when she makes one you story have a feel for health kick your leather is and all of that so you could cut it however you I think it would work so yeah there's really no rules you just you always were going to have at the top of these you're going to have at least an inch of uncut space to create your top but other than that there's really no rules, okay thank you so yeah, we've got a rectangle here that this is three inches by seven inches that is nothing that you have to memorize like I said, you just totally it's your call and so I'm going to take my friction pin, which I think I can see on this black I've tested it and it worked pretty well and then using my quilting ruler you could use a regular ruler I'm just going to measure one inch from one of the long edges and I'm going to make a line and this is on what I am considering the wrong side of the tassel, so now I have a line to just sort of mark what I'm going to d'oh. So then for the next step, you're going to want to make the cuts into the bottom part to create the tassels, and I do think it might be easier to draw the lines. I'm usually draw little guidelines and so I'm going to do that if you made a lot of thes and you got really confident you don't have to, but I draw lines perpendicular to that line I just drew a quarter inch apart and I would I would make them either a quarter inch or smaller than a quarter image but not bigger because then you have a fat tassel which I guess if you wanted a that tussle, you could d'oh have any of you ever used leather in any projects? Are up, cycled leather into any projects? Or can you think of a reason that might be fun? But I really soft, supple leather belt, and I did cut it apart and use some of the leather to go behind a little kabash on in a piece of jewelry to back a cabinet that's a great idea, but that's the only thing I've really think of what I've done I've seen leather belts are really good if you're looking for thick strips of leather, I've seen a lot of ideas of things that incorporate lots of leather belts kind of woven together like stool covers and things like that I didn't make it myself. Somebody gave it to me, but she makes beautiful patterns out of a piece of leather that would suddenly cycled yeah, like she means circular, so just kind of hand cut way a statement piece with a little chain on it, and that was really beautiful, that's wonderful. Thank you, kristen yeah, there's I just think it's fun to play with and what I love about playing with weather is that you don't have tio if you're selling with that there's those teams to finish, yeah, you can cut it and you actually don't have to, so it's finished the second you cut it so there these lines I don't know if you can see them on camera there faint, but I can see them so at this point you can take either your scissors or your rotary cutter I do both and you're going to just cut into each one of these lines that you just made all the way up to the line that you do across but not above that and like I said, you can do this free hand without drawing these lines once you feel more confident that I think if you did it freehand you could make a much smaller than I make in, which could be fun, so after you make a few and you feel kind of confident, you can try that. All right? So now we have our fringe this is fringe weaken stop here at this crap that could be called fringe or we can keep going and we can call it a testicle. So from here, this is when you need your glue and I'm going to do just any glue this particular one has a fast attack, as I mentioned, so it will attack quickly. Oh, and before I do that, this is where the leather lacing comes in so you don't need a lot of this you just eat enough to create a loop that we're going to secure into one side of the tafel so just two and a half inches something like that whatever you like I don't like them too big or at this point like on this version here if you're going to use p cord or something like that and create several tassels you would not make a loop he would just put the edge in there so we're going to put that in so we're putting the glue on the portion of the strip that we did not cut in two I'm going to give that was the second tio set up and then from there I cover this area with glue you don't need to do a time because it's gonna you're gonna roll it and it is going to kind of squeeze together but at this point what I'm gonna do is make a tight little role as tightly and evenly as I can and as I do that the glue will grab and if sometimes if the's don't uh it's the top part doesn't hold well while it's drying. If you've got a large binder clip, you can kind of hold it into place and sometimes it needs just a little bit worth e ent all right, so that's it so you could stop there you don't need to trim it any further, but that's your tassel you're gonna want to just hold it in place for just a minute or so toe let it set up but let's talk about embellishing these and how he would do that because it's really simple, and it adds a lot of color, so to do that, I'm gonna try one with yarn because I haven't actually tried one with yarn, the ones that I did here with the pearl cotton, which is a pearl cotton eyes like heavy it's like heavier embroidery floss that you don't strand into different pieces, different strands, and so it comes in little schools like this and er to create the wraps around these, I just wrapped it twice the way that I'm going to do with the yarn, because it's thinner and you want to get like, I always try to get the the strand's tow line up side by side when I rolling and I can't ever do it, so I just wrap it twice. I just go all the way up the tassel, then I go back down, so to do that once this is set up and it feels like it already has, you are going to just put glue around the top portion that doesn't that you haven't cut into it's sometimes if you're glue is hard to spread, you can use either the finger small paintbrush, but you just want to get it covered get that whole area covered. And let's see let's, try this yarn so to take the to hide the ends at the beginning, I'm just going to decide if you're going to start wrapping from the top or the bottom, so I think I will wrap from the bottom of this area, so then what I'll do is just lay this yarn on so this glue going up the side so that I can hide it, let that set up for a little bit and then I'm going to hold it in place and I'm just going to start wrapping. This is actually much easier to get, like nicely uniform lines side by side, and then when you finish, I just train the end and then you can take a pair scissors just some sort of point and you're just going to kind of coax that down underneath the edge of the road below it just kind of cooks that tail and then if you want a little extra security, you can add a little extra glue and that'll dry clear that's how you do the tests all that's, embellishing it with yarn, and I showed you the pearl cotton and you can also when I embellished the's with ribbon, I just do it one time, I just take they're ribbon and I just wrap it one time around the bottom like right where the test soliz this would be so fun to just you. I mean, you could really have fun and add glitter to the top. If you're into that, you could deconstruct some jewelry and you can add some little jewels and things. So I think it's fun to but if you're giving it to him and he may not want the jewels and the glitter so and then you know, this one's got a velvet ribbon. You could just do a little velvet ribbon and then where it has a necklace. So any questions? You have a question earlier about cleaning the leather and your selection of leather? What happens if there are other types of, like moisture stains or other types of staying? So there are other tools for cleaning, so it would be the same thing sometimes if you see moisture spots or damage. If he put the leather conditioner on there, sometimes it will even out the color overall. And sometimes there's moisture spots are just going to you're going to see a little ring sometimes that's not a bad thing. It's just it's. Part of the beauty of it used leather, so but the leather conditioner consort of unify the color a lot too.
Class Materials
Bonus Materials with Purchase
Ratings and Reviews
Erica Engdahl
Blair has a very clear voice and takes us through the projects in a very calm and clear way. The projects are inspiring and just the general idea of crafting with materials found at thrift stores really appeals to me so definitely recommend this lovely little class.