Lessons
Lesson Info
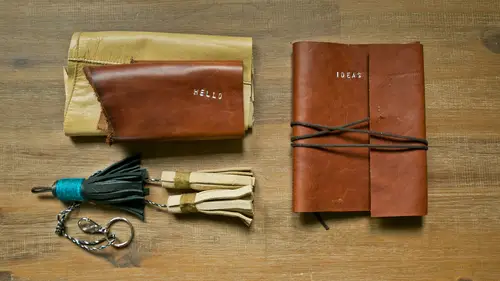
Making a Leather Journal
The way that I made these books is I made them to fit ah a half of a sheet of eight and a half by eleven paper so in other words, once you close the cover around these the paper's protected inside so it's a little bit larger than in a half by eleven I'm sorry then half of the nation half by eleven sheet of paper something to show you how to do that so I experimented with what I was telling you about this is a very thin piece of leather but if you wanted to make this into a book I tried uh sewing two of them together I think it works pretty well it makes it pretty sturdy so um you could either use two pieces of thin leather and these are cut to roughly six inches by eleven inches so you would just take your ruler lee used to make things about the way here and you know, this piece here it has seems if you don't mind those seems they could add a little interest to the outside so I'm just going to make myself a straight edge see I always when he used a little of the leather as possible alt...
hough no scrap is too small saythe then you can make kessel so then I'm going to take just a regular you can use just a regular old just something to make a light mark I use a friction pen like I used for tassels but you could easily just use a light pencil mark and I'm just marking six inches down from the edge that I just cut and then I'm going toe cut across those lines I'm going to line those up and cut across those lines with my rotary cutter get that whole scene there ok so now we just need to make this about eleven inches across I'm just going to mark a spot in measuring eleven inches over from the opposite edge and I'm just going to cut that line it up okay? So this one's a little thicker than the one I was playing with here so we'll try making this one as its own cover without an extra layer and see what happens so you can see when we cut these just like with the tassels there's no finishing that's required and this works the same with leather or I'm sorry with pleather or with vinyl if he wanted to make these same projects out of synthetic fabric you can do that as well so then I'll use grid paper for these so what I do is create groups I believe you call these magazines of I take ten sheets of paper of grated paper I cut them in half and then each half I fold in half so in the end you will have forty pages you can add more uh of the pages and I'll show you how I do that so you can decide if you want to add more pages so I'm just going to find the lengthwise center of these pages which looks like six yep right there I'm just going to make a little line for a god and then with my crafts knife I'm going to cut and this usually takes because I'm cutting through ten sheets a couple passes so just take a flow and do this on your cutting matt ok snap got the two stacks so then we're going toe I'll take each one of these and fold them in half lengthwise to make a nice fold eyes a band folder I use this for so many different things if you don't have one you need one because it's just really versatile all right so we've got two of these so now we need to get these in the book so the way that I designed these books is there is a flap that will fold over the open side of the book so we need to take that into consideration so I'm going to put one set of the paper end and I'm just positioning it so that I've got a little bit of the leather extended beyond the paper said that the paper's not sticking out and with the way that I cut the's hopefully they so we've got a little bit of leather sticking out of the top and at the bottom and then open this up and you've got that nice crease this is where you use your binder clips and I just put thes I just need a couple of these to get me to the sign machine just to hold it in place so what we're going to do is sew a stitch line right through that fold through the paper through the leather and everything and if it's helpful teo draw a straight line underneath this so that you can see the edges poking out so that it can keep their stitch line straight that's totally fine but you don't have to so then from here we'll go over to up its, um binder clips of the bottoms from here we'll go over to the sewing machine and just a couple of notes about setting up your selling machine I lengthen my stitch length a little bit from the factory setting so mine is like at a three if it's smaller than that it makes too many holes and it just isn't a nice clean edge. And then a little trick I learned is when you're finishing you don't back stitch at the beginning and at the end of the scene but what you do instead is you pull a long tail and you're going to actually tie and not little tiny not at both edges and that's going to be more secure you don't want to put extra needle holes in your in your leather so you don't need to back stitch, so I'm starting at the very edge of the leather, not at the paper. I have my long tail it's probably like three or four inches here, my stitch link is set at three, and I just got it, uh, loaded up with my synthetic thread, and I'm just going to stitch straight down that fold mark, I'm gonna leave another long tail and then clip I would even, you know, you could even make the stitched a little further apart. You just don't want your stitches to be super super close to each other. So then I just not these edges and trend the ends another way you could make these covers sturdier if you're using really soft leather is to put a piece of chipboard inside of the cover and you can get chip board from things like a men's shirt box, like if you get a men's shirt box, I think that a cardboard box is probably a little bit too thick that chipboard works really well. So to put the next one in, you're going to do the identical thing, but you're going to move it over like, maybe you're gonna eyeball it, so I've got a little tiny bit of space in there that's like an eighth. An eighth of an inch or something like that and then I'm going to open it up and this time when I clip it, I'm going to also clip that first group of papers closed do you guys carry blank notebooks with you? Do you know I'm glad to hear people still do this because I always carry I do a lot of stuff on my phone that I always carry blank books with me so then again you're just going to stitch right down the center you're going toe pull your extra threat out and on the ones that I made I added two sets of pages so you get forty pages you can certainly add more you could just keep doing the same thing a few more times and add some more paper so claire was that original twenty pages was that sort of the maximum thickness for the needle? Yes, I think that that was a good thickness I think he could probably try more, but when you get more than those and you fold them with your bone folder, you're starting to get paper that doesn't line up nicely on the edges so you can experiment that these, you know, there's these air definitely handmade book so there is an inconsistent quality to the edges of the paper and that's fine, but yeah, you don't you don't want to put more in then the thickness then you think well your machine can handle and all machines are different so you just have to experiment trying this still a little bit and also if you're a little worried about the knots that you made you can put a dot of glue on each one of these and it'll further hold it into place so there's our book with the pages but now we need to add the co closure and for the closure I have used these leather lacing pieces you can use a strip of leather from another garment or from the same garment you can use a ribbon or something like that that we're going to use for hours will use this leather lacing that I got at a craft store and to add this it's super easy you're gonna I put these in the middle of the width of the cover or the height of the cover and I lay this down on the wrong side and this is where I back stitch I literally just go over and back a few times I don't think it looks bad on that to see that like that if you wanted to do just one row of stitching capello glue underneath that let it dry and then do that so for this one I would again I'd pull the tail's going to do like four stitches forward for backward four forward again for backward and then pull my tails and so I'm using a contrast thread so that you can see that there. It makes it just a nice little it looks secure, which is what you want. So if you got let secrets to put into your tear journal like the lock along. Yeah, I had one of those when I was twelve. Yeah, exactly. That would be like the up cycle jury class. Maybe we could find a lock and key. Yeah, exactly. I'm just going to not these. And then when I close the's with this leather lacing, I don't do anything special for me. The leather lacing his decorative and it's. Really just to hold it. I just kind of loop it around and so you can cut it. The link he want you could make, uh, a little lib on this side that came out, sort of like in our tassels. And then maybe so a piece of leather on the other side. So that when you pulled it through our pulled it closed, you have a loop to pull a length of it through me. There's all different ways that you can close thes. But that is essentially how you make these recycled books.
Class Materials
Bonus Materials with Purchase
Ratings and Reviews
Erica Engdahl
Blair has a very clear voice and takes us through the projects in a very calm and clear way. The projects are inspiring and just the general idea of crafting with materials found at thrift stores really appeals to me so definitely recommend this lovely little class.
Student Work
Related Classes
Upcycling Ideas