Make The Image Personal
Lesson 35 from: The Wedding Story: Capture Creative and Authentic PhotosDavina and Daniel Kudish
Make The Image Personal
Lesson 35 from: The Wedding Story: Capture Creative and Authentic PhotosDavina and Daniel Kudish
Lessons
Class Introduction
03:25 2What Are "Epic" Images?
16:50 3The Slideshow Formula
11:04 4First Client Meeting
08:19 5Establish Client Relationship
20:35 6Expectation vs Preparation
10:39 7Pre-Wedding Checklist
06:55 8Gear for Photographing Weddings
07:16Capture The Subtleties
03:32 10Show The Connection
04:07 11Importance of Capturing Transitions
25:17 12Sidelines & Story Telling Details
23:42 13Anticipation & Patience
09:26 14Let The Scene Develop
21:10 15Sequencing in Numbers
08:53 16Successful "Anticipatience"
19:52 17Examples of Poor Reaction Time
08:57 18HTCG in 10
06:41 19Giving Direction
15:33 20Have Variety With Light & Composition
10:24 21Capture The Mood
07:37 22Take Advantage of Natural Light
05:43 23Be Creative With Video Light
06:47 24On-camera Flash For The Dance Floor
05:32 25Find Flattering Ambient Light
04:09 26Don't be Afraid of Tough Light
04:32 27Composition & Framing
12:07 28Lens Choice
06:11 29Keep it Simple
18:13 30Purpose of the Creative Portrait
29:07 31Scouting for the Creative Portrait
17:06 32Maximize a Location
05:48 33Unique Posing for a Creative Portrait
12:04 34Experiment with Your Photography
12:42 35Make The Image Personal
11:19 36Post Production Overview
05:04 37Stay Organized in Post Production
04:42 38Full Gallery Edits
05:25 39Lightroom Workflow Overview
06:48 40Bring Out Detail in Lightroom
10:55 41Black & White in Lightroom
10:51 42Landscape Images in Lightroom
06:32 43Bold Images in Lightroom
05:18 44Slideshow Edits
07:26 45Importance of The Slideshow
08:18 46Selecting Slideshow Images For a Large Wedding
22:13 47Culling Slideshow Images for a Large Wedding
20:22 48Complete Slideshow Example for a Large Wedding
07:22 49Slideshow Images for a Small Wedding
15:24 50Complete Slideshow Example for a Small Wedding
09:49 51Build a Business Around Storytelling
08:10 52Portfolio for Clients
15:04 53Importance of The Inquiry Reply
11:35 54Price List Best Practices
21:04 55How to Price Your Work
12:10 56Final Thoughts
05:05Lesson Info
Make The Image Personal
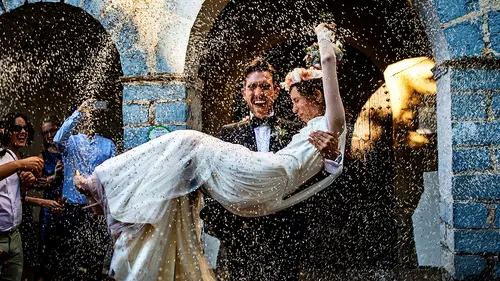
Making it personal is something that ties in really well with the story telling approach. We want the portraits to have a special meaning to them. So with Hannah and Jeff, Jeff spent a lot of time renovating this old pickup truck, and they got married in their hometown, so they had access to it, and they asked us if we could use it for their portrait session, so sure why not, let's incorporate it, it's gonna be a lot more meaningful to you. And here it comes back to the whole play, and the slow shutter, and adding a lot of motion to the photo. So combining those elements to create something interesting for the couple, and also taking it all the way. This is in a parking lot, they're going three miles an hour, in circles around me and other cars. If you show all of that stuff, you're immediately taken out of the moment, and out of the portrait, but by cutting, cropping at the right place, and using the slow shutter, it feels like they're going really fast, that this is very whimsical, t...
hat they're just passing by. But the reality is very different. This is kind of mood, actually, which we've discussed previously, as well. Sometimes, if you're not showing everything then you go into that territory of feeling instead of seeing, right, so you feel wind, you feel motion, you don't know what else is going on, but you don't need to know because it's about feeling. Still making it personal and playing with our portraits, as well. Double exposure, showing the skyline in Miami, this is where they chose to get married. We want to showcase that in the photos. This is an island, Renaissance Island, in Aruba. Aruba. The particular thing about this place is they have seven flamingos that just roam around, and they're stuck there, 'cause they don't really fly. So we're like, okay, going into it, I had research online. I was like, these guys, there's flamingos here, we have to do something with the flamingos. So I went into it, I mean, it's debatable whether this was expectation or preparation, I think it was probably more along the lines of expectation, but I was like, I need a portrait with a flamingo, and I had a vision of having a silhouetted flamingo, or a flamingo in the foreground and a couple in the background. So we went before the wedding, this is scouting, this is what scouting looks like when you have a two month old, or a three month old, no, how old was he, few months old. Six. Anyway, I forget already, what they can do at what age. So yeah, we went to check it out, and just get a feel for things, and then come day after session, or portrait day actually, wedding day, we knew that there was this one spot where they could stand, and we could just wait for stuff to happen around them, that flamingo. Yep, and here making it personal is by including those flamingos which are in the location. Location plays a really big part, in making sure that the portraits are a little bit more personal. A wedding we did in Colorado, and the snow is obviously a big thing, that's why they wanted to get married there, but it was really tricky, it never snowed, there was no snow on the trees, we went in kind of imagining that it would be a little bit more winter wonderland-esque. But it was actually not so, it rained, it was a little tricky to photograph, but I knew the bride had bought these candelabras, she told me, she rented them, she was obsessed with them, and at the venue they weren't really showcased that much, but knowing that she loved them so much, and had spent all this money on them, I really wanted to incorporate them. So we took a pretty big risk, and we're like, let's take them out in the car, and let's just drive around, and see if we can incorporate them in one of these portraits. So this was pretty elaborate, they're in snow to their knees, basically, 'cause you're like, oh that looks good, just walk out there, and then half of their body disappear. It's a thing about snow, right, you'd think I'd know that 'cause I'm Canadian. And then the candles, and lighting them, and getting them all to actually stay lit, was a whole adventure, but in the end, this is their opening portrait. It showcases the location where they were. It's a little bit more interesting and romantic with the candles, and it's the candelabras that I know that she particularly really loved. Making it personal and playing around, this is in the bride and groom's apartment, very, very. In Montreal. In Montreal. Very, very isolated, one spot. They were having a bit of a, what's the word, Oh, like a 1920's wedding. Yeah, exactly, and they wanted a lot of New York vibe to the images, so we just asked them, what if used the projector that we see here, that's the curiosity element, what if we project images from New York? That's the personal part, because we knew that they loved New York. So we just started playing around with it. And eventually something came out of that. This is years ago, and then most recently in Montreal, we did Naomi and Alex's wedding, and during their pre-wedding meeting, we talked about their portraits, we're doing the portraits on the wedding day, what do you guys really love? We would have gone out into the streets of Montreal, if that's something they really wanted, but in December, really sucks, it's cold, it's gross, it's slushy, we don't have a ton of time, so I just suggested what if we rent a studio, and we work with projections again. And in the studio, we were able to do really simple pretty stuff, looking at the camera, more romantic, use window light, there was tons of stuff that we could do to cover our bases, and then we got to play in the same space. It came up in the conversation that they really loved flowers, so I thought that was amazing, that's what we used to project, this is actually my aunt's painting. So I thought it would be nice to have a more abstract version of flowers. I got her permission to use this, and yeah, we used it in their portraits, and the experience was great for them. We played music, and they just, they adored it. They loved that experience, and they loved that we had done something special for them. So it wasn't about the location, it was more about doing something creative, with elements that they really love. Then again, just playing with double exposures, and playing with the projection, that's how this photo ended up coming together. It's really bringing all of those elements together. So the portraits, as much as we use them for opening, we also use them for closing. They allow us to really just put an end to the slideshow, and to the story, so this is Julie and Alan in Hawaii. This sequence is basically the last three portraits that we used to close their slideshow, so it's a photo of them sitting on the cliffs, then walking out of that scene, and then walking onto the beach. It's really important to have something to finish things, so it doesn't just end abruptly with just a photo of the two of them. We need that walk out, so it suggests that things are coming to an end. Sometimes it's not always possible to have those types of portraits to put at the end of the slideshow, maybe we didn't have a day after session, or something didn't quite work out in that regard. So we'll use more storytelling photos from the reception itself to close out the slideshow. But just that concept of closing out the story is just really, really crucial, to making a really solid slideshow. So in this case, just speech, her reacting to the speech, the two of them, with their families, and then dancing together on the dance floor. Just having that strong moment of the two of them on the dance floor at the end of the party, is what we would use to close when we don't necessarily have a portrait. We do that often, just the strong moment on the dance floor, and sometimes it happens earlier in the night. But as long, I'm very aware of whether I have that or not, the moment of them connecting on the dance floor, knowing that I can close out the slideshow with it, if we don't have a day after session. Same with Katrina and Brandon, again the two of them having a good time. This has a feel of, this is the end of the night, there's a lot of confetti, he's not wearing his suit jacket anymore. She's in a different dress, it's really They're on the ground. Yeah, they're on the ground. Guests are having a good time, everybody's feeling it. Again, kissing together on the dance floor. Walking out through a bunch of confetti. And then walking out through sparklers. So that sequence of photos really leads you out of the story of the wedding day, and allows us to close the slideshow. So it's clear that you are doing a lot of preparation for your weddings, and that's how you're able to create such amazing moments. So the question is, I'm wondering how many hours are invested in each wedding, scouting, meeting, day of, post, what does that look like for you? Depends. Yeah, for meeting, it's not that long. It would just be an hour or two. Sometimes just grab drinks at the bar before the wedding starts, 45 minutes, one drink, so it's not that much time. Scouting is probably where we'll spend a little more of our energy. It can be as much as two hours, just walking around finding different locations. And really making sure that we do the scouting at the same time as we would do the portraits, so we get a good sense of light, and just different situations. Wedding day, is the wedding day. And then post production, we each spend, well we're gonna talk about it, but we each spend about 6-8 hours in post production. So all said and done, I guess somewhere around, somewhere between 20 and 30 hours, per wedding. Thank you, okay another question is, so I guess that, when you are doing those day after sessions, or some of the time, when you aren't able to do those the day before, or whatever, however it works out, the question is how much time do you spend on those sessions, in general? Right, we don't want to overdo it, we used to do it like five hours, or something, but that's just kind of, really drawn out for everybody. I think now we've gotten it down to within two hours, I would say. It's all about the timing. So if it's just before sunset, we can get some stuff out of the way with more light, then sunset light, and then maybe into twilight, or that lingering light after sunset, but usually within two hours, we're able to cover our day after sessions. Yeah, we'll typically start about an hour and half before the official sunset time which is when the sun disappears over the horizon, so we can shoot another 30, 45 minutes, after the sun sets. That also gives us a buffer in case they're running late, which they often are, so. Tell them we need more time then we actually need. Great, alright one more, any tips for photographers who don't work with a partner, on how to organize and execute these more complex, interesting compositions, that you're scouting. I know in a lot of 'em you have the off camera flash, the other person was holding, any tips for those folks? Yeah, I would say just get an assistant, it doesn't even have to be a photographer, honestly, someone who has like a good eye for things, or who you can work with who will be able to just, yeah, be an extra set of eyes, you know, like, oh her hair looks weird there, or that hand actually shouldn't probably not be placed that way, 'cause sometimes you get so focused on whatever you're working on, that you don't notice that 'til later, and it's too late, right. So that's the idea, is really just like an extra set of eyes, who can help you out, or an extra set of hands, who can hold a flash, like I said, doesn't even have to be a photographer.
Class Materials
Bonus Materials with Purchase
Ratings and Reviews
a Creativelive Student
Holy Moly! I have been very familiar with Davina & Daniel for several years and I also work closely with Image Salon for the past 3 years. I loved their relatability, raw honesty, human connection, and their teaching method. It was also super helpful to see the GoPro footage on a real wedding day and walk through their thought process with them. A refreshing wind of inspiration has now flooded my mind and attitude. I am excited to begin my 8th year of weddings with a clear mind and full heart. These two are the REAL deal and I am so happy I made this investment. Thanks, CL for always bringing the BEST of the BEST.
a Creativelive Student
I’ve been following Davina and Daniel’s work for years and suffice it to say, they are in my top 6 all time favorites. I was so excited to watch this creative live and it didn’t disappoint. From their approach to shooting through the moments, to their stunning locales and minimalist gear, there is something for everyone in this class. Both Daniel and Davina have a tremendous knowledge of photography and their willingness to share and educate is second to none. Oh, and just so you know, they are also the nicest people on the planet. Super sweet, amazingly talented. Thanks for having them on.
a Creativelive Student
Davina and Daniel are fantastic presenters as well as an exceptional photo team (plus they are super nice people, too!). I love their approach and methods and felt like there is so much value in this course. Even though I've been photographing for a long time, I took away a lot of great value gems from their course and look forward to applying several to my own business!
Student Work
Related Classes
Wedding Photography