Keep it Simple
Lesson 29 from: The Wedding Story: Capture Creative and Authentic PhotosDavina and Daniel Kudish
Keep it Simple
Lesson 29 from: The Wedding Story: Capture Creative and Authentic PhotosDavina and Daniel Kudish
Lessons
Class Introduction
03:25 2What Are "Epic" Images?
16:50 3The Slideshow Formula
11:04 4First Client Meeting
08:19 5Establish Client Relationship
20:35 6Expectation vs Preparation
10:39 7Pre-Wedding Checklist
06:55 8Gear for Photographing Weddings
07:16Capture The Subtleties
03:32 10Show The Connection
04:07 11Importance of Capturing Transitions
25:17 12Sidelines & Story Telling Details
23:42 13Anticipation & Patience
09:26 14Let The Scene Develop
21:10 15Sequencing in Numbers
08:53 16Successful "Anticipatience"
19:52 17Examples of Poor Reaction Time
08:57 18HTCG in 10
06:41 19Giving Direction
15:33 20Have Variety With Light & Composition
10:24 21Capture The Mood
07:37 22Take Advantage of Natural Light
05:43 23Be Creative With Video Light
06:47 24On-camera Flash For The Dance Floor
05:32 25Find Flattering Ambient Light
04:09 26Don't be Afraid of Tough Light
04:32 27Composition & Framing
12:07 28Lens Choice
06:11 29Keep it Simple
18:13 30Purpose of the Creative Portrait
29:07 31Scouting for the Creative Portrait
17:06 32Maximize a Location
05:48 33Unique Posing for a Creative Portrait
12:04 34Experiment with Your Photography
12:42 35Make The Image Personal
11:19 36Post Production Overview
05:04 37Stay Organized in Post Production
04:42 38Full Gallery Edits
05:25 39Lightroom Workflow Overview
06:48 40Bring Out Detail in Lightroom
10:55 41Black & White in Lightroom
10:51 42Landscape Images in Lightroom
06:32 43Bold Images in Lightroom
05:18 44Slideshow Edits
07:26 45Importance of The Slideshow
08:18 46Selecting Slideshow Images For a Large Wedding
22:13 47Culling Slideshow Images for a Large Wedding
20:22 48Complete Slideshow Example for a Large Wedding
07:22 49Slideshow Images for a Small Wedding
15:24 50Complete Slideshow Example for a Small Wedding
09:49 51Build a Business Around Storytelling
08:10 52Portfolio for Clients
15:04 53Importance of The Inquiry Reply
11:35 54Price List Best Practices
21:04 55How to Price Your Work
12:10 56Final Thoughts
05:05Lesson Info
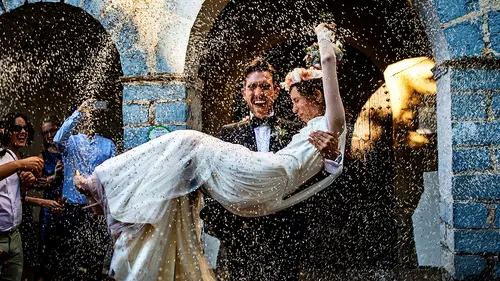
Keep it Simple
When in doubt, really, really try to keep it simple. Probably my favorite thing we're gonna be talking about. (laughs) So, this is the 'getting ready room' that I walked into a few years ago. You know, prep has already been underway for a few hours. It's a big Indian wedding, so she probably started getting ready at like 3:00 a.m. or something. I didn't need to be there at 3:00 a.m. So yeah, I walk in and this is the situation, and I just remember really freaking out. Like, this is not a photo that I took to show you all what the room looked like. This is a photo I took thinking this was an actual photo I was gonna, like, get out of the situation. (laughs) I was thinking, "OK, I wanna go environmental, I wanna show the action, I wanna show stuff going on." But there's, like, a million distractions, and also a very obvious issue with framing here, right? So, she is reflected in the mirror, but there's a line cutting through almost her head, there's a TV monitor on the other side, she'...
s not standing out visually, and there's ten million distractions going on. So, I was very freaked out in this situation. I didn't handle it very well, but I did give myself that pep talk. "OK, that was just the makeup part. The day's not over. I can catch up. I can get one step ahead." So, for the next part I was like, "OK, let's go in this other room. I'm gonna put you in nice light, and I'm just gonna simplify." So I knew the next thing going on was that they were exchanging letters. He had written her a letter, she was gonna be reading it. So by putting her in simple light, simple background, I just... Simple, simple, simple, right? Focusing just on that. And this is the aftermath of her reading the letter. So, out of the chaos, and me just trying to go as simple as possible, I was able to just get the nice light on her, and just shoot the moment. Similar situation, this was pretty... Not as chaotic as the other one, but quite visually messy. I think one of my biggest challenges was actually the makeup artist wearing a down jacket in the middle of summer in Napa, and face mask. So that was tricky. That's the bride there, drinking the champagne. Basically she's feeling the way that I'm feeling in this moment. I liked that there was a scene going on, I tried to work on that but, again, this is like when you enter the room and you're trying to get a feel for things. So when it was her turn to do her makeup, I was like, "OK I'm gonna start really simple." So I played with the sheers a little bit just to get the lighting a little bit more directional. Just focusing on her; very simple. Then somebody gives her champagne glass, and we hang the dress in the door, which always gives for a good background, work on that. Then I brought... Oh, you ruined my punch. Sorry. (laughs) Then I brought out... So we are gonna talk about play when we talk about the creative portrait. One of the things I carry in my pocket is like a little block that's a little portable reflection. So I took out my block now that I've simplified things and I'm calm, you know, play around with this block and just wait for that right makeup brush moment. So, out of simplifying, I actually ended up with something creative and interesting, but that wasn't my intention going in to that photo. The idea was just to simplify, and just get myself calm, and really build on that one simple photo. Yeah. The inner dialogue changes so much once you tune out the chaos, the visual chaos that might be happening, and tell yourself, "Let's go simple. Focus on the light. Get a good moment," and then just stick to that, and then it's a snowball effect. Everything just kinda falls back into place. When I'm feeling overwhelmed by a situation, I often just ask myself, "What's the simplest way that I can get a good photo right now?" Even if it's just a headshot of the bride getting her makeup done, she's in nice light, what is the simplest way that I can get a good photo right now? And then I may or may not build on that, but at least it gives me the confidence that I've nailed something, and I've given my client something good, and then it's that peace of mind that I can either build on it and try to do something creative, or try something else. During the ceremony with extremely beautiful light, there's so many ways that we could shoot this, and over-complicate it, and make different types of images. But a beautiful moment with a beautiful background, with beautiful light, why do anything else? Just stick to something very, very simple. It's gonna be more powerful this way rather than showing a million different things in the print. The bride and groom, behind the scenes, between the ceremony and the reception. They're taking a breather. This is another example of seeing things, or always following the bride and groom and always staying on them. It doesn't need to be about anything but this nice moment that they're having. And simplifying in this case is about three subjects. Groom, veil, and bride. That veil kind of adds that context. The ceremony is over, it's time for the reception, they're more relaxed. You feel that in this photo, right? This room actually had a lot of different elements for us to play with, which we did as the bride was getting ready. This cool round mirror with a lot of light bulbs on it, but now is not the time. It's also thinking of that visual variety. We know that we have the abstract stuff from earlier in the day. Now in this very good moment between the bride and groom, there's no need to over-complicate things. Just keep it simple. Good moment, good emotion. Just being all up in there and as straightforward as possible. Again, this doesn't need context, it doesn't need... I mean, the hands are giving it the context. She's getting her hair done and she's not super happy about what she sees. Then, a straight up emotion is all you need. And then for portraits, this is a wedding we did in L.A. a couple weeks ago and there were different elements for us to work with, but for us, the beauty of the colors... His burgundy suit, her beautiful sari, like, that's all we wanted to showcase. Putting them in a small silhouette, environmental is one thing, but it takes away from their beautiful outfits and all the colors that came with their wedding day. So we just found the darkest background we could find, within the hotel, made sure that it had good light. It wasn't quite black when we took the photo, but in post-production we brought that down, and actually on the edges of the frame, it wasn't black either. I think we might've shot this as a vertical and then we made it a horizontal because we needed that for the opening photo in our slideshow. And again, that's OK. We're not photojournalists, we're wedding photographers and we're trying to do the best photos for our clients. Give yourself that permission, play around, be an artist, and just go for it. I guess tying into lighting and mood, I was just curious about some of your choices when it comes to maybe white balance or color temperature with preserving that with the ambient, or not? In general, we'll shoot Auto White Balance. The Sony does any amazing job. We didn't say when we talked about our gear, but I feel like 99% of the time it nails the white balance perfectly on its own. So we let the camera decide that. If it doesn't, that's what shooting RAW files is for. You have full control over your white balance after the fact. So it's one setting that we don't wanna fiddle around with. Just keep our process as simple as possible, and not make it a distraction. In terms of the warmth, if it's a candlelit reception, and it's warm, then we wanna keep the photos warm. We don't wanna bring it to neutral white balance that kind of would go against the whole purpose of shooting ambient and preserving mood. It's a personal preference thing. I know a lot of people would be really bothered by the photo looking so orange, but to me that's what warm light looks like. That's what it looks like in the moment, and that's the purpose behind keeping it warm and in post as well. Great. Alright, we've got a number of people asking about the reflector block that you mentioned. Of course. (audience laughs) And from both Suzy and Adrian, what kind of reflector block is it? Do you just keep it in your bag? How does that work? Yeah, it's so random but we're gonna talk about this when we talk about the creative portrait. A big, kind of permission, that I gave myself last year, and this is coming from 2016, that difficult year we had, and going into 2017 just being like, "I'm gonna do what I'm gonna do and it's gonna be great." So, one of the things I told myself was that I was going to just play. Again, this is gonna come up with the creative portrait, but one of the things that I got for myself was... It's stamping block. So you know when you have a custom stamp made, they use this acrylic block? And then you make the stamp and they glue it on there, and then you can use it to stamp things. So I got it on Amazon. It's literally just, like, a smallish acrylic block that reflects well. I keep it in my pocket. What I really wanted was a reflection that was clear so I could also try shooting through it when necessary, and that it fit in my pocket. So Amazon, acrylic stamping block. Basically, that's what I did, yeah. (laughs) Amazon just sold out of acrylic blocks. (audience laughs) I should add it to, like, my affiliate cart thing or whatever. Cool, thank you. I look forward to hearing more about that creativity in the portraits and such as the class continues. More questions about some of the things that you've mentioned that you use. Can we go back to the video light? Yes. Do you know which light you use? And then also, how do you use it? I know once you mentioned that it was up somewhere, but in the different scenarios do you carry around a stand? Do you just kind of MacGyver scenarios of where to put it, and how to keep it up? In all of the examples we showed, one of us was holding the light. However, we just got a light stand which we haven't had a chance to use yet, but we do plan on using it. Just so we can both keep taking photos rather than one of us sacrificing themselves and, you know, just holding a light. Sacrificing. (laughs) The name of the light itself is the Stella Pro... 3000 maybe. 3000? I forget the exact model name, but yeah, it's made by Stella. S-T-E-L-L-A. Again, we like it because it's fully dimmable, and you can also adjust different... Sorry, add different diffusers to it so it's very versatile. The examples that we have shown today, I don't think any of them were taken with that light, though. No, 'cause we just got it. Because we just got it recently. So we did have it for... Did we even have it for Sarah and Aaron's wedding? I'm not sure. Not sure. So we just started fiddling around with it, but the reason why we went to the Stella is because we wanted something with more intensity. Just the option to use it when there's a little bit more ambient light, and still get that pop. It's more powerful. It's also a very solid build, and like, it is an expensive video light but it's built very solid. I think in their official material, they say they can drop it from, you know, three feet on concrete, and it's not gonna break. So that was important for us. We haven't tried that. (laughs) I don't plan on trying that. (laughs) Alright, questions about how you meter because you do have such dramatic light, are you spot metering in certain scenarios? Evaluative metering? What are you doing to get... that exposure? Visual metering. (laughs) Is it on the skin? Is it... We visually meter. So the way that it looks in the camera is the way that we expose it for. If it's too dark, I go brighter. (laughs) If it's too dark... That's basically what it is. So I mean, that applies specifically to the Sony because we do have that exposure preview in our viewfinder. When we shot DSLR, we generally... yeah, metered it a bit more. Metered it a bit more. We really tried to expose for the highlights. It's harder to recover a blown out highlight than it is to push an underexposed shadow. So make sure that none of the highlights are blown out. Generally, yeah, for the face or for the main subject, make sure that's what the exposure is set for. Cool. Ah, let's see. When we were talking about the on-camera flash and you were showing us when you might use that, do you ever direct it for if people are dancing or anything like that? Never. No. I think the quality of the light becomes too harsh. I know some photographers who use it brilliantly with a very slow shutter. They get the harsh light on them but also a very blurred background, which is a beautiful effect. For us, it's a little bit off-brand, you know, off-style. And we try to stick to a consistent style and a consistent look for us. So, it's always bouncing off to the side or just with that Flipkart. And a question from Fergie, when you are doing that balancing, do you ever have issues with color cast if you're bouncing off, say, a blue wall or off green bushes, or what have you? And how do you deal with that? That's a good question and yes, that does happen. It's just a matter of being aware of it. There's also, you know, in a tent, it could go like this. So you're on one part of the tent and it's like, you're really close to the ceiling, and so it's bouncing back really bright, versus when you're in the middle, it's bouncing back from further away. So it's just a matter of kind of getting a feel for the room and being like, "OK, I wanna avoid, you know, bouncing in this specific spot because it's going to, you know, give me a cast or something like that." More often than not, like, the ceiling will be either a neutral color, so white or gray or black, or it'll be a wood ceiling. And the wood ceiling, yeah, it does come back a lot warmer. But that's OK, we can fix that in post and just adjust the white balance to be a little bit cooler than if the ceiling was neutral. But green bushes, that doesn't really apply because we don't use the flash mid-day. And then if the ceiling or the wall is lit up with LED lights, and it's blue or pink, the light that bounces on the wall is not gonna come back blue or purple or whatever the color is, because the wall itself is white. From Kathleen, so we've seen this in action, and we've heard you describe how you are interacting with people during the wedding day, during itself. But a question, maybe you could summarize how much talking you're actually doing on the wedding day because you are kind of, you're there but you're separating yourself, you know, but you're not. Are you talking to the clients to help control the situation? Describe that for us again. No, that's a great question. Which one of us do you want to answer? (laughs) I heard him like snickering over here 'cause I think I know what he's gonna say or imply, is that I'm very chatty, right? Something along those lines. (laughs) I think... So I like to talk and be involved in the conversation if I feel like it's appropriate, and when the girls are getting ready I'm often like, right in the conversation and I'm adding, and I'm, you know, sharing as well. And that helps, you know, everybody feel comfortable with me. I'm not, like, the quiet girl in the corner listening to all their girl talk. You know, I'm actually contributing. So I actually do see that there's a benefit to that. But again, like, I want it to be appropriate and for it to make sense. I don't wanna interrupt moments or, you know, take control of the day either so all they remember is me blabbing on and on, you know, at their wedding. So it's kind of that balance I guess. In terms of taking control, I think it just has to happen in the right moments and in a subtle way, but I don't want them to only see me as the person who's gonna, like, control the situation for photos. Something that didn't come up before, I'm gonna kind of use this as a tangent, if I may. I think it's a good thing to take control in those situations just because they want to know that they're doing the right thing. You know, this is their first time and they're like, "Oh, is it OK that I'm sitting like this? Is this the right place to do it?" Again, they're on team Good Photos, right? So, they look to you for that validation, so I think if anything it just confirms to them that, like, OK, if something looks off, they're gonna let me know, and that's very comforting for them, I think, as a subject. If you've ever been on the other side of the camera, which I highly recommend doing even though it can be painful, you know, you're very aware when you're being posed by another photographer just how much is comforting actually when they will come and take some direction, because you're like, "OK, good. I'm in good hands. They're not gonna let me have my arm looking fat, or whatever, you know." And the same goes for things happening in the right spots in the room. So, sorry, I know I took a little detour. No, that's great. And what's your interaction in terms of talking and your style. (laughs) Let's hear this. (laughs) I definitely rely on Davina, you know, for a lot of the bonding that happens. I think it just comes more naturally to her. Having said that, sometimes if I'm alone with the groom and he's getting ready alone and there's nobody there, I will definitely interact a lot more with him, and just try to get him talking and create that same friendly relationship with them. But then the rest of the day, they have so many people around them that, you know, we don't really need to talk so much. When we do come together with them, be it, you know, they're doing a lot of touch ups in between the ceremony and reception, or if we're doing portraits with the two of them, obviously we interact a lot more. And during portraits, we do, you know, talk lot to them as we're doing the photos. Wanna make sure that we're giving them as much of that feedback as possible. But the rest of the time we try to disappear a little bit more in the background. I do give a lot of affirmation, and I think that's really important, you know, like, "That was a beautiful ceremony. You look amazing," you know, any of these kinds of encouraging words throughout the day I think are really good for the brides, especially, to hear. We're the first people to hug them, we put our cameras off our shoulder and hug them when they've, you know, after their ceremony and congratulate them. So we do still wanna kind of be friendly and involved from that point of view.
Class Materials
Bonus Materials with Purchase
Ratings and Reviews
a Creativelive Student
Holy Moly! I have been very familiar with Davina & Daniel for several years and I also work closely with Image Salon for the past 3 years. I loved their relatability, raw honesty, human connection, and their teaching method. It was also super helpful to see the GoPro footage on a real wedding day and walk through their thought process with them. A refreshing wind of inspiration has now flooded my mind and attitude. I am excited to begin my 8th year of weddings with a clear mind and full heart. These two are the REAL deal and I am so happy I made this investment. Thanks, CL for always bringing the BEST of the BEST.
a Creativelive Student
I’ve been following Davina and Daniel’s work for years and suffice it to say, they are in my top 6 all time favorites. I was so excited to watch this creative live and it didn’t disappoint. From their approach to shooting through the moments, to their stunning locales and minimalist gear, there is something for everyone in this class. Both Daniel and Davina have a tremendous knowledge of photography and their willingness to share and educate is second to none. Oh, and just so you know, they are also the nicest people on the planet. Super sweet, amazingly talented. Thanks for having them on.
a Creativelive Student
Davina and Daniel are fantastic presenters as well as an exceptional photo team (plus they are super nice people, too!). I love their approach and methods and felt like there is so much value in this course. Even though I've been photographing for a long time, I took away a lot of great value gems from their course and look forward to applying several to my own business!
Student Work
Related Classes
Wedding Photography