Black & White in Lightroom
Lesson 41 from: The Wedding Story: Capture Creative and Authentic PhotosDavina and Daniel Kudish
Black & White in Lightroom
Lesson 41 from: The Wedding Story: Capture Creative and Authentic PhotosDavina and Daniel Kudish
Lessons
Class Introduction
03:25 2What Are "Epic" Images?
16:50 3The Slideshow Formula
11:04 4First Client Meeting
08:19 5Establish Client Relationship
20:35 6Expectation vs Preparation
10:39 7Pre-Wedding Checklist
06:55 8Gear for Photographing Weddings
07:16Capture The Subtleties
03:32 10Show The Connection
04:07 11Importance of Capturing Transitions
25:17 12Sidelines & Story Telling Details
23:42 13Anticipation & Patience
09:26 14Let The Scene Develop
21:10 15Sequencing in Numbers
08:53 16Successful "Anticipatience"
19:52 17Examples of Poor Reaction Time
08:57 18HTCG in 10
06:41 19Giving Direction
15:33 20Have Variety With Light & Composition
10:24 21Capture The Mood
07:37 22Take Advantage of Natural Light
05:43 23Be Creative With Video Light
06:47 24On-camera Flash For The Dance Floor
05:32 25Find Flattering Ambient Light
04:09 26Don't be Afraid of Tough Light
04:32 27Composition & Framing
12:07 28Lens Choice
06:11 29Keep it Simple
18:13 30Purpose of the Creative Portrait
29:07 31Scouting for the Creative Portrait
17:06 32Maximize a Location
05:48 33Unique Posing for a Creative Portrait
12:04 34Experiment with Your Photography
12:42 35Make The Image Personal
11:19 36Post Production Overview
05:04 37Stay Organized in Post Production
04:42 38Full Gallery Edits
05:25 39Lightroom Workflow Overview
06:48 40Bring Out Detail in Lightroom
10:55 41Black & White in Lightroom
10:51 42Landscape Images in Lightroom
06:32 43Bold Images in Lightroom
05:18 44Slideshow Edits
07:26 45Importance of The Slideshow
08:18 46Selecting Slideshow Images For a Large Wedding
22:13 47Culling Slideshow Images for a Large Wedding
20:22 48Complete Slideshow Example for a Large Wedding
07:22 49Slideshow Images for a Small Wedding
15:24 50Complete Slideshow Example for a Small Wedding
09:49 51Build a Business Around Storytelling
08:10 52Portfolio for Clients
15:04 53Importance of The Inquiry Reply
11:35 54Price List Best Practices
21:04 55How to Price Your Work
12:10 56Final Thoughts
05:05Lesson Info
Black & White in Lightroom
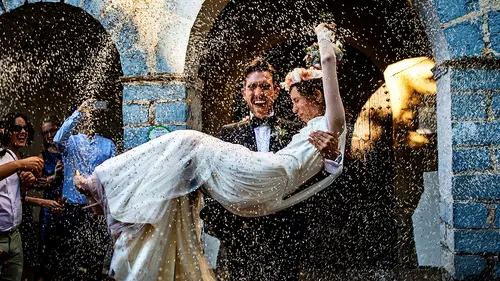
Alright, jumping into our black and whites. We chose St Henry as the name for our black and white presets. It's a grungy neighborhood in our city of Montreal, and black and white just seems ever-so-fitting for that name. So, the way the black and white preset works is it pulls the highlights a little bit more, pushes the shadows a little bit more as well. Whites go up here instead of down. And blacks go down as well. And the biggest change is with the contrast lighter. Here we can go up to a 50, 60, or even a hundred because we don't have any skin tones to deal with. So, the contrast lighter will actually do a really nice job on giving more punch to the images. We don't have color to deal with. Exactly, we don't have color to deal with. Is that what I said? You said skin tones. (laughs) Which is kinda true, too, I guess. Otherwise, the approach is very much the same. So, control our highlights with our exposure. So bring it down for the brightest part of the image. Or pull the ...
highlights a little further down. We can maybe push the shadows a tad more on this image. And then to go and get more light on our bride and groom over here, we're gonna take our D&D dodge brush and just pass it over. If the adjustment brush is maybe pushing the shadows a little bit too much, and you're starting to get a little too much detail in the hair. Well while you're on that adjustment brush, simply pull your shadows back down a little bit, and instead, maybe increase the exposure a tad more. So the effect of that brush is gonna be a little bit different. We also wanna pass it on some of the people in the background as well because we want them. They are relevant to the story here, and we do wanna see them as well. This image, you might recognize from just recently. Again, start with a black and white preset, adjust your exposure for the highlights. Go as bright as we want the wall to go here, and the forehead on the groom, which is the brightest part of the image. Maybe do a centering crop just to make sure that everything is nice and symmetrical. We don't really need the bottom of their hands there. And we want the main subject in this case, like their heads and their eyes, to really live in the rule of thirds. So we wanna place them there. And final step, take our dodge brush and pass it over their faces to brighten them up a little bit. And again, this is not gonna effect the highlights so much, because the highlights are set to pull in a negative direction. The size of the brush that we use, we wanna make sure that we're not cutting out our subject too much. You don't wanna use a larger brush with a soft feather, so that you're blending your dodging with as much of the landscape of the photo as possible. Something like this, again, the color doesn't really add anything to the image, so we'll go ahead and apply our St Henry preset, which goes and gives a lot of tone to the image while going in black and white. Adjust our exposure. You can give it even a little more contrast. Go all the way up to 100, because the contrast adds so much to this photo. And we're gonna do just a little bit of dodging on the edges of the frame. In this image, actually we're using a 18 millimeter, very old lens that got passed down from my dad who was a photographer as well. We wanted to play around with it and get different effects on the image. And one of the side effects was that it came with a lot of vignetting that we don't necessarily want in the photo. So that's what I'm getting rid of a little bit with the dodge brush. Once that's applied, we'll take our punch brush, and just go and give more contrast and more clarity to the edges of the frame. Another good opportunity for black and white, simply because the colors don't really add anything, and we have good light on our subject. Again, set the exposure for our highlights. In this case, the highlights is really the girls in the back. Something like this, where you have like, a really strong, isolated, highlight, is something that we might ignore. Like, I don't wanna set the exposure so dark that it's set for this highlight because that's just gonna make it more challenging to bring out the subject with my dodging. If I tried to bring them out with a dodge brush, you would really see the stark difference between the adjustment brush and the exposure that was set for the image. So I then jump to the next obvious highlight, which is the girls sitting on the couch over there. So, adjust my exposure, maybe give it a little more contrast. And then, final steps, again, is with my dodge brush. And just, go over all of the shadows so that the detail comes out a little bit more. If it's not enough, we can take a second adjustment brush, and apply it just a little bit more on the bride so that the viewer really looks at that part of the image as much as possible. Another good candidate for black and white because the moment is interesting, but the colors really don't add anything. Preset does a great job as a starting point. We'll maybe just pull the highlights a little bit more to retain more information. And push our shadows a little bit more. Give it a little more contrast. Apply our vignette And then do a little bit of dodging on the bride, as well as the people all around her so they stand out a little bit more. If that's not enough, we'll go ahead and get a second brush on the bride herself, so she really becomes the main focal point in the image. Alright, moving on to Dance Floor Preset. Korakia was really designed for that purpose. It's a very lightweight preset, it really doesn't do very much in terms of the settings. But the main thing here is, you'll notice, the whites are being pulled into the negatives because our bounce flash, or our flip card really creates harsher light than natural light, and we wanna counter-effect that by pulling the whites. So that's gonna soften the highlights and the skin tones a lot. If we have them pushed, it does add a nice contrast, but we can see how some of the highlights in the skin blow out very very easily. So it's something that we're gonna keep in the minuses. The preset also comes with a natural vignette already built into it, so we don't need to really add anything. Really, the control here is gonna be by adjusting our exposure. Giving it just a tad more contrast. And just like with the other images, take our dodge brush and pass it over the main subject. In this case, it's pretty obvious what the main subject is. And then, over the bottle of champagne. And the other guys on the side. If we wanna give the image little bit more punch, take our punch brush and pass it over the landscape of the photo. Especially where the champagne is dripping down. That's where we want a lot of clarity and a lot of contrast to come out. So the mindset is really really similar from one image to another. As you can see, we're often repeating the same steps. And that's what really allows us to stay consistent with our editing. And for our body of work, in general, to be similar from one wedding to another. I think that consistency is really important, because we don't wanna surprise our clients with, all of a sudden, a very different approach in our editing. We want them to know what they're gonna get as a final product. Again, we lowered our exposure for the landscape of the photo. And then take our dodge brush to bring out the main subjects. This one is gonna need quite a bit of dodging. So this is the raw file. As you can see, the light is really hitting the speaker first and then traveling to the other subjects in the frame. With our editing, we really wanna try to reverse that. So the way we do that, is we bring our exposure down, looking at the highlight on his paper. We'll go ahead and adjust our white balance while we're at it. It's a little warmer and a little less green. And then the rest of the work is gonna come with our adjustment brush. And start dodging our subjects. And in this case, it's not gonna be possible with one adjustment brush. We're gonna go ahead and select a second one and keep going on the bride and groom and the people in the background. And if that's not enough, we can go ahead and increase our exposure and just make tweaks to that adjustment brush specifically. We can pull the shadows back a little bit, because we're bringing out a little too much detail in the hair and the suit. And sort of, find our happy place there, and make sure that we're evening out the light, so that it doesn't feel like there's a specific spotlight on our subjects. That the light is really falling naturally. Again, dance floor, use our Korakia preset. Bring our exposure down for the highlights. Give it more contrast here, we do want the colors to stand out a little bit more. And push our contrast lighter. And then take our adjustment brush, set to dodge and bring out our main subject a little bit more. I like we're not addressing the photo itself. Like what's going on. This is actually my half-sister's wedding, but yeah. (laughs) Proud sister. Yeah, go ahead. Have you guys noticed a difference in how you edit when you change your camera systems? That's a very good question, actually. No, not at all. Yeah, nothing has changed in our approach. The dynamic range on the Sony is just as good as it was on our DSLRs. Just really nothing that has changed. The cool thing about Develop too is, once you apply the presets, so let me set it to Hyder, it comes with its own callibration file. And the way that they've built that preset is, it's gonna look exactly the same no matter what camera you use. So, if you're shooting Nikon, or Cannon, or Fuji, or Sony, and a bunch of different models within that system. If that photo was taken with a Canon and then with a Sony, and you applied the same preset with the same settings, the image would look exactly the same. They spent the time in studio photographing, you know, a color chart on different bodies to make sure that when they applied the preset, everything goes in the right places. That's really important for Develop presets specifically. Because it's not about the settings, you know, just our settings that we're using for each preset, it's about how they've built it at it's core. Yeah, and we have a lot of clients at the Image Salon who shoot with one camera system and their second shooter shoots with a different one, and, you know, they want that consistency across the colors. And the Develop preset's really allow us to go ahead and get that consistency.
Class Materials
Bonus Materials with Purchase
Ratings and Reviews
a Creativelive Student
Holy Moly! I have been very familiar with Davina & Daniel for several years and I also work closely with Image Salon for the past 3 years. I loved their relatability, raw honesty, human connection, and their teaching method. It was also super helpful to see the GoPro footage on a real wedding day and walk through their thought process with them. A refreshing wind of inspiration has now flooded my mind and attitude. I am excited to begin my 8th year of weddings with a clear mind and full heart. These two are the REAL deal and I am so happy I made this investment. Thanks, CL for always bringing the BEST of the BEST.
a Creativelive Student
I’ve been following Davina and Daniel’s work for years and suffice it to say, they are in my top 6 all time favorites. I was so excited to watch this creative live and it didn’t disappoint. From their approach to shooting through the moments, to their stunning locales and minimalist gear, there is something for everyone in this class. Both Daniel and Davina have a tremendous knowledge of photography and their willingness to share and educate is second to none. Oh, and just so you know, they are also the nicest people on the planet. Super sweet, amazingly talented. Thanks for having them on.
a Creativelive Student
Davina and Daniel are fantastic presenters as well as an exceptional photo team (plus they are super nice people, too!). I love their approach and methods and felt like there is so much value in this course. Even though I've been photographing for a long time, I took away a lot of great value gems from their course and look forward to applying several to my own business!
Student Work
Related Classes
Wedding Photography