Glacier Point: Shooting Stars & Night Photography
Lesson 16 from: The Outdoor Photography ExperienceChris Burkard
Glacier Point: Shooting Stars & Night Photography
Lesson 16 from: The Outdoor Photography ExperienceChris Burkard
Lesson Info
16. Glacier Point: Shooting Stars & Night Photography
Lessons
Day 1
1Class Introduction
11:28 2Photography & Outdoor Experience
30:38 3How to Create Timeless Images
14:19 4Pismo Beach Walk Gear
18:44 5Yosemite Trip Gear
09:38 6Gear Q & A
17:58 7Water Housing Photography
47:25Shooting in the Water
08:52 9Water Photography Q & A
05:08 10Researching Your Location Before Shooting
40:50 11Timeless Images at Glacier Point Shoot
44:45 12Pismo Beach - Shooting on the Pier
32:26 13Pismo Beach - Focus Point
19:56 14Pismo Beach - Composition & Tips
25:22 15Pismo Beach - Shooting Under the Pier
07:44 16Glacier Point: Shooting Stars & Night Photography
21:35 17Equipment & Tools for Night Shooting
39:18 18Basic Night Shooting Q & A
25:47 19Post Processing Tools
09:46 20Organizing with Photo Mechanic
25:02 21Post Processing with Lightroom
39:20 22Importance of Saving to DNG
05:32 23Post Processing Q & A
13:47 24Yosemite Hang Gliding Shoot
22:34 25How to Utilize Social Media
27:17 26Social Media Analytics to Utilize Social Media
25:01 27Social Media Best Practices Q & A
24:49 28How to Upload Photos to Your Social Media
07:42 29Appealing To & Working with Brands
38:39Day 2
Lesson Info
Glacier Point: Shooting Stars & Night Photography
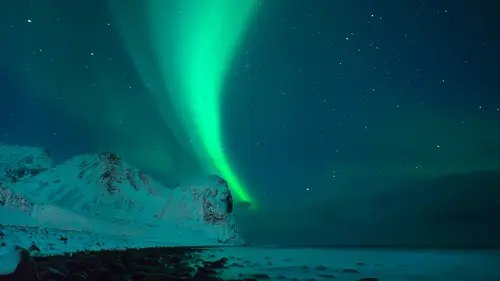
cool you guys so I think that today I'm going to start with this video that we shot of shooting up a glacier point because I found that what happens if I don't play the video and talking about it and playing the video and saying the same things which is great because it means I'm tuned into what I want to say but I want to know I want to go with this video and then I want to break it down and I want one of the hardest thing obviously is that when you're shooting a video about night photography you're not necessarily seeing what I'm shooting it just looks like black so the beauty of this is really his concept and idea of long exposures write and how to I guess maximize your your you know potential for your images and and this is kind of ah complex scenario it's kind of like water housings where the cameras that you use the lenses that you use all these things really come into play when creating create night images um you guys now first just before we start I know yesterday we kind of ta...
lked about a lot of stuff and since we have so much more to talk about today I I want to try to definitely move on from all that so I want to make sure there's there's any questions right now that regarding yesterday water house exists in that now is the time to ask today's gonna be a very question heavy day so if you have any thoughts or anything we discussed nothing not a good okay cool alright sweet well let's get into it then I'm gonna play this um this night photography video and we'll go from here all right so it is officially one of the morning and we're at the top of a glacier point in yosemite uh and this is pretty much I would consider plied the best stargazing location you could go to on a dark night in california you have you know do the logistics you obviously can't really see what we're looking at looks like pure darkness but it's actually a really beautiful view of yosemite valley looking out over half dome in the milky way as well as nevada and vernal falls off the valley bottom it's it's an awesome awesome location probably one of my favorite places to go and I would say for any kind of beginner or someone who really wants to work on shooting you know start trails nighttime photos night scapes whatever this would be an amazing location so I just really quickly want to go over some of the logistics of how to approach these scenes um first thing I would say it would be too kind of prep your gear had a time prep relocation ahead of time because the worst thing you could do is show up here in the middle of the night pure pitch black and you're working with the headlight right and you're trying to figure out where to go and where to be and that's how you know you drop lens captured drop lenses you slip you fall things like that happen you don't want to walk around in darkness trying to find a good location so scott out these locations that at a time no you're going and what your angle is gonna be um so that when you get there you kind of have a perspective what you want to shoot now um best thing for really doing these is having a bit of technology and there's an amazing app uh a few of them but I used nap called sky safari and basically it's an app that allows you teo it allows you to basically look at this night sky and what it's going to do and move it around so you can kind of adjust and see what the milky way is doing and what the sun and the moon is doing so what I can do is I can look out here and I can move my time forward or move my time back and go okay wow the milky way's going to be right here in an hour and a half so it just gives me a perspective so I can kind of know where the sun's gonna rise where the moon's gonna rise if it's a full moon if it's a half moon um and just kind of get a perspective for what the night sky is actually doing what planet's air up there it's also just really good for kind of knowing and understanding your you know the brightest night's guy's going to be at this time when the moon is here in the sun is there so I'm having a good app can really help you to kind of prep these areas so so you're not up all night trying to shoot you really just maximizing that one killer window between you know maybe two and three when the milky way is really in the perfect spot so for me I'm here at one am because right now the milky ways in the perfect spot right above half dome and it's kind of this really awesome frame and this is what I what I sort of came here for at this time to get um let's go over a couple quick just tools and things that you'd want to bring when you shoot night time stuff now headlamps obviously crucial I would say some warm clothing some gloves the essentials is always good to have um I usually try to bring in extra headlamp just in case because worst thing you could have his kind of be in situation where you don't have enough light to look in your camera and whatnot um now a really good sturdy tripod um obviously one that you know you don't mind leaving by itself walking away from it something that's not going to be blown over by the wind also having like a little hook at the bottom so if you want to hook your bag and put some weight on there this really helps if it's windy out because tonight's a windless night but most the time it's not winless especially if you want to shoot night our star trails or time lapses right one of the best things you gonna have in time lapse is a little bit of wind and move the clouds so a lot of times when you're seeing those you're getting wind and you want to make sure you have a really good stable ice surface I'm using um a really write stuff tripod as well as a ball head on this here now the camera that I have tonight with me it's pretty much the camera that issue for all of my star and nighttime astro photography is the sony a seven s and it is a camera that much like any other night connor cannon body that's optimized for low light and you know shooting astro work this camera is the same it's basically set up for high so incredible results at you know s o eight thousand ten thousand twelve thousand whatever you want to shoot and when paired with a really fast wide open lens that can yield incredible results so tonight we have no moon which is really the best time to see the stars and I'm still able to get you know and incredibly bright exposure you know s o thirty two hundred at twenty seconds um this lens is a rocking on twenty four millimeter it's an f one four so the aperture is really wide open typically when I'm shooting nighttime stuff I'm not shooting it all the way wide open because usually lenses aren't aren't the sharpest of that apertures so I'll be backing it off a little bit about f you know one eight or two and shooting it there um now my settings for a night like this you know I'm shooting a prime lens obviously so I've got this lens fixed I'm also bringing another lens with me as well which I'll grab it I'll show you so my other lens I'll bring tonight is a ah enough to sony ah it's a twenty eight millimeter f two with a fish eichenberger and its f to all the way through it's a really great lens to use for nighttime stuff really bright yields incredibly sharp results I'm also uh you know works really nicely with the cameras always good I feel like to use the native lenses with the system so this is something new I've just been using a little bit and a lot of times when I'm shooting say a time lapse or even start trails I want to get that wide perspective of the milky way because it goes up in the sky so shooting a nice wide angle like you know fish eye eighteen millimeters sixteen millimeter twenty millimeters really awesome so right now talk about um talk about kind of the settings and hide set this thing up well I'm going to turn my camera on and usually for me I'm a fan of long exposure noise reduction so I turned that on in camera go to the men you put on long explosion noise reduction right uh and then I would basically go through my settings dial everything in my auto balance to auto white balance my white balance to auto white balance so that I can basically with the night sky it's a lot different in the daytime shooting water you you can get a lot of different colors going on it's it's I think it's easier to let the cameras algorithm work itself um I would it's basically kind of just a guessing game in a lot of ways you know I'm I'm moving the esso to some ranges where I know and feel like I can get good results and on a night like this you know it's gonna be between aiso thirty two hundred or so eight thousand maybe even ten thousand depending on how um how fast of a shutter speed on a shoot a couple little rules and tips I'm shooting twenty four millimeter now there's a very awesome algorithm for figuring out exactly the amount of seconds you could shoot at twenty four millimeter to know how much star movement you're going to get right I'm not that guy I don't know that stuff I know there's some amazing blog's and website you can find out about that but my rule of thumb is usually with a twenty four millimeter lens if you're shooting a fifteenth of a second twentieth of a second to about a fifteenth of a second or faster that's your sweet spot for really capturing the stars sharp and without movement the wider you go um if you're shooting a fisheye a sixteen millimeter and eighty millimeter you can go ah longer period of time before the stars start to show movement now it's all artistic interpretation but what I find is that when you're trying to shoot a night sky um it's it's kind of one of the other you're either shooting star movement with with a big star curve going through a long exposure maybe twenty thirty forty minutes to couple hours or your shooting ten seconds fifteen seconds something like that because you want the stars tack sharp where you really get that defined milky way and by shooting the stars tack sharp with that defined milky way you actually bring out a bit more color I find in the sky and it actually feels a little less noisy in some ways because you don't have all the movement you know in some ways it feels a little less busy so for me I have this really nice wide open lens aft one point for you know I'm shooting it f one eight and I'm actually getting incredibly bright results uh by shooting thirty two hundred here um I saw thirty two hundred at like twenty seconds and s o uh let me see what this one was six sixty four hundred at like ten seconds right one of the key things that would be a I'd be trying to do that's one of the hardest things that I find a lot people are always asking is like how do you go about no focusing in night sky will tonight there's really no way for you guys to watch this process but um there is the easiest method I found is one of two ways first of all if there is any ambient light anywhere city or a car headlights far away or whatever focusing on that light okay with the wide angle lens the nice thing about it is you don't really have a big range of focus to mess with you usually pulled all the way to infinity and you back off a little bit till that light look sharp now that could be really tough when you have a pitch black night sky which is really optimal for shooting this type of scenario um so what you have to do then is most cameras nowadays they have a live view mode and in that live you mode ah what you could do is you can set it to zoom in on you're focusing on the sonys um I could speak to the system because I know them the best they have a mod called direct manual focus on what that does is when I push this focus ring it actually zooms in on my on whatever I'm focusing on right so it'll it'll zoom in for me as many times as I want zoom in zoom in ten times twenty times whatever and I can really get accurate focus on whatever I want now sometimes that accurate focus might just be on the brightest star I confined okay so once I've achieved that focus point and I've kind of got into a place where I feel like it's sharp and literally this is a guessing game a lot of the times right there's no real way to no one hundred ten percent thatyou're focuses tack sharp unless your auto focusing or or you know unless you're testing your results so for me it's a matter of just testing it looking at my image coming back to it trying it again but what I like to is once I find my focus I'll put a rubber band around this lens so there's no movement so nothing gets bunk out of place right because the hardest thing to do this whole process is find your focus so I will look for the brightest star in the sky right I'll look up here wherever I can I'll find that brightest star and I will use this direct manual focus all zoom in the brighter the lens meaning that the larger the f stop you know the more open the more you're going to see that star or that bright whatever object right so when I'm focusing all usually open this lens up to the most wide open mode that it could go f one for right I'll focus it I'll get everything set up on that offer my rubber band around then I'll set my camera back off the f stop to maybe f one eight two and then I'll go in here I'll start messing with my settings ok I'll look it you know what is what is ten seconds look like what is fifteen seconds look like you know I'll just go incrementally I'll start taking shots to kind of test each scene now we'll talk about this problem classroom but one of the things that's super important especially when you're shooting night exposures you really want information on that history ram right you want that history an ark to actually have information on the right hand side so that you can come back later and you could actually mess with these files you know one common mistake a lot of people make is they think you know I'm better off shooting a lower eyes so and pulling out that information later um rather than shooting a high rise so and having it be the correct exposure right because going to noisy well it's actually untrue you're actually better off shooting slightly bit overexposed at a high rise so and bringing it back a little bit then you are opening it up because you're gonna have more degradation in the file if you're trying to do it the opposite so that's that's pretty much in a nutshell the process that I can think of right now I would say you know making sure that your cameras set up on a mere lockup mode as well as a short timer is really good right now I don't really have any purpose to have a remote clicker thiss camera has an infrared most cameras do nowadays so samantha used my cell phone is a remote clicker or sometimes I'll have even a cable release off the camera but since I'm only shooting ten fifteen seconds exposures I really don't need to mess with that right now um but that that's really in a nutshell I think the best sort of you know night exposure you know tips and tricks I think we could we could give so I just try and see what the results look like and talk about in the classroom all right so if you look at my screen right now basically I'm racking focus okay so what I'm gonna do is first I'm gonna do is I'm gonna put my screen all the way to infinity and then I'm gonna I'm gonna zoom in I'm gonna push my little zoom unbutton and if you look at that that's me zooming in on my focal point right I'm zooming in zooming out so now I'm zooming back in I can move it around I can adjust it to whatever I want and what I have is I have a friend down there with a light on it so I'm just giving you an example of how you can use this direct manual focus so this is my normal frame right here correct zooming in once to me in twice and now I'm gonna start to adjust we shine that light down more away from you yeah they're a little off to the side so if you look over here this whole scene we can see a lot of we can see a lot of detail in here I'm focusing basically to get this I can see this the stairs steps right here they're getting in focus I can see the silhouette of his body he's almost too blown out because I've got so much light on him right now um and basically the camera's exposing for twenty seconds at at sixty four hundred s oh right so it's it's over exposed a bit but this is giving you an example of how it looks to mess with that direct manual focus and keep in mind this is my frame right so I'm super far away but it gives me the ability to zoom in there and get a really detailed quick you guys well this video's going if you look up here in the corner you're seeing this little magnifying glass right I'm gonna talk about this direct manual focus concept after this but I just want to pay attention this this is telling me the amount that I'm zoomed in on my focus right so direct manual focus um it allows you to basically your viewing your image in live you write your viewing on this screen and what I can do is I can push a button so it basically resumes in upto like eight times or whatever so win your fight me you khun sake this is just normal view and what I was showing he was eight time zoomed in so when you're finding that focus it is such a helpful tool if you need to you know focus on a bright star far away or a headlamp far away or a city in the distance right it's one of the only ways I've found to get really accurate focus at night right so this is kind of just what that is and this is this is what I'm going over just see you guys know right and another point to its what's really important is when you're shooting a wide angle which typically almost always when you guys were shooting at night you're shooting fifty millimeter or below mean you're shooting you know everything from a you know sixteen millimeter to a twenty four millimeter to a thirty five I tend almost always be shooting thirty five millimeter to about sixteen millimeter I'm not really a fan of fish like that's a little too skewed for landscape stuff right but I like this perspective of you know the sixteen to the thirty five and the beauty of those wide angle lenses you guys is that wide angle lenses um everything beyond a certain point is in focus right I mean there there it's it's so much easier to teo get a good focus point if you're shooting something far away because all you need to do is find your focal point that's between you know for for the wider the lens that the easier it is to find that focal point for a sixteen millimeter it's about three feet to infinity right so beyond three feet everything's in focus the larger the lens a little bit further that ghost maybe it's six feet to infinity with it with a thirty five millimeter right but that's kind of the beauty of that is that it all goes and focus right so this is kind of why you typically use that and this is why I'm only focusing im only gaining my focus on on object that's about a hundred feet away from me because one hundred feet or the stars are gonna be the same thing right so this is what's really nice is that it yeah don't you put some infinity why do you need to focus stealing it directly on infinity because that would be out of focus you need to back off a little bit right so um it's infinity too you know you're you're I can I can show you a good I'll demonstrate on one of these lenses really quick but basically you can't just throw your lens to infinity because that would you be throwing it all the way like it would actually go a little bit out of focus so you basically what you do is you roll it to infinity and then you start to back off and you back off when you see visually that your image looks and focus right so you still have to do stuff to find that little like that little spot you know but essentially like that's all you really need to do it there's a there's a pretty big spectrum of what you could get in focus but but the main thing I'm showing you guys a lot of times people will say I'm having such a hard time getting my my night explosions and focus and and you know a lot of times what you find is that you're if you're going to shoot good night explosions usually you're out of the city you don't have a lot of light pollution right you're away from a lot of things you don't have light available to you to focus on you know um but it's a simple is having a friend walk a hundred yards away turn a headline on and focusing on them right or having someone shine a light at themselves and be like cool I confine my focus now it's it's a simple is that because one hundred yards or the stars in the sky are gonna all be in focus that's what I'm that's what I'm trying to say you don't really want to have somebody like three feet in front of you directly you know because that might be tough but just have them have them walk down and turn your car headlights on focus on those the nice thing is that once you get your focus you could tie it off with a rubber band you just slip a rubber band on your lens like like this let me see this like this lens you can just you've basically you put it to infinity right here and that what I'm doing is because right where infinity is it's not really where your focus start your focus starts here where the line is ok so between here and a meter basically everything beyond a meter is going to be in focus right that's what it's showing you a meter to infinity isn't focus so everything beyond three feet for this twenty four millimeter lenses all going to be tax sharp right so I just need to find the point in here that I feel like my subject is is nice and bright if I was shooting right here setting up a tripod and shooting star trails all I need to do is focus on one of you guys and everything beyond that would be fine now if I move closer to that of my subject is here or here or here then it becomes a lot trickier but typically for night exposures you're not doing that right so with the lens like this this is the one I'm shooting in the video right I'm just basically I'm racking it all the way to infinity and then I'm backing it off and I'm backing off slowly you know so between one meter infinity is really my sweet spot somewhere in there okay that makes sense you guys want to make sure it does but I know this is a little tricky um and once I have that I could tie it off there were banned because whether I'm shooting vertical or horizontal or whatever it's all going to be the same focus and that's the nice thing is that a lot of times I'll have this lens pre focused before even get there all you know have it from the night before rubber band tied around it it's not going to move so I know that it's good to go right and that's kind of the nice thing about these um so we'll finish this up we'll keep keep talking about it their focus of what I what I want what I need so right here I'm pulling to infinity and I'm backing off just slightly right there you know and I might pop in my eye in the screen and that gives me a really good perspective popping into the screen because I could see really up close so um yeah that's pretty much the process of getting that that focus locked off and this is really I think the key the best setting in these new cameras for finding your kind of night exposure center is is using that direct manual focus because without it you can have all your settings perfect but if you have a a little bit of out of focus image is just not gonna work so
Class Materials
bonus material with purchase
Ratings and Reviews
Sjeupie
I've been staying up all night to watch the live broadcast. As somebody else here mentioned (latsok), it's emphasizes on the non-technical aspects (emotion, engagement, colour and composition) rather than the technical stuff like shutter speeds, iso and f-stop. Although I can use some help in both, the technical aspects are not only camera specific but fairly objective as well. The non-technical aspects however are something much harder to grasp. Getting help in this by no-one less than Chris Burkard is just amazing. I bought this class so I can re-watch certain parts of the broadcast again whenever I need it. But also to show my appreciation for Chris Burkard and Creative Live for providing this great online course!
Matt Redfern
This class was packed full of amazing knowledge. I really enjoyed the topics covered and have found it super helpful for my work. I have had so many takeaways ranging anywhere from how to put myself out there, finding my style that stands out, practical applications, etc. I would highly recommend this class to everyone interested in photography! Big thanks to Chris and CreativeLive for putting this together.
user-082aad
This was a phenomenal class. I highly recommend it to anyone. Chris is not only a sensational photographer, he is a wonderful teacher. He provides such detailed information and freely gives same to his students. He is really really available and eager to answer questions and so easy to understand. I learned so much and I was thrilled. I am very very grateful I found this particular class.