Basic Headshot Eye Retouching Techniques
Lesson 31 from: The Business of Professional HeadshotsGary Hughes
Basic Headshot Eye Retouching Techniques
Lesson 31 from: The Business of Professional HeadshotsGary Hughes
Lesson Info
31. Basic Headshot Eye Retouching Techniques
Lessons
Class Overview
13:07 2Getting Headshot Clients
27:23 3Headshot Pricing Models for Individuals
24:47 4Headshot Pricing Models for Groups and Companies
13:05 5Payment and Delivery for Groups
20:49 6Six Styles of Business Headshots
38:31 7Headshot Lighting Gear
11:31 8Posing Basics for Headshots
08:03Basic Standing Pose for Headshots
05:10 10Basic Seated Pose for Headshots
03:22 11Head Position for Headshots
04:25 12Expression Sells the Image
06:45 13One-Light High Key Headshot with Male Model
35:42 14One-Light High Key Headshot with Female Model
09:01 15Two-Light High Key Headshot with Male Model
10:08 16Two-Light High Key Headshot with Female Model
04:58 17Two-Light Standing Pose Headshot with Male Model
19:17 18Two-Light Standing Pose Headshot with Female Model
13:47 19One Light Low Key Headshot with Male Model
16:18 20Two Light Low Key Headshot with Female Model
14:55 21General Q&A
11:03 22Constant Light: Low Key Classic Headshot with Male Model
31:47 23Constant Light: Low Key Classic Headshot with Female Model
21:56 24Constant Light: Standing Pose Headshot with Male Model
17:22 25Constant Light: Standing Pose Headshot with Female Model
10:45 26Setting up the Background for Extraction Shoot
10:49 27Shooting for Extraction Headshot with Male Model
12:06 28Shooting for Extraction Headshot with Female Model
13:53 29Shooting Low Key Modern Headshots for Extraction
12:28 30Basic Headshot Facial Retouching Techniques
23:48 31Basic Headshot Eye Retouching Techniques
12:14 32Basic Headshot Retouching Techniques: Dodge and Burn
07:40 33Basic Headshot Retouching Q&A
11:18 34Extracting a Single Subject
20:01 35Creating a Headshot Composite
15:07 36F-Type Headshot Lighting: Equipment and Principle
10:36 37F-Type Headshot Lighting: Execution
21:29 38Shooting Headshots in Volume
18:49Lesson Info
Basic Headshot Eye Retouching Techniques
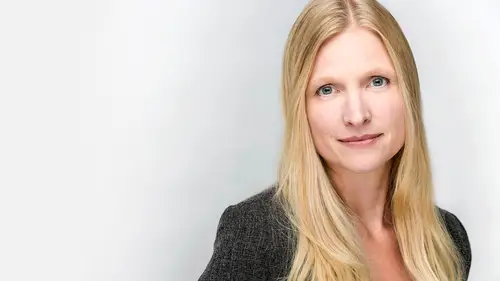
Alright, so let's get to the eyes. Now what I'm gonna do is I'm gonna try and remove the darkness under the eyes without removing the roundness, or at least some of the darkness and some of the wrinkles. So I've got my Patch Tool and I'm going to take this and circle this dark area and some of this wrinkly area and I'm just gonna grab it, just like so. Everybody got that so far? Alright. Now the Patch Tool has a natural feathering whereas if you were to just select it with the Marquee Tool or the Lasso Tool it works very differently. You actually have to intentionally feather that selection to make the edges softer. The Patch Tool does that built in, so you don't really want to mess with that. So then I'm gonna drag this down just a little bit to an area that's similarly in focus and similar texture and let it go. And now I've gotten rid of, sort of the darkness and the wrinkles, but I've also lost the shape in the bottom of the eye. So that's just stage one. Then I'm gonna head and gr...
ab your new best friend, and mine, the History Brush Tool. Now what the History Brush Tool does is a lot of really cool things. But in its basic form it enables you to paint back through the image to a previous state of the image's history. If you use this little tab right here you've got all of the moves that you've made up to a certain amount. And you see this little guy right here? That's the History Brush, that is the history state that I'm gonna paint back to. And I really don't use it in any more complicated way then all the way back to the original. So let me just show ya. With the History Brush, and I'll put this on 100% just to show you what it does. If I go back to the eye it will bring that completely back 100%. Okay? However if I put the History Brush on 30%, Normal Blend mode, and I get in there nice and close. And I just gotta go back and forth right under this eye right here, you're gonna see that roundness start to come back without bringing the darkness back. So now I've got the roundness in the eye, let's see up close what that looks like, without the wrinkles or the shadows. See? That's what it looked like before I did anything. I'll just move this over a little bit so you can see too. And this is what it looks like now. I still have the roundness, I have detail in the pores, I just don't have the darkness or the wrinkles. Everybody with me on that? Is that super cool? I mean, it's a really really easy way to do it. And it works most of the time, like 95% of the images I edit, this is exactly what I do. So then I just do the same thing to the other side. You don't even have to be that accurate. Just move it down here, that looks pretty good. Grab that History Brush. Paint it back in, there we go. Now here's the thing about the History Brush. You cannot use the History Brush if you've cropped the image. Because essentially what you've done is you've moved the history underneath by cropping it. So leave the cropping of your image, you should never crop your image, until you're done editing your image. Because it's all about the intended use of the image. So don't crop it at all, you can crop it in Camera Raw before you open it in Photoshop but don't use Photoshop to crop your image until you're done with it and you know what the output is. Alright, so let's take a look at this. Boom. Now I've got the roundness. You see? But I've got no bags. Is that cool with everybody? So let's take a look at where we started. Boom. And let's take a look, the shinies are gonna be gone and the bags are gonna be fixed, or the dark circles, and we got some of the blemishes out of there too. Boom. Everybody cool with that so far? Still looks like a human though doesn't he? Isn't that pretty neat how we can still look human? You can actually retouch somebody without turning them into an alien. Alright. Cool, so there we are, and you can still see detail in the pores, you still got some of those specular highlights kicking. And one of the things that I see a lot is people whitening the eyeballs, the whites of the eyes. That is a terrible, terrible, terrible mistake. There are plenty of people, especially if they're on drugs when they come into your studio where the whites of their eyes might not look exactly white. First of all they're never white, no matter how bright they might look they're always a little off, or yellow, or a little bit red. But you will run into people who maybe didn't get a great night's sleep, or maybe they just got punched in the face, I dunno, but here's how you get rid of the discoloration in the eyes. Now Oscar, who is clear and bright eyed, still has a little bit of yellow discoloration here in the eyes. So rather than actually adding white, which I see people do all the time, which is the number one way to make the eyes look fake and make the image look Photoshopped, don't add white just take out yellow. So if you grab your Lasso Tool with the, by clicking on L, what I want you to do is grab the areas of the whites of the eyes, select it, and it doesn't even have to be perfect. And then you're gonna hold the Shift key, you see the little plus sign pop up? Boom, and that means you can add to that selection. Because when you do something to one eye you want to be doing it to the other eye at the exact same way or else you're gonna have eyes that look different. So now I'm selecting the whites of the eyes. ♪ Private eyes are watching you ♪ There we go. I'm a big Hall and Oates fan. Anybody else like Hall and Oates? My friend Booray Perry says that Sara Smile is the best Hall and Oates song and I totally disagree, although it is a great song. Private Eyes is a great song. Alright, so now that we've feathered the selection once we've got it selected, what that means is if you select it with the Lasso Tool, let me back up and escape that. Okay, when you select something with the Lasso Tool you're basically getting the hard edge. So let's say if I were to put this on a new layer by using Command or Control + J, and you were to move the eyes onto an area where you could see what I have selected you see how hard those edges are? That's because it's taking the literal translation of what you just selected and it's gonna cut it out. When you feather it, you can just right-click, or Control-click on a Mac, and you get this little, what am I doing here? Boom, okay. Let's add the Lasso Tool, make sure that Lasso Tool's selected. Go back here. Now you feather it, right-click or Control-click, and that little sub-menu comes up. You can Feather, or I believe you can do Select, and Feather is somewhere in here, or Edit, Feather, or it's somewhere in here, alright. Image, something, it's somewhere in there, I dunno where it is, okay? It's in there, trust me, it's there. Just right-click. There's 17 ways to do everything in Photoshop and I only know the way that I know how to do it. So you right-click, Feather selection. When you have a full resolution, high res head shot that was taken with a modern VSLR, typically you're gonna find that two to three pixels is gonna be plenty of feathering. That's just about where I find it works. So I'm gonna put this at three pixels and I'm gonna hit OK. And you might see the selection jump inward a little bit to reflect the feathering, or you might not. Burt now if I were to take that selection and I were to put it on its own layer and bring it up, you see that the edges are much softer, okay? So what that means is whatever effect that I do to this selection it's going to be less and less as it gets to the edges. It's gonna be less apparent in that. So basically it's gonna make the transition smoother. So let's back up. Go back to our Lasso Tool. We've feathered three pixels. Cool. And now what I'm gonna do is use the very, the age old tried and true method of the saturation control. Now you can, I think you can do this Image, Adjustments, and Hue Saturation. Or, you can do Command or Control-U. And that's gonna come up. Now I want you to watch what happens, let's really zoom in on this eyeball so we can see this. Boom, come here Hue Saturation control. I'm going to select from this Hue Saturation control the color Yellow. And I'm going to bring down the Saturation of the yellow in the eye. And then you can see that it's a lot less yellow. You with me? Super easy, every body got that? And I will also go to the Red and I will de-saturate it with red a little bit. The amount of saturation you're gonna choose here, there's no set number of points. It's gonna be eyeballing it for you. I'm overdoing it here so that you can see it on your screen. I wouldn't normally bring out 60 points of saturation. But you can see, look at his eyes now. You guys see that okay from there? Yeah. See that's red and yellow, and that's with red and yellow removed. So if you take out too much of the color it's gonna end up looking like the whites of their eyes are really gray and weird looking, so don't take out too much. But there, boom. So that's, now that same thing can work, I've done this before, if somebody does their own makeup and they really overdo their lipstick. And I've used it, you use the exact same technique to reduce the saturation or change the color of things. It's a really really useful tool. Or if somebody's got a really red face, you know, some people have that, sort of like, blood vessels, Rosacea, that sort of thing, where their face is just abnormally red? I do the same thing where I would select the face, like so, and feather it a lot more, 'cause it's a larger selection. So I feather at 50 pixels. And then now I can control the saturation of the face. So if you thought his face was too yellow you could just make his face less yellow. Or more yellow, or less yellow. ♪ Oompa loompa doompety dee ♪ Alright, cool. So I'm wondering, Gary, you talked about taking out the yellow, which I think is awesome, I haven't really heard that, but do you ever do any brightening of that? Let's do that. Absolutely there are times when I would do the same thing. Especially in the case where maybe my lighting wasn't point on point exactly and one of the eyes didn't get quite as much light as the other one. So I would use that exact same technique, let's see if we can go back far enough. There we go. Okay. Okay, so we're back to having it selected and then we're gonna go into the Hue Saturation control. Alright, and now you can do the same thing except you wanna use the Lightness control. And you can actually lighten the eyes in the exact same way. That's still in Hue Saturation, or you can make them dark and evil. Dude, that's messed up. Okay, back to zero. So I will typically, you can give it five, 10 points to make the eyes a little brighter. Again we're gonna take the reds and the yellows out. Bring those down. Okay, so now if we zoom in we can kinda see what it is that we've done. The eyes are brighter and they're a lot less colorful on the whites. Make sense? We haven't added a bunch of false white in there because that's not supposed to be white. The whites of your eyes is just an expression, they're not really white. And if you make 'em white, I hope that you're doing some really cool conceptual Photoshop work there. Alright, very cool. Alright, there we go. So now it's actually a really good way to clear somebody's eyes up, bring those yellows and reds out and then lighten it just a touch. It really can change an image a lot. Now see there you go. And it actually looks to me like I even overdid it a little bit. So what do we do? We grab our old buddy, the History Brush. I wish this were Schoolhouse Rock, we could make a song about the History Brush. And I'll put it on about 30%, I will very often peel back some of what I've done if I feel I've gone a little too far. It's not a bad idea if you're gonna apply a filter or an effect to an image, apply it and then reduce it half way just to make sure. 'Cause we kinda get into it too much sometimes. But we're just editing corporate head shots here it's not like the end of the world. And so other than going in and grabbing like, you know, little things like this, I wouldn't really, I wouldn't really do too much else to this image.
Class Materials
Bonus Materials with Purchase
Ratings and Reviews
Melville McLean
Gary Hughes is possibly the best teacher I have seen here and that is a very high compliment. His business analysis is simple and to the point. His set ups and techniques are simple and straight forward, no easy task in itself. His interactions with his models/clients are finely developed and reduced into the fewest but most important key exchanges. He teaches by example how to interact and direct. If you are a high volume photography with brief time per sitter, you might especially appreciate his tips. It is extraordinarily difficult to keep a tight, well structured class going live for so long at a time. His intelligence, wit and personality are all in his favor but it is the content itself that is most impressive. I am not a portrait photographer but I have 30 years of commercial studio experience. He knows what is most important, leaves out the rest and has organized the material in anticipation of most difficulties that arise so that it rests in a seamless, smooth, coherent learning experience. All of his practical advice is excellent. Just understand that his work is about doing a relatively large number of shots in the most efficient way rather than a lot of time spent on a few clients for a completely different format [presentation like very large prints. In fact he is especially pragmatic. He emphasizes that you do not have to own the most expensive equipment but you absolutely do have to know how to use the equipment that you already have. And I am telling you this as someone he makes fun of in his course with fancy cameras and Profoto lighting gear. He is an advocate of all thought out approaches as well as relying on skills and knowledge. You will understand how and why to make all of his key, conventional light and posing set ups. He makes everything sound simple and doable -- and with his help -- it is. What you have to appreciate is that it is up to each individual to acquire the specialized skills to make our work compelling enough to be competitive. The unspoken truth that we all face is that talent plays a key role as well and that it takes time to become every accomplished. But I have also seen concentration, commitment and hard work result in developing innate talents that blossom in very successful careers. Mr Hughes reduces every step into the clearest, most essential components. He is self effacing both as a photographer and post process retoucher but he is very good indeed and does not waste time overdoing images that cannot benefit from a larger format presentation. Everything is appropriate and practical. He has already removed everything that does not matter for his purposes for us that would only interfere with the concise, clarity of his presentation.
Roan
I am so glad that I had the opportunity to watch this course. It has not only provided valuable lighting set-ups, but also great basics for posing.!. The Photoshop extraction technique Gary demonstrated was icing on the cake. Gary did a great job teaching and I greatly admired the technique in which he taught. Thanks for a great class!
aodeal
This was an excellent class! The class covered so much information and great tips and ideas. Gary is funny and has an easy going approach, which makes the class that much more enjoyable. As a struggling pet photographer, I have been trying to find something to supplement my business with that does not involve children/babies, or shooting weddings again and headshots seemed to be a great option. After watching this class, I feel confident building up a headshot component to my business. Definitely recommend this class!
Student Work
Related Classes
Portrait Photography