Using Brushes to Paint in Detail
Lesson 10 from: The Beginner's Guide to Masking in PhotoshopJesús Ramirez
Using Brushes to Paint in Detail
Lesson 10 from: The Beginner's Guide to Masking in PhotoshopJesús Ramirez
Lesson Info
10. Using Brushes to Paint in Detail
Lessons
Lesson Info
Using Brushes to Paint in Detail
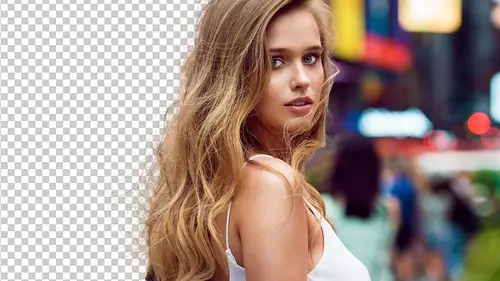
If we wanted to extract her from her background, we would have a really, really hard time because there's a lot of fine hair, right back here, that will be really, really difficult to select. And in some cases, even impossible. I'm not really sure why people think that you need to select every single strand of hair in a selection. You don't. Nobody's gonna know that it's missing. Also, a lot of times you don't have to make selections to actually create believable selections. And what I mean by that is that a lot of this hair will take you so much time to select and it wouldn't look good. Just because the background is so busy. Instead, what I recommend doing is actually painting that detail in later. So, in reality you're working with fake hair. It's not the real hair but it looks real. So, this is basically what that looks like with a different background. I still have all those strands of hair and it's fairly convincing. But it takes a whole bunch of layers to achieve. Some people th...
ink it's a lot of work but in my opinion, it looks a lot more realistic than simply trying to get all these little, fine details. Some of these strands of hair are out of focus. Some are in focus. Some are behind orange. Others are behind black and white. And it just becomes really, really difficult to select. What I recommend doing instead is, first, making a selection. We're gonna let Adobe Sensei do the first selection. So, I'm gonna click on the quick selection tool. Select subject, Adobe Sensei does a really good job. I'm gonna refine by holding ALT, option in the Mac, and just painting away, or draw a selection so I can remove those strands of hair. And then I'm just gonna create a very, very rough layer mask, and we're gonna work on that. Now, what I recommend doing is painting in hair. And I've actually created these brushes which are, I believe, one of the free gifts for the class, some of these hair brushes. And let me go to the top here. The Jesus Ramerez hair brushes. There's two of them that you can use, and I'll show you how I created them. Basically I have this one called Hairball. And, it's a hairball. (chuckles) So, I'll create a new layer and paint. That's it. That's my brush, Hairball. So, instead of spending all that time trying to make an impossible selection, I like to instead paint in the detail. So, I can bring this back, and actually, what I'll do first is select her hair color. And then create a new layer with the hairbrush paint. Put that into position. Control + T, Command + T on the Mac, to transform. And now I can start distorting my hairball, so that it matches her hair. I can also right click, select warp, and warp that brush stroke even further, and that, as you can see, is already creating a more realistic selection than I would have if I went in there and tried to mask all of that out. Of course, there's blending techniques that I need to do. And one of those things that I would need to do so things blend better would be to blur that selection. Just so that it's not so sharp. There's a couple way of blurring the selection. I just showed you one a moment ago where I went into the selected mask workspace and I just increased the feather. That's one way of doing it. Another way of doing it is by simply selecting the brush tool, selecting a soft brush. Let me find a soft brush here. Like this one here. That's way too big. And then just painting with white or black. Depending on what you're trying to do and just smooth out those edges. So, there's a lot of things you can do. Another thing that you may consider is using the density or feather sliders. In this case, more likely the feather slider. The feather slider allows you to blur that layer mask non-destructively. So, if I increase the feather slider, notice how the edges blur, and I can bring it back if I need to. So, you can use anyone of those techniques to blur the edges of your selection, which is something I didn't do. And then, you can simply start painting in hair. And you might be wondering, well how did you make that hairbrush? Very simple. I went into Adobe Stock where you can shoot a photo of a hairball like that, and you can just simply make that into a brush. And what I did, in this example, was duplicated it. Use the multiply blending mode. Multiply hides white pixels and it reveals dark pixels. The background is white so then now it's hiding the white background on one of those copies. I'm gonna press Control + T, Command + T, to transform, rotate it, more or less like that. Obviously, I fine tuned the actual brush that I really use much more than you're seeing here but that was the basic idea. Just create a fur ball like that. And I'm gonna have, I'm gonna merge 'em all into one layer, like so. Then I can go into the channels panel. You guys remember this technique. I can just look for the channel that has the most contrast, duplicate that channel. Image, adjustment, levels, and just make sure there's a lot of contrast between the foreground and background. And, that is going to be our brush. I'm gonna press Control + I, Command + I to invert and if I press Control, click, it makes a selection. And what I'm gonna do is just create a layer and fill with black. Oops that was white. And fill with black. So, that's just one layer with black and it's a hairball. So, I'm just gonna delete all these layers. That's one that I worked on before that I spent a little more time on, but that's how I got here, by doing those steps. But obviously, I fine tuned, warped, and did a whole lot more to get a hairball that would work better as a brush. What I can do now is just go into edit, define brush preset, I can call it Hairball, or whatever you like, press okay, and now if I go back into this document, it's automatically selected and I can just paint, and do what you saw me do earlier. Which is transforming, and make it match the scene there. Another thing that I did, where's that example? This example is use her, and I took that piece of hair there. That one helps me do this one. This hair strand. So, let me select her hair. I'll create a new layer. And that's a little too big, so let me make that smaller. Still too big and I'm tapping in the left bracket key on the keyboard. Something like that. I'm gonna press Control + T, Command + T, to transform. Right click, flip it horizontal, so that it's facing the same way, match it as best as I can. Warp it. So that it fits better, and then just put it behind her. Obviously, I can keep fine tuning the colors. And actually that was way too bright so I'm just gonna, I'm sorry it's way too dark. I need to make it brighter. So, let me just make that brighter so that it matches her hair a little bit better. But, anyway, you get the idea. I'm creating that detail in there. I'm not really selecting it because the actual, original detail is too difficult. This is one of the reasons why when you're shooting your models, you want to work on flat backgrounds because they're easier to select. For some reason, designers don't have a problem with that. I find a lot of photographers, especially when you're teaching, they'll say things like, "Oh well you're using a perfect background, "of course you can make easy selections." And yeah, when they're making a super hero movie, the actors are behind a green screen because they're easier to mask out. Yeah, it makes total sense. But yeah, so, when you're shooting your models, try to have them on a flat background because then you don't have to worry about doing all this stuff I'm showing you here. This is more for examples like here where the person wasn't shot in front of a flat background. You can come in there and paint the details in. This image took me about half an hour to complete. Obviously, I can't go through every single step. But I do have all the layers here that I'm just gonna shut off, so you can see what I did. You can see a lot of different distortions of hair. I have my background, and I'll also enable the model there. You can see that the original selection was just very, it wasn't very precise, and I just started adding detail. Each one of these layers is just one of those two hair brushes that you saw. They were distorted in one way or another. When you get to the end, you get a very convincing result. One of the things that I like doing when I create, this is a composite, when I create composites, is I like to put everything into one layer and just add a little bit of noise, because, in my opinion, it makes things look more cohesive after you composite something in. So, that's before and after. The way that you would do that is by, two ways. Number one is you can press control, ALT, shift, E, command, option, shift E on the Mac or smash your forehead up against the keyboard and I'm sure you'll hit all those keys. When you do that, you'll get a duplicate of all the visible layers in one layer. So that's what this layer two is. It took all the layers below, copied them, and put it onto a new layer. Then, I can go into filter, you could do add noise, but I actually prefer doing the camera raw filter for two reasons. Number one is that I can add the grain from here. So if I zoom in, you can see the grain that I'm adding. And I just like to add just a tiny, little bit. Just enough. Just a little bit. Just so that everything is not so smooth 'cause usually when you're compositing, and painting, and masking, things start looking very, very smooth, and not realistic. So, I like to add just a little bit of grain to make it more realistic. Anyway, so that's one of the reasons why I go in here. And the other reason is that I can also fine tune the entire image as one solid image, as opposed to different pieces. I can adjust the shadows, highlights, clarity, which is contrast in the mid-tones, vibrance, which is a smarter way of adding saturation. Vibrance protects already highly saturated pixels and it protects skin tones in portraits. She obviously has her skin showing, so it's protecting those pixels so that I don't overly saturate her skin. When I'm done I just press okay. It's a subtle effect but I think it works. So, that's before and after. You can barely see all those effects that I applied. Does anyone have any questions about masking, or anything else in Photoshop? Any other interesting, challenging, Photoshop questions? Joe had asked, "Is Jesus gonna review focus area?" It's a masking tool below the color range. Yeah, so, I wasn't planning on showing that but since a person asked. There's another way in which you can create selections or masks and it's the focus area. You can go into select, focus area, and this works great with photos that have a shallow depth of field like this one here. So, this selection tool looks at the image and then tries to determine what's in focus and what's out of focus. So, it tries to select the things that are in focus. And you can adjust this in focus range to change, more or less, what is out focus and out of focus. When you're done, you can output to a selection or you can output to a mask. So I can output to a layer mask, press okay, and that's my selection based on what Photoshop thought was in focus and out of focus. Of course, I could've fine tuned it just a little bit more to determine more what's in focus but, to be frank with you, I think that, although that tool can be great, the quick selection tool and clicking select subject, does a much better job. I don't have to click around on so many sliders and fine tune things because that right there is already better than what the other tool does. That's one of the reasons why I didn't think it was worth mentioning it in this class. But I have no problem answering the question. Well, good to know what not to do. In addition to what to do. Right. So, Joe says, "Thank you very much." You're welcome, Joe. I guess another question would be, what are some things that you, other things that you used to do a lot for creating masks that you no longer use? Not necessarily that I, I'll tell you things that I should have mentioned. Even better, 'cause there's not a lot of things that I don't do. I feel that I just keep adding. It's like kinda having a tool belt. There might be an instance where the focus tool might work better. It's in the tool belt. I don't like to say, I just don't use it as often. That's probably what I should say. But one thing that I didn't mention that I should have mentioned is that with layer masks, you can apply filters. So, for example, I can go into filter, render, clouds, so now I applied this ghosting effect to that image because now the layer mask has that filter applied to it. And actually, just 'cause I'm talking about filters now, here's another hidden feature that not a lot of people know. If you want clouds with more contrast, whenever you're doing clouds you can hold the ALT option key on the Mac. So, if you go into render, clouds, by holding ALT, you'll get clouds with more contrast. See the difference. That's before. That's after. So, that's another little hidden feature for you there that Adobe doesn't tell people. But, yeah, so you can apply filters to your layer mask. Also, actually I thought of something that I used to do that I don't do anymore. Before when I was showing that bear example, you saw how I created that. I think it was this one here, this brush. And I use it to paint in the fur in the bear, right? What I used to do before that I don't do anymore but the technique might still be relevant in some cases, is that I used to go into the smudge tool. Make a really, really, tiny brush and I just used to smudge the fur out like that, see that? Kind of looks like fur. And it would take me forever until I realized that I could create a brush and paint it in. But the point of this is that you can actually use just about any tool in a layer mask. You can even use transformations, do all kinds of things. For example, if I press Control, Command + T on the Mac, to click and I'm making a selection there. We have a selection, right? You see the selection right around her. If I have a selection tool active like the rectangular marque tool, I can right click and click on transform selection. That allows me to scale, rotate, skew, distort, and add perspective to that selection. Now I'm distorting the selection. I can warp that selection. So, I can distort it, just like I would distort any other pixel layer and just click on the check mark or hit enter, return on the Mac when you're done, and you have a distorted selection, which you can then turn into a layer mask if you need to. Just because I think this is important, especially for beginners, when you're making selections, don't try to select everything because, most of the time, it's impossible. It's okay to leave things out. And if there's important detail you can't select, paint it like I did at the end, so that's basically it. That's like a golden gem that I would like to leave people with 'cause I've seen so many people spend hours and hours and hours on something that just cannot be selected. It just cannot. And if you do select it, it's not gonna look good and you probably don't want to use it anyway, so. It's okay to leave things out.
Class Materials
Bonus Materials with Purchase
Ratings and Reviews
Gary Price
Probably mistitled as "for beginners" Moves very quickly, sometimes without clearly describing actions taken. This is fast paced and often assumes that the listener is very familiar with photoshop. Good tips if you are already familiar...