Lessons
Lesson Info
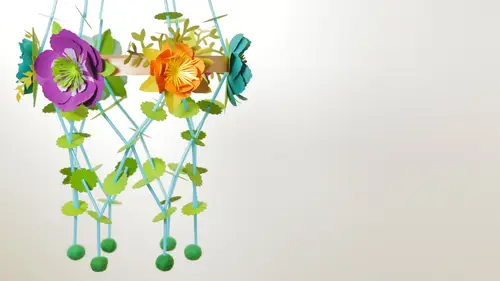
Construction of the Lower Portion
So we're moving on now to our second variation I showed you in the last segment how to build the upper portion some differences with one that we're looking at here instead of threading those ornamental paper pieces that we had punched out, I'm using some small shaped pom poms that I had created earlier and strong those on instead. Now obviously, pom poms don't have a little hole in the center like a bead wood in order to string them on, so what you'll need to do is to take your two pieces of thread thread them through a needle, preferably a large I need a lycan embroidery needle and then just stick it right through the center of the pom pom and honestly, then you can keep that needle on as you string it through all of the straw segments to create that a proportion. The other difference with this particular example is up in the very top I did my string configuration exactly the same, but before it started stringing on the straw segments, I put on a little wooden beat it's really just an...
ornamental component it it doesn't affect the structure in anyway, but you can start to think about, well, what else could I string on there? We've done paper, we're doing pom poms you could you wouldn't beads you could do any variety of beats quite honestly on I'll show you some variations when we talk about styling a little bit later on, so I've gone ahead and I've secured four of the upper strings onto the towels that are sticking out from our god's eye structure, and I'm just going to tie on these remaining tio so what I'm doing here is very similar to how we attached it tio are hoop variation, I'm leaving the clip in place to hold the strong pom poms on, and I'm going to tie a loose not around it tighten that up just a tiny bit. I'm going to remove the clip now I'm going to make sure that he straw is pushed up, and now you want to remember that about a half inch from the end of each barred owls, we cut in a little groove and that's going to be the perfect place for us to tie our string it's going to keep it nice and secure in place again, you do want to be mindful of the tension now when you're using pom poms, you're not going to get a perfect line as you're stringing the straw between the pom poms. It's going to be a little bit wonky, back and forth just kind of need to embrace it, it's just kind of the nature of the beast with this, I still think it looks really sweet and festive. So I'm going to double knot this onto the end of the dowell and I'm going to move on to my very last one to secure this in place and you'll notice on the god's eye that I put the rib portion on the top I kind of consider that the back although you could just as easily use that is the front and the reason I do that is the chandeliers will be hanging up high and most likely you're going to be looking up at it and this bottom side has a little bit more of ah smooth graphic pattern that appeals to me and so that's the part that I want to have facing me when I'm looking up at it all right? I'm going to go ahead and tie this loosely around the last dowell, tighten it up a little bit and removed my clip make sure my straw is pushed all the way up and push the thread into that groove that we cut at the end of the devil and then just to make it secure I'm going to double knot it. So what you've got now that your upper portion is securely tied to your center structure are six pairs of string hanging down so twelve in total and what we want to do now is build our bottom structure of the chandelier and to do that I'm going to start by stringing longer segments of the white straw onto it, and I'm going to do that for each of the twelve pieces you're going to push it all the way up to the top, and again, you're going to secure it with one of your little clips. I'm going to go ahead and repeat that all the way around the chandelier to begin building that lower portion once you've gone through and added that long piece of segment and secured it with one of the little clips, what we're going to do next is combined them together and at a pom pom no, I've worked ahead a little bit here, and I've gone ahead and add it on to five of them, so we'll show you how to do this last one, you're going to take these two strings, the two separate strings, and you're going to bring them back together again, and the trick here is is you're going to take both of these ends and because we're not going through a punch piece of paper, we're going through a pom pom, we need to thread it through using a needle, so I'm using a really large, uh, embroidery needle and, uh, going to a tent to here we go, all right, so we got both of them through, and I'm going to leave a little bit of a tail I've pre made several really small scale pom poms and I'm just going to take the needle now and thread it directly through so goes from top to bottom side to side whichever your orientation and then spread it through I'm gonna remove the needle and then I'm going to remove the two clips that were underneath the straw pushed the needle back up and then secure it again with the clip and you can see we've done that all the way through to kind of create this uh, triangular formation as thie beginning of the lower portion begins to form, we now have a pair hanging again now beneath each of the pom poms, we're going to bring those two pieces together one more time and we're going to string both of them through a single straw you're gonna feel both of those pieces as one all the way through bring them out the bottom side I'm going to remove the clip from underneath the pom pom and I'm just going toe shifted down in position it right below the last straw I combined so you can see we've created sort of a wise shape here we've taken the individual pieces, strung them through the straw, brought them back together, strung them through the pom pom and down through that bottom piece of straw and I'm now going to continue and do that on the remaining five pieces beneath each of the remaining five pom poms all right we've gone through now and we have strong all of our pieces of straw we've put the payer through so we've combined them again strong them through those individual pieces what we're going to do now is bring these all together in the center so they kind of come to a little bit of a point so one at a time I'm going to take the clip off I'm going toe push up a little bit to make sure that the straw pieces air more or less secure up against the top of the god's eye structure I'm going to go to the straw that is hanging opposite the one that I have in my left hand I'm going to remove the clip from that push that oppa's well and I'm gonna tie these first two pieces together just with a simple model and I'm going to double tie it just to make a secure since I'm dealing with four pieces of string grates all right now I'm going to go to any one of the remaining four I'm going to remove the clip off the base again kind of push that straw up a little bit just to make sure that it's secure up against the top of the gods I I'm taking that along with the first two that I tied and I'm going to create another not so we're securing it to the base and we're going to do this now with the remaining a few pieces that they all come tio a nice point at the base I sw so there we go. So now we've got three attached let's go ahead and add a fourth again removing the clip kind of giving it a little gentle push up to make sure that it's tight up against the structure tying that on the straws will end up being a little bit of a jumble at the base don't worry about it too much because we're going to add on a giant pom pom that is going to kind of the skies that area where all of those pieces come together because with so many straw pieces it's really hard for it's really hard to configure them in such a way where they come together neatly all right, some adding one more almost there and again with each of these you probably just because we're dealing with so many strands now of thread at the base you want to just be double knotting as you're bringing them together and then I've got my final one here take off the clip, slipped the straw up and tie that to this mass of string we have now going at the base so what essentially is happening is all twelve strands are coming together now at the bottom and converging so once these air all together, I'm just going to give it one more final not just to make sure it's super secure and then I'm going to trim these ends you can see it's a little bit of a knotted mess don't worry about it as long as it's tied securely we're in good shape so I'm going to go ahead and just kind of clip that off cleans it up just a tiny bit I have created this lovely giant pom pom here and I have left the tie strings on it for a very special purpose because this is what we're now going to use to attach it to the base of our pie aki and I'm now just gonna tie the securely to the base now we've been dealing with pom poms on this you could also be using tassels at the base and he would like to learn how to use tassels. I want to encourage you to check out one of my other courses here on creative live it is thie simple himal ee mobile and there's a great segment in there where we create some beautiful yarn tassels that would be fantastic on your pie, aki so I've tied it securely I've cinched it up a little bit and you can see when you get up close it really just disguises that little mess that was going on of knots down at the bottom and it's a really sort of lovely way to finish off the bottom portion now one final component I've gone through and I've created some medium sized pom poms and I'm tying them at the dowell ends so there are a total of six of them have gone ahead and tied most of them on it again leaving your tie strings on and not trimming them is important for attaching them it just makes it a lot easier, so I'm going to go ahead and take those two strands I'm gonna go right up onto that last remaining dowel and tie it nice and snug on there I'm going to add double not just to keep it nice and secure we'll triple knot it there you go and I'm going to go ahead then and just trim that off. Now at this point you kind of go through and fuss with it a little bit like just make sure that pom poms air all fluffed out um that you know, the straw pieces are about as straight as they can be, but honestly, guys, I think this is looking pretty great I'm really happy with this. I love the bright hot pink colors I like the way that our gods I component sort of gave us equal places around the structure to tie on some ornamentation now if you didn't want to do pom poms, I did mention the tassels which would be really kind of great hanging off the ends paper flowers would also be another option. You're going to start brainstorming as you construct your first in your second and your third pie, aki, about different ways that you can configure these. And that, my friends, is how your pie aki chandelier comes together.
Class Materials
Bonus Materials with Purchase
Ratings and Reviews
April S.
I watched a re-broadcast of this course. It was fun but what I liked best is that Robert Mahar is a good speaker. No hemming and hawing. He keeps the stream of instruction going naturally without uncomfortable pauses (he is prepared) and without falling back on ummming or "you know", or any of that. He was easy and pleasant to listen to and his techniques were shown well making this kind of project accessible to most people.
krish vista
Nice and Beautiful!
Student Work
Related Classes
Mixed Media Art