Lesson Info
11. Shoot: Choosing a Modifier - Extra Stuff
Lessons
Day 1
1Studio Essentials: Shutter Speed
15:50 2Studio Essentials: Flash Exposure
22:26 3Studio Essentials: White Balance
21:15 4Light Principles: Inverse Square Law
26:46 5Lighting Patterns
15:29 6Shoot: Demo Lighting Patterns
28:06 7Quality of Light and Modifiers
09:59Shoot: Choosing a Modifier - Diffusion and Grid
13:40 9Shoot: Choosing a Modifier - Umbrellas
31:01 10Shoot: Choosing a Modifier - Softboxes
21:08 11Shoot: Choosing a Modifier - Extra Stuff
28:10 1210 One Light Set-ups: 1 and 2
17:07 1310 One Light Set-ups: 3 to 5
18:16 1410 One Light Set-ups: 6 to 10
15:57 15One Light Set-ups: Pop Quiz
21:21Day 2
16FAQ for Purchasing Studio Light Part 1
31:00 17FAQ for Purchasing Studio Light Part 2
25:36 18FAQ for Purchasing Studio Light Part 3
43:53 1910 Two Light Set-Ups: 1 and 2
24:29 2010 Two Light Set-Ups: 3 to 6
25:24 2110 Two Light Set-Ups: 7 to 10
22:30 225 Two Light Set-Ups: 1 & 2
13:27 235 Two Light Set-Ups: 3 to 5
33:37 245 Basic Three Light Set-Ups: 1 & 2
21:05 255 Basic Three Light Set-Ups: 3 to 5
25:52 265 Intermediate Three Light Set-Ups: 1 to 3
17:14 275 Intermediate Three Light Set-Ups: 4 & 5
12:58 2810 Common Lighting Mistakes
16:46Day 3
29Solving 12 Common Problems of Studio Lighting: 1
39:29 30Solving 12 Common Problems of Studio Lighting: 2 to 6
37:25 31Solving 12 Common Problems of Studio Lighting: 7
15:50 32Solving 12 Common Problems of Studio Lighting: 8
25:51 33Solving 12 Common Problems of Studio Lighting: 9
16:19 34Solving 12 Common Problems of Studio Lighting: 10 to 12
26:11 35Portrait Lighting: 1, 2, and 3 Lights
14:51 36Beauty Lighting: 1, 2, and 3 Lights
18:06 37Lighting Groups: 1, 2, and 3 Lights
15:53 38Lighting for Drama: 1, 2, and 3 Lights
24:19 39Your First Studio Lighting
38:46Lesson Info
Shoot: Choosing a Modifier - Extra Stuff
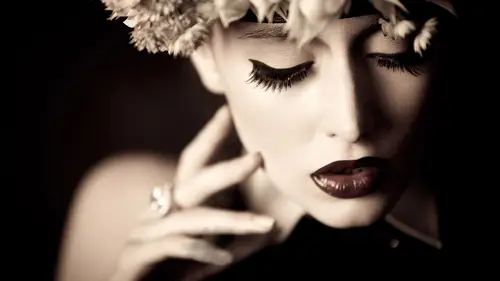
I wanted to switch on to the last part of the modifier equation, which is the extra stuff but extra stuff I called the rim lights the's might be lights that go on the background the's might be lights used as hair lights these might be lights used for the jaw and threw a whole bunch of different ones. So can you grab me a couple of those? Do you have a strip late barn doors, grids, newt any of them that you have and I'll start in whatever order I got the bartenders here, okay? Oh, and can I have sent a foil? Perfect? All right, we're going to take a look through some of these different extra other modifiers they put this down, so this is a rym light modifier that I personally use all the time, but it is less popular in portrait photography, so I won't double with this quite as much as I will some other backlight modifiers the reason they're usually using room lights is tio either separate the subject from the background to give them a little bit of definition or to highlight something o...
n the body like a hair light to make the hair look shiny, you might use a rim light too light someone's jaw or maybe someone's wearing black on black, so you used that room lights so they don't blend in with the background the's room lights these they're not usually you're mainland cesaire extras to help give you a little polish so this would not be something for the one light set ups but what we're talking about modifiers let's take a look at them. This is one that I use all the time. This is called barn doors of the barn doors, how I use them as they would go in my background life and I can change the focus of these doors of these leaves to give me a broader or more focused light source. So if I want a tiny little bit of a highlight on the jaw like really, really crisp, I can close these barn doors down to really narrow when I'm lighting the subject from behind or if I wanted to wrap a little bit more broadly I can open them up. This is a little bit more common in cinematography then it is in still photography what's more common in still photography would be a strip light would be a strip light like this, which is basically a long and narrow soft box and this is usual portrait photographers use and the back forty five degree angles to separate the subject out from the background to give them that soft highlight on the side of their face were separate their clothing from the background there's a couple benefits of strip boxes themselves one of the benefits is that it gives more even illumination head to toe because as we said before when you have a strobe lighting for example a strip light it starts off really small, but as soon as it hits that diffusion panel it spreads out and it becomes the size of this front diffusion panel, so if you have a subject, maybe they're in a wedding dress on a darker background when you now use this, it'll give them a nice even highlight a little bit on their hair on their jaw, the back of their dress that looks great it's just harder to get a really crisp high contrast rim light from this because it is diffused and it is bigger if I want that really chris contrast the light I said you want silver, the barn doors had the silver and I can narrow the beam problem with barn doors is I'll get a really bright hot spot because it doesn't have just diffusion panel that it hits and then spread out evenly so you'll get a hot spot let's say I have it up over her shoulder, I get a hot spot from like her hair to middle of her elbow and then the light just falls off exponentially gets dark towards the bottom of her body that you lose that highlight here not the case will have much more even highlights you just can't quite get that same christmas so it's kind of a tradeoff either way barn doors, there's, more portable courses and other soft box you have to set up but most portrait photographers go this direction as well. Next one this one is called a snoot and it basically is a funnel to focus your light more or less what it does um this light can be used in many different ways in traditionally it's either used to give a highlight on the background help separate the subject from the background or it's used as a hair light to give just a little sheen to the top of the hair but you could use this as a main light to give you really focus light on the face. The problem is it is really unflattering light for main light so I'd probably stay away from that and I want to switch back to the bucket example real quick. One of the things to keep in minds about these modifiers is umbrellas but beauty dishes all these things the flatter that they are the wider and flatter that they are without death the more the light just spreads out everywhere there's not as much control the deeper the modifier, the more focused and controlled delight is in one direction and I think of it just like water because if I have a flat pan of water and I stand here and I throw it in all of you the water goes every direction it spreads out up down side to side however if I have a little bit deeper bucket and they throw it at you you hit a few of you but it won't spread everywhere and if I have a really deep bucket and I toss it it's only going to hit one or two people because it funneled it out in one direction so that's the same thing that you're getting in a snoop for example is it has that depth so it focuses all the light out in that one direction it doesn't spread everywhere so this gives you like a really tight source of light so whenever you're trying to figure out what modifier do I want death will make a difference it's as well there's something called parabolic umbrellas can get even fancier there's like deep umbrellas that throw the light forward and there's the silver dishes there's deeper one so it's like another dimension to think about when you see something like this something deeper you know that it's focusing the light um sit if oil in case you don't want to buy barn doors because you don't think you're going to use them but there's just once in a while a time where you think you might want more focused like you you like the strip life there sometimes you want just a sliver of light so this is a good makeshift solution this stuff is called sina foil and you can get it from a theater supply store even get from adirama for example on what it is it's basically thick black tinfoil but the key is that it does not catch on fire because I feel like I used to make my barn doors makeshift where I would cut out cardboard and tape it to my lights but cardboard and tape melt and catch on fire and so this is actually made for this purpose it's made to go on lights it's made for that purpose it won't get hot so what you can do is you can take a piece of this tear it folded up and then use that on your light to make your own barn doors and it's also pretty portable and it's less expensive than the barn doors solution especially depending on your brand. So again, this is called sina, foiled by roscoe it's very valuable I don't ruin it lack rap, he says, is another name for it so you're mike okay um last thing is you have met the grid set waken describe it it's the last thing I want to describe it I started off talking a little bit about grids, but I want to talk about them a little bit more so I have the grids for the beauty addition explaining how it focuses the light depending on the modifier they make different grids and the smaller the holes the more focus, the light and the smaller the holes the smaller the holes the smaller the number so right now this one is a twenty five degree grid, but depending on your light they make twenty degree, forty degree ten degree and five degree so five degree grades are tiny little holes and they really really focus your life so I'm gonna grab these perfect you can all go to ten. All right, so this is a five degree grid and a ten degree grid five degree great has tiny holes that will focus the light in just a small spot. So for example, if you've ever wanted to illuminate a subject really dramatic now very dramatically we're all you wanted was just the light on their face. A five degree grid would be great for that if you think of our bucket of water example, if I hold my five degree grid way back here sure, the light is focused, but the problem is the light still kind of spreads out, so I'll probably have from your shoulders to your head from here but just like the bucket of water if I just want to let your face with this little bucket ok, so like I'll throw it out this way it spreads out I just want to like your face if I throw from right here it'll onley light a tiny circle so you want to keep that in mind as well whenever you're trying to focus light the closer you can get it the less time it has to spread out the last time it has to diffuse over an area so a grid focuses your light you bring it close and it is it tiny eighty focused light so it's great you can use it for hair lights you can use as mainly you could use it on the background to separate your subject from the background so these have versatility and what's knife is there one of the less expensive modifiers? If you're trying to get creative grids would be way down on my list modifiers you need just getting started it would definitely not be even in the top four things but if you feel like you've got and you already have your soft box already have your umbrella then this will let you get creative and I will cover a couple set ups tomorrow using it so that one goes further down on your list. All right, let me see if you have questions so far yeah let's take a few questions and let me know in here raise your hand if you've got one all right, so my high garcia says, do you do use ingrid's modify the light output of the source? Do we have to compensate for that yes. Ok. So when you put on a grid, it will change the output of that it's not actually output of the light, but because it focused it more, it will actually make it brighter in one area. So you will have to compensate. And that a lot of times just comes down to me during it or giving it a test. The other thing that it does is using grids, increases contrast. I think it just gives you a more scene contrast that gives you more contrast to your image in general. So when I light someone with a grid directly on their face, this would be someone that requires minimal retouching. Or I know I will be re touching them a lot could be one of those two things. Great. Thank you. Let's. See? So dave birch had asked, do they make grids for soft boxes? They do. They make grids for soft boxes. They call them little egg creates a egg crates. I never know what the calm there and that's. What? Actually, on the on the strip light picture and see where it is. And so it's on the great picture on the grid set up here. This is what it looks like and they can, and if so, if you want your strip light, for example, to be a little bit more focused to have a little bit more contrast to be a little bit more dramatic, you can get the grid for your strip bank and it focuses the light and more or if you have a soft box like this and you want a little bit more dramatic fall off, you want the light to be focused a little bit more. You can get grids for these, and a lot of a lot of times it will come with the grids and you don't even know what it is because they're just collapsed and kind of folded up and doesn't look like anything because it's not they're not hard, they're just fabric that extend. So you want to watch for that? All right? So furthering from that people were paying attention earlier when you were showing us about the expo disc and finding white balance. So if you're just joining us, we did have to do a whole talked about finding a white balance a lot, as well as using a light meter, because people are asking about that again, eh? So catch the re watch, everyone. So the question is, would you need to change the white balance when you're using an expo disc of sorts when you start adding these different modifiers? Ok so that is an awesome question because if you notice I haven't taken great card I haven't photographs a great card I haven't used a color checker I haven't used expo disc haven't done any of that if this were like an actual shoot where I needed the color to be correct I would have teo and I'd have to do it with every modifier that I changed it have to be constantly doing that so maybe I should do it you know but you guys get the idea so if I were using an expo disk and I had got the lights that you know in the beginning it would have changed every single modifier I'm switching right thank you I I wouldn't show that one and then can we put a beauty dish on this one okay so ally switch that I was going to show you real quick how that great works go for it you khun take a step up for sick yeah well I notice you're not using a len shade even when you're right beside the light okay so if you for example I was shooting with that shoot through umbrella and it was appointed that when I'm on the other side of it you would definitely want tio use a lens hood because what's happening is you're shooting and all that light sure a bunch of it is shooting through but it's one of it is kicking back at you so you would definitely want to the lens hood to try to block out some of that light on what len said they're used for if you're more of one o one person is they're trying to keep extraneous unwanted light from hitting your lens what happens when they hit the lens it bounces around it decreases contrast and it gives you a flat image or it gives you a lens flare I need I usually use lens hoods and I think I'm missing them with my travels but there's a couple reasons why one it would be that and in the studio I remember I remember thinking well why would I want a lens hood? Another reason is with those back room lights like the barn doors I had there a lot of times the angle that you have the map and you'll see this in practice for the no tomorrow in detail is the angle that I have them at that lights kicking back towards my lens and it catches and it kicks lens flare all the way across. A lot of times all I have to do is put on that lens hood and there's no more lens flare and it solves huge amounts of problems so I do use lens hoods in the studio as well as on location just of course not right now, okay all right so much in this month alone always up for oh that's why all right, so just to give you an idea where you grab them all for me I'll compare them that should be good. So just to give you an idea of the type of focus light you get is this particular one is a ten degree grid, so if I wanted a spotlight over the shoulder of my subject I could use a ten degree grid over their shoulder or I could switch it and watch it get more focused with a five switch d'oh it's even more focused, but if I wanted to spread out maybe only had a five degree grid the further you back up, the more diffused it gets and the more it spreads out. So this is true no matter what type of grid that you're using that with those same affect supply, but this is where you get a lot of the drama from so I could get, like, super tight with a grid set up. I did want to make sure, but while I have a couple minutes left in this that I talked about my favorite modifier and when you would use it in why okay, so my favorite modifier is this one right here. So this is a beauty dish? Um a beauty dish is that cross between a soft box and like a silver dish, it cz kind of a hybrid because it is reflective it is it's, shallow but it's a little bit deeper. It gives you more defined shadows. But they're not harsh and the skin is still soft and beautiful. I still would not put this in your top number one purchase. I would still pick a soft box if you're a portrait photographer. Because it's a small light source. So this is great for lighting one person, maybe two, not three. Not four. Not five. Like at that point it's such a small light source. I can't evenly light everybody. And then such a small light source. If I want a light, I heard the same is you have got to back up. And now it's. Not the same quality of light because it's small. And so you run into that. If you do buy a beauty dish. Definitely the one that you would want would be white if you're a portrait photographer. There's silver and there's white there's, different sizes of them. This one is around the twenty inch size, and this is what I tend to prefer. When they get bigger, you would use that more for lighting. Multiple people are lighting groups, but this makes it a little bit easier for me to get a nice, tight beauty shot with this just above your head. A soon as its big I can't get paramount anymore until it's really high and it becomes a little bit on we'll be so I prefer the twenty inch this is great for porches as well if the skin is a little bit harsh like it's not ideal skin I would generally switch overto a soft box but if I only had this they do have diffusion that goes over over the front and softens it a little bit. I love this modifier because it gives me more control when I'm using a soft box, I find it a little bit harder to get dramatic light patterns to get chris brown branson control the light like I'd want so that's why I prefer this one and he has the diffusion thank you so it should be in diffusion pound so what's nice about a beauty dishes you can add a grid to focus the light to make it more contrast e to give you more drama or go the other direction grab the fusion, softened it out and we just fit over the top ok, but with all of that said I did want to give you a rundown of how to not use a beauty dish or how to use it better and there's two huge ones the angle of the light and how far it is from your subject so I'm going to bring my model back out here thiss back on and if you want to pull your chair out a few feet, thank you, and I'm done with the good that's like, two seconds. Sorry. All right, cool. Back this up, so bring it out. Maybe ten feet this way. Come on. A little more like right there. So here's a couple of things about a beauty dish when I'm using a beauty dish, I'm generally using it at about this distance and this is pretty close, but this is where I'm using it for a head shot as they start to back up and move that light back, it just it loses that glow that it already has. So you want to keep that in mind? And then the next part of this equation is how the beauty dish works is the light bounces off of that center reflective panel and then kicks back out into the dish itself. But that means that there's actually on ly very small, sweet spot of light in the center of the light. What you're really trying to do is you're trying to line up this center panel with her face. And so what you don't want to do is you don't want to try this, we're gonna angling this little bit, you don't want it to be angled pasture, so if the camera can get this thing right now it's actually hitting her with the raw edge of the light not the center part so it's not getting the nice diffused glowing light that I'm trying to go for so if you look I can see texture and her pores and the speculator highlights are brighter here those that texture on her skin is more visible because it's just getting the raw edge of the light right from out underneath that panel however, if I angle it down just a little bit now that center panels lined up with her and the contrast of the light the glow is exponentially better it could significantly better on her face so if you do use a beauty dish it's probably one he's closer than you think you would and you got to constantly pay attention to this angle which makes it a less flexible light to use because what happens is if she's standing I'll do a lindsay dance okay if she's standing and she's posing and she does something like this like it's possible she's not in that sweet spot anymore for beauty shots I shoot like three to four feet for fashion shots I shoot like five or six feet away so I give myself like full length shots. I give myself a little bit more distance but this wouldn't be necessarily a light I would use for portrait photography as much it's not it's flexible it's not as forgiving soft boxes soft diffuse more forgiving and when people move around just this little bit of distance won't make a difference the soft box here if she just leans lean that way and then it will totally change the quality of the light so this would be on my list of things to do of modifiers to try but like much further down than a soft box now this would be if you've been shooting for a little while maybe shoot high school senior portrait you want to try a different type of light or you want to try it a little bit of fashion and beauty lighting but I would do a soft box first so I did want to show you we talked about this the whole thing is what you're choosing for your modifier maybe one big because you're letting groups maybe one small for drama but I brought back this nice gentleman he's an actor in new york on and he was my model for this but the modifiers that we use left to right a silver dish beauty dish and soft blocks so zooming in on his skin you get silver dish it's harsh a lot of contrast you really see the wrinkles and transitions from shadow to highlight beating this gets a little softer that shattered a highlight transition is a little bit softer is a little bit more gentle and then a soft box it's just a big soft radiant so this gives you an idea of exactly the shadow transitions that you would look for in each different one of those lights if you want chris go with silver dish if you want it to be no still some definition but not harsh should go with a beauty dish if you want it just to be a soft transition to go with the soft box, but look how it affects the wrinkles as well much more pronounced in much more defined with more contrast to lot light source where it's much less noticeable when you go with, say, a soft box so we definitely plays a role on the skin perfect, so I am going to go through just a couple more things about quality of light to wrap that all up, talk about a couple terms and then we're gonna go right into ten setups so let's, look at that, ok, so we are going to talk about quality of light and some terms you might have heard first one is, maybe you've heard high key in high key it would be an image like this basically the images using mohr less predominantly light or bright tones not usually much shadow generally on a white background, the light is usually flatter because there isn't much shadow and it conveys more of an upbeat or joyful image so you'd see a lot of high key images for maternity for photographing children that kind of thing and beauty there's not really any one reason you need to use this but it would be maybe a photograph like that cat another tribute right here would be loki which is just the opposite it's predominantly dark tones it tends to be more dramatic more serious a lot more use of shadows so when you hear high key loki think of those type of things low is dark high key is light and after all that we talked about we talked about where to place the light and we talked about the modifiers you could use and we talked about the intensity of light I did want to show you kind of the extremes that you could get for example in this portrait the one on the left is a large soft box it's wrapping light notice there's not a lot of contrast kind of flat on his face there's not a lot of deaths because it's centered it's not very shadowed on either side of his face not much death to the wrinkles so it's a soft box overhead and a still card underneath so that would be the one extreme of flat light and a little bit more forgiving but not much depth and then we come over here to the right and this is the likes far opposite it's a silver reflector dish high up to the right it's contrast lots of shadows lots of drama it's just barely short light right got the shadows coming towards the camera a little bit so these are the far opposite directions and if you were maybe trying to make him look sinister you're maybe shooting like a movie poster where he's the villain you would want to use dramatic light short light you know give him a dramatic expression of man but if this is maybe it has him smiling in this image and this is supposed to be in a family portrait there's no right or wrong answer just depend on the look that you're going for when we get into multiple lights tomorrow we're going to you'll hear this over and over again main light phil like kicker light you'll hear me say these things over and over again so what does that mean? The main light is the light that is the primary light source on your subject like what is the main light illuminating their face? You might also hear the word key light key light and main like kind of the same thing uh so if you could look here right hand side of her face is getting the most illumination key light the main light is coming from the right hand side ok pretty simple phil light is used to control or modify the shadows it's the light that is filling in the shadows of some sort so you're phil light could be just a reflector a white reflector, a silver reflector or it could be another light source altogether. You could set up another strobe as your feel light. We will talk a little bit about clam show lighting tomorrow and talk about how you can use feel like they're but usually it's saying their shadows on one side of her face. What light source of reusing to affect those shadows, to make them lighter, darker, fill them in a bit, and then the last term would be kicker, like also known as rim light. This could be a hair light. It could be a light on the side of the face and that's. What this highlight is right here in the term kicker is think of it this way, it's kicking them out from the background, it's finding way to separate them so they don't blend in its that pop that kicks them out. So in this case, it's is the barn doors that I was using in this photograph just to give me a little bit of separation on the hair and on the neck.
Class Materials
bonus material with purchase
Ratings and Reviews
BolesMA
If you're on the fence about this class I can easily answer your concerns. BUY IT. Lindsay provides top notch professional education while keeping things interesting. Her words are precise and direct. I actually felt GOOD just watching and learning. I mean, like someone surprised me with a cupcake kinda GOOD. After the class I could immediately see improvements in my photography. The best part is that I learned enough to see the wrong in my setups. Knowing what's wrong is just as important as knowing what's right. She is funny, easy going, energetic and filled with knowledge. I would also highly recommend her Posing 101 class as a must have addition to this course. I feel like I have learned more than I could possibly use. I will be going through this course over and over again just to make sure it all sinks in. There's THAT MUCH she offers that you will always learn more with each time you watch. I hope this helps someone make the decision to up their game. That is exactly what it did for me.
Jason Ashley
I loved this course! Lindsay spent so much time with explaining each set-up in-depth that anyone picking up a camera could understand how to accomplish their lighting goals. This course covered so many unique (but, most likely to come across scenarios) and how one would approach the challenge and how to successfully accomplish with incredible results, not average-sub-standard or basic results, but above entry-level standards, high-level, money-generating lighting expertise! ZERO laziness in her explanations to the point where she is constantly refining her course in the middle of the 3 days. Her passion gleams throughout each days lessons with so much energy. You know she really wants her students both in-person and through the screen to be successful in whatever type of lighting they choose to dabble in. I am so happy, I have bookmarked, and i'm so happy and fortunate to have this course to reference for hopefully –everrrr. Thanks!
Beatrice Palma
Hi, I am Beatrice from Italy. I think this class is superb. I finally understood what are the guide lines to follow, I tried for years but never found such a good explanation. Lindsay is a wonderful teacher, she explains in a simple way, she shares a lot of knowledge and she shows in practice what are the results of every single choice. Thank you so much, it was really amazing and super interesting!!!!
Student Work
Related Classes
Lighting