Intense Editing - Skyline in Waterfall
Lesson 11 from: Shooting and Editing for Mobile PhotographyElise Swopes
Intense Editing - Skyline in Waterfall
Lesson 11 from: Shooting and Editing for Mobile PhotographyElise Swopes
Lessons
Class Introduction
00:49 2Settings
02:36 3Scouting Locations
07:36 4Shooting Reflections
06:26 5Shooting Leading Lines
03:05 6Shooting Skylines
09:26 7Organizing
03:32 8Removing Billboards
10:05Lesson Info
Intense Editing - Skyline in Waterfall
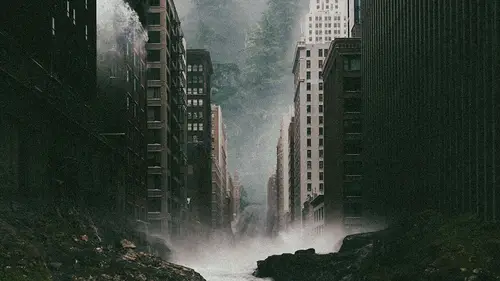
on the ferry. I was shooting horizontal and you'll find out why I was shooting horizontal for this edit starting art studio. And I'm gonna go ahead and do a file new document. I'm gonna save this last image. You could definitely always save your images. I'm gonna save it. And the nice part is, is that the four by five file sizes there at 2160 by 2700 I know that will be the max amount of pixel size that I'll be able to work with. So I'm gonna go ahead and create that new image and you'll notice it's just back a white background for now. But what I'll do is I'll do file import insert as a layer import from photos. And the nice part is is that I already have these albums already set, so I'll be able to tap fairy and I'll be able to see all those very images that I shot. So now I'm gonna go ahead and find a skyline image that I can play around with. I kind of like the distance of this shot. So I'm gonna go ahead and use this one and upload it as a new layer. I'm shooting in landscape beca...
use I want more details from left to right rather than from top to bottom. And I'll be replaced in the sky, replacing the water. Anyway, So what's the point of having all that extra detail for no reason? So I'll enjoy the skyline much more. I'll be able to work within a lot better. I'm gonna go ahead and edit transform. This layer looks a little crooked, so I'm gonna go ahead and pull it out of tiny bit. You can also tap down here. I want to get a little bit more specific and I'll tap apply. Okay, so now I'm gonna go ahead and replace the sky. It's a nice blue day, but it is really easy to replace the sky with these types of days. So I'm gonna go ahead and do file import interred as a layer import from photos in the nice partisans that I've got all these stock images already saved that I've already bought within the many years that I've been editing and creating, and I will definitely have an image in here that I could be able to use that I can do something kind of crazy with. Maybe I'll replace it with this super storm E sky. So I'm gonna go ahead and upload that into it. You'll notice it's taking a big toe load because my all my files are saved in the cloud, so they're not saved on my phone. It allows me to have a lot more space on my actual phone rather than saving all these images on there. So I've got about 90,000 photos on my phone, so it's nice that I can still have all of them to access, But I just wait a little bit for them to load and upload some time. So sometimes it will give you this little warning. It says, you know, size of the imported images a little bigger than the actuals canvas itself. So don't worry about that. Just click. OK, so now we're gonna go ahead edit, transform that cloud layer and bring it up and kind of place it where you think it should fit in the sky. Go ahead and apply. And now I'm gonna do is tap the I just make it not there. So now I'm gonna do a selection. Do that magic tool again Do add, and then threshold. I'm gonna lift maybe a tiny, tiny bit because you want to select that blue that's in the sky. So now I'm gonna go ahead and do select, actually, So you just saw a little problem, so I tapped on it. You know, notice it's not selecting that blue because I'm on the wrong layer, So make sure that you're on the correct layer that you're trying to select. Now I'm gonna do is tap on that blue, and it's gonna select that whole sky area for me. Keep going in there detailed. Keep zooming in. I love art studio, cause it's just so nice to zoom in and it's it's very detailed that way can really get into like each and every pixel to keep going down the line to see what you can select from the sky And it seems you've got all that blue So the top of the white is obviously still not selected So I'm gonna go ahead and do the square, keep the ad selection going, and I'm gonna go ahead and select that top part. So now that's great. And everything got that top part selected, but I want to go ahead and make that layer visible again. And then I'm gonna go to select in verse and it clear, silly. See what I did there Cleared the wrong layer. So go to the correct layer. Tap that layer for the clouds at it. Clear selection. Now you've got really kind of crazy sky. But also he could do. And what I did with the giraffe is because the issue comes about where there is that extra pixel or so within on the buildings. When you're selecting that blue, so again, do select, expand, give it at least one pixel expansion, expand that go back layer selected, do another inverse and go at it clear selection. And now you won't see any of that blue anywhere. So I'm gonna import from photos, and I've got a whole folder of waterfalls ready, which is always might go to always having those folders. And I'm gonna find the correct waterfall that might fit in this scene. Maybe this Wait till it uploads and let's see, let's transform it. Make sure you're lining it up with that. You can always change it afterwards. So what I want to do is actually give that a mask, make sure we're on the color to color so that we're doing ingredient and then bringing that radiant through that waterfall. And it's already gotten kind of insane already. And now you see, you've got a really, really interesting, surreal edit of a skyline that was once very simple And, uh, not not not a bad image at all, but, you know, if you really just want to stand out and do something a little different, this is definitely the way to go with art studio. So I zoomed in a bit, but I see there's some kind of mistake here. I'm not sure what's come where that's coming from, but let's fix it. So go ahead and do a little draw over it. Actually, we could do is do a little push tool, maybe size a bit. Fix it that way. It's a little strange. It's just fixed that do undo. Sure, keeping those cutouts in. Okay, cool. So we've adjusted that also, I shot a picture of a bird while I was on the ferry, so maybe I'll add a picture of a bird insert as a new layer import import as a new layer and my fairy, and I'll see that I have my bird got that looks nice in detail, which is great, so I'll go ahead and select, select all the outside of it, then the easy part is just doing that square again. You don't have to keep tapping. Just go around it like that little bit and then do another select expand. Spend one. Go ahead and clear that. Now we've got bird flying through crazy go ahead file export, PNG export photos. And then from there, like my last said it. I'll go ahead and bring it into Visco so that we can just bring the whole image altogether. Go ahead and just see. Looks good. That's cool. And that filter just brings the whole image together. Oh, that looks great. Well, cool. So go ahead and save this. I'd actually say this camera will. And then my final I always go to light room, had opened up that light room, go to your camera roll, open it up with the light and kind of play around with the highlights. Give it more depth within that cloud. Up there, you play with the color of bit boost saturation, but my favorite and final thing is just add that green in there to bring the image all together. Now we've got a waterfall in Seattle.
Class Materials
Bonus Materials with Purchase
Ratings and Reviews
Kate Crossley
Found it very interesting how Elise translated Photshop style art composition onto her mobile and how she scouted for images. It would have been good to have had a list of the apps she uses in the class information page. I had to go to her website to find them. I appreciate she mentioned them in her tutorial but a list would have been helpful too. Having been doing composite work on my iphone recently it was great to see another artist at work and their approach. All in all, very enjoyable class.
Jennifer Pinter
I think the class could have been longer with more detail about the editing. I am glad I purchased the class and can go back to watch again because she goes through the editing process very fast. Overall some good tips about shooting with your phone and worth $25 to me.
Ken Hattie
I cannot attest to the course content as I tuned out after and left after the 10the use of the irritatingly over-used word, by videomakers, "super". By god, get a thesaurus, people.