Lesson Info
14. Lighting Set Ups
Lessons
Class Introduction
04:58 2Keywords and Terminology of Lighting
15:17 3Lighting Patterns
16:29 4The Science of Light
13:49 5Lighting Pattern Demos
27:53 6Study the Catchlights
17:42 7Study the Shadows
08:31 8Soft & Hard Shadows
28:57Lesson Info
Lighting Set Ups
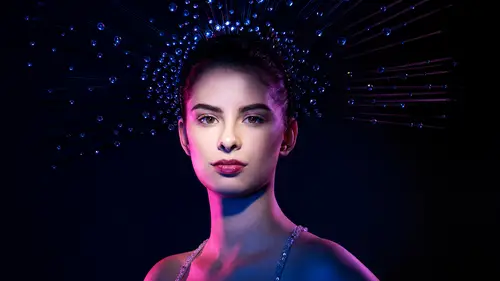
How's It Lit, I started in the beginning explaining how I was doing a shoot a couple weeks ago, and this is what the shoot was, and I was doing this shoot, and, I saw the styling, I saw the crowns, and the gold, and I'd been watching a whole bunch of Game of Thrones, and I wanted something elegant, strong, maybe a little bit mysterious, and so, I started looking through images on Pinterest, and I found this this type of lighting, and I stared for a long time, trying to figure out how the heck they did it, cause it's not, it's not, anything unusual, but it is, there's something different going on, it's not like there's amazing weird highlights and shadows, but it's that texture, and I didn't know how much was done in Photoshop, or how much was done with lighting, but what I did, is I found this editorial of the light I liked, it looked nothing like this as far as styling, it was a beauty shot, and so I zoomed in, and I could see the catchlight, in this other editorial, and I zoomed in, ...
so it's like little pixels, but, I could still piece it apart, so, this is my actual image, and so, I see three catchlights, I see three of 'em, one at the top, I can tell it's round, one in the middle, rectangular, it's gotta be a softbox, and the one in the bottom, irregular, so, I've learned, round is beauty dish, rectangle is softbox, irregular is probably a silver reflector, now also looking for the placement, they're all pretty much just lined up, lined up in a row. Now, not necessarily to the camera, but to the subject's face. So, what I did, is I shot tethered, and I set these things up, and all I did is I started playing with exposure, turn it up, turn it down, how much, and you can kind of see, this is what we ended up with for a setup, so, I had the beauty dish above, her holding a silver reflector, a three by four foot softbox by for fill below, but I what I was looking at in the original photo, that you see here is okay, at what point, is the fill from the soft box below overpowering the shadow, I don't wanna flatten it out, she still definitely has a shadow on her cheek there, so, the main lights are giving me paramount light on her face, but she's got a little bit of darkness in the eyes, so, I probably need that beauty dish kind of high, and I want the softbox below to fill in, but not to eliminate the shadows, I don't want 'em to be gone, so it was just a whole bunch of dialing it up, and dialing it down, but, I've never seen a presentation on how to do this particular type of light or honestly, most of the lighting I do, most of it, nowadays, I didn't learn from a tutorial, or behind the scenes, or watching something, I learned by looking at another photograph, and decoding it, so, I'm constantly learning, so, that's the behind the scenes there, and just so you know, I've got a before and after, what it was shot on a camera, there's the retouch and there's the raw, I don't know if you think this is heavily retouched, I mean obviously the skin is, but the same look, it didn't actually change the lighting, like, the lighting's still there, it's just improving the skin, so, that's why I'm urging all of you to learn, and to go through this checklist, so, I've got that checklist, it's in the free download, or a version of it's in the free download, and anyone that get's a class will have this download as well. So, when you take a look through it, I've got questions of how many catchlights are there, where are they located in the eyes, any of them from reflectors? And goes through the shadows, it's everything we did today, so, if you've downloaded already, I would recommend for this next section, bringing it up on your screen, so, that you can go through as I show you some examples, and we'll kind of walk through it, so, I'm going to start off without doing, reveals, kay, I'm gonna start off, but I'm going to do a setup, you're going to see it, we'll take a look on the computer, so, you can actually see, right, alright, this is reconfirming everything we know, after a few of those, I'm gonna jump over, where we hide it, and you cannot see, and so you're going to have to guess. I will do some guesses in the audience, and then also take some guesses from people online. Perfect. Okay. So. The first setup, what I have written down here, and this is why, let's say that you're looking at a photo is I want an octabox, in loop position, I want the shadow to be falling to the right, so, that means that my octabox needs to be to the left, this is would be if I'm looking at a photo, that's what I'd say, I'd say look there's a loop, and it's falling to the right, so my light needs to be left, like this is why I write those things down, which is why the terminology is important, so, that first part, would you look straight on to me? Now, as I was looking at a photo to try to figure out what I wanted to do, I'd figure out how long that shadow is up or down, so, the longer it is, I would say op, it's a long shadow, I need to raise this up a bit, make that shadow a little bit longer, kay, the next thing, examining this photo, I'd say okay, looking at this one, I'm re-creating, how about the shadows on the face? Are they, and I've got the octabox and the catchlight, for example, so the next thing, I'd say how bout the shadows on the face, are they filled in? Are they Dark? Do I need negative fills to make them really dark? Well, in this example, they're actually very filled in. So, much so, that, that loop, I can barely see it, ya know, you see a little bit, but it's very light. So, we're going to take a white reflector to fill that it, and then the last part is I'm asking is, is there a rim, and how high or low is it? So, I see a rim light, that's soft, it's not super crisp or narrow, and it's catching the top of the shoulders, and a little bit of the hair, so, that, this would be the setup, kay, and what's the number on that? Five, six. Let's try six, two, kay. How's the height? It's good, look's good to me, a little bit of the hair, I see it right on the shoulders, so, it's perfect. Alright, so let's bring that white fill in to the front, kay, perfect, okay, so let's take a look at the photo, and then we'll just piece it apart real quick. So, I can see catchlight in the light, if In can actually see it, it, rendering, so, I'm shooting with the Canon 5DS, which is 50.6 megapixel camera, and I'm shooting with this on the full size roz, which is why it takes a second for it to render. So, you can see an octabox shape, I can tell that it is, highish up, but it's not too high, I can still see a bit of it, and to the left, so, it's slightly to the left of the frame, I don't see any other light sources, I can also tell from the shadow, it's in loop position, but these shadows aren't super dark, which tells me there's some sort of film, it would just be how close you put it, and then I've got that soft rim light, getting a little bit of the hair, and also, it's high enough to get the shoulder, so, that's what I would see in a picture, so, I'm gonna pop on to the next one, so, let's say, I look at a photo, and I see, that the subject is turned to her right. Will you turn to the right? Great, so, she's bout there, and I see Rembrandt light on the face, but it's short light, so, it means, the shadow side of the face is falling toward the camera. So, I know that it's not based on the position of this light relative to me. It's based on the position of this light relative to my subject. So, I'm gonna move that back around. So, I'm gonna start with that, and I'm gonna use my modeling lights, to try to help me out, okay, try not to, Can I get on there and I'm gonna probably have to go back a little bit further, but I don't want to break that, I'm connected, and I can pass this to you, as well, oh you did, well you're fast, okay, cool, I'm bring this back around behind, just a little bit. So, I'm aiming for Rembrandt light, so, I may have you angle for me, alright, so, if I'm looking for Rembrandt light, I can change, okay, and just rotate that for me, just a little bit, towards me just a little, okay, so, if I'm looking for Rembrant light, I can either move that light around, or, I can actually change the position of her face, because doing so gives me Rembrandt, so, I'm gonna turn you back towards me, with your, a little less, I tell you when, ready, go real slow, real slow, right there, that's what gives me Rembrandt light, it's like, it's even the littlest movement from side to side, makes you go from slit to Rembrandt, so, right there's perfect, and then I look at this shot, and I see that there's a really crisp highlight, on the side of her neck, and on her hair, separating her from the background, it's not on the background, it's on her, so, I would try barn doors, that would be my setup, so, let's take a look, so, what you'll see, is this Rembrandt light, just nice and dramatic, it's almost like carving out a silhouette, so, I've got a tiny shadow from Rembrandt light, if you look at it, if I can zoom in, it's a pretty subtle transition from shadow to highlight, that's what would kind of give away that's it an octabox, but you could probably get something similar, with a beauty dish, especially a beauty dish with a sock on it, but if you can see the catchlights, ya know, it's looking more like a softbox, I can't tell that's an octabox from the eyes, but I can tell just from the shape of it, that's not a beauty dish, like it's not round, so, that's how I kind of piece that apart, and then the highlight that I've got here, see how crisp it is on the ear, and on the shoulders, that texture, that would give me the idea of it being, barn doors, so, you've got a softbox, in this case an octabox, in Rembrandt short, with back barn doors, for your kicker for rim light, we're gonna look at a different one on the key note. Okay, so, while we move this around, take a look at this shot, and figure out if you can see how it was lit. I will tell you it is outdoors, kay, take a little glance. So, we're taking a look at the catchlights, the transitions of the shadows, the location of the shadows, the fill of the shadows, and the reason I wanted to put this up here, is let's take a look at the catchlight, it's really weird right, it's a really strange catchlight, there's like a, yeah, I hear someone saying, yeah, so, you wanna say what you're, what you're seeing? Looks like a concrete barrier? Yeah, okay, she said it looks like a concrete barrier, so, let's take a look. It's a concrete barrier. So, really the point of this is just to say you're light could be from anything when it's outdoors, and that's why you take a look at those, those natural reflectors, but what I did, when I walked into this scene, is I said well, I got some light bouncing off the concrete barriers, and I've got that fill light, from that truck, that truck is a large neutral surface, when light, when the sun hits any large neutral surface, I'm talking about neutral like not having a color cast, it becomes the size of that surface, that becomes a gigantic reflector, so, it's bigger than any reflector I could take, so, it hits that, and it's large, relative to my subject, so, it just gives a nice fill. The reason that the catchlights from the barriers are brighter is they're so much closer, so, the light doesn't, doesn't lose its power, so, that again, let's look back at what that shot looks like, so, you can kind of see, and depending on where she would place her head, would change the direction of light, if she turned her head to her right, it would flatten it out, if she turns even more towards me, it would go more split like, okay, good, alright, so, I wanted to show you in this example, I've used a lot of beauty dishes and octaboxes, I don't want anyone to think you can't use umbrellas, you can absolutely use umbrellas, and they're a great place to start, and there are ways, there's other classes here on Creative Live, that talk about ways to manipulate umbrellas, and use them in unusual ways to focus the beams of light, or to use them as shoot through or bounce or that all exists here, but I was gonna tell you how I usually use umbrellas. I usually use umbrellas with diffusion, and so, that basically turns them into a softbox, so, if you need a more portable softbox, where you don't have to setup the speed rings, or, I don't know where the heck I would put a seven foot octa, but a seven foot umbrella with diffusion, that I can fold up, and put away, and it's much easier to setup, than a seven foot otca, so, what I've got here is I've got this umbrella, which is very, very similar, it's gonna act quite similar to a softbox, so, I wanna watch the light on her face, and for you guys now to be able to see, this is what it looks like, kay, the one that I use in my studio, this one is a pro photo deep umbrella white medium with diffusion, the one that I use is the extra large, so, I just, ya know, that's what I wanted to be an easier to setup giant softbox, but, let's set this up on her face, and on her face here, I've got some Rembrandt light, but what I would like to be able to do is create checkerboard lighting, and remember how I talked about checkerboard lighting, highlight, shadow, highlight, shadow, well, what I've got here is I've got a highlight side of her face, and I want it to be on the shadow of the background, so, what we're going to do is we're going to use a v flat to cast a shadow, we're flagging the light, now, it doesn't have to be a whole v flat, we could also just a piece of black foam core real close to it, something smaller, and so then, the shadow side of her face, is against a lighter part of the background, you could do a couple things, I could separate her out from the background more, and put a reflector on the other side, but this what I usually do, and I'm going to, I'm getting double shadows, so, I'm going to test this to see which shadow's actually from the modeling light, I think this is it, let me just switch it this way, hold in, I'm gonna move you back just a little bit, if you don't mind, kay, thank you, hold on, alright, cool, so, can you, Kat, bring it in for me, bring it into, and I'm watching with my modeling lights, so, I can see it, and bring it in closer to the light, good, I think that's it, alright, let's see. Kay, I don't know if you'll be able to see this as well on your screen as mine, let me do one lighter, cause I think you can see it better, great, perfect, perfect, okay, there, now, yeah you can see it better, I opened up my exposure a little bit, so, if I take a look here, it can be really subtle, but it's shadow, highlight, shadow side of her face, and it doesn't need to be a bright highlight on the background, it's just a little lighter, and that has to do with the shadow, put up the foam core, put a shadow on the background, and the angle of that light cast some light behind her, so, it's just, a bit of separation, so, you can see the side of her face, checkerboard lighting, I use this all the time, like, I love this setup, it's like, it's simple, it's clean, it's portable, alright, so, we're going to switch to one more, before we do some reveals. I wanted to show this one, because this of the lighting setup that I use, very, very commonly. Let's see, okay, so, this is a setup, that you will see all the time in shots of celebrity athletes or movie posters or whatever, and one of the other instructors, who's also a friend of mine, that speaks here on Creative Live, Joel Grimes is known for his three point lighting. So, three point lighting is when there's one light in the front, and then two back rim lights, and those two back rim lights could be anything, there's times where I've seen him use strip soft boxs, I've seen him use large softbox, I've seen him a variety of different things, typically, he uses strips, you're rim lights decide how much you carve someone out from the background, the smaller you want them to be, the further you bring them around behind, the more you want them to wrap, the further you bring them around to the size of the subject, but then your main light determines the mood of the shoot, and how you want to shape the subject, so, if want it to be dramatic, I could have Rembrandt light with a zoom reflector, or if I want it to be soft I could use a large shoot through umbrella in the front, and fill in the shadows. It's like that main light controls the mood, and those two back rim lights kind of carve the subject out. So, what I'm going to do is I'm gonna do a little harsher version. We're going to use two back barn doors, because I'm gonna be able to get those razor sharp highlights, and I'm gonna pull you up a little bit, the reason I'm pulling her up is I'm giving myself a little room to put those barn doors back behind, because the further I put them back behind, the more razor sharp and narrow they get, so, that's why I'm choosing to use these two, alright, so, we're going to use the two barn doors, I also want to make sure, that they aren't lower than shoulder level, because lower than shoulder level, I won't get that separation, and then the main light that we're going to use is a zoom reflector, I'm going to go really, really hard light, my, one of the reasons I wanted to show you this is, I use hard light all the time in beauty photography, and the reason it looks great is cause it shows every texture, which as long as its retouched is awesome, cause it shows every pore and every texture, and the skin just looks impossibly perfect, but for the average portrait subject, it's probably a little brutal, it's probably not so nice of you, so, you have to kind of keep those things in mind, but the reason I wanted to say this is you might say ah, man, I would never shoot with a zoom reflector, because it's so harsh, but then you look at a photo, that you love, and you're like man, those are really harsh shadows, and how did they get that look, it's probably retouching, is my, my point, like, it's that balance. So, I have shots that are hard light all the time, but, they're retouched, so, you gotta kind of train your mind to see those different elements, so, I'm going to start with just the back two rim lights, and I'm gonna move 'em around, so, I can get the razor sharp light, let's test right here, and are they equal power? Seven, o. Perfect, great, let's try this, there's no main light on, oooh, beautiful, I love these rim lights, so, you got this, this is what you get from barn doors, that you don't usually get from strip, this is like, it just carves her out, and it's beautiful, I don't know, I'm one of those people, when I see beautiful light, I get excited, fantastic. So, I love that, I'm gonna go with a harder light source, I'm gonna go with a zoom reflector, and I'm too short to see what that is, alright, and I'll test this out, I want it nice and centered on her face, but, no shadows hitting the lip, and I said usually you don't wanna do that for a portrait, also, turn your chin down a little, if I shoot lower, no more catchlights in the eyes, so, that's why I've gotta bring this down, just a bit, and boom arms are great, cause I can change the angle, alright, so let me take a quick test, paramount light, so, it's nice and centered, two back rim lights, let me give this, give this a quick test, a little high, turn it down a little bit, hold on, I'm gonna do one more, and then I'll show everybody, kay, so, let's take a look at the next one that pops up, so, if I'm looking here, I wouldn't say that looks like bad, harsh light on her, but that's because she has nice skin, and she's a model, and so she looks great, but we've got those two rim lights, one on either side, mostly paramount light, maybe a tiny bit off to the side, I can tell that there's no fill, cause those are dark shadows, and so, if I break this apart, I see, point of light in her eyes, when you see that, it's probably using a reflector, you can kind of actually see the reflector, with the light in it, mostly, centered, I can also tell, that the shadow is mostly centered. So, it's telling me main light, high up, cause look how long that shadow is from the nose. It's almost to the lips, so, it's high up compared to her face. So, that tells me the main light, I don't see any fill, the shadows are dark, I don't see any reflectors, and I've got two rim lights one on either side, they're crisp, so I would guess, that they are barn doors. I wanna do one real quick variation. I'm just going to have you hold a reflector, for a second, real quick, I'm gonna just take one test with a reflector, so, you can see the difference, let me, I'm gonna change it, so, I'm watching, so I can see, and I can even point it down a little more, okay, so, I can see it fills in the shadows, and gives me a little more defined catchlight, so, watch the difference. So, how I would know that there's fill, watch the shadow on the next one, shadow gets filled in, and, I can actually see that catchlight down there, by the way this is why, this is one of the reasons I shoot with the 5DS, like I can zoom into the eye, and I have every single detail, here's another natural light example, take a look at what your guess would be, as how it's lit, placement of catchlights, quality of shadows, direction of shadows, all of that, number of catchlights, to see if you can take a little bit of a glance, I'm gonna give you my guess, and what I would be looking at, and by the way, let's take a look at the catchlights, do you see me and the car behind me? You can see another car, alright, kay, so, I will tell you what my guess would be, and how I would kind of break it apart, I told you I'm cheating cause I already know, but I'd go okay, so, I'm gonna guess it's outside because narrow depth of field and textured background, I'm gonna guess it's outside, first thing I'm gonna do is look at the catchlights, that's my go to, and I can see 'em, they're big, so, it's either a big light source, or it's something smaller really close, but it looks big, and I can also tell, it doesn't look like a studio strobe, it's not a, like, they glow more, they're sharper, when they're studio strobes, so, I would guess that it's maybe a reflector, and the other reason I would guess it's a reflector, is because I see some sunlight, so, it makes sense, it's opposite the sun, that works for me, now, from the catchlights, the catchlights are on the right hand side of the face, so, that's telling you probably, the lights on the right hand side of the face also, it's a little bit more shadowed on the left, so, the shadows would be opposite the main light source, and it just looks really, it looks very pale, if it were a silver reflector, I'd see more texture, more sparkle, so, I'm gonna guess that it's white, but the other reason, just look how smooth the skin is, when it's silver there's more texture to it, silver creates more contrast, so, but I told you I'm cheating, cause I know, but she takes the 30 inch reflector very, very close, relative to her, that's like, ya know, the three foot octabox, nice and close, it's why it's giving me quite a similar look, but all those filled in shadows, you can never quite know if there was a fill card, unless you can see it in the eyes, or if was just fill from the environment, alright, so, so, we're gonna take a look, alright, like I said, sort of, kind of, a little more simple, I'm gonna, I'm gonna give you the hint, so, well zoom in here, but it's like a, it's a, it's a hidden hint, so, I did this on purpose, so, you couldn't' totally see it, kay, so, running through catchlights, shadows, background light, okay, Cmon who's brave in the audience, okay, ya brave, ya ready. Aye. Okay, excellent. I would say there's a, probably an octabox on her left, or on the left, up high, based on the catchlight, and I'm not seeing any other lighting, other than the background, a light on the background. And what would the light in the background maybe be? What do you think? Probably a a grid on the strobe, Kay, now, my lovely people, do you want me to take guesses online, or just go with that, I think we're just going with that, right, kay, perfect, so, do I just like pull it away, so, that's not on, can we just move, can we hide that, so, we know, don't think that's on. This one. Or just point it the other direction. Yeah. Okay, so there's this light in the background in the corner. There's two lights being used. Kay, two lights for this setup, so, that he was totally right, okay, so, all of the above was absolutely, it's high, up off to the left, and you could tell that, cause it's creating Rembrandt, but it is so high, that you can barely see that catchlight, so, it's telling you, it's high, you can't really see what's going on here, right, the other part is, it's really far off to her left, I mean relative to her, this is really far, and can tell that, cause it's small Rembrandt, the further that that shadow from the nose, keeps creeping over, it means that light is even further off to the side, there's a light on the background, and it is a grid, what degree do we have here, this is a 20 degree grid, it, ya know, you could have a smaller grid backed up, or a bigger grid closer to the background, either one would do the same thing, you, this could be, like one thing it could be would be like octabox with a grid, like focusing it in a little bit more, the reason I would think, maybe, a beauty dish, like this, this line, this maybe a little bit sharper than an octabox, but those two, you could get very similar things, its goes an octabox, with a grid and a beauty dish, with a grid, like you can get very similar effects.
Class Materials
Bonus Materials with Purchase
Ratings and Reviews
Kaltham Ali
Wow wow wow- I finished the entire class in a day! I feel like owning and buy right away all her trainings... this is what a real trainer is al about.. I went from zero in light understanding to really looking to lights/shadows etc.. awesome thanks Lindsay .. the best purchase ever
Warren Gedye
Lindsay, you're an absolute genius!! Such a terrific teacher. You are so talented- not only as an out-of-this-world exceptional photographer, but also as a person who clearly is so passionate about her craft and has that very rare ability to teach your art in such a unique and structured manner! I have learned so much from you previous courses too, Lighting Bootcamp 101, I think was one of them. I look forward to more of your tutorials. On a side note- John in the background is such a stand-up guy! I love the rapport you have with him. I've seen him in on a few Creative Live courses now and he's a kind of guy I just want sit down and have a coffee with, and pick his very informative brain! Such a cool fella!
a Creativelive Student
Lindsay is a talented teacher. She is very knowledgable of what she teaches, but also can teach it well (which is not something all talented people are gifted with, whatever the field). She is humble, dynamic and her courses are interesting to study. The one small improvement I would have liked would have been a little more emphasis and theory on the shaping part. However, this not being the most important, it is better that more emphasis was put on seeing (if you can't see it, you can't make it). Finally, I will say that to study and understand this course, or Lindsay's methodology, you are then equipped with an understanding—you could even say partly knowing the language—of light, which gives you a huge set of tools and advantage, allowing you to progress quite substantially with your studio or out-of-studio photography.
Student Work
Related Classes
Lighting