Studio Calico Kits & Welcome Layouts
Lesson 2 from: Scrapbooking Your Baby's First YearNicole Samuels
Studio Calico Kits & Welcome Layouts
Lesson 2 from: Scrapbooking Your Baby's First YearNicole Samuels
Lessons
You CAN Scrapbook Baby's First Year
18:02 2Studio Calico Kits & Welcome Layouts
32:51 3Organizing Photos & Using Momento
19:54 4Using Sketches & The Be Happy Layout
26:24 5Collages in Design & The 5 Months Layout
26:17 6Milestones to Document
10:01 7Skype with Ali Edwards
19:38 8Journaling & The Around Here Layout
36:24Lesson Info
Studio Calico Kits & Welcome Layouts
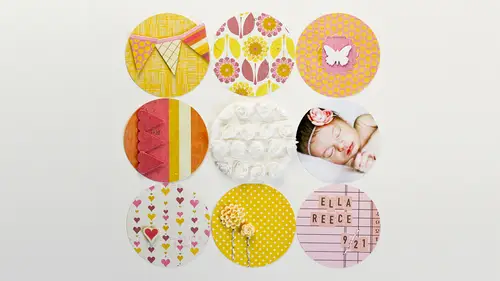
I want us to have some fun kind of dig into some of this product, and we're going to talk about scrapbooking with kids personal just tell you what the kid is, because I don't think everybody knows, but a kid is just a coordinated collection off papers and embellishments, so the kind of guest workers taken out you have that comes to your doorstep. If you're a subscriber, there are many companies kick companies or kick clubs online. We're going to be working with the kit from studio calico. I've been on the design team for seven years now, so I feel like he can wholeheartedly recommend them both their customer service and the quality of their kits is just awesome and in seven years time, I don't think there's really been a kid that I haven't like, so if you're worried about subscribing because you just don't think, what if I don't like that kid that month? I haven't really had that problem at all you haven't either your subscriber. Great, great. All right, so that's just the basis of wha...
t a kid is. Um what's. Wonderful when you have a baby is that this kid will arrive on your doorstep each month so you don't have to go shopping with your children, which can be difficult at times. You don't need to make a trip to michael's or the other craft stores or whatever and I don't know about you, but a lot of the scrap book stores around me have all closed down, so it's really like online shopping or the big box store shopping and that's about it and the kids are wonderful because like I said, they come to your door but they're filled with product that's kind of brand new and just kind of innovative stuff, so that's fun like I said, it takes a guess work out of the equation, so if you are feeling a little worried about how do I know which papers to pair with which letter stickers and I don't know how to do the embellishments and doesn't match, they've kind of taken the guesswork out of it because everything here should coordinate together and you could just pull the kid out and get started scrapbooking it also seems a lot of time because maybe this is just my personality, but when I put down the scrapbook without a kid it's been a long time since I've done it. But when I d'oh, I have the tendency to feel like I need to look through every single letter sticker that I own to find the one that we're talking about perfectionism to find the one that matches exactly to my page and I've been scrap booking for a long time so I have a fairly large stash of alphabet stickers, so that takes a lot of time to sit there and like rifle through all of them to take him out of the drawer look at them and it just gets overwhelming it definitely gets overwhelming and that's why I love the kits because, you know, I just take this out, I open it up and this is what I use so we're going to get to play with those and the other great thing about kits is that the kid clubs that you was subscribed to or even purchase from they have websites that offer a lot of inspiration and support. So each month when the new kid goes live there's ah whole gallery of design team layouts they're there for you to look at and gain inspiration from there's a member gallery that you can look at and there's also a message board that's a wonderful community of other scrap pickers that you can gain you know you can ask questions of them, you can kind of go back and forth get inspiration and so that's great u um a preview of the kid before you get it or is it just a surprise because you get a little bit of a sneak peek? They call it of what the kit will be and what you know you kind of get a sense of the colors and little bits and pieces on that you do get to see ahead of time so you can just the baby in those colors exactly bagley okay, so we're going to go ahead and open up our kids and I want to show you exactly what's inside you can get this really large on below should be at your tables and the wonderful thing also about the studio calico kisses they come in this great envelope that then becomes part of your storage solution and your organizational solution so again making the process more manageable because it's already think you it's already in something that you can then use as a storage system. There's a place to write down the name of the kid in the month and it's from this happens to be the sand lot kit and you can open it up and just take a peek I'm going to kind of walk through what you'll find I get mine out here, okay? So at the bottom going to start at the bottom with the papers will fight all this over to the side ok? The bottom there's always four pieces of card stock in here some of them are new trolls and then some of them are colors that will match the kids specifically, and each month a kit will be kind of a different color scheme and they'll be different embellishments in the same general items like you always get an alphabet you always get paid pattern papers and card stocks, but what with the exact items are will vary from month to month but this is this month's we have these four cards stocks and then you can kind of flip through and see all the different pattern papers and the wonderful thing about pattern papers now is that they're all double sided so you kind of have double the options with your kid. And another great thing about this pattern papers is that most of them if not all of them have this thing at the bottom that I'm going to call a branding strip or a manufacturer strip or tear strip I never really know what it's supposed to be with the technical term is but there's always this extra little strip here that has a pattern to it that you can use on your project so that's nice too the papers and then even kind of see the different embellishments that are included in the kit there's always an alphabet and in this kit we have this fun little silver alphabet stickers we also have some numbers he's our wood veneer numbers that are going to be fun then there's this extra alphabet and this is probably more of an embellishment in my mind because it's such a big letter so you probably use it as an embellishment of some sort this fun envelope that could be used as a place to put extra photos or a place to put extra journaling there's some metal rim tags inside that little envelope this is some fun washi tape, which is just like a semi transparent tape that has designs printed on it that's really fun and there's always so much of it that it lasts forever, which is often there's some fun ribbon or actually it looks like fabric torn in tow are cut into strips and then a stand most all the kids come with a stamp of some type, so this one says be happy and there's some nice numbers there and then this is a fun collection of just like stamp types of embellishments that you can just cut apart or tear apart there's a whole bunch of different ones there and we'll be using some of those ok? And then there also was a little message in here that I think it's fun from ceo calico where they just give you a little bit of information on that kid. So this this is called sand lot this katniss from august of two thousand fourteen it talks about the artist that were feature that produced the products in the kit um and then even who packed the kit so my was packed by meghan so that's a fun little personal touch that they put on there in their kits so you're going to go ahead and get started I'm just gonna look at my notes here to make sure I have all the cut two missions right her um these air different designers in here and then somebody else pulls it all together and the colors it's just not one design or designing everything right right they'll cut will kind of pick and choose from different manufacturers and also in house their own exclusive studio calico designers that they used and they produce the kits and in the papers and embellishments in which each one and a lot of the women that are on the design team right now have also been producing stamps on dh stickers and things to be included in the yes sir that's fun okay, so this first page that we're going to make it sort of I have it just title welcome it can be great for photos from the hospital or photos when baby first comes home anything like that and we're going to start with our base paper is going to be that gray card stock you can pull that out we're also going to need the white car stock you can set that aside and then I'll tell you the other pattern papers as we get to them you kind of slide everything else off to the side for right now and you'll need your adhesive and since the authors and some adhesive phone for this page ok, so the first thing we're gonna do is trimmed down our wake hard stop. We're going to make like a big photo mat for a page, and the dimensions of this are nine and a half by eleven, and I just wanted to show on tremors because I've taught a lot of scrapbooking classes, and some women who have been scrapping for a long time never realized that there's an arm that swings out from underneath your paper trimmers. I meant because I never knew that andi can be helpful to cut larger pieces so that you still have the numbers across the top and it gives you a straight edge. So that's, just a little tip that I found I kind of assumed people knew that, but not everybody has ever used that part of their paper tremors, so you can set those white scraps a side that we cut and as we go through the day, just always save your scraps kind of set them aside because we will use them as we go. Okay, so hopefully everyone has their cars, their white card stock cut down to nine and a half by eleven, and then we're going to use to photos for this page one is a four by six vertical, and then one is three by four, and I'm just positioning mine along the right hand. Side of that weight card stock, and you don't have to hear your white cards talk down just yet if you don't want to, but at this point, I'm just going to eat here. My photographs and what I like to dio, especially if I'm using some busier pattern papers like I'm going to be using on this page, is to leave a little bit of a border between the photograph and the pattern paper, and that just gives, like, a visual break so that your photos don't get completely overwhelmed, because the reason really is that we want to look at these lovely pictures, right? And another thing I'll point out at this point is that you can see that we're not using any specific baby product, ok? And I should have listed that on a stumbling blocks slide because really, that feeling, like you need to have a themed product for every themed picture that you have can be a little bit overwhelming, like I have baseball picture, I need to have baseball, paper and baseball stickers and et cetera, et cetera. You don't need to scrapbook that way. I prefer actually, for me, if I just look to the colors that are in my pictures and then pull my pull my papers in my product, based on those and that's, just a I think it's a more visually pleasing played and then your baby album won't be just filled with like pink and blue and yellow and the sides the baby color so you can scrapbook a baby album without any baby product it's it's, it's all good all right, so since we have our photos on, then the next step is to cut up some of this pattern paper and we're going to make some different kind of strip what you need is a strip of this numbered paper and it's going to be two by six and a half and you want to cut it so that the numbers go long ways ok, so a two inch strip of that first and then you cut it down to six and a half okay, so once you have that one's cut, then we're going to cut this yellow fever yellow paper it has the love love, love love on the back and this one gets cut down to one by six and a half that was the same that they're a little bit of a perfectionist when it comes to things like that. Where do you stand on that on just being a perfectionist? Yeah, I struggle with that too I'm definitely like a measure, you know? I don't eyeball things you too often I like to know where I'm going with the design and kind of cut things to be the measurement that need to be but other people are really it's really more free to just cut things and play with it and pushing around your peso I think that's the beauty of scrapbooking is that you can actually take it from either way neither measure and imprecise or you can just really have, you know, completely just eyeball everything exactly the reason to embellish thank you that's right? You can only bar always coming them up, right? Okay then we need to find this paper it's called candy shop it's got the top that's yellow dots in the bottom has pink dots were actually going to just trim off the pink branding stripped? Remember that strip that I talked about on the bottom? We're going to trim that off and then cut that strip also to six and a half long they're doing ok, ok? And then that same candy's candy shop pattern paper on the flip side it's that nice blue with a really subtle kind of graph paper look to it I'm going to cut that down for the largest block on our page it's going to be six by six and a half so you can cut the six part first that'll give you a larger leftover piece six by six and a half what's that one with that one with the back that the yellow annual that's just won it two by six and a half I'm sorry two by six and a half or actually no, that one's one I'm sorry I was right the first time it's one yeah, okay, so once you have all those strips of paper cut, then weaken started hearing them down. Andi, I'm going to make mine right flush up to the left edge of my white card stock. So there's going to be like I said, a barrier there are some white in between the pattern paper and the photos, particularly that you favor you know, I just kind of tried a lot. It doesn't really matter. You find that sometimes the blue might see through the backing to think there are some that you really should avoid for me, it hasn't been a problem if I'm using, we're going to use a piece of melon a little bit in this on this layout and for that I would definitely try to use a clear case of or I like to use a stapler actually would hear that and that we don't even have to deal with the problem. I'm just a kid hearing all these pieces of pattern paper, you can kind of stacked them and you don't have to stack them in the order that I'm doing it it's just kind of how, um it's working on my page okay, and then once you have everything on the white card stock and you feel like it's in the right place, you can. But here the white card stock down to your great card stock, and I'm in hearing minds what's flush with the left edge of my car of my gray background looks great very so simple. Yeah, I have a pretty simple style. I don't like to go too overboard because like I said, I want to keep the focus on my pictures on my photographs, okay? So then we're going to take this like a seersucker fabric that's been cut into strips and we're just going to cut off. We need a peace that will kind of stretch across here, so that's going to be that six and a half inch length and then we'll need a smaller piece that's going to be tied into a knot safely cut like a six and a half inch length and then almost about the same size, another six to six and a half inch piece that we're going to tie into a quick not and I would hear this strip of fabric I found that it's easier to put the adhesive on the paper thin, trying to get it on the back of the fabric itself for some reason, it doesn't really want to stick to the fabric. Until you put it on the paper first, you can also use the stapler for that if you like have another way to hear it. Okay, so I'm just going to use that fabric to kind of cover up the the sea between the yellow pattern paper and the blue pattern paper and then I took the other about six inch length and I just tied it in a simple knot and this part I might actually just staple comprised a staple the one edge with my stapler won't reach all the way and then you see matisse of okay um at this point we're going to be pulling out some of our principles and you are able to print these out at home or you could take them and have them printed out like an office supply store and what's great is you can print as many copies as you need, so if you're doing a whole baby scrapbook he could use these multiple times and these were designed for the class by sean and you also want to say a special thank you to shawn offer designing these adorable principles and we're going to use the square are them sorry the rectangle juan it's about four by three and it has are quote from the beginning of the segment so sometimes the smallest things take up the most room in your heart so you can cut that out and that's just going to get kind of you know a little bit um not straight up and down that a little bit on a diagonal found in to this open spot in the blue pattern paper the clicking of the glue in like a crocodile in the room but it's really it's wonderful to see everybody so enthusiastic yeah right well actually that's a question that's come up in in the chat room of nicole so will actually ask you know this stage there is actual christine who is asking saying you're a busy mom you've got four kids how do you find the time to preserve these memories and create your scrapbook well that's a great it's a great question because it's not it's not easy you have to kind of carve out that time um I will say I don't watch a ton of tv but some people are more into tv I now that my youngest is off to preschool I use that time in the morning when my kids were all small instant still taking naps I would use naptime a lot to scrap book I know a lot of money feel like nap time comes and you have to use that time to the dish is done the laundry and do all the chores and I would kind of let myself do that for a little while but then kind of committed to using that time to scrap book other moms are our big night owls and like to stay up late after everybody else is in bad I've never been one to be able to stay up very late, so that didn't work for me, but you really do you have to kind of make it a priority and carve out that time I'm going to talk about it a little bit a t end of the segment just how you know, where can you find that extra time there's a place to do it? I should just say because this is true for me death scrapbook too and they are very much involved in preserving members in fact, it really felt to me, you know, my son's mother was very tired and, you know, she had exactly the same struggle to every other month and so I so I was the one who really focused on that. I know I was just trying to find us who's got three year old twins he's a stay at home dad and he's very much into the scrapbooking memories. Yes, I don't want to exclude dad mom just because they have it, but definitely dads to any parent and grand mom. Yeah, so what denise's just recently had a new group. A lot of grandmothers wants to be the kind of memory keeper for the family and like to scrap book so okay, also in your on little pile of supplies there. This did not come in the kid. That is just a piece of vellum. Vellum is kind of like the semi transparent paper that I really like to use for adding journaling to my pages because I could send it. It's just comes in like eight and a half by eleven pieces. I can send it through my printer at home and then have my printed journaling there. And so you can if you want to wait until you're at home and can take your time to write down. Um, your journaling that's fine, or you can just hear it down and then write down your journal e on it later. But I'm just going to kind of layer that halfway over my principal card. Actually put it underneath a little bit. No, not fitting. Ok like that. And then I'm going to staple it because the adhesive I brought with me is not really great for vellum. So just gonna use my whole stapler on the edge there and staple that down. Bonus back. Dole throwing he's going back. You know, I usually so I usually just kind of trickett I don't know I usually use my stapler or I would like if I didn't have my stapler here I probably would have tuck this further down underneath the ribbon and kind of put the adhesive down there. The only problem that is in the top is kind of flapping, but once you get in your page protector it's okay, so I'll try to cover it or maybe I was strategically put an embellishment right there and then underneath the embellishment add some of it is actually because they've got some beautiful things coming together here that you're actually seems like you're following what nicola is directing, but it hasn't all sort of try it on the other other kids helping is this something jessica you're saying yes exactly because I have a signed picture but that way to adopt it it's still feel sloppy because you're beautiful it looks awesome good so that your first official page I mean I screw up this way we're going back in this this is this is definitely the first official scrapbook good awesome okay, so we're going to add a few little heart embellishments because no page feels complete unless you have a few little fun things on there and to do that we're just going first hand cut the heart remember how you do this from like elementary school? Do you need a square first so just cut like I don't know two by two piece of that yellow paper it's that same yellow kind of grid design that we used before so like a two by two square and what I do is I just fold it in half and then he and kind of heart so you just really cutting a half of the heart and of course there's lots of punches out there that you can buy the craft store that would punch that for you but this is just a zizi for hearts for me ok I'm going to stick that there but I'm going to use some adhesive phone anybody else a fan of it he's a phone I love it he's a phone it just gives your page a little bit more dimension gives you the ability to pop things up off the page so I'm going to use some of that on the back of this heart stick it about there then you can take another that same strip of yellow that you just cut you can take that and just cut a smaller heart out of this blue because we just wanted to be a solid blue so anywhere on there if you can get kind of a big piece it's going to be a small heart obviously because they only have a small little piece that doesn't have love on it or you could include some of the love actually maybe I'll do that I can just folded in half and then some word he's a phone used to call these pop dots. When I first started, scrapple came. I'm just gonna put that up kind of overlapping the gray and the white a little bit. And then so we have two hearts and there's kind of a design rule that I always follow, and I'm scrap booking the rule of three. So if you're going to use an embellishment, I usually use them and multiples of three so or an odd number. So I'm gonna have I want to have three hearts there because I think it would just balance everything out. And if you look in this little I don't know what you want to call this stamp book. I guess if you look through there there's one at the top here it's orange square with a little kind of teal sticker or till heart in the middle, I'm gonna tear that out because I want the heart from it. So I have this on little stamp, the square stamp, the orange with the teal heart that I was going to cut out this heart. And this is when these fine tipped scissors, the smaller scissors, kind of become helpful when you're cutting these little tiny pieces. And then we will also use some more he's a fam on that I think that's really love it. You should be able to create some depth here, give it that three d look, particularly the fabricas well, that's, a really good accent, right? It's always nice to add some texture in some way on your page, whether it's some ribbon or fabric or the dimension of the piece of film helps andi last thing that we need cause we're missing something, anybody no title? We need a title for a page, we use these silver stickers and I'm going to spell out welcome on my page. You could name your page whatever is appropriate for your for your story and your photograph, and I'm strange cause I like to spell things backwards name scrapbooking, so we'll see if I can do this on air if I can spell it properly might be a little bit of a stretch, and again, if you're watching at home, remember that there are instructions for how to completely to these pages that are include it in the bonus materials. If we're going to quickly air, you're not able to scrapbook right now, you can always look at those directions to it's joe funder joe funk was just asking nicole, what is your average time? Do you think of page normally takes you does it depend on the details? It does depend on the detail and it depends how how well I thought out that a page beforehand I'm a slow scrap occur so it does take me sometimes a couple hours and I like to kind of work on something for a little bit and then not it here it down so I'll kind of leave it there overnight and then the next morning I'll come and say like, are you the same way? Yeah, let it just let it stay there, right? Right? And then I'll come down the next day and I'll say, ok, look together money to get here everything down so it also is a family activity mean, do you encourage your older children to help you as they got older with perhaps with your youngest child is something you really like to focus on? Yeah, they haven't well, my oldest to our boys, so they know nothing, probably not really they think, um my daughter does like to use my supplies, so I have I kind of keep a little box of things for her, their scraps or things that I'm finished with us she can play with, but yeah, I hope someday that they might enjoy adding a little bit to the scrapbook and that's a way also to do your journal and you could have a page that you ask your child to have their perspective or they're you know tell me what you thought about this trip that we took or tell me about your memory from that day and put it in their words and that'd be a really fun idea for a page remark and also takes the pressure off you of coming up with the journal in yourself if you don't like to write, may I have a question from that from our viewers saying how do you scratch a memory that doesn't have any photos? For example, my baby's first theater experience was going to see a movie recently, but I didn't save to stop or take a photo any thoughts on how you can actually preserve those types of memory? Sure, I mean you don't have to have a photo on the page you could just make it more story centered or you can use a picture from any time you know and he just I think we all have so many pictures of our children that you could use just any random photo that you really love and and tell the story behind the event instead he didn't keep the stop maybe download an image of the movie post that's true that would be a great idea yeah great idea oh the memory of that event and then that's what you scrapbook that's a great idea that's a great idea I love that ok, so my page of about ten, just how you all doing. Coming together? Yeah, okay.
Class Materials
bonus material with purchase
bonus material with enrollment
Ratings and Reviews
user 1399659125750739
This was fabulous! I enjoyed Nicole, she was easy to understand and follow. Her class had a ton of useful information and I took many notes. I look forward to any future classes she teaches.