Decorative Scrapbooker Profile
Lesson 5 from: Scrapbooking, Paper Crafts, Stamping and More!Close To My Heart, Monica Wihongi, Jill Broadbent, Karen Pedersen, Michelle Snyder, Kristina Livingstone
Decorative Scrapbooker Profile
Lesson 5 from: Scrapbooking, Paper Crafts, Stamping and More!Close To My Heart, Monica Wihongi, Jill Broadbent, Karen Pedersen, Michelle Snyder, Kristina Livingstone
Lessons
Class Introduction and Explaining Profiles
07:23 2Stamping Profile
40:59 3Card Maker Profile
11:22 4Stacy Julian: Why Stories Are Important
25:44 5Decorative Scrapbooker Profile
58:24 6Studio J Scrapbooker Profile
25:16 7Paper Crafter Profile
44:17 8Pocket Scrapbooker Profile
21:34Fundamental Scrapbooker Profile
25:46 10Close To My Heart Catalog Walkthrough
09:44 11Create Using Cricut Cartridges
04:17 12Close to My Heart Cartridges
19:48 13Using Cricut to Create a Page
43:17 14The New Consultant Kit
26:14 15Consultant Party Planning Basics
14:24 16Consultant Event Basics
38:34 17Card Making Workshop
18:46 18Home Gathering Demo
1:07:06 19Consultant Highlight with CTMH Consultants Karen, Michelle, and Kristina
14:40 20Jill Interviews the in-studio Audience
06:07 21Connecting with Community through Social Media
04:51 22Consultant Opportunities
13:58 23Close To My Heart Events
11:17 24Skype with CTMH COO Brian Holman
17:23Lesson Info
Decorative Scrapbooker Profile
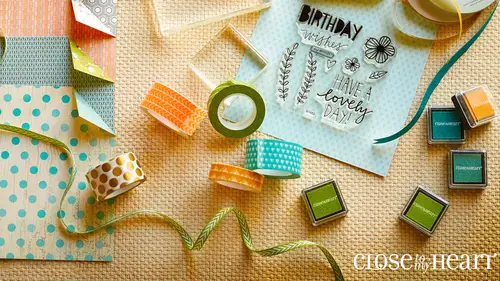
Decorative scrapbooking so you can see they're like works of art and we're going to delve into that a little bit more look at all of the beautiful embellishments and this is a scrapbook page isn't it just beautiful piece and you can see how the photos just pop off the page and by adding embellishments and sparkles and sequins and all of those beautiful things, it really helps that become a piece of art at close to my heart we have paper sweets we have background and texture paper it's twelve by twelve paper what I'm showing up on the keynote is called love ian rose and so you can see our paper is double sided and I'll show you here a little bit better under the the camera it's double sided paper we have these really beautiful like the zip strips tell you what colors are being used within this kit and then on the backside of the zip strip it has some some design elements as well that are fun to use so you can see libyan rose which we're going to be working with today and you can see tha...
t oliver paper has beautiful designs like I said, it is card stock background in texture paper and we do include card stock in these packs we also have so this one has the pomegranate card stock because it's complimentary but the really nice thing about this one in particular open, we got some white daisy as well. Is that you can really bring in? Are pulling any other color and you'll see how it just pops up. So there's two of each design in one of our paper packs. We also have what we call compliments. But what? There are accessories. So for instance, here's, our sangria paper pad. I've got it right here again. It tells you what colors are being used within this paper and you can see the double sided designs. Zip strip at the top twelve by twelve once you cut off the zip strip. Isn't it just beautiful? Oh, I love this paper and has a really beautiful, subtle patterns within it. And also some really fun pops of color. You can see all of that as part of our sweet. We do include that you can purchase here like stickers that go with this kid. So these are called compliments, and this one are the sangria compliments. So you can see all of the design elements to really help your scrapbooking and take it up a notch by adding something as simple. These winds are done on kraft paper, but we also have some done with foil and let's see clear resin we'll go back up to the kino, yes. You can see little badge buttons that one's with love ian rose here are some other embellishments that go with libyan rose we have the gold sequence and the gold foil ribbon all just coordinating beautifully and taking your scrapbooking up another level all right, here's another sample of the page that you can see how it all fits together. Not only do you have the paper suite, but we really work hard because close to my heart has forty colors that coordinate you can use paper from other packets and really combined those together. All right, so that looked like something really exciting. Yes. So for the folks at home mom who aren't familiar with close to my heart can you talk about where people can actually order the oh, yes, of course. Well, we have a website close to my heart dot com where you can find a consultant near you. So we have we sell through independent consultant. We are a direct sells home based business and you can have workshops for yourself what you and your friends kind of what britain is doing doing crops in that type of thing and so go too close to my heart dot com to find a consultant near you and you can purchase any of our beautiful, wonderful products that will be showing all of today and tomorrow as well. All right, so let's look at our layouts that we're going to be making over here, I've got this layout for my class here you can see the decorative scott it's a very it's got some really subtle color in it, but it's also just really pops I'm gonna show underneath the document camera here are this camera all right? So here I can I'm going to show you how to do these wonderful coloring, sponging techniques. All throughout here. This page has a lot of dimension. We do have this phone tape here that we use again, a product that we carry to help things rise up off the page just to give it a little more dimension and little more interest. All right, so you should all have your packets in front of you and for our viewers at home, this would be a really fun time, too. If you've got a sponge, bring out your sponge and some meeks and just learn how to use the technique that we're about to dio. And so this layout here's page one and it does have stamped mean, jill taught us the basics of stamping, and we're going to take it now onto a twelve by twelve scrapbook page, we have these beautiful shapes that you see right here. All of these have been cut with one of our cricket cartridges, which are very, very popular for scrap booking and we're going to be talking a lot more in depth about cricket and I'm just a little bit so all of these little bounding boxes and all of that comes from the cricket cartridge the sentiments are stamps, so we'll be stamping on of course using our beautiful thanks to give this page some pop this little background here is the late libyan rose so you can see how it just really subtle and yet beautiful piece of art let me show you the second page and we're going to be doing coloring these square so you want to pull out your sponge, your scissors, your microchip scissors, which I absolutely love and then we're also going to need let's see pull out your flowers were going to do all of the flowers sponging and the stamps that's better at your stations. All right, so the first thing I'm going to show you is how to do that sponging technique so let's sponge one of the squares here, we've got this little three by three square and we're going to take our sponge and we're going to cut it into seven pieces ok? So that's a really cool thing this is a great way to use the sponge andi lots of different like not just as around sponge you're going to cut it up so I'm going to cut it first in half because I don't want to mix my colors and essentially you're going to need seven pieces because we have seven colors that we're using yeah, I've got seven pieces right there, so we're going to be using seven different inks and I'm going to show you this beautiful, soft, sponging technique it really is so simple and yet it makes your art just look like something that you, you know, took a long time to color and paint, but with close to my heart sinks and sponging technique, we're gonna make it really, really simple. All right? So the first color that we're going to need if you want to pull those out as well is let's do the sorbet. So we have our survey here and one of the tricks to doing this technique is you're going to pinch that little wedge so that it just has this little side there and you're going to do it in a circular motion and I'm using my all purpose matt as my pal it really it's going to be my palette? So I'm going to actually start by thinking my sponge and then putting that ink onto my palate, which is my all purpose math and then coming into because what I want to do is I want to highlight the edges of this paper and yet keep the center soft and make it look like there's less ain't here so it really gives it that dimension and depth into the piece all right? So we're going to circle inc right and now we're going to use our all purpose matt and you see how it's just coming up into the edges and by catching it down on the sides of my edges it gives it that sponged effect but also the dimension if you want to do it lighter then do more on your all purpose matt to get some of that ink off and really lightly circle in and then just work your way to the center and the more that you do the size and the edges you see how it goes light it goes from dark to light and just gives it but radiant look so and just you could turn your paper around and hold your papers that you have more control is not fun and it's so cool doesn't look so beautiful so I did mind a little bit darker this time around the edges just to show you a little more of the effect so if you wanted to go lighter like it is on the layout just you can you know flip it over again I've already have ink on here and if I want to do it lighter then I don't spend as much time on my edges all right, doing to go ahead and finish up that piece. Hey, now, let's, take the flax and ink and do another one same technique. Now you're getting a new sponge a clean sponge because we've put in already on that one. So we're taking the flak, sonny and it's the exact same technique again, the lighter I want it, the more I'm gonna work the ink off on the all purpose, matt and gently touched the sides as I do that circular motion coming in, but I'm doing it a little bit darker so that you can pick it up better through the camera and see it so my edges look like they've been distressed because they catch on the sponge. Do you like that, it's simple, isn't it? But it gives it a really beautiful, muted look. All right, I'll let you work on that, and I'm going to just talk through a couple of other of the features with that, let me show you. So here we've done some masking like guilt I talked about earlier in the earlier segment, we have we're using quite a few stamps sets with this layout and that's what makes it decorative is because they're bringing in so many other mediums into this page to really showcase my photos. This is my oldest daughter arianna, who is living in hawaii now I know lucky girl she's going to university down in hawaii and so these are her senior photos and I really wanted to just tell the story through photos because their photos are amazing of you know she's become a young woman now and and she's moving on and so she special and I love her so there's where my sentiments come into play and you can see that we're doing that technique with the flowers and the leaves but there's a couple of things if you'll notice here I'm using two different color so again we're doing that hombre effect but we're doing it with the sponges all right, so why don't we go ahead and pull its pull flower in you've got several flowers inside again all cut with our cricket cartridges let's do we have four different sizes? I believe yes so let's do this one the one it's c we'll do large medium small, extra small, small, extra small so let's do the medium power. All right, so we're going to take the flaxen inc and the sorbet and we've got our sponge is right that we've already used the one with the sorbet will think that again same technique circle and now we're just going to go probably like up to where the the pedals before you get to the center and these ones are going to be a little trickier because they're smaller, so you really want to make sure that you're holding your piece? So do you see how that's come up on the survey with the survey? Now, I'm going to take my flaxen and finish off my flower on this side, and so about how I'm blending these two colors together, make sure you get the center as well, and again, if you want it lighter to a little more often, all purpose, matt, see how simple that is, and I can come back with my other one just to give it a little more blending into it. Do you love that so much, hombre sponging bond technique there so that's beautiful. So you're going to have these beautiful shade do this size, and then you'll do the large flower and you're doing exactly the same thing, and what I love about doing this technique to is how it picks up and really shades all of the edges, the sponge catches there and just makes it a natural shading, all right? So we'll keep doing that with their flowers, so it looks, doesn't it look like so super, super fancy and hard to dio and look how simple it is once you come together, all right, so we've done that, and we're going to be doing something really, really fun it's the hombre with this circle piece so when you're done with your flower you're gonna pull this peace through I'll show you this this is the finish so you can see how it does the light the light juniper and it could just kind of goes darker, darker, darker so again using the same technique, everything throughout all of this page is done with that exit exact same technique so let's do that love you. We have our white circle days, that white card stock right here and I'm taking my juniper inc taking a new sponge because I haven't used the sink yet thinking that and I really want this to be lighter, so I'm going to try to get there there we go and you start off going dark and it will just naturally continue to go light as long as you don't think it are pushed down hard so it's starting that different hombre effect here but not going to do some more a couple of more passes down on the bottom to really make it stand out hey wow, look at that so fast and easy to dio so then I would put that and you can see the difference between the lar indict light and dark, so I want you to be a little darker so I'll go ahead and go and do another shade and that's what you could do you just keep layering and layering tio get the depth of color that you'd like so another fun way to use our in ok let's keep going and you have that cricket piece cut out so just keep playing with it and seeing what you want if you want you to be a little darker there we go now I'm starting to get the effects that I'm looking for so lighter on the top here a medium color and now a more richard darker, vibrant color at the bottom so that's the hombre and then you would use your adhesive and just it here this piece on top of this piece and that's you're finished piece okay, I'll put that right there, all right? I want to show you I know we have more spending to do, but I just want to get you going on a couple of things. Well, I don't know, maybe we should just let them keep sponging before I move on. Do you have any questions out there while we keep sponging away? Let me well, one question that had come through on and I'm not sure if you've already talked about this can you use this? Bunge dauber is to get the same effect? Yes, that you can, but it has a finer sponge surface so it looks a little more fine this is a little more porous so you have it's just a different look but yes you can certainly do the sponge dauber as well I find this a little more cost effective to to d'oh and what is the stuff the sponge dauber for people who aren't I don't actually have one here but it's a little round circular has like a plastic case and then the top is just a white sponge and you you can flip it onto your fingers so you have a little more control with your finger that way but I like working with the round sponge but yes you can certainly do this technique with a sponge topper as well so just a shout out we have sonya who is saying love this love this love this it's five a m in adelaide south australia on I'm having my own scrapbooking party yeah love well let me tell you I'm so happy that you brought up adelaide so thank you to our ozzy's but we just announced that we're having our australian convention and adelaide next october so we are super super excited our conventions are amazing fun they are like seriously it's like better than any family reunion I don't even I don't even have explain it but just incredible it's a lot of training aa lot of recognition we unveil and introduce new products we teach our consultants about south techniques and we do of course a lot of crafting of course of course so we had another question that came in how do we easily find colors that will blend well with the hombre effect well close to my heart any of close to my heart's colors we'll work so as long as you're using our inks I can guarantee you this effect will work and so like I said, we have forty colors to offer I've got seven that I'm using right now for this layout and it works beautifully uneasily all right, so we're still sponging so you've got these two you've got these two and then we're leaving some of the flowers white we've got one flaxen a small flaxen as well and this one so and the other thing too that depending on how much thank you use and this I'm very effect with the spending it will as it dries it will go lighter so you may think oh no I've done too much and like joe pointed out our papers double sided so look aiken I can do it again so let me do a little bit more I want to do that one a little lighter all right? So I've got to for my left page and two for my right page and then this little one we're going to do the same technique what the couple of the leave pieces leaves leaves branches those cute little branches and I am using the juniper on to weaken, do one small when large and then we're going to use the pair on a small and a large so again, I've got my juniper sponge I'll bring in my juniper ink and you don't have to push hard you just really just kind of go with it. These ones like I said, are a little tricky, but what's so cool about these is look at how the tips get just naturally dark, and I love the shading I really dio and then you can just kind of sponge those looking how simple that was, and we're going to do a small one, okay, I hope our viewers at home are loving this tech. Me, one person says, this is so cool, I feel like I'm in the room even though I'm actually watching from brisbane, australia. So thank you for teaching these check meeks another question is, is there a way to order the map that you're using? Yes, we also sell, of course, everything I'm showing everything I'm showing lee a cell through our close to my heart consultants are independent consultants and you know so many people you sign up for so many different reasons to be a consultant, we have a beautiful kit will be talking about that later as well on how to sign up and how to be a consultant, but it's such amazing camaraderie community building while also making beautiful things that means something that are meaningful and it's a way for us to connect as people connect with their families connect with people who do things you know you just want to make somebody's day a little brighter, sending them a card or something like that and so it I I feel like it's super special because it has such a positive message and we're also preserving our memories and telling our stories all right, so you should have something like this going on at your your station so we've done that technique pretty pretty well, right? So I'm going to show you I'm going to go ahead and jump ahead for our viewers mainly and I'm gonna move this off to the side and I'm going to bring in one of my base pages because I want to show you how I use the sponging technique on my base pages low so just taught you how to dio are stamping the way that we traditionally do it now this is just a little different technique again using a sponge so I'm going to use my whisper inc put that right in here and my archival blank black ink I'm gonna grab my two sponges here I've got one for my whisper and one for my my are called archival black and here I've got this image it's um I don't want to call this like a quattro boil yes quattro boyle lost my words for a minute I know hard to believe it does happen so here I'm doing the same technique but this time I'm putting it on my sponge are on my stamp image why am I doing this you say that monica jill taught us that we can just stamp direct I'm like well you can but this helps me to pinpoint exactly what I want on to my background so it looks a little more distressed so then I'm going tio stamp that right over here and I have my verse a mat underneath so I've got so if you don't have a versa matt make sure you use your insert phone from your stance sat okay so I'm gonna do it right towards the center a little bit off of my page and it just gives me a really nice to see that light effect but it's given me and it's not it doesn't show all of the ink across because I only targeted certain spots so do you only show you that again one more time all right so we're using the contra foil from our stamp set we've got many let's see which one did it come from? Well it's not out right now but and review all right are in review stamp set and we're putting our contra foil on our block and then thinking my whisper inc and I'm just tapping down random areas of this design but I want to show up on my base page so we have another one up here in the corner and again stamp off the page but because you that really like like a second generation but arrested look so it's not intentional looking it just looks really beautiful and vintage I feel like it's like a vintage look all right and then we're going to stamp after you do that make sure yes you season your stamps actually we have some on the other page so let's do it on this page take my quattro boil stamp ink randomly so it's giving it like a distressed second generation look and we're going to do one this on this side going vertical that's exactly what I'm looking for and if that's not what you want you want it a little darker a little more distressed looking then just lift your page over it's about do you get do overs will close to her heart it's so cool all right so here we have this side and our stamps are made in our corporate office we call them my acrylic stamps um it is on adhere to it acrylic block the stamps themselves are made from a palmer it's a special formula so no one has stamps like us we really stand by the quality of our stamps we have a just in time manufacturing made right in pleasant grove utah and so we have so much control over design and quality of our stamps and so we're very very proud of our stamps and just absolutely love love this foundational product so when I got another one that crossing over here all right so that gave me the look that I was looking for just a little light settle distressed look all right now I'm going to show you second generation stamping we're using ink blot flare here's the stamp set and this is cool because it gives you that splattered look like the splattered effect without having tio really be messy so here I've got that design already loaded onto my block I'm going to seize on that and I'm going to use my archival black and this time I probably do need a little death you know what I'll just use a piece paper it's all good we're going to improvise I don't have a desperate here but that's all right because I'm going to use the scratch with the paper so we're going to do second generation see so remember first there now I want some ex platters down in this area right here to fill that to connect it all again I'm gonna stamp it off of the page and that gives me a little bit more of it now you can do direct to make it a little darker let's see we'll do the side over here you can see the difference between that and that and now just for fun just for kicks I'm going to dio second generation over here so that gives me that really fun textured look down this way I want to do a third generation I stopped some ink on there so do you see how it kind of just comes together? You could just really make it whatever you want but I've done first generation second generation sponging on my my stamp there's just lots of technique with this page so this is my right page and I will put this up for you all to see their now let's bring in our other page and finish that up so we're just doing the base right now again I'm thinking with archival inc the black and I'm going to do first generation hold on a second here we go I'm gonna do first generation and then second generation over here there that's it so simple we have hundreds of designs and our stamps and we love our stamps they're so versatile and fun and easy to use all right? So those are our two bases. All right? We're going to do some more sponging after we finished with their bases on this page does use a very large supply list but let me tell you it's so so so worth it all right? Jill do want to talk to sounds I have a few more decorative layouts just for fun to show you some more techniques and just to really get your ideas flowing for things you khun dio to jazz up your pages this one is an adorable simple grid pattern, but the thing that really makes a decorative here is that I've used the cricket to cut these background, so this is layered this one's being t this one tnt and when maybe anti speak background texture paper now you know a new term if you're not familiar with our papers we call those printed papers background, texture, paper so but these squares here I've cut with the cricket and layered card stocks together, so there's dimension with all of that the's banners are an adorable stamps that I use the staff it all the time because it is so versatile use it on birthday party invitations and all kinds of different things because these banners are just adorable and you get that perfect pattern every time because those air stamped and then just easy to cut out. But can you see that we've sown all around? The page added, are journaling and strips that's a really fun way to make your journaling become part like a fine elements of your page? And then again it's just all layered together so that you can really you're also using the foam taped pop things? Of course of course yes because we do love to mention in our decorative scrapbooking it really does give it some depth than some interest local interest if they really are work of art talk about working artist one my absolute favorite piece oh my gosh it is including incredible you see all that detail okay, so this is a labor of love but totally worth it because visually it's amazing and and I love that we took some inspiration from some aboriginal art because we've been doing a lot of business in australia lately and we wanted to show how you can find inspiration through things that you see in a magazine or in an art gallery or just all around you and that was the inspiration for this page which is I think I think they nailed it so fun but yeah again just you can cut letters out of the cricket to do we have fonts on all of our cricket cartridges which lets your journaling or your titles become a real focal point and have some right nice variety to it and again just mixing that stamp and embellishments you just that list goes on and on a possibilities now this one I love how perfect is this speaks to what stacy was teaching us about telling your story how many of you have so many works of art from your children that you can't bear throwing away but you also don't want boxes and boxes of boxes of every little drawing. Let me tell you, this is a life saver. What the studio audience may not know are the audience may not know is that I actually have seven children. Yes, I'm a little crazy, but it's so fun, and we have seven kids and this is amazing. This is an amazing way to keep all of that artwork because you can imagine all the papers that come from in backpacks at my house. And so what a wonderful way it is, tio preserve those beautiful art pieces that your kids bring home it's true, so I love to do is just take their art. You can put it on a scanner bed and scan it in, save it as a j peg. Or you can simply take a picture with your phone of the art and then it becomes a photo that you can manipulate the size. Shrink it down, make it a small item. But look how many of these works of art get to fit on this adorable layout that they'll look out more often than they would their box of artwork that they made, and so pull those important pieces those special masterpieces that's what we call him at our house, I have a daughter. My oldest daughter is an artist that's what she says, I want to be an artist, she says she wants to take over my job when I retire. So per favorite thing, though, is to constantly be drying and coloring. And so we got to the point where we're having so many papers. So we've put together a binder, a close on her album with empty sheet protectors in it. It just stays on the shelf full ready to go. When she brings something home from school, we say that's beautiful, is it a masterpiece? And then she decides if it's a masterpiece or not, and if it is, she goes and drops that piece of our right into the sheet protector. So it's, always great to have the piles and then assemble a book later, you just have an album ready, and if it's special, they put it in their book, and that keeps that manageable. But for all those other fun things, this is a great way to preserve it. And so, again, all the embellishments that make decorative just part of the process of creating art that you, khun, treasure and love, and sometimes my favorite thing about decorative, to be honest, is I look at a page and I say, I remember those photos, but then I also go I remember the day I made the layout, so I almost get, like, double memory for a scrapbook page because I look at that and go. I remember the day and I was working on this and I had this project and you know, these are the papers I used. I can remember the close to my heart, brandon. What year we came out with that paper so it's, really fun that you're scrap of pages also become an additional memory for you as the artist who created them saying it's a total experience, well, let's, go to the keynote really quick and show some of our beautiful art that art studios created back in our home office. So jill mentioned briefly some of the cricket overlays. This one is showing a cricket overly as the background of this page, and you can see that beautiful white crisscross little butterfly pattern behind it is done using our cricket cartridge and again mixing our background and texture papers with our card stock that all courtney, I think that's. Something that really sets close to my heart apart is that we take all the color guesswork. Out of it so that you will well I'm not artistic I don't know how to do this I would like to do that that looks beautiful well we call that scrap lifting and scrap lifting is a ok at close to my heart we want you to scrap lift we want to give you all of the supply list of everything that we show you so that you can recreate this you don't have to be a creative genius or even a designer because we have designers that designed these pages for you so that's the one that I was just showing up here you can see the beauty of that and so it really does all come together beautifully at close to my heart all right so we're going to start putting our pages together all the way and I think we're just doing the left payout that'd be great let's showem how the left one comes together and then the audience can take those the right side home and assemble that one all right so we have these pace pieces again this is from our love ian rose bmt background texture paper let me show you what the whole page looks like and just by I mean really for those people who love paper say that five times please fast people who love paper you can see the pattern here and so a little paper goes a long way at close to my heart when are it doesn't have to, but it can, so we're just using some little parts of this beautiful love ian rose background and texture paper. All right, so we sponge all of these pieces. Now you'll notice that we pass part of our cricket cartridge collection. We can get all of these wonderful little small piece is cut out perfectly that nest inside of each other, and so I'm going to show you here, I'm gonna put this one down. Hold that help you? Yes, please. Thank you, jill. Hold on, please hold. Well, I try to get this page off of here now. There we go. All right, so we're going to take this piece here. So you've got what you can't really see or tell is that they're layered because the cartridge cuts them out both the negative and the positive parts of these. And we've built the cartridges this way. And again, we're going to talk about it a little bit more later in the day. But you can see that there's different parts, so you can see that there's white edges, but then there's also these colored and sponge edges and that's all done through layering. So here is, for instance, this piece, and then you have this piece that goes on top and by doing some of the using the phone tape we actually have mounted it up onto our page so it gives it that dimension as well. So you're using the same technique again and then do you have that little piece yet? So really all we're doing so for this piece that's, what makes you special piece? You need these three pieces right here way move those off and we're going to use the sorbet inc or maybe it's this movie? I don't think we've used movie yet and we're doing our sponging technique and I'm there you can see coming in there another thing I love about when you have these cricket shapes like this she's using the center of that tag but then on the next project you could use the reverse, so when you have an image that cuts out, you can use the background as a mask to do something else or you can simply use the negative space for something to give you a whole another look all righty so that's how it then comes together so then I would stamp this my sentiment that's what makes you special and we're doing a lot of the stamps that we're using in the sentiments are done be a masking so jill taught you had a mask with a post it note and I'm going to teach you how to mask by just not by wiping a little bit off of the stamps it so you've got to have a pretty steady hand and be really careful but it's possible to do it that way so I need the yet thank you jill it's nice having an assistant mastery any time any time already so here we have this one all right I'm gonna do the jill technique yeah get a technique named after me sure, I know e I don't think I can claim that but well the jill technique for today there we go. All right, so the sentiment says um that's what makes you special that's what makes you special that's right so and I'm on lee oh actually we're not doing that okay? So we're going to do the whole sentiment, huh? Just getting this one's easy, okay oh, I know what it is we're taking off the dots all right? Do you have my little so you can use a baby? Why make sure that it doesn't have, like chemicals or like al over or anything like that so or you could just use a little tissue or if you don't care about getting ink on your hands I'll just use my finger and I have I have done that plenty of times to all right so we're not using the ellipsis I believe that's how you say it and it's clear and it's a very small piece but you can line it up perfectly because our blocks are clear so you can see no ellipsis right? So I've taken it off by using a little bit of my finger like I said, I have just a little wet tissue right here and I just wiped that off you can also wipe off the period at the end of special if you'd like and that's where your message comes from on that one all righty so you want to show him the little sure do we have that one out here it isthe okay, so we have this cute little heart here on this stamp sat and then where's the you right next to it I'll use a small one so this is cool we could do it this way so we've got our cute little heart and now we're going to use oh, I didn't sponge that piece though let's punch that piece for still might only it's this right here yeah, I've got this center so this is my center again. This is how we're building this one they're the three pieces. This is the piece that goes inside of the circle and we're going to use the flaxen in we're doing that we did have a question that came in from cassandra bennett, who says monica and gio what is your favorite workshop kit? Which child is your favorites like? How do you do that weii polish to do like based off catalog I don't know there's always one that you just go I just I love this I love this so much and so, um it's hard to really specify really is like picking your kids is yeah yeah um honestly I think for this annual catalog I really dio love love ian rose because there's so much versatility you khun bring in any color although we have a specific color palette with that one well, really the only color pulls in with that one she of the floral rose paper which is beautiful, but if you don't want that pink and red color than you can make those black and white papers work with anything, I think I'm going to choose a sneak peak that's coming out you cheater because it's out there enough that you can see it we have a new paper pat called charlotte that's being released we actually have some artwork we did it with their audience is going to make it today so it is sneak peek but also really exciting and for customers it's available on january first coming up and you'll start seeing lots of artwork from consultants and from our home office with the charlotte paper that is to die for its grays and peaches it's I think I love it so much because it's soft and subtle and beautiful that you can use it with so many projects but it's perfect for home to core because it ties in the colors tie and so nicely with everything for almost anything so way after lunch that's great I was a fun question all right, so now we're using the sentiment sending you so I've stamped my heart, which was a single image right? And now I'm going to just be thinking up the you part with my archival black and I'm going to try to carefully just ink the you part another way I do that sometimes is by bending the stamps since they're so flexible I'll bend it up and around the block so that it's not even in the way to touch the ink so if it's a longer image or it's tight that way you can just kind of put it towards the night sending around uh you uh very well, so yeah are weak and I can show you how jill just described it we can put it on the block here, let me put that so that you can see it and because it's sticky you can see I've cut that off, so if you don't have a steady hand necessarily hope high guy here, I'll just flip it so that you can see so two ways of doing that outside of just masking it the traditional way no question is just a crazy thing I do lets her I actually cut the stamps the first time I did going todo doesn't hurt anything it was crazy the pieces and say I have a feeling way naomi ideo but I do it because then I could get double duty out of my stamps especially like it it's the thought bubble I want is for something else yeah, and like that one says sending you aiken stack it I could make it said you you khun do it using our microchips sisters, they're just the best because they're so sharp and anyway, you get right in there. So now that we've already stamped our sentiments on this page, we're ready to start building so you have these pieces that I've already been cut and sponge, so you're going to start layering up all right? So just using your adhesive and we have several foreign so that he said that close to my heart you can start putting down your squares and you can see the first thing is if you haven't already done this, putting the white daisy card stock that's been trimmed down for you on to your twelve by twelve black pace base page so you can put that down and we've already done the stamping that's on these these different sides of the page and now we're going to start layering, so you're going to use adhesive on this branch right here this cute little leaf damage right there and on these smaller, intricate ones, especially with cricket, I like to use our glue pen close to my heart has a glue pin that uses for smaller spaces and it really is ideal for this, but of course you're adhesive your scrapbook a case of works well too you have to be careful to not show through that you're putting adhesive on spots that won't show through the page. All right? We're going to put that one down first, then you're going to do this one that's been cut with the levee in paper, the sense actually a smaller one. You'll put that one down and then we have these funds centers which they didn't need any sponging we didn't want those two stand out, so they've just been cut by the cricket cartridge and then just layer underneath the flowers themselves. Are we're using our phone tape again? We sell this phone tape a swell to give you that dimension you want to make sure that you have in your kid hopefully dio the little black center of this flower so that you can see the black come through and if you don't that's all right, we'll just make sure that you have that that you're not showing too much adhesive through that and then again it's all about the layering so very simple, very easy to put together all right? Do we have anybody on skype by champions d'oh I think we have melissa lavrenti who's joining us from virginia so like monica said, we have consultants all across the country today and in other parts other countries even we're joining us to celebrate the fun of crafting and to really show you what it's like to be a consultant you her name's fancy melissa way working great they're working away of the play out awesome it's a little bit pixelated for us on this end just keep talking you know they were having fun freeze um like techniques with plunging were loving it good who all do you have there with you today? Looks like what are you eating that's the important thing we'd like to know way we found thrilled we're on the top pop course it's grilled corn on the cob popcorn that sounds delicious. Okay, so we we were asked melissa what our favorite background are paper favorite paper pack is what's yours you know what? I really love the zoe paper so he is awesome yeah it's really, really fun and colorful so what do you got crafting away are you doing the sponging technique? Oh yeah we well, I think we're working on assembling now go I'm great I love it it's gorgeous so many different techniques and dimensions and layering really fun. Isn't the un hombre effect really fun and different? It's way full of very impressed. Thank you. So are you guys all have you been working all along this morning? We have way decided it was america out of spread. Yeah. There's time. As long as you're having fun, that's, all that matters. But it's, such a great group that consulted in us first year grip of us probably get together at least every other months from together. So that's, just like he said, the fun community of it is it's all about the community too, isn't it? We just it's just wonderful. We are so happy to be with all of you and to have our studio are our students here scrapping away. And so we hope you tune back and thank you so much. We are really loving, sharing everything that's close to my heart. Well, can we ask some questions? Sure. Okay. So questions it that come in in that last time it can you explain again what archival black ink is? And how it's different from regular blacking. And then similarly, people were asking about how do you clean the archival black ink off the stand? What we do have we do have our stamp scrubber and are cleaner on the archival black ink is a water based ink so it is but it is a permanent ink as well and so it just is a little more vibrant I don't know if you know a little bit more about the think of it more like a sharpie right not going to come off it's not going to smear where are others are water based and so we do have a black ink that is water based you're archival black is a lot more of the permanent stay so it will stain your down your stamps but but we say that makes them well loved and the more you know the more you use them the better the quality of the stamp images as well and so we feel like you know buy it showing a little bit of that ink than it will it's fine it doesn't do anything to the image itself their cable is also really good to use with water colors like we talked about earlier water coloring are using shen hand markers we also just have a regular black ink that's really good when you're not doing a lot of coloring because sometimes that equal come into your coloring and kind of give it a little bit of a gray hugh and so they are kind of it just helps us to have a little more permanency in the image we also sell another brand of ink that's really wonderful tio do watercolor and shin han and we just started selling that won the memento ink pad so they've got some different options and by using our shin han alcohol markers with the's inx, it really does come together. I'm just just nicely another thing I like to recommend even when you're using archival because it's the saturation is so good you want to heat set that or let it dry for a longer period of time, but lots of times I'll just stamp with archival and use my boston my handy and bossing tool that melts carpet and all he said that stamp image so that it dries quickly and is more permanent that way. So that's another really good way to make sure that that color doesn't bleed all right, so on this page I used it like I said first generation just direct paper and you can see how the color just stands out a little bit more so when you really want that true black that really pop of black I would use the archival inc but um but it really is a great inc well, we have another question from the folks at home how do you do the sewing on your projects? Do you use a large sewing machine like jill and the berlin says I have never been successful sewing with a machine on paper I only use my machine for paper so my mom again be so sad to hear that because she gave it to me and she it was the seamstress of all seems just made my wedding dress every prom dress but I can not so fabric together, but I just send it straight through paper my paper straight through sometimes it's nice to use a stronger thicker needle in your sewing machine because you are kind of cutting and breaking through paper that's a tighter fiber, but I've never had a problem just using my regular sewing machine going tricky thing is if you're trying to go around the edges and there's one right there that one of those yeah, I mean, if your sewing machine arm is tight here to come over, then I kind of have toe per vet in to make sure it goes through. I just kind of roll it up and guided around, but yeah, I've never had a problem using my regular sewing machine just might want a specific needle that's for your paper, so I knew you'd happy and actually a question had come up earlier about the circles on this particular piece and how those were cut yeah, all from the cricket everything all these past any size circle of the nice thing about a cricket is you can set your dial test to take the same shape and go up and down a scale to make it any size that you need it to be. So all these pieces, everything that's been layered on the page has been cut from our cricket cartridge. Yes, definitely the flowers, all of it and leader in the class were going too. Yes. See a lot way cricket, cricket, cricket. Lower because we love. We love our cricket. We really do. We love our cartridges and close to my heart has unique cartridges. Just just tow us that hold seven hundred images. So lots to talk about when it comes to cricket. Wow. Right. Ok, we have another question. Do you ever think the edges of your paper pieces by sponging directly onto the paper? There's a few different ways. You can we call that distressing? And so you can you want to continue? We do a direct to paper technique, which is basically what she's doing right there, rubbing they had directly onto the paper and that's going to give you a stronger, darker color and a little more of a jagged edge. And depending on the angle, which you hold that you can really are single this way, you can see you can see how she's getting a lot more think that way. So that's going to give you a more distressed you can use the sponges to sponge the edges and that will give you that softer look similar to what we've done here you can go direct you know we were focusing on doing a light effect but yes you can definitely there's different methods of doing sponging and distressing you can distress in any color and just add it just makes that little piece pop off your page a little more so do you have any any tips for things getting a little bit messi in terms of us with I'll clean and I were and I think when you're stamping to work as much as possible one color at a time because so often if you've got multiples you can't tell exactly what color that is and I've done that many times of accidentally stamping into the wrong color so I try to even if I'm working in multiples like this layout I would put them to the side and just pull in what I need so that I don't just reach up and hit the wrong ink pad on time project but yeah I like to make a huge mess and then just enjoying it so you want to just get in the process getting your groove and enjoy all of especially if you're going in the flow but if you're following a pattern we have designed like I told you earlier, we've designed actual workshops that show you different pages. So something like this we would say these are all the things you need, these air, all the stamps. You need these air, all the tools you need. So you have everything ready to go on at the ready. So we do give you that guidance as well. All right. Do we have any questions here in the studio? I know everyone is busy. Busy, but feel free to let us know. Full pages. Yes. Can you tell us what studio j again is? And then we're going toe go into the paper. Crafter profile studio j is our digital offerings. So we do digital scrapbooking as well. I get that question a lot, especially from the guys. Have you ever thought of doing digital? Well, yes. And it's called studio jay. And you can find it studio j dot com or of course, that close to my heart dot com and just going to talk through studio j after the break and really show you what studio j is all about. We actually have a studio j expert here in the audience. One of our consultants, amy ulin, is sitting in the front row here and she's going to give you her. Her testimonial heartache on studio j and why she loves it so much and so if you're someone like me who has a full time job, a really busy family, always on the go and I don't have time to pull out all the supplies really, this is my real problem and it's true, I'm like the old woman who lived in the shoe, I have so many children, I don't know what to do and so I don't have a scrap booking room because I there well with kids, you know? And so I don't have a space and so for me, someone like me studio jace perfect because all my photos are out there on my computer and I just drag and drop and they are just is beautiful once they're printed out and put inside of an album and I'll say I'm the opposite I have three children, which feels like a team that just right, but I also use studio j all the time, even though this is what I do is the decorative side of things I'm going to show you why it doesn't matter if you want to go completely digital or if you want to really use it in your decorative scrapbooking or any of your other paper crafting projects, how studio j is still really applicable for you, so we're going to talk about all of that oh, and he's, like, I can't wait to talk about it. I have no children, and I still love studio j. So it really is for everyone about the headcount. No, it is not too heavy. The quality of the problem. The other thing I love about studio j is that you can just dio photo printing with it as well. So if you're not going to do a twelve by twelve scrapbook page, or you need a specific size, will show you how you can do that.
Ratings and Reviews
user-50b2e2
I have been stamping, making cards, for 10+ years but only found out about ctmh last year. I love, love, love your clear stamps. They are great to use and easy to store. These classes inspire me and get me all excited again about making cards. I just recently got a circuit, so much to learn. I've got to get me a ctmh cartridge!!!
DebbieTuggleFL
This video series will provide all viewers with a fantastic overview of not just the wonderful products Close To My Heart has to offer but the creative environment they foster. Whether you want to craft personally or would like to see if this could grow as a business, watch this series and receive tons of information. Thanks CTMH and Creative Live!
Aya
I'm in love really with art ,craft ,colours, everything related to papers stamping writing party preparation, celebration wedding everything over and over things that course will be definitely increase my ability to innovate more and more ... thanks a lot for that free course with massive information love my heart to close to my heart
Student Work
Related Classes
Paper Craft Ideas