Class Introduction: Ten Tips Before Starting
Lesson 1 from: Retouching for Exterior Architectural PhotographyMike Kelley
Class Introduction: Ten Tips Before Starting
Lesson 1 from: Retouching for Exterior Architectural PhotographyMike Kelley
Lesson Info
1. Class Introduction: Ten Tips Before Starting
Lessons
Lesson Info
Class Introduction: Ten Tips Before Starting
This is post production for exterior architectural photography, which is similar, but different, to photographing interiors. Some of the same concepts apply, and I tried to show you images of how it works for exteriors versus interiors, so let's get rolling on this one. And like I said, we're gonna start off with quality post production does not start at the computer. There are so many things that you can fix on location that will make your life in post much, much easier. As you know, there are some things we can fix in post, but there's many things that are better dealt with on location, and in this class in particular, I wanna show you the difference between interiors, where we're doing a lot of furniture staging and that sort of thing, versus exteriors where it's a lot more of a waiting game, finding the right light, finding the right angle, etc. Just like with interiors, it's very important that we are meticulous with our work on location to get the best final result in post produc...
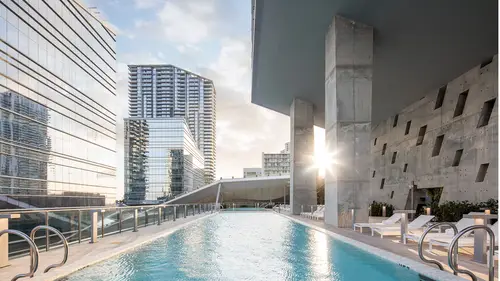
tion, and these are some of my favorite tips I have acquired over the years to ensure a consistently high quality result. Number one, even more so for exteriors than interiors, is that's important to work with the light. You don't wanna fight the light, you wanna work with it. Now, unlike a studio, when we're photographing an exterior or even like an interior, where we have some control over the light, 99.9% of the time when we're shooting outside we don't have any control over the light, right? How many times have you gone to do an exterior shoot and it's raining or the light is completely flat or you're there at the wrong time of day. The world is our studio, and we have to time everything to get the perfect light. And some of that comes down to luck. I like to plan ahead using different apps to find the best light. I feel like I'm a better photographer now because of the technological world we live in than it would have been 15 years ago, when we had to just kind of know exactly where the light was gonna be and when. So what is flattering light and how do you find it? Well, the question is kind of like asking how long is a piece of string? What looks good? Well, there's different things that we can see that will help determine if light is good beyond just saying, oh, that's pretty, it looks good. Well, why is it pretty? Well, good light is generally soft, angular. It's not coming from behind the camera or it's not harshly backlit. There's good backlight and there's bad backlight. I think a really high contrast backlight generally doesn't work, but a nice soft backlight can be really great. Light from the side can carve out some dimension, which can look really great as well. Soft light, kind of like when you're shooting a model in a studio, soft light tends to work really well for architecture, as long as there's some direction to it and you're not flattening everything out. Bad light is usually directly overhead. We tend to lose dimension, we have really deep shadows. It can be okay in some cases, but in general I try to avoid it because it can be very difficult to work with on location and in post. Also, I really hate standing out burning in the afternoon sun. I'm from New England and I'm as pale as they come. I don't like being outside in overhead light, so I generally tend to avoid it. It does take years of practice to kind of know what good light is, to be able differentiate it. So be patient when you're learning. Don't give yourself a hard time, I would say. Look at Renaissance paintings and that sort of thing. They are masters of good light and seeing soft, angular ethereal backlight. That is where I get a lot of my inspiration from, is looking at paintings, because they are masters of light, even more so than photographers. So here are two apps that I use regularly to find the good light. This is Sun Surveyor. It's actually an augmented reality app, which means you can hold your camera up and you will see the path of the sun all the way through sunset and sunrise and will show you exactly where the sun will be at a certain time. It's like black magic sorcery. I don't know how they do it, but I'm very grateful for it. And also you can change the time of day or the time of year or anywhere on Earth you can pretend, sorry, you can be anywhere on Earth and you can get a perfect visual of where the sunlight will be, which is great when you're setting up these morning shots at four or five in the morning. You wanna make sure that you get the right angle. You can set it up ahead of time. You know the sun's gonna be right there. You get this great golden light coming through that open aperture. This is LightTrac, which is good for all of its own reasons. LightTrac gives me a Google Maps overview of the scene, and this is really cool when I'm working in streets with downtown areas with those big street canyons and stuff. I wanna see where the light's gonna come. It shows me the shadow angle. I can store all different kinds of locations. It's good for getting a quick overview if I'm not in the location and I don't need this augmented reality thing, I'm just with a client maybe 1,000 miles away and on the phone I can play on my app and be like, oh yeah, the light's gonna be good at four in the afternoon and I can sound like a genius, even though I've never been there. So that's one really, really an Owen Wilson voice. (audience laughter) Wow. (audience laughter) So LightTrac and Sun Surveyor. And here's a little example I put together. I left the camera in the same spot for 12 hours straight a couple years ago at a shoot I was doing in Hawaii to kind of help understand how the light changes. This is right after sunrise, first thing in the morning. You can see this is a very soft light. There's good shadow, there's pretty good dimension, but it's not very striking. But, like I said, it can be okay to have nice, soft light, like a nice, softly lit portrait. Or you might be one for a bit harder light. You can see this is about three hours later. No, maybe an hour later, so maybe this is like, I don't know, say 6:30, 7:00 in the morning? And then at nine or 10 in the morning you do get this hard light which kind of chisels out the dimensions of the architecture, if you will. You can really start to see some three dimensionality come in. But if you prefer one or the other, I don't know, you know? This is maybe mid-morning, 11 or noon or so. Maybe not even, because we still have quite a bit of angle to the light here. But which one is better, I don't think this is necessarily worse, but I think it's definitely different and the architecture changes. You can see the color changes, the intensity of the light changes, you go from soft to less soft to harsh, and it's getting more sort of, it looks more three-dimensional with this light. But again, in the afternoon we have these storms rolling through. I would consider this kind of bland light, like, yes, it's soft, but there's no direction to it. Whereas before our early morning light sort of had this nice orange-ish color to it, which I really like, this soft sort of glow. That noon overcast light just felt really bland and flat and almost like monotone to me, so I'm not too big on that. If I have to shoot in it, I'll try to make it work, but it's not my favorite. This is sort of afternoon light. This I would kind of consider crappy light. While the sun is out, the only real dimension that we have here is in this opening and on the pool deck here. We're losing some three-dimensionality of the structure itself. It doesn't really pop out as much as it did previously, like with this shot. It's like, bam. But this one, it's kinda flat even though it's sunshiny. It's not the best light in my opinion. And this is pre-sunset, this is kind of the inverse of the morning shot. This is, I would say, not quite ready. You can see some of the light starting to turn on as that exposure outside sort of darkens the interior relative to the exterior, gets a little bit brighter. But I don't think it's quite ready. It's not ready to come out of the oven yet, as I say. This is that full-on twilight, and you know, I think this is super interesting. You have lights, the interior light, you have this blue exterior light which gives great dimension. Again, you have orange. You got this cool sort of like cinematic play of orange and blue. Those colors on the color wheel there are opposite to one another, so you get this really striking image. And again, they all show the architecture in different ways. But you can see the variety of which... The variety of... The variety of... How should I say this? You just get to see how much the building can change over the course of a day when you leave the camera in the same spot. And it will help you, you know, it helps me know what times of day are the best. Like I said, I love this blue twilight. This doesn't really do anything for me. This doesn't, either. But neither does this, but those morning hours and those dusk hours are definitely my favorite. So try to plan around that. Use this as a tool for planning your own shoots. Here's another example. This is in San Francisco. This is our scouting shot. This is bright daytime. I don't think this is very cool. It's a pretty picture, but it looks like a Xerox. It doesn't look like it's a photograph of architecture. It's a picture of a building, you know. I didn't do anything to make it special. But we came back at the crack of dawn at 5:30 in the morning to get sunrise over the San Francisco Bay and you have the bridge all lit up and the whole thing just comes alive. You get this really cool streak of light across the buildings and you get the glow inside and the colors start to come out and you get these amazing clouds. It looks a lot more interesting to me than the original shot. And also, it kinda tames the buildings around it and focuses our eye on the subject. So it's all coming down to putting the camera in the right place at the right time, which is super important with exterior photography. Number two. Just like with interiors, we gotta slow down. Use a tripod. Get out there, make sure that you line everything up. Like I said, we wanna represent reality while adding a little bit of artistic interpretation. We don't wanna be boring. We don't wanna take a Xerox of the building. We want to get artistic with composition and light, maybe show the architect something he hasn't seen before. They have all their renderings and their favorite angles, but part of our job is to really assess the building and come at it with a fresh set of eyes and show them something that they haven't seen before. Some rules with exteriors just like interiors. Your vertical lines have to be vertical. If you're creating one of those one-point perspective shots like a perspective drawing, your vertical lines gotta be vertical, your horizontals gotta be horizontal. You don't wanna make the building look like it's falling over, right? We don't want unhappy architects. It does take some time to get everything lined up. Again, use a bubble level and a geared head to slow yourself down to avoid that ball head sort of jerk motion and get the camera in the right spot, take an extra five minutes, get there, make everything perfect. Again, here's the camera sort of perched on the ledge. You can see I've got my geared head really working hard to keep everything level. Kind of a tricky spot compositionally, but again, it maybe took me five minutes to find this, get everything set, dialed in, you have a beautiful image here of the same building from the previous shot, but from a different angle, different kind of sunlight. We were at the right time, right place, vertical lines nice and vertical. Here's an example of what not to do. This is a snapshot from our scouting, and you can see it looks like the buildings are falling over. It's kinda like they're just falling backwards. The architect clearly did not build them like this. They don't look structurally sound or safe in any way. I would never want to live up there, 'cause it's only a matter of time before they fall over. But here, they look structurally sound, they were designed with nice straight lines. They look safe and well-built and the architect would be very happy that we kept his proportion in line straight as he designed the building. So again, slow down, get your vertical lines straight, use a geared head, make sure everything's nice and lined up. This will save you time in post production and it will save you pixels in post production. If I had to stretch this out, I think this is 24 millimeters, I'm going to lose some pixels on the edge, 'cause I pull these, I can do it, but I'm gonna lose the edges of the building. But if I use a nice tilt-shift lens, get everything lined up perfectly, I won't have to do that. I will keep as many pixels on target as possible and most importantly, our client will stay happy. Number three: get there early. Especially for exteriors. Interiors you can get away with a little bit better because most of the time our interiors aren't super dependent on the light. We can cheat a little bit. We can add light, we can use flash. With exteriors you can't do that. You have to be there on time. I don't think I've ever made a good picture by being late, and no amount of post production can save a picture if you're too late. Another reason I like to get there early is shooting over a set time period, say an extra hour or so, can reveal lighting conditions that you didn't really know existed. Especially if there's clouds moving through the scene. You can get those streaks of light which look really, really cool. You're there early, you get set up, you leave the camera there for an extra 20, 30, 40, an hour minutes, or however long, and you can show some really cool stuff. This also gives you the option for blending photos in post. For example, windows from a later time when it's dark outside, you can get a perfect view of the interior with an exterior from earlier. It will also allow you extra time for setting up the camera and the tripod. When I'm out on location, I've got everything in a roller bag. I've got the tripod. I break it down after every shot, and it's a good 10-minute process to get everything set up and online again because I'm using a little Wi-Fi router so I can see my photos. I've got the laptop, I've got a tether. That extra breathing time is great. It stops me from rushing, lets me evaluate what's going on, etc. So being there early is critical. It saves you from yourself sometimes. Here's an example of a photo. This is the photo I thought I wanted, right? I wanted a twilight of this building. I wanted all the lights turned on, but to me, this isn't my favorite photo. This was there maybe 30 minutes before sunset. The sun is right down here on the horizon. It just lit up this amazing glass building. You've got these amazing reflections. You've got these really cool clouds. I think that is way cooler than this. This looks a little bit dark and brooding. The shot that I wanted didn't turn out to be the shot that was my favorite, and that's because I was there early, probably an hour before sunset, all set up and just left the camera there, shooting over and over. And I think this ended up being one of the hero shots for the company that hired me, and it wasn't even a shot that I had intended, because what I didn't realize was that they had these black sort of tints on the windows and it didn't really reflect the sunset behind me very well. And not too many people were home, so the lights didn't turn on and the building wasn't totally finished. That ended up being the shot that worked out very, very well, all because I was there a bit early. Here's another example. Here is the shot at the proper time, but if I had waited another 15 minutes, you can see we lose all that directional light on the building and the interior becomes very blown out. You can go pretty far to make this better, but you'll never be able to totally fix it. So I, again, advocate getting there early. This is a much simpler photo to make. It was pretty much just one exposure. There's more light on the structure. Because of that, my exposure is a bit faster. It keeps the interior from blowing out, like in this photo. I lost pretty much all detail in the living room and the upstairs windows here. Again, because I was there early rather than rushing around and being there late. Number four: keep your wits about you. Great Rudyard Kipling poem if you don't know about it. But never forget that light changes very quickly, and while you might think you have the shot, it might end up being because for some reason there's clouds flickering in and out, you might have to change really quickly. So even though I say take your time and get there early, these are all just ways to set yourself up for the highest likelihood of getting a really great shot. Some of my favorite exterior images existed only for a blink in time and they weren't the picture that I had actually planned for. And despite your best preparation, the real world is always different. Like the Mike Tyson quote: "Everybody has a plan 'til they get punched in the face." And that happens on every shoot. There's always something that goes wrong. There's always some level of improvisation that happens. So even though I'm outside, I like to keep all my stuff together, kind of keep it concise and ready to go so that I have to move quickly for another shot that's developing, I can. This is one reason I advocate for DLSRs over medium format. People out there are gonna be like (gasps) How could he say that? Medium format is the end-all be-all. But if you're shooting on a tech camera connected to a computer and you're totally locked into getting one shot and the light changes, to set that up, change lenses, re-tether everything, the light's gonna be gone, it's super slow, and a little less resolution and a little less dynamic range is better than missing the shot entirely because you have this crazy set up that takes forever to set up and break down. All the megapixels and dynamic range in the world don't matter if you miss the shot because you were fiddling with getting the color right and getting Capture One going and all that. So just make sure. Maybe you are shooting medium format, but have a DSLR with you so that you can move really quickly to get the shot, because I'd way rather risk messing up a $3,000 camera than knocking over a Phase One setup because I was moving really fast to catch the light. So just kind of be aware that you should have maybe two camera systems if you're that kinda guy. Or be prepared to move really quickly with another backup system. This is the actual shot that you guys use for marketing this course, which is kinda cool. I didn't really plan for that, but this is one of my favorite pictures of all time, and this shot existed for maybe five seconds in real life. That's all I had. This is what it looked like most of the time. You have this overcast light. It's Miami, so you have the huge cumulonimbus clouds, the thunderheads that are moving through in the afternoon. I was like, "Please. "Please just happen." 'Cause I had 10 seconds of the light at sunset transiting through there with the clouds breaking, and we just stood there. We were there early and the light makes this picture, right? This is kinda dull. It's okay, but it's flat, it's dull. As soon as that sun comes in, it's like (mimics choir) (audience laughter) The client was psyched. It was, at one point, the hero shot for the project. You guys ended up using it without even being told about that. It's just an amazing picture, all because I was ready to go and I used my app and set myself up. I was like, "I think the sun's gonna come through here, "so if we can get everything aligned, it'll be great." It was a little gamble, it paid off. I was there early, ready to go, it happened, boom. Number five: mark your territory. When I'm outside, I like to use cones or some kind of caution tape or something to let people know that I'm shooting, go away. People tend to take you a lot more seriously when there's a little bit of... Officialness to your shoot. Maybe it's a caution vest or cones or tape or something. Because pedestrians in public places tend to not be thinking. People just walk around like this. I've had someone literally just walk right into my tripod. I'm like, "Oh, there goes the shot "because I've been sitting here for an hour "and you just kicked it." They don't care. They're like, "Oh, sorry," and they keep going. I'm like, "Oh, my god." So make sure that if you're in a heavily trafficked public place you have cones or caution tape or something to keep people from walking into your stuff. Because someone walking into your tripod could totally ruin your shot, especially if you're doing some kind of lit composite photo. Not to mention, you don't want to have to use your insurance policy if someone trips over your tripod. Because you never know. In this world today, let's do our best to avoid any possible litigation. (laughs) Cones are easy enough to remove in post, and they're well worth putting out. I try to bring some with me if I'm traveling. I'm not gonna deal with checking cones, but I'll try to e-mail ahead to the client. If we're gonna be shooting on a sidewalk somewhere, it would be good to have. Even though it's like little stupid soccer cones that are this tall, just to give yourself some breathing room. Here's a shot at Los Angeles International Airport that I was doing. You can see I actually put the cones right in front of me because I didn't want someone parking their car there and taking 20 minutes to unload their bags. And you can see, this guy actually, if you zoom in he's rolling his eyes at me. He's like, what are you doing? I'm like, I know you hate me. You're in traffic, keep going. But it kept people, I in Photoshop took them out very easily. It kept people from parking right here, which I think is a critical part of the photo. I don't want someone's minivan or wheelchair van standing here for 20 minutes while I'm trying to get a shot at a time of day that lasts for five minutes. So I was very easily able to Photoshop those out, kept this clear, and I think got a great shot. I think it would be far worse if a bus or something pulled up right there. Believe me, it's LA. Tons of people told me off one way or another. "You can't be blocking traffic like this!" Well, the airport, kinda working with them here. It's gonna be okay, we've got the shot. (audience laughter) Number six. Know when to stop. With editing, with shooting, everything like that, just like interiors, sometimes the natural light is all we need especially if we've planned properly. I like to let the natural light do the heavy lifting if possible. And again, using those apps to find the best spot to be is really gonna make your life much easier. Sometimes we do have to add light to the exterior, but I like to keep it subtle and I like to let the photo be about the architecture, not about how good I am at compositing photos together. If you're working for an architect, it's not about you, it's about the architecture. It's about capturing the architecture, putting little artistic twist on it. Sometimes we do have to add a little kiss of light to fill in some shadows or add some drama, but it's really not about going nuts and showing off how good we are with Photoshop. But on the other hand, as anyone who does this for a living knows, sometimes we are hired to shoot something that's less than perfect and we have to add light like crazy. Like a lot of hotel rooms. People don't really know this, but the better the architecture is, the less work it is to shoot it because they design the light really well. The dynamic range is very well controlled. But with some commercial jobs, hotels especially, you know that they can be total caves. When you're shooting small interior rooms, we gotta light the crap out of it to make it look really good, right? So there's a whole spectrum of how much light to add. With great architecture, very minimal. With dark, more difficult interiors. You might have to pull out all the stops, use all the light in your bag. Here's an example of where I thought I totally went overboard and in post production noticed it and dialed back a bit. I was like, "There's no landscape lighting. "I might wanna bring out some of the textures "on this building." Beautiful, beautiful house. So I lit it up, but in the end, I didn't need any of it. The natural light was pretty much all that I needed. I feel like if I had left these lights on, I would have flattened out the building. I love this light that pulls you right through the center of the frame. With these flash-lit areas, I feel like the whole scene is flattened out. I lose a lot of the drama and I lose the motion implied by the brightest part of the frame, sort of pulling me right through that front door. So this is one case where I added light but didn't end up needing it. I let the architecture speak for itself, and I think the photo's much better for it. Number seven: block the light. When you're shooting exteriors, there's a lot of stray street lights, car lights, stuff like that that could enter the camera and add flare or some sort of stray light which is gonna be very difficult in post production to edit out. So flare from overhead lighting, from street lights. It'll kill contrast, it can be a total nightmare to fix it in post, and if you can block the light at the source with Cinefoil, I will go to extreme lengths to do that. Or you can use a flag on your camera. But if the light's in the frame, you might have to get up there and take care of it yourself. They make really cool hot shoe flags with an arm that comes out and then you can block the light over the lens to stop the flare. Here's one such example of a building in Los Angeles with a bunch of LED street lights all around me, and you can see this flare coming in. It goes all the way across the frame. I don't know if you guys can see it, but it kinda goes all the way down. And if I block it, all I'm doing is, I think I had a little hot shoe arm over the camera like this. Blocks the light and stops me from having to do post production to remove all those green little things. And those are surprisingly difficult to take out in post. I hate doing it. Always best if we can avoid that. Here's another example. This is a theater in St. Louis that I shot. I actually had the client go get us a ladder so I could climb up these street poles and wrap Cinefoil around them with the sodium vapor street lights, and they were crazy, crazy bright. So here it is turned on, and it's still leaking through the Cinefoil. And this is totally wrapped in black, but you can see that it's starting to come through. And I toned it down and for the final picture here, it looks like there should be some light there, but I don't want it overwhelming the frame. And this is what it looked like without any Cinefoil. You can see this crazy sort of lens flare that comes in that lined both streets. I apologize, this isn't the same angle, but it gets the point across. I don't wanna deal with this in post production. These all look way too hot. I'm so glad that we got up there. I mean, we looked ridiculous, but we wrapped it with Cinefoil. The whole idea is that you can use it and it will get very hot without burning so you can wrap a light in it and block the light. Number eight. Capture life. With exteriors, especially in more urban areas, it to me looks a little strange when people have these completely sterile photos of architecture with no people. People add scale, they add softness, they add livability, believability. If you're in Manhattan and you're shooting whatever building, there's no place in Manhattan where you're not gonna see any people. So let them breathe life into the photo. Let them become relatable. Let them add scale. Let them add humanity. Pedestrians, cyclists, cars, stuff like that. Life can really add a lot to a picture. A correctly placed person can make a picture amazing and take it from pretty good to incredible if you do it right. I will often, again, leave the camera in the same place for 20 to 30 minutes, especially if I'm there early and have the time to do so. I'll just capture everything that's going on around the scene, whether it's people pushing strollers, people riding bikes, different cars, taxis, all that kinda stuff. And then I'll take the most interesting bits of that and composite it together. It's sort of like expanding the decisive moment. I would say most of my street level exteriors or exteriors where you can see some of the street and life are these temporally expanded composite images rather than just being 100th of a second and done. It's actually more like a 20-minute span where I captured all sorts of different goings on in the city, and then created my own reality out of it. This creates a photo that contains well-placed, yet still real people. I can pick and choose who I wanna go where, like if someone's wearing this crazy, over-the-top outfit, I won't use them, but maybe someone walks through the frame and I capture this really cute moment of maybe like a kid chasing a soccer ball or someone on a bike in the bike lane, and it adds this nice humanity. I can, again, carve all these little interesting things out and make the best scene possible. If you want to show motion in your photos and blur outside, about 1/15th of a second is good for capturing people walking with a blur. Cars in daylight, maybe 1/30th, 1/40th of a second. The problem you run into is if you don't have an ND filter, you might have to be at like F and still might be a little overexposed. So it's tougher during the day. And about 1/200th of a second will freeze distant action with a wide-angle lens. If you're shooting soccer at 1/200th, you're never getting anything sharp, but when we're wide-angle and someone's pretty far away, like at the other side of the building, you get a nice sharp shot of them. Depending on what you want, if you want that blurry action, sort of moody, ethereal feel with the blur, use a slower shutter speed, but if you want a quick, daylight sort of shot, use a quick one. Pretty frequently people will have the blurry cyclist or something in the frame. Use your judgment there. Here's an example of that. This is a museum that I photographed in Los Angeles. Camera was in the same spot for 20 minutes, and I just captured all these different sort of people over the span of, what? 20, 30 minutes? It's not just random people. There's a guy on a skateboard. That's a total LA thing. Architects love people on bikes for some reason. You know what I'm talking about? In every render, there's like a guy on a bike. We have the business people over here who look pretty serious. We got a great mix of people. Sort of told the story of the life of this, it was a college campus. Told the story of this college campus in this shot. And there's about the final picture, where I removed someone just for balance. But again, none of these people existed at the same time or place. It's all over a 20-minute period, and I strategically put the cyclist there to block the golf carts for the maintenance people. So yeah, temporally expanded photos, big thing that I do all the time to create the reality that I want. Number nine: keep an eye on the sky. A sky will make or break a photo. A clear blue sky sometimes works, but I like a little drama. I like clouds. I say bad weather makes good photos, as long as it's not pouring rain. I love moody clouds. I love twilights with big pink expansive skies. People always... The comments on the Internet I get are kind of hilarious. They're like, "This is fake," "You're not documenting reality." To an extent, sure, but it's not like I'm altering the building. I just want a little more mood, so I will all the time keep an eye on what's going on when I'm shooting outside around me, and I will drag in other skies from the same spot or different spot, depending, to get the most interesting photo. Sometimes the interesting clouds, your subject might be here, but like over here you have your sunset and this amazing cloud formation. I'll just be like, click, and then drop it in in Photoshop. Every shoot that I do, I'm always keeping an eye out, might run over to the window, take a shot out the window, and composite it in if I'm doing an interior for exteriors, again, same thing. Just keep an eye, keep an eye out. You never know when you have the chance to add in some more interest into an image. Like I said, the sky can take a good image to an amazing image. Rule of thumb: it's a lot easier at twilight. It's harder in the daytime, as you have to match the angle of the light and the intensity of the light. But at twilight pretty much anywhere in the world you can get away with an easy sky replacement. But daylight, you gotta pay attention to the way the light is hitting the clouds, especially if it's a sunny day. This will avoid these really ugly gray flat skies, and adds a bit of drama. You can do it, once you've practiced it, without too much headache. So here's a shoot I did in Montana a few weeks ago. This was the straight out of the camera shot looking forward to the subject, but behind us there was this amazing cloud formation going on. And I think this is okay. It's a little boring. I would like to add some more drama to it, so I literally, like I said, just turned around, took a few shots of the sky, and dropped it in for the final image. I think it makes it a much better picture. Much more drama, much more interest. And the leading lines of the sky kind of bring the subject, form this natural vignette. And I don't consider that an extreme form of cheating. I would say I was in the same place at the same time, and yes, that sky was there and now I'm putting it in the picture. Take it or leave it. Number 10. I would say a tripod is your sharpest lens. If there is one area where you don't cheap out on your equipment, make sure that you get the best tripod that you can get and the best geared head that you can get, because handholding, like I said, if you're doing these temporally expanded composite images, you cannot handhold for that. No matter how much you practice, you're gonna have a little bit of movement. It's gonna be impossible to composite things together. When you're on a tripod you can simply erase and add people. The better your tripod, the more easier life is gonna be. The tripod forces you to slow down, back to point number one. I could take my own advice, 'cause I'm talking like a million miles a minute. But slow down, it will allow you to composite your images together. You can compare multiple images in the same spot if you're shooting tethered. You can see how the light is subtly changing across the building, rather than just looking through the tiny little viewfinder and comparing different shots with different angles. Really helps to compare different aspects of the scene, whether it is people walking through, people walking their dogs. You can say this works, that doesn't work, let's see. And when you're outside, being able to shoot tethered really kind of focuses you and it stops you from squinting when the sun's overhead. Pretty invaluable. You can obviously bracket exposures. It's very difficult to bracket exposures handheld. And lastly, it allows you to use a tilt-shift lens so you can basically put your camera on the tripod, set it up, and then use a tilt-shift lens to change your field of view while keeping the same perspective, which is very difficult to do handheld 'cause it's all manual focused, all manual movements. And again, getting that correct use of the tilt-shift to frame up your subject is very important in architectural photography. And you mostly need a tripod to do that. So in short, a tripod is absolutely essential to creating great photos and essential to all of the post production techniques that I'm going to talk about. So here's my tripod in action and all the cool places it gets to go. Tops of buildings, hotel rooms and such, but every shot always on a tripod. It would be very, very rare, exceedingly rare, that I'm handholding. In what stage of your pre-production are you finding and getting access to these opposite rooftops? Yeah, so (clears throat) When I'm shooting exteriors, especially in a city, access is really critical. If we have to get there a couple days before the shoot just to arrange access with other building managers, we have to beg, borrow, steal, sneak, whatever it takes to get the camera in the right spot, I try to go the legitimate way and get the paperwork done. Sometimes people just don't wanna help, so you have to improvise. I snuck onto plenty of rooftops. The heart has pounded. I've done plenty of insurance paperwork. But generally, yes, there's especially in cities always some angle that we need to get access to somehow and sometimes our architect or the building manager or the developer has relationships with other buildings in the area. And it helps to say hey, you guys are gonna need marketing photos at some point from our building. If you let us look now, we'll make sure it's not a problem in the future. That helps a lot. But yeah, being polite, asking. A little bribe money can help too, especially when you're (laughs) when you're talking to security guards. And if they help you out, Starbucks gift cards. You don't literally have to palm them a 20, but make sure you take care of people who help you out. Sometimes we have to just pay to have a security guard on that location with us, and there's a fee for that occasionally. So if we need to pay someone overtime to come up at six in the morning, we'll work it out with them ahead of them. But there's always something, and all these exteriors in the city, like I said, generally have some kind of access arranged ahead of time. Do you have a particular like go-to lens that you're using? Yes. Or could you tell us about that? Yeah, I would say 95% of my photos are using the Canon 24 millimeter tilt-shift or the Canon 17 millimeter tilt-shift. And I would say all my assistants know as soon as we get the camera set up, let's put the 24 on it and we'll go from there. In addition, I have a 1.4 teleconverter, which you can use with the tilt-shifts. Canon doesn't officially endorse it for some reason, but you can turn the 17 into about a 22, and the 24 into a 35 millimeter tilt-shift by adding the teleconverter, so with those two lenses and a teleconverter, covers nearly everything that I'm shooting. We got one from online. Sure. Don asked about model releases for anybody that ends up like a commercial shoot. And then what other sorta releases do you need? If you are shooting with a client, I will ask them to get property releases if they think it's necessary. If model releases in public places, I've never bothered with, I tend to... Blur faces as well. If you're in a publicly accessible place, I don't want say I'm a law expert here, but as far as I know, if you are out in public, you don't have an expectation of privacy, and you're not being portrayed in an unflattering way, there's really no chance of anything happening. But again, if you are using talent models who are very visible to the camera, who are being used to sell something, then of course you want to get all the proper releases, but when I'm on a street level and there's a biker going by at 40 miles an hour and he's blurred, I'm not gonna worry about it. And like I said, I think for anything to even happen, you have to proof that only was this being used to demean or otherwise defame the person, you're pretty safe with architectural photography. And I think most architectural photographers I've talked to work the same way. But common sense prevails. If someone's doing something ridiculous, don't use them. Or if someone asks. It happens occasionally, when people are walking past me and they're like, "Am I in your photo?" And I'm like, "Nope," and they're like, "I don't wanna be in your photo." I'm like, "Okay, I'm not gonna take your picture." By all means, just use common sense and you should be fine.
Ratings and Reviews
user 4a6ee8
I think this is a good course to gain a better understanding of how to shoot on-location more efficiently, while learning a few tips and tricks in post-processing to make your image shine. I would have liked to see the edits of the photos be more of a portfolio hero shot rather than a photo in a series of photographs that are delivered to a client. I found that my best learning tool from this course came from how to properly replace a sky without doing damage to the original photograph.
Christian A
A quick course that flows well. Not overly indepth but provides some good tips and some things to think about and be aware of. Good class for anybody who is looking to improve or brush up on their architecture photography. The purists will likely hate it but for the digital artist this will be useful.
Roy Bisschops
It's a nice and clear course, with good explanations from Mike. But at the same time it's aimed at photographers starting in the field of architectural photography. I expected a tutorial with some more challenging situations, but instead it contains two photos dealing with masking out unwanted objects and replacing a sky. So if you're starting out, go ahead and buy the course. If you've got experience with photoshop masks and replacing a sky, don't bother.
Student Work
Related Classes
Architectural & Real Estate Photography