Essential Retouching Techniques
Lesson 1 from: Retouching & Adobe Photoshop TechniquesLindsay Adler
Essential Retouching Techniques
Lesson 1 from: Retouching & Adobe Photoshop TechniquesLindsay Adler
Lessons
Day 1
1Essential Retouching Techniques
55:08 2Intro Q&A
25:31 3Portrait Retouching
1:10:38 4Body Shaping: Liquify
25:37 5Beauty Retouching
1:04:41 6Shoot: Portrait, Beauty, and Avant Garde
41:29Day 2
Workflow and Lightroom
24:15 8Beauty Image Retouch Review
40:08 9Portrait Recap and Frequency Separation
15:40 10Frequency Separation Q&A
25:21 11Blend Modes
11:32 12Creative Techniques: Color
14:40 13Miscellaneous Creative Techniques
08:13 14Faux HDR Look
12:53 15Avant Garde Retouch
23:25 16Displacement Maps
35:10 17Audience Image Retouching
17:14 18Special Shoot: Halloween
24:59Day 3
19Compositing Basics
45:55 20Compositing Examples
26:01 21Creative Skin Effects
21:12 22Additional Creative Techniques
22:21 23Retouching Dark Skin and Q&A
17:13 24Common Problems
29:12 25Perfect Mask Plug-in
13:37 26Audience Image Retouching
18:46 27Sharpener Pro and Color Efex Plug-ins
30:41 28Cinemagraphs
37:32Lesson Info
Essential Retouching Techniques
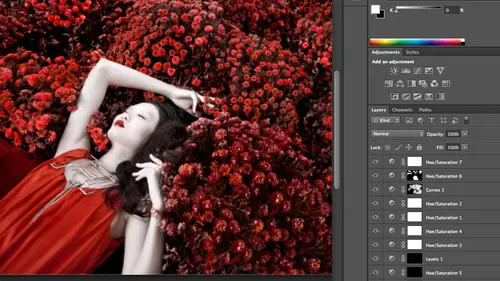
For me, retouching and photoshopped it's never been fixed it later kind of thing. So for example, I take a picture and there's a piece of garbage that I didn't want to move, you know, I don't treat photoshopped in that way. How I see photo shop is either a wei to help perfect my client's, help them look and feel their best or it's a completely different realm of creativity altogether, and some people think photo shops cheating. But, you know, for example, just depending on how you pose somebody and how you interact with them completely changes the way their body looks. And so there's a lot of little tweaks and things you could do to help them along the way as well in photo shop. So part of what I'll be doing let's talk about the very first day, my very first day here on creative live, I'm going to be talking more about retouching traditionally what you think of so I'm going to cover getting rid of blemishes and reshaping the body and as in tricks and, you know, adding eyelashes imposed...
and all of these different things that I do in my portrait photography and also my beauty photography, so it's more of the core of what you guys think of retouching. I know that there are a million ways to do everything that's how photoshopped works so I actually will be showing you how to do some skin retouching in a two or three probably three solid different ways trust me, I know that there are more, but I'll tell you which ones work for me so day one is mostly just solid retouching we're going to do at the end of today it's gonna be really fun we're going to wrap up by doing a shoot because what I thought would be interesting is to kind of show you how I can take a shoot start to finish, I'll shoot a portrait and also a beauty image and then I'll be working with them tomorrow now, obviously today we kind of going slower going through every technique, so tomorrow will be a nice quick summary I'm using those images of example, okay then tomorrow after that we go into creative retouching techniques and that creativity for me it's a really big part of what I do is a photographer, so sometimes I approach a chute knowing what I'm going to do in photo shop, maybe an example behind me here in this photograph I had a theme and the theme of the shoot was red and I wanted to have her reclining in a bed of flowers, but the flowers were brown and yellow and green and I didn't have a budget so I couldn't buy eight hundred dollars worth of roses to have her land and so I knew that I could do it in post so sometimes it's just practicality sometimes it's saving money and then sometimes it's just making the impossible possible and so that's how I'm going to be teaching and day too, so I'll be showing how to make photos look old selective coloration I'll be showing just a lot of really creative techniques but what? I want everybody out there to know if you don't know anything about retouching I've got you covered whoever if you've been doing it's a really long time I have you covered is well certain times I'll say I'll let you know okay guys, we're going to go a little advanced here, so for those of you that are beginners, don't worry um you could always especially if you buy the course, come back and watch it again in the future when you feel more confident but for example day too I'll be covering displacement maps, not a beginner's tip how to rap patterns around the face and that's how you might add fake tattoos you could also make it look like somebody's blended into the background more advanced, but it'll be something so there's something for everybody so that's day two um and then we're going to be doing tomorrow is halloween for those of you that are re watching, so we're doing a little bit of a halloween celebration at the end on day three is all about the idea of saving time. I'll be doing a lot of practical things so okay shooting in your studio and the it's a small studio and you can see the background, you can see the floor how do you photoshopped that to smooth it out? Or how did you smooth out the background? I'll be talking about techniques they use for specific types of individuals on dh then I'll be talking about plug ins because I don't feel that I should tell everybody, ok, we'll get this plug and it makes your life easier not everybody has the funds, however, for me as a professional if it saves me time it's saving me money and so that's how the wrapping things up so we'll be doing everything from retouching, too creative effects to time saving and practical techniques and it's for everything from beginner to advance, so hold tight, I'll let you guys know what applies so with that since I wanted to give everybody a layout of kind of what's going to go on, I thought I would just jump in and this is anything okay, cool uh this class is not for people that want to be professional retouch er's and here's why I say this professional retouch is when they get a photo they don't take pretty much any of the shortcuts that we as photographers would take the zoom in and at one hundred percent and clone every blemish at one hundred percent capacity and they do every I mean it's so time intensive this is a class for photographers who want to know how to retouch so something that maybe professional retouch it would take four hours on you know we know that it's not as necessary and what one of the first things that you need to dio when you approach retouching is knowing the end use of your photograph what's it for andi I'm just being very practical in if you see me teach before I'm very much about practicality and getting to the point so for example, if you just have an image that it's not going anywhere it's not going online you just you have a client coming in you wanted them to quickly view a photo I'm trying to sell it you know you want to give them an idea of where this image might go maybe only want to spend five minutes on it something just quick get rid of a few blemishes, make them look a little skinny or something like that um they help sell your image right um ok then the next most photos I for example spend between fifty fifteen and forty minutes on honestly that zosia what? I spend a lot of photos if somebody doesn't have a lot of work they need to have done get it done in fifteen minutes if it's a little bit more intensive it might be forty let's level one is five minutes level two fifteen to forty and then level three for me is sometimes I have a photo for example a photo plus this last week blown up to six feet tall by four foot wide a giant close up of someone's face I spent a lot more in forty minutes on it because I knew the viewing distance was right in front of me and you could see every pixel and every pore sir, you need to know okay, what is this going to be used for us? We're just going to be on the web something they quickly see or is it going to be an image that they blow off large in the wall? It does make a difference now professional retouch it would obviously do pretty much everything the same and really end up so you have to look at it look at it that way another consideration for this end uses all right, so what is this is this portrait? Is it beauty or is it kind of fashion creative for portrait for example when I do porch of somebody I flat out ask you know that scar you have do you want me to keep it? How about that mole for example I have a mole on my neck I would absolutely remove it I could care less it's not a part of my defining feature other people if you remove it they're offended you know you're changing me or your you know you're getting rid of the scar that I, uh that is part of who I am so I always ask and so that's something with the portrait um it's the same thing you might want to make somebody look a little skinny here you know the camera puts on ten pounds right? Take off the ten pounds whatever he needs to dio but for a beauty image I'll change whatever I want if it's meant to be for a beauty portfolio are meant to be for a cosmetic campaign so I'll make somebody's nose symmetrical I'll make their eyes bigger I'll reshaped the body however I need so I make the skin completely silky smooth I get rid of the bags under the eyes completely so knowing that makes a difference as well and then for my av and guard my kind of creative you know you know all that's off it's whatever you want it's whatever you want to express yourself creatively so that's another thing to look at is well um I want to tell you that retouching can be exhausting and it's one of those things that because of such import of important part of my creative process I don't pass it off to everybody it's not like I say I do my chute and then I sent it off to a re toucher a lot of the times I'm still doing it myself and so you know I'm trying to do this efficiently and effectively so I'm going to give you a couple of real quick best practices and then just dive into retouching um all right so one best practice that goes onto that exhausting take breaks take breaks it breaks take breaks because here's what happens first of all it's bad for your eyes obviously um my someone just said you need to take a break every hour you get up walk away from a screen very your viewing distance but the reason I want to do this as well as to get a little obsessed that's when you over retouch a photo because you don't see you're not looking at how divorce it is from its original state related to that whenever I do re touches I never let it go out into the world with only me looking at it I always have someone else look at it so maybe it's an assistant maybe it's a friend it's a significant other whoever because they'll look at it neither say you've gone too far or you know, I didn't think you'd make me fix that wrinkle on an actor or whatever it may be so just a tip that I always do I always have at least two sets of eyes look at my photos, the next thing and you'll see as I do this part of retouching what a lot of people d'oh is they open up their photo and they really excited right away to start retouching get rid of those blunt blemishes, make someone look their best and then they start doing the levels in the color afterwards you have to do your global adjustment first because it changes what you can see in the retouch. So for example, if you have an overexposed picture yu do yur retouching and then you go make it darker all of a sudden all these pimples and blemishes and wrinkles you didn't see before appear so I always start off whether it's adobe camera raw, whether it's light room, wherever it may be and get those global adjustments done first, which means my exposure by contrast and my color balance or white balance and so you need to start there and I've run into this a ton of times where I just get really excited and every touched and I look at him like, okay, I missed a few things a couple other things that I wanted to recommend as well um I'm going to show you and the very first demo we're going to do is if you don't know adjustment layers and layers masks you have to watch this for a second segment you absolutely must I know them and understand them because everything I do from now on is adjustment layers and layers mask uh and there's so many reasons why but the first reason why you'll see eyes it's non destructive you can always go back and change things and so he spent two hours on a photo retouching and then you realize you can't step back and fix a mistake that you made your making your life in your job much harder and then we'll also talk about it keeps your file sizes smaller so it's easy to work with if you guys want to see some more best practices I have they're actually up on my block which is blogged at lindsay other photography dot com so I have kind of my top ten best practices and then also there's a link to something I'm going to use a little bit later on which are actually fake eyelashes a brush that you can download sits a link that you khun think they're download on I'll show you how to use that similarly um for not all the photos but some of the photos they'll use in the next three days what I'll do is after I retouch them here for you guys I'm going to save them is layered ps seizure tiffs and we're actually gonna put them up on the creative life site for those of you who purchased that you can actually take that image and then go back through the layers and try to remind yourself basically I'm going to do is after I demel I'll make sure they're there named on labeled so you guys know what they're all about so all right, so basically with that I will get started unless there's any questions perfect you guys all set? Okay, cool. I remember when when I heard that you guys wanted me to do three days of retouching I thought, holy crap people are gonna die three days retouching so try tio give us a nice breaks. I also put in some of the photo shoots for that reason as well trying to convince george to be like a zombie or something for a shoot on halloween. But I don't think he's going to buy into it. Well think george baron akkus that calls out for ur head of photography zombie george sammy george hashtagged zombie george or like like warrior like three hundred war you're george could do that like that. Okay, so uh I'm going to use an example here to do like a really blatant in your face example of what adjustment layers and layers masks d'oh okay, so when I look at this photo on, I'm going to do something I would never do. In reality, I'm going to make it black and white, except for her, except for her jacket. And let me say I did this all the time when I originally did porches and weddings. Now I try to stay away from it has been a little bit too overdone, but does a good example. So if you guys see in the bottom right hand corner here we have the half moon cookie. Okay, um, and it's, your adjustment layers and this is going to be one of your best friends. You should use this all of the time, and so when you click on it what it does, it brings up a variety of different changes. You can make your photo, so maybe it's going to be exposure or levels or hugh saturation, all of these different things. So what do you do what you do? I'm going to give you an example if I click on black and white. Okay, it creates this lair above your photo what's. Great is that it doesn't take up extra space and it's not permanent. So if you see where's his black and white, everything below this layer in this layer mask is then black and white and so it could be the same thing if you have a levels adjustment, you make it's kind of like taking a gel like a black and white gel and putting it on top your photo, which is great because he didn't have to take that photo duplicate it, change it black and white it's just a jonas says everything below it has this change applied but that's not actually what the power of adjustment layers are again saves you sees a lot of space but the power is is aiken selectively paint things off so I go over here to the bottom left hand corner and grab a black brush alright, I'm describing regular brush, by the way uh, the quicker the shortcut for brush is b nice and simple on dh if you come up to opacity this is basically how heavy is this effect? How transparent is this effect? It's commonly thought of his transparency, so if I want a full strength brush here, wherever I paint black on the mask, okay, it'll bring back the color. And so how you're supposed to think of this is black is going to hide that effect so wherever you see black and whites the left of it, if you see that we're words black white wherever I painted black, it hides that effect so let's say I have something that maybe is I changed hugh saturation I go over to my mask wherever I paint black it will hide that effect so I can go ahead go in paint black wherever I want to reveal the bottom layer the power is in this if I mess up and I go ahead and accidentally paint on the background like I did there um if you did this where you duplicate the layered changes to black and white and you were erasing and that's what I did for ages so I went ahead and I was erasing for most people how they have it set up, you could only step back twenty steps in your history and so if you're doing this for a couple hours and realized who I just I didn't notice it it's it's kind of subtle what your kind of stock you can't go back however, with your adjustment layers in your lair masks, I can switch my brush back to white and paint that effect off and so this is what everything that I'm going to be doing when I bring up thes adjustment layers in their mask I'll be doing my contrast through levels and curves using lair mess and justin layers mayhew saturation my color around my black and white all of that so this is look kind of last time will explain it just kind of keep it in mind so again if you want to hide that effect that you've just created, you're going to paint black and it will get rid of that effect now to give you an example polly do this um I don't know if many views light room but a lot of times I'm creating vignettes and so I darkened down the edges and I think that's really, really important uh something anyone I would do when I look at my photos that go okay um let's just look at the time it turned this whole thing black and white all right the entire thing black white when I look at this photo I say okay, well where's my eye going and I saw analyze my photos I'm saying right now it goes to her face but I also think I get distracted in that back left area like my eye isn't focused on her and so typically if you go ahead and maybe do your vignette in camera raw or in light room you know you have a little bit of control right? You could darken down the edges you could kind of make it round, but if you go ahead and use an adjustment layer in a lair mass karen photoshopped you can completely control where that vignette goes, so let me just put it into practice if I click on my half moon cooking my adjustment layers and I goto levels if I go ahead and I start darkening down so I grabbed that middle point to drag down the mid tones and the black point too dark and things up I made that background a lot darker but now what's too dark around her hair around her face so we just learned about adjustment layers and their masks so I can grab my brush on black and as I said anywhere paint black is going to hide that so I can go ahead and change the transparency my brush if I want and just start lightening things up so what that's going to allow me to do is maybe that's exactly what I want just went a little bit later face I've created vignette but not in the traditional way you think of work surrounded around the edges I focused the eye I absolutely, positively any shoot that I do on location I will darken down the edges and focus the eye every shoot that ideo because there's always something in the background that's a little bit distracting or darkening down the edges just to bring your eye to the subject more so when I talk about adjustment layers their masks this is why they have so much power and they take up really almost no additional space something I want to make sure I mentioned before I moved on uh is a couple of things you can for these lair mess you never have to have the full capacity for likes basically one hundred percent so let's go to this black and white layer maybe I don't want it to be completely black and white, but I wanted to be subtle. You can always back off europe acid e so up here on my layers palate, I can back off and maybe just make it subtle tone, or maybe I didn't. I said that was too supersaturated, so maybe and said I just have darkened it down or decreases saturation a little bit so you can always back off. This will become important later when we talk about retouching let's say that you went a little bit too far. You can back off europe ass ity bring back some of that skin detail, bring back some of those wrinkles and other elements. Uh, since we're talking about black and white, I'm black and white there's really? Only one way to do it, uh, well is either well, the main way, if you don't have a plug in, is to do it here doing your black and white conversion what I wanted to show you. If you double click next to your mask where you kind of you see this symbol here, it will bring up thes sliders for black and white you don't ever just say okay black and white and then be done play with these sliders and move them around and here's what they mean if you look here at red if you look to the far left its black if you look to the far right it's white and so what it's telling us when you convert to black and white you can change how every single color in your photograph is represented so in this instance she's wearing a red jacket but we changed it black and white well, I think that jack it's a little distracting maybe it's pulling away from her face so if I dragged that red slider a little bit to the left that red now goes darker so it's the same thing if you've converted to black white maybe of a bride and groom and there's a bright blue sky well, it just kind of goes like average just kind of goes a light grey when you convert to black and white gave a light a light a bright blue sky you khun dragged that blue all the way to the left and you could make it a really deep rich dark sky so don't just ever convert to black and white you can take control of it for caucasian skin tones when you convert to black and white I already actually in on the course page somebody already asked the question before we even started um and they're asking one of things asked about was getting that really light skin tone almost that kind of like porcelain in black and white the way you do that is you drag the reds and the yellows to the right because caucasian skin tone is made up of reds and yellows, so if you want that kind of creamier a smoother skin drag those the right and left also if somebody had like blatch your redskin you would drag more of the red to the right because it will kind of like end it up and I'll get rid of that detail so that is the very first thing that I wanted to touch upon about adjustment layers and layers masks so we're going to go ahead and I'm going to use an example that I use all the time and how I'm going to do this is I can actually start by telling you the way that I used to do things and I used plug ins then I'm going to use a couple other examples of other ways to do skin retouching get a little more in depth with a couple tips and techniques with two other photos, so we use a photo that I used frequently to demo this and then I'll show you a couple of new things you might not have seen, so we're gonna start with this photograph and the reason you use this photograph because I have a lot of skin texture to deal with highlights on the nose, wrinkles in the neck, highlights on the forehead, some shadows under the eyes. So I have a lot of the problems that you commonly run into on, so we're going to start there now what I'm going to do is whenever I'm retouching, I want to duplicate my background player because then I can go back and I can make changes. I'm going to duplicate that background there, and you could drag it if you look next to the trash can if you drag it to the button to the left of that, that will just duplicate your layer. So once I've opened my photograph, if I got everything all set and I have the exposure, right and the contrast, right that's, when I can start doing my retouching, uh, and if my dad's watching, if you stay tuned for a little while, I'm re touching you and I know how much you love me. I didn't know if other people would want me to be his brutal, but my dad loves me, so you'll have to deal I'm sure he is watching. Um okay, so what? I'm going to dio and I'm going to zoom in, and really the first place that I start is by getting rid of blemishes. And problem areas so let me break down the main tools that I use and this is where I said this class isn't for professional rita cher's they wouldn't use any of these tools they use like clones sam one hundred percent and like that's mostly it but for us you can absolutely get beautiful images otherwise a short cut that in my shortcut list I put an asterisk by the ones that I use most commonly you guys will have those um you have to know the left bracket makes your brush smaller the right brackett makes your brush bigger if I could if I used any shortcut I use that every day nonstop all the time so if you see me and you're like wow, how she making her bracket bigger and smaller you can do it up here make your brush larger by dragging the size but it's it's a pain to go up there and set little bang and so I just use my brackets all right? So the first tool that I want to go over is the healing brush and the spot healing russian kind of those two tools we'll start with spot healing brush what spot healing brush lets you dio is you make it slightly larger than a blemish in case you change the size and when you click there what you're saying is okay photo shop look at this piece of skin what my mouse is on doesn't belong there it's a blemish it's not correct so what you clipped what you do when you click is it calculates and says okay, so if this doesn't belong what's around this area and it blends it automatically so for example, if I click, you know there goes my blemish and it gets rid of it and so the same thing, so what I would do is I would click around here and I would start getting rid of blemishes. Now what's really nice about this is it's kind of a single click thing you don't you don't need to do a lot more work, but sometimes if you look, it'll make a mistake. It often happens in areas with really high contrast, or maybe this area that's surrounded it's it's, a lighter colored blemish on and it's surrounded by a lot of different textures or something like that. A variation that you might take is the healing brush itself, and what it's going to allow you to dio is if you hol hold the cult or option key if we're going to talk about cologne sample a minute that's most commonly what most people know is that tool but just like the clone stamp it lets you sample and area and say, okay, this is the right type of texture now replace this and blend it it's if I click it'll replace and blend that area so now it's a two step, two step process but it's actually going to give you more precise results and so it's actually better for getting rid of a lot of blemishes? Um I'm going to use a retouching plug in the one that I'm going to use for this example on again I wish you had to do stuff by hand later, but the example of the plug and I use is image gnomic portraiture and so when you use a plug in, you begin to be familiar with how much you have to retouch because I know okay, maybe I don't need to go in and get every single one of these dots with my plug in because it will smooth it out if you do it by hand, you have to and there are several different plug ins that exists out there another one that you might consider trying is called portrait professional porch professional does skin softening and also helped to shape the face it's kind of built in where you can define the eyes and the nose and the mouth and you can actually even things out and make eyes bigger and lengthened neck and also smoothes out the skin they have a free trial I think it's fifteen day that you could download image gnomic portraiture the one that I'm going to use also has a free download for a trial and then another one that exists as well is on one has perfect retouch, which is another one I will tell you my favorite one that I've tried is in islamic portraiture and that's why I'm going to demo with it but feel free to do it yourself they all have free trials, and if you remind me kenna, I can give the lengths to those up on course pager wherever they belong I consent share that, okay, so all right, so you guys got that, so that was three healing brush and the spot healing brush, and I would click around and get rid of major problem areas all right? So the tool that most people know most people use most commonly is the clone stamp, and the reason probably a lot of you are watching this class is what tends to happen is you lose skin detail and it becomes too retouched and it looks fake and it's because how people are using clone stamp, what a lot of people do is they do one of two things they'll clone at a really high opacity so like, like it's, a really heavy retouch and so that it just doesn't fit, for example, like the texture under your eye doesn't look like the texture on your skin, so if you do one hundred percent, it doesn't look real the other problem that people have is that will take their clone stamp and then maybe put it at let's say, fifteen percent and they clone and they clone and the cloning each time you're layering on top of this clone, you're getting rid of your texture and that's when you get kind of that smoothed out effect, that doesn't look real, so I I'll show you a little, you know, basic cloning, but for example, let's say I just want a client that that blemish the clone samples here and the shortcut for it is s food the clones, sam, if I click on it again, I'm gonna hit my left bracket to make the size of my brush smaller if I go ahead and make my opacity maybe thirty percent it's the same thing if I hold the altar option key, I can click and say, ok, these pixels right here I basically I'm cutting in, pasting them over top of the problem areas, so click and it paste them more or less. And so if you did one hundred percent for example, you'll see it can pace but literally it's cutting a pacing, the pixels, the the different elements that you'd want to consider changing in the clone stamp if you come up here, you have the brush size and then you also have the brush hardness and if you're familiar with feathering feathering is the idea of an effect is one hundred percent in the middle and then it gets softer at the edges or it gets less strong at the edges well, with a brush it's going to be hardness the same thing with a clone stamp it gets kind of soft around the edges the thie spot healing brush it actually blends it for you you don't need to do blending, whereas the clone stamp you need teo take control of it and change your brush hardness so I could click around and I could clone things out and what you're watching for is not tow accidentally have repeated patterns that's a clear giveaway when people are cloning things out in the background like, well, that's the exact same tree next to itself for that is the whatever it may be you know that that area there was maybe like three pimples and they're cloned in the exact same configuration next to themselves it's a clear giveaway I used to play this game with my sister and actually still do it a lot with my assistance is we look at tablets and subway ads and see where we can tell where people cloned incorrectly or liquefied and correctly and it's everywhere like it's absolutely everywhere I wanted to start a blogger where I like posted those things, but I thought I might get myself in trouble so I didn't do it, okay, but this is where it comes into practice, so cloning you conclude things out, people mess up because they'll do and say, for example, it's going to example they'll take a low opacity, maybe they'll take fifteen percent I was going to create a new layer it's to see you guys know I'm going to show you what not to do and I'll do this and the clone and the clone and I clone look okay that's not working and you keep going and look what happens if you're trying to fill that and even out that area under the eye. Well, now there's, no skin detail it's completely gone, so I'm going to introduce you to the most wonderful thing in the world if you don't know about them. Um, blend modes blend moans are the best thing in the entire world, and they change everything I ever do in photoshopped uh, blend modes have a different meaning for how they interact with brushes versus layers, but let's talk about brushes or these tools over here that we have on the left so far a clone stamp throw away that ugly layer create a new one if I just clone it's cutting and pasting, but if I come up here where it says mode that's where you can change the blend mode of your brush and what it's saying is how do you want this brush in this example the clone stamp to interact with the layers below it and so in this instance if I'm going to say okay, well what I'm trying to do is fill in shadows and so what I can do is I can change my blend mode toe lightened and what that makes it do a zit on ly clones filling in the shadows and it leaves your highlights alone and so what that's gonna allow us to do is fill in those shadow areas but keep the detail under the eye and so for example let's take maybe and enough what sick forty percent capacity grabbing area and see how it's filling in but you still see the detail so do before and after you can still see the detail underneath the eye but it's filled in some of that shadow area you don't want to eliminate it if it's a portrait by the way when I do beauty a lot of time to do completely eliminate the area in the eye it's not supposed to look rial per se on dh so I would do it at a higher capacity maybe I would do for example to do it once at fifty five percent and it fills in the area underneath the eye the same thing applies let's come over here and say you know think this highlight on her nose is a little distracting you know it's it's drawing attention or knows probably making look bigger then I'd wanted to be there so if you go ahead and just clone again you do have a couple layers and it starts to get rid of the skin texture but if I ask myself the same question what am I trying to do here I'm trying to dark and down a highlight so this is where blood moz come in yet again and I come up here towards this light and instead of light and I can switch it to darken through the same thing come down here use I'm using my clone stamp again we haven't changed we're always on clone stamp in this instance so I'm using my old or my option key all key to sample in area and I can cut it fill in sooners how it keeps some of the skin detail but it's kind of dark and down that highlights so this I most commonly used for foreheads when people have shiny forehead maybe not really really shining completely blown out but they've got a little bit of a sheen there were little sweaty whatever it may be futures you are a clone stamp put it on your dark and blood mode you can go ahead and I'll just use this inn instance say aiken darken it down a little bit and so before and after I'm starting to get rid of that sheen but I'm still keeping skin detail so so far what we've done is the spot healing and the healing brush and so you're identifying a blemish you click on it for spot healing and photo shop estimates what it's supposed to be and replaces it the spot healing brush you say this is the good area replacing blend this and then our clone stamp and the clones sam people usually say, oh, it doesn't work well it can if you're using a blunt words appropriately and so I would do the same thing teo I would use, you know, maybe clone stamp to come down here and get rid of the veins in her eyes and I'm looking that and this was actually the sexual professional model and showed up on my car when she do the night before like, oh jeez, um so you could clone out what's in her eyes on just so you guys know everything that I'm talking about is available whether it's photo photo shop pre much photo shop says three and newer most of it is an element's most of it any of voter shop that you have will do a lot of these techniques there's a few things that I'll touch on that are specific to say c s five or c s six but I'll let you know when those things apply and so you could do most of the things um so let's come down to her, I for example I could do the same thing. I want to lighten and go ahead and I concert kind of cloning out and lightning these veins in her eyes. If I wanted to try to even that out just a bit and it's good for reducing redness in the eyes or anything else. Okay, another tool though that I would use is a patch to him. Patch was really great. I found let's say that I'm photographing somebody's a little bit older and they have a really clearly defined wrinkle across their forehead and I'm trying to fix it up. So would the patch to allows me to dio on the patch was right here. If you look over on the left hand side it's underneath where the spot healing brush was, I see if I can show it there you go on theirs with a patch so it looks like a patch keeps a nice and simple, and what allows you to do is you can select a problem area and click it and drag it to an area you want replaced with so it's kind of a variation on that's by healing so I could zoom in, say, to this problem area could click and say, replace it with this skin and it would replace it so you select the problem area you click it and dragon and gives you a preview and it blends it automatically for you it's not going to be a harsh edge the problem that people tend to run into is when you have an area of really high contrast and a lot of texture you usually khun see where it starts to try to blend so let's grab this area okay if I click drag this say we want to blend it they're free zoom in that didn't work at all um it's just the algorithm doesn't like areas of high contrast or texture and so what I usually think of is okay ah forehead where it's kind of just evenly lit and you're just removing some wrinkles okay? It works well for that um it also will work well, I use it all the time from neck wrinkles I'll talk about this I'll give you some examples later with beauty one of the ways that I kind of that I tend to help people along and looking younger is removing wrinkles and next and for women wrinkles in hands um we tend to shore age earlier in our hands so that's one of the ways that I can make it a little easier on us all smooth out on hands using patch tool and it also on the neck so it definitely has its uses but if you're looking here it didn't work so honestly I have to try different things it's not like I know right away okay this is going to work for sure all using the patch was easier than going in and cloning so I'll grab it I'll select it if it doesn't work my shortcut is command z undo and that would be the second most commonly used tool that I shortcut I use undo all the time I'm always testing new things so if I look at this example well my spot healing isn't going to really work chances are you can actually drag your spot healing if you wanted to you could actually click and drag an entire area but it it fell into the same problem it's those tools have difficulty with areas of high contrast and they're basically trying to figure okay what skin goes here is that the bright areas is a dark area how do I blend it so this is an example again where a clone stamp is going to be better the clone tool is going to be better option so we're going to switch to a clone tool and what am I doing in this instance I'm filling in a shadow area and this is something I know for sure there's no way I would let this portrait out my door with those wrinkles on her neck they're just not tracking similar another hate these armpits armpits are evil and ugly and terrible it's not like I have like a huge trouble armpits but in photos they drive me crazy on dh you tend to get those like especially okay bribes that were there to top dress is too tight and you get the kind of fold over and then the dark area under the armpit I would do the same technique here neck armpit feeder totally different thing but that's a totally different really feet armpits so we're going to take the light into all I mean we're gonna take the clone stamp on lytton and I'm going to go ahead and you saw how the other tools didn't work but if you watch here I'm gonna sample from this area skin and I'm gonna click and drag and what it will do is we'll take the sample area and it follows the tool so I don't need to keep clicking. I can um one of the reasons you might want to keep sampling from different areas when you just click and drag that's when you get the repeated patterns that becomes so obvious so wanna click here a drag so it fills it in and so it still kept skin texture but it's filling it in and so I just hit at undue control z I can also go to a higher opacity if I really want to try to just eliminate this thing and some notice it makes a huge difference and you can go ahead I can back off my opacity and clone back over and then maybe this is a time now where I would go in and get rid of that wrinkle on the neck so usually for me I will go ahead and try it one way and okay, that didn't work. So go ahead and try it where I'm cloning and fill it in that way something to that effect so clone has a specific uses. Each tool is great for different things. I'm going to show you how I use the patch tool for wrinkles. I think that might be my poor dad. I think you like it now. Ivy and his example. I teased him about it. Well, one time he didn't know I use it as an example for class I taught and being h and it was recorded and he goes online and he sees why is my face in front of sixty people like close up? And I conceived four dead, um anyway, so I would go ahead and let me just finish that up real quick and it's the same thing for any area of the body if I go ahead, andi, look at her back here that I look at and no, okay, if I took my might spot healing brush and went on and clicked on every single one of those that's gonna be huge huge time constraint it's gonna take me a really long time so that's in my brain starts thinking okay what kind of skin softening or smoothing can I use and so I'm going to address those but another thing I sees it's kind of blot she miss color there's a darker areas and so this again my brain goes okay so darkness can I use my clone stamp on light and again and maybe all kind of just fill in some of these shadow areas just a bit so that's usually what my mind is processing and I try and basically I'm just trying not to overdo it um a perfect area as well if you're looking in smile lines smile lines apart of somebody's face and it looks really funky when you just eliminate them I mean especially or the bags under the eyes of the crow's feet next to somebody's face so I don't try to eliminate them I try to light in them and reduce them so here two ways that you could do either wrinkles under the eyes or smile lines it was going to duplicate my background to shoot two different ways the first way that you can do it is you can use your clone stamp online so you go ahead use a little bit more rapacity and basically you sample from outside the samples skin near that smile line and so it starts to fill it in some shape before and after. Some, like, have lightened it. I can go ahead and do it even more if I wanted to, and I can click. I'm just quit clicking and dragging and so it's filling it in rice that's one way, but another thing that you could d'oh is, whatever wrinkles there are on the face or the knack or whatever it may be. I'm going to use the patch tool, for example, I'm going to select that wrinkle, and I'm gonna completely eliminate it, and I could also go ahead and clone normally a normal passage e, you know, for example, and completely eliminated, it depends on what you want to do, so I could do the same thing, eliminate wrinkles, wherever and that's where it's really nice with a eliminate? This smile as well was clicking, and what I'm doing is, I'm sampling from different areas try not to get this repeated pattern, so you'll see right here if you watch carefully, if you don't very where you're sampling from, you'll actually build a c o okay, she selected that pattern twice, so if I looking or reduce it and eliminate it, you can see a little bit of repeated pattern and it's completely gone that's when you back off europe acid e, so I could I just bring it back a little bit and the capacity is in the top right hand corner of your layers palette so I could maybe go said I bring it back to like they're so it's there but it's really, really subtle that's one of the things again it's a different scene portrait and beauty beauty I get rid of it there are no wrinkles, no smiling, no nothing portrait I want too realistic to the person's age on dso the usual what I'll do is get rid of a lot of the blemishes and what not an older person and then just bring it back uh, they find that's easier trying to get rid of everything and then just bring them back suddenly. Okay, so, so far we did kind of those basic retouching tools and I'm just going to show you what I would do in this instance for using a retouching plug in and then we're going to go back and other examples and show you how to do things by hand and sometimes by hand works better somehow it just doesn't look right, so I'm going toe merge two layers down. If I right click, I can go to merge down and that's just going to make it so that if I know I'm happy with that retouch if I keep going and going and duplicating every single there I'm going to have like a two gigabyte file so sometimes it's okay to merge down especially if maybe you did it on a separate layer because you're doing the cheek area and then the other area was the chest will you can still go back and merge those two and you'll still be able to undo if you need teo was gonna merge down I mean duplicate my background and I'm going to use my first example of a retouching plugin going to go up to filter and the programme I'm going to use for this example is image gnomic portraiture alright so opens up this dialog box and there is a plug in for light room as well if you guys are light room users I don't believe there's an aperture fucking but there could be so check on that and the reason that people when people talk about skin softening or skin smoothing that it's a bad word for retouching is because of that word softening you never want to soften your detail and that's that's what it sounds and that's when you get that kind of overly done glamour look where there's like a soft haze or hail around the photo that's awful I mean there's there's no time where that's good I'm just there's very few times were all say something definitively that like over retouched hayes on does anyone know the phenomenon why they do that in the pageant world why why I don't know this is wholly different discussion whole different debate I don't know why they do that because it's not even remotely realistic and they looked really funky um anyway so uh the's tools can be used well you just have to not overdo it and use them selectively so let's kind of break down how this is working in the top left hand corner we have detail smoothing and so what it says is right you have in your photo find it tell medium detail in large details so that's talking about fine detail is going to be things like your pores and the hairs on the face that's fine detail a medium detail is going to be more like um kind of blotchy nissen the skin and then largely to art like features large details in the shot and then what threshold means on there's threshold is in other places in photos ofus well they've extended it here I'm usually for threshold let's say there's something called select color range or selecting color range let's say that you pick um this skin tone when you adjust the threshold it says how far into similar skin tones are we going to reach and that's what it's the same thing how far into other tones or colors and detail is this going to affect you uh so if you go ahead and put this all the way up let's take a zoom in I meant it scary there's no detail it's over retouched it's I mean this is this is what people are horrified about so you know that's not right and so that's why I usually I might just completely turned off all the sliders and then bring things up slowly and so if I just turn these off and I kind of move it all down moving is all to the far left you know it starts me off there so let's look over here I know that in general the thing that keeps my photo looking riel is that skin texture so I want to do very little softening if I can with the skin texture e I don't want to get rid of it so maybe I'll just bring it up a tiny bit and then I'll say okay medium let's look, you know I mean she's a little blotchy over here so where the medium khun go up a little bit and if I click all devotees click on this photo it could well be able to see and do this kind of do before and after I was thinking all right, so let me bring up large a little bit and so we'll start giving you a little bit of a preview if it's doing any changes what I need to dio is say ok by default it would just apply this to every single place in the photo so what we'll do is we'll smooth her forehead the same as your cheek the same it's her neck the same mr back. Well, if you look at me for example chances are my forehead doesn't need the same softening as maybe the skin on my cheek or the skin on my neck and you saw her? She needs a lot more skin softening on her back a lot more skin smoothie on her back than she does on her forehead. So what I need to dio is the way that I not incorrectly used this retouching program is idea different amounts of retouching based on different areas of skin. So that's why this first year you can kind of smooth stuff out for the second area? The skin tone mask is you're saying ok, well, what part of the face is that the faces of the neck is at the back so you get a little eye dropper over here underwear is the show mask you can select the eyedropper and wherever you click is what it's elects cut do we can do that kind of foreign after all right? Let me hit okay real quick I'm going to bring it back with freezing up let's try this again, okay, so we have the same things I can go ahead and I can select an area around her cheek and you can see the difference and there's different ways to confuse side by side you can kind of you the changes that way or if I go ahead I can just click it on and off we're seeing that changes so select her cheek I could also go ahead and say all right well let's click on her back click on her back I can get away with a lot more and I'd actually want to smooth out the finding telling medium detail so basically what I'll do is I'll say all right I'm going to run this retouch once just for her forehead once for her cheek once for her neck once for her back and then s o that make sure that I you know, if the back needs a ton of retouching I'll only do it just applied to the back so let's do that let's for example say okay, I need a ton of retouching down here in the back we'll look over here on the right it's called it's, giving you a mask and idea of what pixels were affected so I can see right now I have affected her back but it's also touched a little bit on her face so I know that I'm going to probably need to erase or remove this effect if I want you actually have the ability to have the new layer on ly b the pixels that had the effects changed, thea retouched applied to it so let me to show you what it looks like it'll make a little more sense for him, okay? And this was again I did the smoothing for her back, so if I come down here I hit before and after, you can see what it's applying to, but if I turn off all these layers that's what the eyeball does next sole heirs you could turn him on off, I can turn off the layers below and by clicking that option that said, create a transparency mask it's showing me on ly the pixels that actually smoothed out, but this is really important because what I can see is, well, I definitely don't want the iris and pupil of her I smooth, nor do I want her eyebrows, moods or the nostrils of her nose, so I'm seeing like, okay, so I did a pretty good job of getting that selection right for selecting her lower back using that color dropper, but it got some areas I didn't want it so I could go ahead in the race. So I'm just selecting my racer and I can raise it and I didn't intend for it to be there and they can select a hundred percent and say ok didn't want on her ears didn't want under nose her mouth but okay, maybe I am okay with it around her neck and round her back so when I'm happy with that change I can if you wanted to merge down so you see I mean that is a you know drastic and get a drastic change in her back but if I applied that same effect your face it would be over smooth let me see a shrink I'm kind of foreign after looking good so far I would go ahead and maybe create a new layer and go back in to portraiture and do the same change just let cheek area I should kind of textures on her cheek so I consume weigh in grab my eyedropper which again was here under the skin tone mask and click right there on that area of the cheek so seo it's switched from the shadows over to the highlights but I think that now it's overdone it's just kind of it makes it look kind of like blotchy skin texture not what you really want so that's when you can bat back off again it's it's starting to look a little better and I can do my before and after say they just want a little smoothing I can pump it up until it feels right basically and so you can keep re sampling and click around and so let's see something right there so that's just a little and so that's what I want like take off the edge just a tiny bit and I can click okay and so it apply it and you could do the same thing could hide the bottom layers and see what else what other areas of the skin and it affected that you didn't want to so that's generally kind of variations of that is generally how I would use a retouching program so instead of saying okay so everything equally go and then it over does it over smooths it I'll go in and do it selectively if anyone else is interested in portraiture a couple other things I want you to be aware of just gonna open up one more time filter in islamic portraiture is where it saves it if you look in the bottom left hand corner where people get in trouble is I'm going to minimize a couple things where people get in trouble is where it says enhancements and where is this softness softness literally softens the photograph and that's how you kind of cuts out on some texture and that's where a lot of the issue comes into place the reason that most people what kind of misses the conference okay look I see says there's presets ivy's presets in light room where I've used presets other places for those of you that haven't news presets in light room how it works is if you get a set of changes maybe exposure and sharpness and something like that that you really like it's kind of a formula. You khun save it as a formula called a preset. So in the future, if you want to go back and access it, you click on that pre set and it will fly it well, that's, really nice. And so people see preset here, and so they'll click on one, and they'll say, you know who enhance glamour and then this is when it pumps up that softness and it gets rid of skin detail, and it it messes things up. So I'm I will create my own presets, but I never use any of their predefined one because that's, when they mess with softness and that's, never anything that I want down here. So all right, so that is a basic overview of how portraiture works, but I just want to use this image more as an example of how I'd run through it. I'm going to take us through some more intensive skin retouching with a couple other photos.
Class Materials
bonus material
Ratings and Reviews
Sean
Fantastic Photoshop course. I knew Lindsay was great at Photography, Lighting, Posing and Public Speaking, but I am really blown away by her mad (great) skills at Photoshop. Lindsay really is a fantastic teacher. She turns what might be a more or less dry topic into a fun and entertaining topic. Thank you Lindsay and thank you CreativeLIve. You have a real superstar with Lindsay Adler.
a Creativelive Student
This is a great workshop for photographers wanting to learn and hone in on their retouching skills. As a photoshop user and photographer of 10 yrs I have been able to take away some further techniques to help better my skills and more or less tailor them. I would suggest you have some adv beginner knowledge of photoshop because I don't think some of the techniques you will be able to keep up with unless you buy it. There are two things that I wish she did better in her teaching and that is to teach new users to label all their layers and what they are as you are working. As you can see Lindsay ends up with 20 layers and unless your the one doing the editing you will have know idea what is what when you have to go back to it. So its best to teach this in the beginning so people get into the habit of organization early. Also I wish she used a Wacom. It really does cut your editing time in half and you have more solid movements in precisely selecting areas of a photo. From a photographer to other photographers. Use a wacom. You can start with a basic baboo for $89 and when the apple wireless mouse cost $69. Time is money, and a wacom truely save time! I used to use a mouse and my trackpad and once I switched I was like OMG what was I thinking before! So I wish she just emphasized that point more. Overall I think it was $99 well spent.
Christian G.
Not only is Lindsay very knowledgeable and a very good teacher but I REALLY TRULY appreciate her no-BS, straight-forward style.. No time wasted on long tangents talking about herself (or what have you), on cute remarks or on off-the-mark humor. She has showed us many great techniques, has presented to us various creative/different ideas AND she has also really been able to explain "how she thinks of a solution", how there is a bit of trial and error, "even" at her level.. All in a all, a truly excellent course and worth every penny!! Thank you Lindsay and thank you to the CreativeLive team for a great course!!