Lessons
Day 1
1Essential Retouching Techniques
55:08 2Intro Q&A
25:31 3Portrait Retouching
1:10:38 4Body Shaping: Liquify
25:37 5Beauty Retouching
1:04:41 6Shoot: Portrait, Beauty, and Avant Garde
41:29Day 2
Workflow and Lightroom
24:15 8Beauty Image Retouch Review
40:08 9Portrait Recap and Frequency Separation
15:40 10Frequency Separation Q&A
25:21 11Blend Modes
11:32 12Creative Techniques: Color
14:40 13Miscellaneous Creative Techniques
08:13 14Faux HDR Look
12:53 15Avant Garde Retouch
23:25 16Displacement Maps
35:10 17Audience Image Retouching
17:14 18Special Shoot: Halloween
24:59Day 3
19Compositing Basics
45:55 20Compositing Examples
26:01 21Creative Skin Effects
21:12 22Additional Creative Techniques
22:21 23Retouching Dark Skin and Q&A
17:13 24Common Problems
29:12 25Perfect Mask Plug-in
13:37 26Audience Image Retouching
18:46 27Sharpener Pro and Color Efex Plug-ins
30:41 28Cinemagraphs
37:32Lesson Info
Creative Techniques: Color
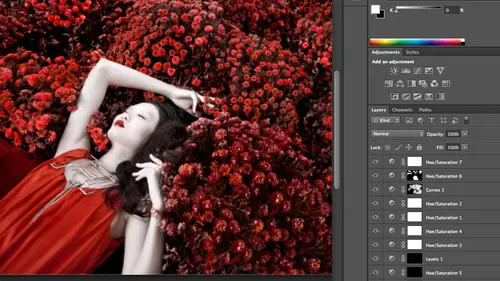
I guess I'm going to jump in teo creative techniques and the message that I want to convey to everybody is that when you're watching for example, I'm going to change leaves that were yellow to red I'm not implying that there's going to be many times where you need to change yellow leaves to read that's not the point um what you need to know is if once you know the tools exist and how easy it is to use them, then when you're shooting it starts opening up creative possibilities so it's knowing if you know that it's easy to change the yellow leaves to read, then maybe it's easy to change that greenhouse to blue or the blue shoes too pink you're knowing what you can do that it makes you more creative so as I go through all of these different things don't be like well, that's dumb I'm never going to want to change the color of leaves okay? Yeah think beyond that uh I had that question will instantly expand. All right, so um I had a fashion editorial and the theme of the shoot was red and yo...
u guys have looked at my at my portfolio shoot red all the time it's like everything that I do I love red nonstop live free bread this is my apartment it looks just like this gray walls with red accents um and so I tried to figure out something I could do that would scream red because I've already used it so much my portfolio I look out my window I live in central park and I see a lot of yellow trees but no red ones now normally it might be a little daunting so I think okay the one red leaves I didn't have to have a fake tree or it has to go in and paint each one of these a different color will not true it's actually very very easy in like probably takes me fifteen seconds when I'm not talking about it to change these to read, to go down your half moon cookie which you guys know no familiar with click on it and go back into hugh saturation I've already talked about this a little when we were pulling out the yellows in the teeth right when t through two yellow you'd go ahead and select the color channel and you can de saturate yellow for example what I want to go in my yellow channeled but instead of de saturating I'm going to change the hue and so I can drag the hugh and I could drag this to be read and I'm looking at it it is a couple problems that pop up uh first thing is that the reds are oversaturated and they go out of gammon they go so saturate that they lose detail so I can just back off my saturation a little bit and they can go darker. The other problem I run two into is if I look over on her face her face has yellow in it um later skin tones have a lot of yellow and red and so I do need to grab my black brush and paying off the effect on her face and on her hair but that's that's it I mean I didn't just knowing that I could do that and do it simply I shot my entire editorial in front of yellow leaves knowing that I could quickly change it so if you're thinking of your example the same thing the girl has addressed that you want to change to match the wall behind her or I mean anything like that the flowers you want to change those colors to match the makeup and vice versa so knowing that allows you to take control of your chutes one of my favorite photographers or one of them that I draw a lot of inspiration from um is david lachapelle now if you look at david last of pills work uh it looks nothing like mine in the sense that it's often a critique on society and celebrity and khun sumer ism and I never touched on any of those things it's not the content but I love his color theory you never look at a a shot where the color doesn't have high impact on how you feel about that shop and so when I do that I don't say oh okay, well the car just happened to be green and is going to stay green notes it looks better read it, change it red it's the same thing if that dress it would have been better a darker red will I make it a darker red? I don't leave it up to what existed, so I'm going to take that same shoot and we're going to go a little more complicated but it's the same concept and so I'm opening up this high risk file here I just want to show you where it started and where we ended up when I began um I didn't have a budget for red flowers and there were dead mums in central park and so right here there's a children's playground, some shooting with the big lens and a whole set up and mum thanks for children's playground central park so I need to be quick and I needed to save myself money so this is where I make the impossible possible or just more practical if I turn off all my layers and I'm going to show you and I you saw how I do lots of tweaking and, you know, get really obsessed with it but I turned off all my layers this is where it started it doesn't look anything like it, but this is how I say david lash of hell completely changes the way issue and I did this because david dash of hell wouldn't just say, oh, those flowers are green I'm gonna leave them that way I'm going to make a change so I'm going to show you how I go from here to their very, very quickly and obviously that's the photo behind me minute to lead all these layers because most of them are completely unnecessary um they're just me tweaking all right? So the majority of what I spent my time on for this photo was cloning because when I zoom in here and turn off these layers I had a clone out leaves but I didn't have a permit and I was next to a children's play you know playground so I need to be fast otherwise I would have picked out those leaves the only thing we did this is completely true story like right here where I want to lay her down there was a dead bird and we picked the house it's kind of gross, but we didn't tell her any way you can know its although everything so I spent majority of my time cloning and this comes back to what I said you know, in photo shop it's all about what's believable and what's good enough if I zoom in really close I'm sure you can see where I cloned like, can you tell that that's cloned right there? We have to look for it. You have to know that that flower might be a little about a place, or I know that there's an area over here where I can see that the kind of slightly less opaque area it just seems to be good enough. I've been knowing how big it is. And you guys, I don't think you looked at this, and I don't like god there's places I can see where it's cloned, so keeping that in mind, it probably took me it definitely took me probably an hour and a half times to clone out all these stupid leaves. Um, but to give you an example, what you do is you could just take your clone stamp. When do I get my background? So you can see I needed to be one hundred percent of past day because they don't want it to be slightly transparent, then we'll see where we touched and then I need a semi hard edge, and what I could do is maybe clone these flowers over onto here, and what I did is where you got those kind of blurred edges I wanna hadn't erased to use the lair mask to cut up blended in later on. Um after I did the cloning and you can't tell I mean, you can tell if you know what you're looking for, so I'm just going to skip that because you guys get the idea of how it was achieved but taking control of your color so I'm going to go back down to my half moon cookie open up hugh saturation and now I realize I have a lot of different things and working with so I have yellows that I could make red I'll switch let's see oh, I'm on the bottom going back up so you guys okay? So this wass yellows that I moved to read so it started off here and maybe something around there okay, that looks good. What other colors I also have green so if I switch over to green change the hue I could make the greens red I mean, I think has a lot more impact looking up there if you didn't see any green same thing I also have some magenta I could make the magenta is more red so that took you know I could be more precise but that took what twenty seconds to dio the way that I added impact in the end is your eyes always looking for certain areas? It's looking for the brightest area in the picture it's also looking for the highest areas of contrast and also looking at the brightest colors like these air things when you look at the foot okay what's the brightest area is my going to the right place what's the area's highest contrast okay what's the brightest colors in this photo I feel like I'm getting pulled here and here and so am I I am I I'm kind of getting sick stuck at these later flowers so I'm going to dio as I'm going to go to curves or levels either one is fine when grab curse in this instance I'm gonna pull down and I'm gonna darken everything up and so everything comes becomes much more rich and much more saturated but some places becomes too dark so if I switched to my brush back two black and a pit him pick maybe forty percent capacity and I could just late enough where it got too dark around her face for example in her hair maybe got a little bit too dark up here but notice how much more your eyes focused and how much more impact it wass that I darkened it down so from this you should kind of take away the fact that you should try to control your color and realize that if it's in your scene you can change it you can control it and that's one of the things that I hurt one of my teachers and I did go to school for photography and that was the biggest critique there's no excuse if there is a problem in your photo you have to take care of it if your photojournalist you frame it differently if you are a portrait photographer you move it out of the background if you are an illustrated photographer you photoshopped it out esso and then also focusing her eyes the other thing to take away your eyes looking for those bright areas and you want to pullets here but your subject any questions or can I move on to another example? Um okay just sort of to emphasize maybe what you said earlier I think is pretty shocking to a lot of people so fashion tv from singapore says are you suggesting we can change from one cover to any color we desire other situations or colors that are impossible to change okay so I I can look on my hard drive later maybe and see if I can find this so for this editorial she started off and I said it said my word it's us I need eight different outfits that albright red she couldn't find eight she had seven one outfit she showed up with and she didn't know how photoshopped works who shows up with one she knows I can change it and we've had a discussion cause sometimes she says you know what I love this dress it's blue the fame of our shoot is green is that ok with you I could change it no problem so I showed she shows up and it's a light cream outfit. It is very, very hard to take things that are really light or really dark and assigned color so them because something dark, you have to fundamentally lighten it up to make it look a matching color. And so it's like taking a dark area of a photo, maybe underneath an arm underneath his shirt, lightening it up the stairs to pull out too much grain, it starts to pull out. You can actually see a lot of detail that you didn't want to see. Same thing with something light if you try to darken it down, it doesn't hold it a swell. So in general, I'm kind of an average tone is going to be better than lighter, dark, but I took this this light colored I'm sure I could find it. This light colored suit was cream and made it bright red, and so what I had to do is when I did my changes, I had to make selection of the cream suit I had to. Instead of doing hugh saturation, I had to colorize it to read, I had to saturate it, and then one of the other sliders is light and dark, and you can lay on it, so I had a dark, innit? To take the cream because it was kind of pink until I made it darker so you can change anything for fashion tv. Assuming that they deal with fashion. I do also keep in mind if the designer would freak out or not. Just as another note on my wardrobe stylist lets me know which designers would freak in which ones they just want to have their name featured or they understand that it's creative expression, it doesn't matter if you change it all right, so a few more comments because people definitely are blown away by this head. Katie katie winter floods says omg that's so much simpler than I ever thought. When I saw that image, I was trying to figure out how you did that for ages, huh? And then pee gumbs dot net says I'm amazed how fast that happened, but a couple more questions e m h photography is wondering, are there still green leaves in the bottom right hand corner since you changed the green channel to read, or is that just what's coming through? They might have been it's like had a little more yellow or something to them that need to be changed, but in my final image, when I kind of spent time on it and went through each channel, there was no green. Everything was pretty much read and there were a couple things where it was a little too magenta and so I did a little selection and then just selected those flowers and made sure I moved it more into the red. So I spent I probably spent about fifteen minutes tweaking the color once I had gotten rid of all of the leaves. So instead of a minute while talking right, maybe right, maybe a quick calm and I have to read this one with the wording because halloween, uh, irene adler says, lindsay, can you show us how to have the pale vampire ish skin tone like the model that you have there? Uh, what if we have a tan skin tone and we want to make it the pale, damp irish so two parts that model her skin tone because it was really dark outside was almost raining on dh she was underneath the tree I had overexposed to make that scene look correctly exposed. And so actually she looked like that that's what it looks like she was that pail that being said, these shoot that I will be doing later find this quickly uh, one of the shots that I did before I'll show you who's gonna open this up, but we're going to go through this in detail is going to be making creamy or lighter skin does not work for people with dark skin, and if they have a tan, it works even less. It's it's. Not ideal, but real quick to show you where she started, I could go even paler than this. But I'm gonna kind of do that retouch, uh, that's, just something that I would do regularly. But if I wanted to, I could make her skin, you know, very pale and smooth. So we're going to go over that later, and that would be kind of after lunch, so get kind of vampire ish.
Class Materials
bonus material
Ratings and Reviews
Sean
Fantastic Photoshop course. I knew Lindsay was great at Photography, Lighting, Posing and Public Speaking, but I am really blown away by her mad (great) skills at Photoshop. Lindsay really is a fantastic teacher. She turns what might be a more or less dry topic into a fun and entertaining topic. Thank you Lindsay and thank you CreativeLIve. You have a real superstar with Lindsay Adler.
a Creativelive Student
This is a great workshop for photographers wanting to learn and hone in on their retouching skills. As a photoshop user and photographer of 10 yrs I have been able to take away some further techniques to help better my skills and more or less tailor them. I would suggest you have some adv beginner knowledge of photoshop because I don't think some of the techniques you will be able to keep up with unless you buy it. There are two things that I wish she did better in her teaching and that is to teach new users to label all their layers and what they are as you are working. As you can see Lindsay ends up with 20 layers and unless your the one doing the editing you will have know idea what is what when you have to go back to it. So its best to teach this in the beginning so people get into the habit of organization early. Also I wish she used a Wacom. It really does cut your editing time in half and you have more solid movements in precisely selecting areas of a photo. From a photographer to other photographers. Use a wacom. You can start with a basic baboo for $89 and when the apple wireless mouse cost $69. Time is money, and a wacom truely save time! I used to use a mouse and my trackpad and once I switched I was like OMG what was I thinking before! So I wish she just emphasized that point more. Overall I think it was $99 well spent.
Christian G.
Not only is Lindsay very knowledgeable and a very good teacher but I REALLY TRULY appreciate her no-BS, straight-forward style.. No time wasted on long tangents talking about herself (or what have you), on cute remarks or on off-the-mark humor. She has showed us many great techniques, has presented to us various creative/different ideas AND she has also really been able to explain "how she thinks of a solution", how there is a bit of trial and error, "even" at her level.. All in a all, a truly excellent course and worth every penny!! Thank you Lindsay and thank you to the CreativeLive team for a great course!!