Lesson Info
6. Compositing Multiple Shots
Lessons
Lesson Info
Compositing Multiple Shots
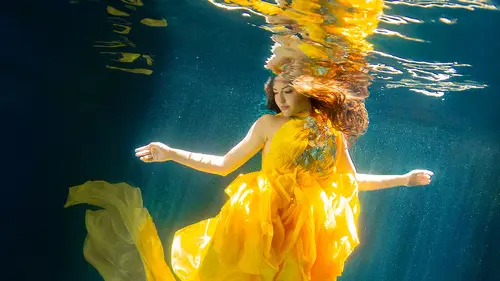
The overarching issue for this is that, like I said, you are sometimes going to have to compile multiple different images to get the final shot. So, let me show you the final shot. So we've got our final shot here. You can see the tail's in the perfect position. I love her hand, I love her facial expression. Her finger actually got bit by some anemone. I think she went in the wrong hole and she may have encroached on somebody's home and so she ended up with a little bite but she didn't show it. She's a professional, she's totally cool. But, what I wanted to basically show is that this is actually a composite of this tail, this face, and that reflection. Okay, so what we're gonna do is we're gonna kind of start to use our compositing skills to really make the image epic. So, from here, I want to select the reflection. I wanna select the top body and I wanna select the tail body. Nope, that's the wrong one. All right. And I'm going to open all of these images. Edit in. I'm going to open ...
as layers in Photoshop. So, what this is going to do is it's going to open all three of these images in the same Photoshop file. Oh man. And then I'm going to open this one as well so that you guys can see. Okay, there it goes. Just took a minute. Come on. Okay, so we've got our three files there. So, there's the reflection. Here is the upper body and here is the tail. And... So what we're going to do now is we're gonna take our upper body and we're gonna start to line things up a little bit. So, we've got our tail here and our upper body here and so what I did was I just decreased the visibility of the upper body so that we can line her up with the lower body here and so we're just gonna pull her down here. And this is one of my favorite tools. The warp option right here because it allows you to really play around. It's as if you're printing your image on Silly Putty so that you can really line things up. I'm trying to line up right here. Looks good. We increase the visibility and then hide most of this behind a... Yeah, that's good. So, I've got a white mask here. I'm gonna use my brush tool. I'm gonna use black and then I'm gonna use a hundred percent opacity and a hundred percent flow. And just add in the tail that I want. And the nice thing with the reflection of water is that it's very forgiving with your masking. (laughter) I mean seriously, it's like anything is possible in those reflections. So... Just because I'm doing this in literally five minutes, we're just gonna kinda-- We're gonna try and work on lining up the tail and the torso. 'Kay. Little bit better lined up. Okay, so I'm glad I was able to get the tail and the torso done. I don't have time to add the reflection that I originally used but let me just quickly show you the final or the PS-- The final PSD that I did work on so that you guys can kind of see what we got going on 'cause we are running outta time. But you can see how-- For me personally, if I don't get it all in one shot, it's not the end of the world because I'm dealing with her not being able to breathe. I'm dealing with her getting bitten. I honestly-- While I'm down there in the water, half the time I'm not even looking through the viewfinder 'cause I have a mask on and then there's this tiny little hole for my viewfinder which I can kind of see through but not really see through. So, some of the time I'm just shooting blind. I don't really know what I'm getting until I take the card outta the camera and see. But the good thing is don't be frustrated if you wanna start shooting underwater and you're like, uh, I didn't get it in one frame. That's totally okay. Photoshop it together. You still took that photo. So, I'm definitely not a purist. I will never be a purist. That's not the way that I roll, but here is our original. Okay. And then with the reflection and with the new tail and with all the coloring, colorization and stuff like that. I added a little bit of flow to her hair.
Ratings and Reviews
JennMercille
This class is SO COOL! I don't shoot underwater photography, but now I want to try. I especially appreciate that in addition to walking through the editing process, Kristina explained the how and why of each step in a way that can be applied in so many other creative and editing situations. Awesome class!
a Creativelive Student
Really great class! I would also like to see a class on underwater photography.
Simona Grigorescu
Usefull tips. I would like to see also from Kristina a class about underwater photography. :)