Lessons
Lesson Info
Know Your Concept
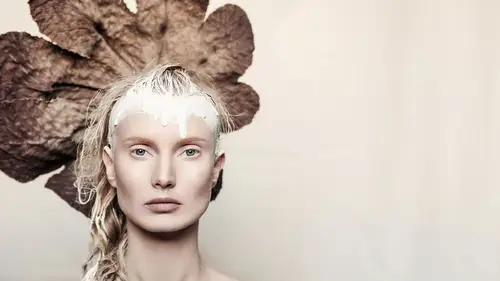
So, I'm gonna start with the first most important thing behind any beauty image, and this is not just behind beauty images. When I teach, I tell everybody, "This is the most important thing behind any image, "is what is the purpose of this shot? What is the concept?" And so an example that I give, all the time, is, let's say that there's a model, and she's got really dark, defined brows, okay? And then like, razor-sharp, black lips, and a mohawk. But then, soft lighting, like high-key background, soft light in the front, fill reflector, and then soft pose. Why? Why? Like why are those things? Now, there are images about juxtaposition, about things clashing, but most of the time, if you didn't think it through, you can tell. And so when you know what the picture's about, it actually makes your job easier, because all of your creative decisions reinforce this idea. Because, if it's about the skin, then you're gonna know how to light for the skin. And you're going to know how to compose s...
o it really shows that. And if it's meant to be a soft image, you know, the lighting for a soft image, the posing for a soft image, make-up for a soft image. So, if you start off with what the purpose is, everything else kind of can fall into place a little bit more easily. I actually find it easier to be creative when I don't have every choice in the world. If I can work within a little box, I can start thinking outside of that box to do something different. So, knowing the purpose of the image really is really, really helpful. What are you emphasizing? What is the mood? Is there a theme or a story? For example, if I know what I'm emphasizing, I'm emphasizing the lips, for example. Then I know, okay, well, the make-up. Maybe if it's a shot emphasizing the lips, the lips are what get the most attention, so it's a pop of color on the lips, but not just the styling of the make-up, but, you know what, maybe I should shoot at a lower angle. Because when I shoot at a lower angle, whatever's closest to the camera appears largest. So, my slightly lower angle actually puts me at lip level instead of eye level, so I'm emphasizing the lips, and they'll look bigger. So knowing it's about the lips helps me do that. And what's the mood? Okay, so it's an image about lips, but it's kind of sultry. And so maybe I go with a little darker shadows, and maybe I have the subject bite her lip, so it's a little bit sexy. And so the mood is helping me decide how I should pose, and how I should light. And then the theme or the story, maybe, the story is kind of vampire-esque, you know? So you see, it's not literally like vampire teeth, but she's biting her lip and there's a little piece of red make-up dripping off, so it looks almost like she bit her lip for blood. I just pulled that out of nowhere, but I'm like, thinking if I had an idea than I'd go, "Oh, so now I know all of these different elements." I really think knowing your concept makes a huge difference in actually having an impact when you have your final image. So the concept, it really makes it easier to make creative decisions. So for example, picture on the left. The concept of this beauty shoot was meant to be, kind of hot jungle beauty, okay? So if it's hot jungle beauty, she's gonna be sweaty. So, we're covering her in baby oil and coconut oil, but also her hair is not going to be clean and well-kept. It's gonna be wet, it's gonna be pieced across her face. And then the light, it needs to be a little bit sunnier, like I'm gonna have bright highlights, and then the background, these are from a florists shop, we got these different, like kind of, Caribbean leaves that we'd put in the background. But all of those things helped me decide my creative decisions. And then the picture on the right. The theme of this editorial, which will, it will be in I think it's Marie Claire Indonesia in November. The theme was nude-on-nude browns, warm tones. And so then I know the background needs to be nude tones. And the hair, I need to select a model with blonde hair, or kind of a dirty blonde hair, instead of black or red, because it doesn't fit the nude-on-nude. And then her skin tone, I need someone who's not completely pale but maybe not someone who's really dark skinned. And then for make-up, I want bronzy, and warm tones, and browns. I picked my theme, it helped me make the other creative decisions. And by the way, both of these shots are lit with a single light on the subject. You don't need to have a lot of complicated light, because in these instances, it's the subject's beauty, not the lighting, that leads the story. Or in this one, this was in a couple of Marie Claire's and Elle's, because sometimes what they do is they pick up an editorial and then one says, "Oh, I want that one too." And it kind of passes around. But the theme of this was bright streaks of color. And this was lit with one light, it was lit with a Zoom Reflector, a hard light source. And what I did is I held gels, like just regular gels that go on your lights. I held them in front of the subject's face and then the hard light comes through and it casts that color onto the subject's face. And if you actually go to learnwithlindsay.com, and you go to the blog section, I have a full behind-the-scenes of this so you can see exactly how it was done. But if you look, if I know this is gonna be the purple, and blue, and pink gels, then the pop of the colors of the lips to unite the whole thing. And then the choice of the nails to unite the whole thing, because I knew what the idea was, helps me make my creative decisions. And I can go on and on about these things. It is weird and funky, bizarre beauty, so let's go with weird and funky, bizarre make-up. And then the picture on the right is kind of a Hollywood film Noir style, so it's all gonna feel that way. The picture on the right, the prop I bought, and it was a $70, or $60 vintage phone on eBay. You know a lot of times, I'm scrounging for these cool little props to help tell the story. So, when you know your concept, it helps you plan ahead, it helps you make creative decisions about everything. Now, when you are planning a beauty shoot, there are different reasons to shoot beauty. It could just be, "this is fun." And you want to do fun, that's fine. It could also be maybe a beauty client hires you. One of my recent commercial shoots was for KISS Eyelashes. So I shot all of their, if you follow their social media, all of their campaign images, they'll all be mine, and it's a girl smiling with lashes and laughing. Doesn't look like my style but I was shooting for a particular goal for that beauty client. Or, you could be shooting a beauty editorial. So how it works is beauty editorials, if you wanted to shoot for a magazine, typically you need to have about six different looks. And what that means in a beauty editorial is it means, maybe you change the lips six times, or the eyes six times, or maybe the mood of the face six times, or maybe the hair six times. But in each of these, there needs to be a story and a theme that holds throughout. So maybe the theme is that it is the tropical shot in the beginning, and so it's different ways that the hair is clinging to her skin, and she had that bright pop of color on her lips, so maybe in each one, the pop of the color changes. And then her nails change for that. And so for a beauty editorial, you think slightly differently than if it's just a play day, because you have to have a story that holds together, but have some diversity in the images. In a play day, I actually usually have two days per month, every single month, where there's no boss but me. And it's me, and a make-up artist, and a model. And I keep it super simple, and then all we do, is we bounce ideas off of each other, and so, we'll plan, we'll send each other inspiration. And I'll say, "Okay, so let's try vintage, "or let's try glossy", or we'll try these different things and most of the time, I'm saving these images for inspiration off of Pinterest or Instagram. There's no magical place that I'm finding these things. And so, if you are doing that. If you are trying to do something more creative, and have a play day, I want you to keep in mind the start simple, then build. Which means, start with make-up that's not complicated or heavy. Something with not so much make-up, not so much contouring, not so much foundation, just a little bit more subtle and natural, and then build on your heavier eye, or your heavier lip, or whatever it may be. And there's a couple reasons. I find that the first shot of the day, I'm working the model into things, you know? We're working on posing, and so if I'm just doing a clean, natural beauty shot, doesn't need to be channeling any particular mood, we're just focusing on the model's beauty. And then, after a little bit, I go a little bit heavier, because let's say I do a bright, red lip, glossy thick. I didn't know this in the beginning, but if you change your mind and say, "Okay, next look, I wanna go to all nude and clean," the lips are stained, like it's really hard to get that back and look fresh. And usually you have to do more re-touching, or let's say you're like, "Yeah, I wanna go creative, "we're gonna cover her face with paint and powder", you're gonna have to wipe it and start from the beginning, so you're slowing down your whole shoot. I find typically when a make-up artist is doing the initial prep for the skin, that first look, it usually takes an hour and a half, maybe an hour? Hour, hour and a half? To get the skin and the look ready to start. And then the changes, depends on how difficult you make them, maybe it's 15 minutes, but it could be, you know, could be 30? But if you have to wipe it, you're adding on that hour and a half again. So, I start simple then build up. And I do the same thing in an editorial. If I know I want a little heavier, more dramatic, we save those looks for the end of the day. Before I move on from this, there's one other tip I wanted to give you about working with models. So, some of you are blessed to live in mid-sized or bigger cities that have model agencies. And, that's great. And one of the reasons I love to work with model agencies, is if a model gets sick or canceled, they have a back-up. But if you're working with someone you found online or someone that you found on Model Mayhem, there's not necessarily a guarantee they show up. But the reason I'm saying this is agencies are great and I like to work with them, but also know that a lot of times, these models when they walk in, they're just like, cute everyday girls, like they're pretty, you know, but it's the make-up, and the lighting, and all that, that transforms them. So you might be like, "Oh, I don't live in New York, "I don't have access." A lot of these people are coming from all over the world, all over the country, and so you definitely have people but you have to train your eye of what you're looking for and keeping your eye out for those things. So, like I said, long necks, nice cheek bones and jaw lines, bigger eyes. We also like symmetry, more symmetrical features. And so, these things are all things that I consider when picking a model. When I work with agencies, the reason I'm mentioning this is the start simple, then build. If you are photographing a model from an agency, and you are like, "Yeah, I'm gettin' creative today, "And I'm gonna do beauty Avatar. "I'm gonna paint her blue and cover her with glitter." I mean, the shots might be cool, but for most models, it's super not useful for their portfolio, and like, it's not gonna be anything that they can do anything with. So, what I always do is every single shoot that I ever do with a model that's just for fun, it's not like a client campaign shoot, is I start simple. Something clean, something with simple light, something fresh, because that's actually something they can use and will like, and then if they aren't down with my Avatar, that's fine, they still got a useful shot. So I'm considering everybody, everybody in this equation. So start simple, then build, both because you can't move backwards, but also make everybody happy.
Class Materials
Bonus Materials with Purchase
Ratings and Reviews
Margaret Lovell
I'm enrolled in a number of Lindsay's courses, and am moving slowly through them. Although I'm more of an outdoor photography, I am interested in fashion photography. I decided to take this course because of its focus on beauty photography, which I feel is a subset of fashion. Lindsay is an excellent instructor who gives plenty of easy-to-follow tips. She's extraordinarily passionate about fashion and beauty photography. I love that she'll set up shoots for classes so that you can watch how she applies her knowledge.
Alfonso Ruiz
Loved the course, Really good info in a fast and concise way
Stefan Legacy
Good course for someone new to photography and looking to learn how to pose and light their subjects. Very clear teaching style and easy to follow along.
Student Work
Related Classes
Lighting