Lesson Info
7. Modifiers
Summary (Generated from Transcript)
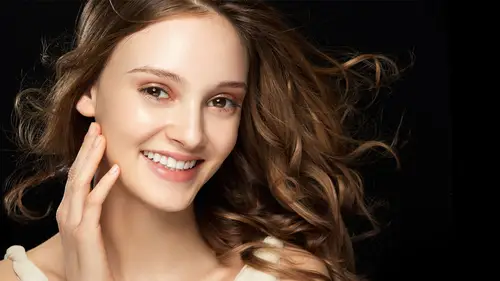
In this lesson, the instructor discusses different modifiers used in portrait photography to control the quality of light. She categorizes modifiers into three categories: hard light, soft light, and in-between. Hard light modifiers produce contrasty and crisp shadows, while soft light modifiers create a more diffused and even lighting. The instructor also explains the benefits and considerations of different modifiers, such as beauty dishes, softboxes, umbrellas, grids, and barn doors. She emphasizes the importance of choosing the right modifier based on the desired mood and effect, as well as the specific subject and shooting conditions. The lesson concludes with a demonstration of how different modifiers can be used to achieve different results in portrait photography.
Q&A:
What are modifiers in portrait photography?
Modifiers are tools that are used to control the quality of light in portrait photography. They are attached to the front of strobes or speed lights to change the characteristics of the light.
How are modifiers categorized?
Modifiers are generally categorized into three categories: hard light, soft light, and in-between. Hard light modifiers produce contrasty and crisp shadows, while soft light modifiers create a more diffused and even lighting. In-between modifiers have characteristics of both hard and soft light modifiers.
What are some examples of hard light modifiers?
Silver reflectors or zoom reflectors are examples of hard light modifiers. They are small in size, silver in color, and produce bright highlights and dark shadows with crisp edges.
What are some examples of soft light modifiers?
Softboxes, umbrellas, and beauty dishes are examples of soft light modifiers. They are larger in size, often white in color, and produce a more diffused and even lighting with softer transitions between highlights and shadows.
What are the benefits of using a beauty dish?
Beauty dishes are in-between modifiers that produce soft and glowing light, with slightly brighter highlights and darker shadows compared to softboxes. They offer more control and definition to the shadows, making them a popular choice for beauty and fashion photography.
What factors should be considered when choosing a modifier?
When choosing a modifier, factors such as the desired mood or effect, the subject's features, and shooting conditions should be considered. The size, color, and diffusion of the modifier can affect the quality of light and the overall look of the portrait.
How do modifiers affect the skin of the subject?
Different modifiers can produce different effects on the subject's skin. Hard light modifiers can create more contrast and crisp shadows, while soft light modifiers can soften the shadows and make the skin appear smoother and more flattering.
What are some options for rim lights or backlights?
Strip softboxes and barn doors are commonly used as rim lights or backlights. Strip softboxes provide a softer and more even highlight from head to toe, while barn doors offer a more focused and contrasty highlight.
What are the advantages of using barn doors?
Barn doors allow for more control and precision in shaping the light. They can be used to create a sliver of light and add more contrast and drama to the portrait.
How does the direction of light affect the portrait?
The direction of light can change the mood, shadows, and overall look of the portrait. Moving the light off to the side or higher up can create more shadows and drama, while placing it flatter can reduce shadows and create a more even lighting.
Lessons
Gear & Getting Started
1Introduction and Overview
1:53:24 2Cameras
55:41 3Lens & Focus
1:01:58 4Cropping & Composition
35:28 5Group / Accessories
45:29Lighting Essentials
6Intro to Studio Lighting
1:13:03Modifiers
41:08 8Natural Light Essentials
21:01 9Speedlights
37:28 10Training Your Eye - Light
28:08Posing & Directing
11Directing and Posing Headshots
46:50 12Posing Couples
21:18 13Posing Individuals Full Length
25:35 14Posing Groups
22:10 15Posing: Training Your Eye
15:34Subject Matter Essentials - Bringing It All Together
16Headshots: 3 Go To Set Ups for Men and Women
37:11 17Quick Reference: Photographing Men
29:39 18Quick Reference: Photographing Women and Full Figure
48:15 19Quick Reference: Photographing Couples
36:55 20Quick Reference: Photographing Families and Groups
30:43Lesson Info
Modifiers
We're going to talk about modifiers which I could talk about forever. I'm going to show you how to use modifiers to control the quality of light and there are so many different modifiers to choose from. Everyone has a different favorite and there's not really a right or wrong answer for portraits some people use large diffused light sources, some people use really small harsh light sources and modifiers. So what I want to do is I want to take you through the range of the modifiers that exist. Tell you how they behave, the qualities that describe them and how I would use them in portraits and then of course how you might be able to use them as well Thank you very much. So let's start by talking about types of modifiers. Modifiers are what go on the front of your strobes and it's also a word that can work for speed lights as well. But what goes on the front of the strobe to change the quality of the light. So when you think of a soft box, a soft box is a modifier. So let's look at the ra...
nge of modifiers that exist there are many categories of modifiers but I generally put them in three categories. Hard light, soft light and then like in between. So let me talk about these categories of light and what they mean. In the hard light category, this is going to be very contrasty modifiers What does that mean, means a couple things. It means that you're going to have a very crisp, very defined edges on your shadows. It's not going to be slow gradient from highlight to shadows they'll be crisp. Shadows achieved with harsh modifiers with contrasty modifiers and also typically the shadows are darker and the highlights are brighter. In Photoshop if you select something and you drag the contrast to increase the contrast. Highlights get brighter and shadows get darker and this is the same thing that happens. If you use a high contrast modifier. Now there are a couple things that typically describe these modifiers. Often they are silver, all the time but they're usually silver. Silver gives you more contrast. More difference between the highlights and shadows. Compared to say a white modifier, the next element of these contrasty modifiers. They don't have to be but often they are smaller and so the smaller the light source is relative to the subjects the harsher the light and then they also tend to be in these type shape categories I'm going to show you a few of these. But let's go to the opposite extreme, Soft light, sources soft light sources tend to be larger. They're bigger larger relative to the size of your subject means they're softer. They tend to be white most of the time, so they'll be a white large umbrella or a large soft box and they often have diffusion. Diffusion in is going to take you in the opposite direction of contrast. So what diffusion does it takes the highlights it takes the shadows and cuts the difference down. So there isn't going to be as bright specular highlights or is deep dark shadows. It brings them closer together so contrast the hard modifiers, makes highlights and shadows further apart where a soft more diffuse modifiers bring them closer together. So those are the extremes and then in the middle there are many different options. There are beauty dishes, there are umbrellas there are parabolic umbrellas and so I want to take a look at some of the modifiers we have here. So let's take a look at some them. John could I have the silver reflector? Of some sort. Oh, of course right there, okay sorry and let me grab this, okay. Breaking stuff, all right. So if I look at this. On the far right hand side over here with a hard light source. I have something like this, this is a the most basic modifier out there. It's called a silver reflector. Pro photo calls it a zoom reflector. So what are all those qualities we talked about it is small, it is silver and so it is going to be harsh and contrasty. It is going to give you bright highlights, dark shadows and really crisp lines from the shadows. Not a slow gradience and so this is On one extreme for contrast, harsh light. And then let's go over here to the other extreme I have a three foot by four foot soft box, so this is larger relative to the size of my subject and larger compared to that Zoom reflector and it is white and it is diffused. So all of these things give you more gradual transition from shadows to highlights. It brings in the highlights so they aren't quite as bright in the shadows so they aren't quite as dark. This is going to be much softer that is going to be much harsher. So let's take a look at something that exists in between and in between is a beauty dish. And Beauty dish is kind of solidly in the middle here and the beauty dish is my personal favorite for a modifier. what it does, this one in particular is actually a twenty inch white beauty Dish, Pro photo calls it a soft light reflector. and what it does is it bounces the light off of the center panel back into this dish. So it's got qualities of both of these modifiers, on both extremes because for example it's white. Like the softer light sources. It's bounce light like the softer light sources but it's a little bit smaller. More like these contrasty modifiers or the harsher modifiers and what it's going to do is it's going to give you soft and glowing light. It won't give you as bright highlights or as dark shadows as say the contrasty modifiers. But they'll still be a bit of a crispness to the edge they'll still be a bit of definition to the shadows. So if you want more control more shape out of your light, if you want to be able to have more definition to the shadows you'd go for a beauty dish over a soft box. However if you really want more shape but you don't want the miserable harsh contrasty light that you get from a zoom reflector. You go for a beauty dish. So those are the extremes and the beauty dish is in the middle. There are so many different options but this is kind of how I think of things. Contrasty, harsh, soft, in between and so these tend to be around my core of what I am trying to use so I want to walk through a couple other examples talk about these lights but let's look at I'm going to show you ten different light modifiers. Ten different ones and how they affect the light on the face. So as I flip through these next slide what I want you to look at is I want you to look at the highlights on her face. How bright are those highlights, how dark are those shadows. Then what I want you to do is I want you to look at the transition from the shadow to the highlight. How crisp is that line around the shadow of her nose. So look at the highlights in the forehead and cheek. Look at the shadows by the nose and the shadow on the far side of the cheek. For each of these photographs I took ten modifiers I rotated through and I kept the same direction of light the same height of the light and just switched out those modifiers. So let's look at each of them and let you know what modifiers there are. So this one is a small white umbrella. It's smaller which means the light won't be as soft but it's white which makes a little bit softer and so let's look at the next one soft white umbrella, the next one is a beauty dish. So you see the lights are still forgiving. However there's a little bit more crispness to the shadows. Next we have an Octabox. An Octabox wraps around a little bit more and it has a softer gradient to the shadows than the previous example. Let's go on from an Octabox. The next one is a soft box this one is a square. A little bit different quality to the shadows How about the next one is a parabolic umbrella. A parabolic umbrella is something that I will address in just a little bit we'll talk more about umbrellas. And we have a small silver dish or Smalls zoom reflector. You'll notice here how crisp those shadows are how dark they are, how bright the highlights are dark the shadows are. How there's a really crisp line from those shadows. Then I have a larger reflector. So it's a little bit more diffuse but still really crisp shadows. Something called a long throw also called zoom, a telezoom reflector. Even more contrast so all of these, I mean they're all producing a different quality of light then you have a snoot which focuses the light on the face. So I encourage you to go back through these and take a look at all of these examples. But here is a side by side comparison you can see what changes. So as I reflect on this I can see some highlights that are brighter and shadows that are darker. Some shadows that are more crisp others that are a little bit more gradual. I can also see some of the light that falls off very quickly some of the backgrounds fall to completely shadow while others the light spreads everywhere and the light hits the background. So the question to you would be which light do you like the best and of course you, if you've been watching you know that I do this several times but there is no best light because if I wanted something dark and harsh and dramatic and maybe going kind (mumbling) I might use a snoot or a long throw or something really crisp and dramatic but if I wanted something softer maybe more in the portrait realm I would use an octabox or a soft box or for my beauty lighting and for fashion photography I love beauty dishes. So all of these are equally valid but it's knowing which tool is right for which job just as a random note I one time put up on a screen all these different modifiers. I've been to the modifiers of the shoot the photos and I flip through them and I asked everybody what light do you like best on the subjects face? Which light do you think is most flattering and many people really liked the parabolic umbrella. So I will be sure to touch on that briefly so you can get an idea of what that does. So definitely you want to take a look at all of these different modifiers and you'll be able to, you can search online to see what they look like. But if I were a portrait photographer which I am, I shoot portraits and fashion as well. If I could only get one modifier what would it be? And it kind of depends on what you shoot at how many people do you shoot? Do you shoot a single person? Do you shoot two people together? Do you shoot families, do you shoot groups of people? How mobile do you need to be is this need to be a quick and easy light that you can take that modifier tear it down quickly or doesn't matter is it going to stay up in your studio space. So probably as a portrait photographer I would generally lean towards an octabox, three foot octabox like we have over here this is the rapid box Octa XL. And then over here the three five by four foot soft box. I would go for a bigger soft box if I'm lighting small groups. Two or three maybe four people I could light with a three by four foot soft box but if I'm doing a lot of head shots than a lot of just clean portraits. I might go the Octabox realm and the reason I do this is. This light is most forgiving if you are shooting a wide range of portraits subjects and your job is to flatter them. Help their skin look great you want to take away from any weaknesses or any flaws including blemishes or wrinkles. A soft box or a softer light source is going to be your friend for portraits it's true, it's going to be a lot more forgiving and the larger the light source you have it is going to give you a softer quality of light the larger the light source is relative to your subject the softer the light. But there's a balance. In my first studio space it was a, I think it was a six foot octabox that I had. Six foot octabox and I had eight foot ceilings. Which means I couldn't do much with the light it stayed in one place and sure. Every photo had beautiful soft light but I couldn't do much with it. I couldn't really shape the light, I couldn't really create too much drama it stayed in one place. Whereas if I had a smaller octabox for lighting individual I could start to change the direction of light get more shadow if I want, shape the face, sculpt the face. Whereas with my huge light source I didn't really have that flexibility. So I would choose one of these options and something that's nice about this particular modifier over here is if you do a lot of shoots on location. This one is called the Rapid Box Octa XL and the reason that I like it is it kind of acts like an umbrella. In the fact that it's really easy to set up and tear down. So it packs up like this. Packs weight easily and then you can pop it open without having to put it together and feed rings and then you can put the diffusion back on. So I like that because of how easy it is to set up. So if you're looking for ease of use, less expense and also you want it to be a broad light source could I have this umbrella over here. The diffusion. Something else that you might check out this is another one of my favorites that I've really been shooting a lot. Thank you. This is a large umbrella with diffusion panel. I really like the light that comes out of a soft box but soft boxes can kind of be a pain to set up. Especially on location, if you're working with speed rings and you've got to put the little two metal poles in and set it up, it's not quick and it's not super easy. what I love about these umbrellas is that, well I mean they're umbrellas. So what you can do is you can take them on location and I think of these umbrellas with diffusion as my on the go at all times window light that I can set up anywhere. I can set up this window light wherever I want because I can take umbrella. I can pop it open, so it's going to give me a large light source and then when I add the diffusion on the front that softens the light and spreads it out. So when I go on location or when I'm doing a larger family portrait. Where I need to light multiple people and I need the light to wrap around. This is what I'm going to take with me and this one is in particular is made by Photek it's called a (mumbling) I believe and they come in different sizes there's one that's even larger than this that I will shoot if I want a huge light source and it's a lot easier to cart around than a four by six soft box or a six foot octabox. It pops open you add the diffusion and you're all set, it's your window that travels with you wherever you are. So I recommend checking this out and also one of the great things about is not just its portability, it's inexpensive it's like, it's less than a couple hundred dollars, I think. This one's like $160 or $130 something like that. Compared to the cost of a large soft box so you got your portability you've got your beautiful lights and then also a good price. So check this out if you want that soft box like but you want it to be portable or if you're trying to have some cost savings right away. This would be a good option. Let me pass this back to you. Thank you very much. All right, so let's continue in this presentation over here. So selecting a modifier. I've touched on the fact that of course there's not a right or wrong answer but the questions you're asking yourself are. Okay, so what mood do I want to? Do I want there to be a lot of contrast and a lot of drama and crisp shadows or do I want it to be soft? Am I trying to compliment the skin? Perhaps maybe, I would go for a softer modifier in that instance and what kind of features do they have. Can I use my modifier to help me out with this. So this is some of the things that we talked about small, silver or grid. More contrast, sharper edges, brighter highlights more focus light. Opposite size, if it's white larger or diffusion. It's less contrast, softer edges, brighter highlight more spread of light. I mean less specular highlights more sort of like. So basically these are options if you look at it, it's silver. It's probably has more contrast if you look at it small it probably has more contrast but the other direction if it's white or if it's larger. It's less contrast, it's more forgiving. So this is what I'm looking at a modifier trying to figure out what it's going to give me like, how big is it? Is it white? How large is it going to be relative to my subject I kind of ask myself those questions to figure out what type it's going to give me before, what type of light it's going to give me before I ever shoot with it. So let's look at a couple other words, a couple of the things you'll see pop up along the way as I talk about light and light modifiers. One of the things I talk about is diffusion. Diffusion is neutral and it's a semi transparent or translucent material that goes in front of the light to soften it. And so what I do for diffusion on location. I can actually turn the sun into a soft light source. So what I will do is I'll take a piece of diffusion material the light when the sun hits a diffusion material the light spreads out and it becomes that light source. Like the actual piece of diffusion becomes the light source, so the sun spreads out and it softens. But here's what it matters for a soft box if the soft box didn't have this to fusion materials. If the soft box didn't have this diffusion material in the front of it. It would just be a spot light source with the light does as it hits the diffusion it spreads out and now you're light source is not just that spot in the middle. It is the whole front of this diffusion panel. So there's diffusion for soft boxes as you already seen diffusion for umbrellas. So the umbrellas become softer. There's also diffusion for your beauty dish if you want to soften the beauty dish. So this is going to be, let's say, you have light on your subject and those highlights look a little bit too bright. Well you can add diffusion it'll cut down on those highlights a little bit it just softens it a tiny bit. So that is one thing that I use often diffusion on umbrellas soft boxes, beauty dishes. I'll take a look at another tool that I use. Another tool would be called a baffle or sometimes called Inner diffusion and so this one doesn't have it but many soft boxes will have an inner piece of diffusion you can see it in this photograph here. There's one piece of diffusion in the inside and one piece of diffusion on the outside. Here's why. If you have a large soft box like a four by six, a huge soft box. What happens is the light in the center. Hits the front diffusion panel of a four by six and you're going to have a bright hot spot in the middle Now granted the light does spread out along the diffusion panel but I've metered before like a four by six and the difference of the light the brightness in the center to the edges is more than two stops it just doesn't spread out enough so there's a hotspot. And so yes the light is bigger because it's a four by six but not,not really it is kind of still concentrating in the middle so if I want the light to really be bigger and really be softer I really need to spread out more I need that light to soften. So when you add an inner diffusion, an inner baffle what happens is the light hits that inner diffusion spreads out and now that spread out light hits the second piece of diffusion the outside diffusion. So it gives you more even illumination around a soft box so this is really important for a large light source or a large soft box so it's something if you've ever like pulls out that inner diffusion like with what I need it for that's would be why you would need it or why you would consider it. Next would be a grid, I love grids and was one of the things I was really excited when I finally discovered it took me forever to learn about grids I had no idea and now they're incredible for controlling the light. What grids do is they prevent spill of light from a modifier they make it's a little light just doesn't go anywhere that it wants it keeps it coming out in one direction and they make grids of all different sorts. They make grids for soft boxes. They make grids for beauty dishes. They make grids that are just stand alone light May I have that one please? Thank you very much. Here is a grid for a beauty dish. It looks like a honeycomb and when you put it on your beauty dish now when you have the beauty dish regular let's say four or five feet away without the grid. The beauty dish basically hits from head to maybe mid Mid thigh, mid calf perhaps mid calf and then I add the beauty dish grid and it takes that light and it goes it focuses it in it can't spread out it prevents the light from spilling everywhere so all of a sudden originally without the grid the light hit down to my legs once the grid is added it might just hit my midsection it focus is all that light in and for a soft box maybe doesn't focus the light in that much but the grid make sure the light doesn't spread everywhere so it will hit the walls won't hit the ceiling it keeps a light going out in one direction. You can use a grid by itself just as a spotlight on the face or just as a spotlight on the background I love grids and I use them all the time but if you are just starting your portrait photography if you're just getting started I've been kind of rambling all over the place about soft boxes how great they are how I love beauty dishes why you might use more contrasty modifiers However. Probably when you get started a lot of people are just using umbrellas so let's just take look at umbrellas. Okay, great. Would you bring that umbrella out here real quick. All right I've got a whole bunch of different umbrellas and then you also saw the extra large one from before so looking at these umbrellas what do they do, which one would you choose? Okay, so we've got silver. We've got white and we've got shoot through I gave you a list of what some of these different qualities are these different descriptions will do to the light so silver makes things more contrasty silver will give you a brighter highlights and a little bit darker shadows crisper edges. White is going to give you a little bit softer transition to the shadows a little bit softer light and shoot through is like diffusion, it's a diffusion material where the light spreads out becomes really soft and then the next thing that you could consider is how big is that umbrella? The bigger that umbrella is the softer the light is going to be. The smaller that umbrella is relative to your subject the harsher that light's going to be so you have a goal of these different things to choose from and the benefit of umbrellas is that they're inexpensive and they're portable. The down side is I think of this let's talk to the bucket of water example right if I have a it's basically a pan of water okay, if I feel that if I throw this at the camera. The light is going to go everywhere so I'm going to do that again so I throw this at the camera the water the light it just it spreads everywhere there's not really any control it's going to hit the wall that's going to hit the floor it's not really a modifier that lets you take control of what the light is doing. It looks okay on the face like it might look soft specially if you bring this umbrella in really close it's white and so I bring in super duper, duper close it's going to be a soft light source. Without control though so it's going to be hard for me to get crisp shadows the lights going to bounce off the ceiling so it's kind of a pain but if I have you know. A bucket there's going to be a lot more focus to my bucket and so the deeper your bucket is. the deeper your modifier is, the more focused the light so a deeper soft box for example the light is going to kind of head out in one direction so I think about it if I have a pan or a deep bucket the water will hold the shape of the bucket and like travel further before it spreads out. Okay, so this is just coming back to the point of well the umbrellas there like pans the light it just goes everywhere. But there are these things called parabolic umbrellas where the umbrellas are deep they're deep set and so it makes the bucket it's less like a pan it makes it more like a bucket and so the light goes more front more directional instead of spreading out in every direction so I've actually been using a lot of deep umbrellas and parabolic recently it's a little bit beyond but if you want to look that up and look into them they're the really great tools and I like that they can be portable I've been shooting a lot with the pro photo deep umbrellas with diffusion in front because they're just like soft boxes on location so if you're going to use an umbrella know that you can get good quality of light you can get pretty light but you don't have control it's inexpensive but if I want crisp shadows it's not going to happen if I don't want the light spilling on the wall it's not going to happen it just kind of throws the light in a decent way to give you an okay photo. Now that being said some of the most famous photographers of all time have made amazing photos with umbrellas of course, it's all about the tool and whose hands it's in so you can do something great with umbrellas if I were going to use an umbrella basically the summary of this whole conversation would be if I were to use an umbrella I would use a larger umbrella with diffusion it would make it softer kind of like window lay on location or I would use a deeper umbrella so the light doesn't spread everywhere so those are some of your choices silver if I wanted to be a little bit more crisp white if I want to be a little softer I tend to go towards bigger umbrellas So stay away if you're going for a nice porch light stay away from small silver umbrellas far away small silver umbrellas far away is going to give you just kind of contrasty unflattering light. Thank you. All right, thank you very much. Okay, let's go through a couple other things so far umbrella of diffusion verses softboxes. Softboxes come in different sizes so larger is going to be softer as long as it's close to your subject it comes in octaboxes it comes in rectangles. Some people prefer this is this is a taste thing I don't really care either way some people prefer to have octaboxes because they like the octagon the circular shape of a catch light in the eye compared to large rectangles so when you see the highlights in the eyes some people care or have a preference for Circle vs. rectangles I don't particularly care either way sometimes a larger rectangles I can get to wrap around my subject a little bit more or perhaps a rectangular soft box will give me more even lighting from head to toe whereas an octagon might just like the face and the midsection so those are some considerations as well I shoot with a three foot octabox and a I have a three by four foot softbox and a four by six it kind of depends on how many people you're lighting. are you lighting from head to toe? Do you want portability? In the end the right modifier for you depends on what you shoot and what you value out of a modifier. Let's talk about those some rim lights, my back lights here and I'm just going to pass these off to you if you want to take some of these offset briefly. Let's talk about backlights I need something to separate my subject from the background one of the sure ways that I can tell if someone without a lot of portrait photography experience is when the subject is blends right in the background dark hair against a dark background and it's one in the same. I can tell that they haven't really finessed the lighting yet they don't know how to make their subject pop out from the background or a lot of what I see when the shadow is cast upon the background again watch my studio lighting 101 class because I go in depth all about controlling all of those considerations I go through all of this in detail. All right, but one of the things you can do to make your portraits a little bit more polished is to make sure your subjects stand out from the background and this would be using the rim lights or hair lights. Rim lights is a bunch of different options you can use but I've got two favorites and let's see both of these favorites the first one is going to be a strip softbox. Thank you very much and the next is going to be barn doors and I actually have you hold both of them if you can. Absolutely. Thank you. Okay, so these two lights are usually what I use on my back lights I talked about a kicker light in a previous segment this is that extra lights that their separation between the subject and the background. These two lights I do not generally use on the face but they're used to separate the subject to give them some separation that rim light and here's the difference between the two. This one is called a strip soft box or a strip light. And what this does is the light hits the diffusion panel and spreads out and so this is going to be a softer rim light but also it gives me a little bit more even of a highlight from head to toe because it the light becomes this whole soft box so I can get a little bit more of an even highlight. Barn doors on the other hand, it's going to be a smaller light source but I can focus that light down to a sliver. So I can have a very contrasty, notice this is in fact. Silver So I can focus these barn doors down to the smallest sliver of light and just light the jaw line of my subject or just light the hair or just light the side of the body so this is softer with more even light from head to toe but barn doors are going to allow me to have more contrast more of a crisp or smaller highlight. Maybe, kind of depends on where you're going for a down side of barn doors as there's going to be a hot spot it will be brighter maybe in the middle of the body and then the light drastically falls off. Whereas you don't get that with the soft box but it's a little bit harder to control the spread of light Most portrait photographers tend towards the soft box gives you a little bit more control it's a little bit more forgiving barn doors is a little bit more cinematic you see it a little bit more in maybe movie lighting as well as like movie posters and things like that so these are both rim lights these are both backlight intended for separation I also like barn doors because they're a little bit more portable and easier to set up than the Strip banks but both are fine thank you. And there are other modifiers that are used for rim lights there are things that are grids and there are snoots but those are the two that are used most often in portrait photography. So just to kind of summarize this and what it means to you. Let's take a look at what modifier choice does to the skin of your subjects of your portrait subject because that's what really matters we're bringing this back around it's a combination of, okay the quality of light it's helping me achieve a mood but really what is it doing to my subjects skin so let's take a look at this individual picture on the left. I'm using a silver zoom reflector in the middle I'm using a beauty dish and on the right I'm using a soft box so I go from harsh to medium to soft. Let's zoom in and take a closer look at the skin so I'm just looking at the shadow contrast the shadow gradient on the left hand side and also the wrinkles on the far left with that silver dish the zoom reflector it goes very quickly from highlight to shadow. It's a very crisp shadow line and then the next over it's a little bit more of a gradient and then on the far right with the soft box it's a very subtle gradient the shadows are more defined on the left and the difference between the highlights and shadows on the right is more subtle so all of those things are considerations so just for the next couple of minutes while I wrap up I just want to show you a couple of those modifiers in action but if you watch future segments of the boot camp you can actually see in action a lot of these modifiers how I would use them for different subject matters for groups for individuals and why I would choose to talk through why I would choose each modifier Can I borrow you from my last couple of shots here. All right. Thank you. All right. So let's start off with our raw light. Which is brutal. I'm turning my modeling like back on. (mumbling) Okay. And as I've said in the previous segment you can meter to figure out what the correct exposure would be on her face. But I'm going to guess. (mumbling) (whispering) Yeah, I'm gonna do negative five Yeah, let's try five. (mumbling) Got to turn it on, that would help. (mumbling) All right. So if you look, don't hate me, it's a little, little brutal, okay. No, it's not that bad if you look at this light I see this out of a lot of beginning portrait photographers it's a light that is just there there's not really a purpose to it because it's, it's contrasty, but it's not dramatic, right? I mean I don't look at this photo and think wow drama but it's also not soft and flattering So make a decision, what's the purpose of this photo? What are you trying to do with your modifier choice? Are you trying to go really soft and diffuse? Are you're trying to go really dark and dramatic? It's the quality of light it's your modifier, it's your direction of light when I see that I think undecided I did not know what I wanted to do and so, in a previous section you saw what a beauty dish looked like Right now, let's try the, can I have the octabox that John is setting up real quick so I'm going to take this octabox and what's the octabox going to do? It's going to take this light source and make it relatively bigger it spreads it out compared to the size of my subject. And it's going to soften the light because of the diffusion on the front so that's what I'm going to do here and also how diffusion works it's going to cut out some of the light so I will have to adjust my exposure a bit. And I'm just going to keep the direction of light relatively similar I'm going to move it over just a little bit so it's not in my photo just raise the light up a tiny bit, okay, cool. All right, so, now, I'm going to soften the light and it's going to be bigger relative to my subject. (mumbling) Okay. Okay. So now the light starts to get a little bit more forgiving there aren't as bright highlights on her forehead and on her nose is just a little bit glowier you don't notice blemishes as much it's softer it's more forgiving it looks more like a portrait although what I would see as I look at this and still say what are you trying to do like what are you trying to do with this picture do you want it to be soft and high key and bright and if so can I have a reflector real quick a reflector, reflector so there's two different words reflectors or two things just so we can address this because you'll hear me say it a million times so this is a reflector as a modifier but then there's also a reflector to bounce light I guess they ran out of names (mumbling) thought that was strange they ran out of names. So if I were saying to myself in this photo Okay what I want to do is I want it to be soft and bright and high key while going to push it further that direction so I could put a silver reflector to capture more like put more sparkle to her eyes and do a portrait that way. And I'm going to open it just a little bit brighter can you bring that up just a tiny bit like a little bit higher capture even more light, great. Okay. And so this makes the picture just a little bit brighter fills in, sparkles her eyes just a little bit more. And so it's a softer picture but then if I were going the opposite direction say Okay wait no I don't want that anymore what I really want to do is I want to forgiving light on the face but I wanted more drama I can move the light off to the side and add more shadows. Good. So I can do something like this. And now I have a little bit more drama but if I wanted even more drama I could say, okay, well, I've got more drama because I have shadows here cause I changed the direction of life but if I want to push that further I could grab a more contrasty modifier can grab a beauty dish or a silver reflector but if I want it even softer I could grab a bigger light source like a three by four foot or an umbrella with diffusion so really you're going to see all of these come into play as we go through the boot camp but this is what I think in my head I look at the photo and I say, what's the purpose of this? What mood I'm trying to set? What features of my subject am I trying to draw attention to What looks best on their skin? What's most important? And then I go through and I say, okay, Does the modifier fit my goals, yes or no? And I can switch the modifier more contrasty or softer and bigger. Is the direction of light fitting my goals? More shadows off to the side or higher up or flatter so there's fewer shadows and that's kind of how I break down and decide what modifier to go to and where to place my light. So join me for the rest of this boot camp so you can see this all in action you can see this in play when photographing women, men, groups women with curves all of this come into play as well as head shots which is something you want to definitely master and build upon.
Class Materials
Bonus Materials with Purchase
Ratings and Reviews
Berus
One of my favorite courses thus far on Creative Live, and definitely well worth the purchase price. Lindsay effectively demystifies many of the critical stumbling blocks to achieving a practical understanding of many critical elements of portrait photography. I would rate this course as being perfect for the advanced photographer - a couple of the concepts might be beyond that of a casual/intermediate photographer, but even they would probably gain a great deal from this course. Her discussion on equipment, in particular was superbly done, and allows one to move forward in beginning to make the right choices to achieve whatever effect one is after in terms of capturing the subject. Finally, the great thing about this course, and the thing which makes it such a great value, is the overall scope of what is being taught. Lindsay covers almost everything imaginable, and does it all in a manner which is enjoyable, and makes the time fly by. There were many, many times during the various days of this course during which Lindsay would share some particularly great tip or technique, and I would think "Insert bookmark here." I don't dole out praise easily (actually left a fairly scathing review on another course here recently) but this course has won me over. Highly, HIGHLY recommended. I'm definitely going to check out her other courses as well.
a Creativelive Student
This is Lindsay's best course to date and believe me, she has given us some good ones already on Creative Live. She hit this one out of the park! She was very well prepared and organized. I could tell that Lindsay put a lot of work into preparation for the class because she just kept giving us great information non stop. There was no down time or wasted moments. All future instructors on Creative Live should be encouraged to watch this course just to see what good instruction looks like. Lindsay has evolved over the past few years and just keeps getting better as time passes. Thank you Lindsay and thank you Creative Live for a job well done! Craig Banton
Penny
This class is one of the best investments I have made in my photography business. Lindsay is an excellent teacher. She is a seasoned, yet humble, professional. Unlike some other instructors I have seen on creative live, there isn’t a lot of fluff in her teaching. She sticks to the topics, gets all the information in, but still manages to engage and relate to the audience with real life examples of her own experiences in photography. I have been a professional photographer for several years, but have mostly stuck to natural light. This course gave me the confidence to tackle more advanced lighting setups and expand my capabilities as a photographer. I really appreciate that she doesn’t bash flat lighting, like other lighting videos I have tried to watch. Most portrait clients do not want photographs with dramatic lighting, they want to look their best, and I’m glad that she acknowledges this. This class gives you the information you need to create whatever photos you want to create.
Student Work
Related Classes
Portrait Photography