11:00 am - Warm & Cool Adjustments
Lesson 6 from: Adobe Photoshop Mastery: Color & ToneBen Willmore
11:00 am - Warm & Cool Adjustments
Lesson 6 from: Adobe Photoshop Mastery: Color & ToneBen Willmore
Lessons
Day 1
19:00 am - Tonal Adjustments
1:27:55 211:00 am - Understanding Curves
1:07:12 31:00 pm - Adjustment Layer Essentials
1:19:41 42:30 pm - Advanced Tonal Adjustments
1:16:20Day 2
59:00 am - Hue & Saturation Adjustments
1:25:09 611:00 am - Warm & Cool Adjustments
1:07:49Lesson Info
11:00 am - Warm & Cool Adjustments
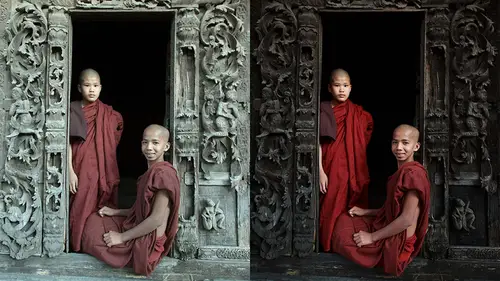
one thing I should remind you of that. I don't know how clear I made. It is when working with hue and saturation is We did in the last session realized that it is only able to isolate things based on color. So if I ever showed you a red car or certain colored flowers or whatever, it has no idea their flowers and has no idea it's a car. All it cares about is what color it is. So if you have multiple objects of the same color, it will change them both, and you get paint on the masks to further isolate. But I just find a lot of people end up thinking, Oh, it can isolate objects. No connects like colors. And so if that object is one color than it can look like, it's isolating the object. But is thinking purely about color. I have an image up here. I did right as we're going to break. Yes, didn't see me do it, but I'll just show you the before and the after. I have to adjustment layers here. One is adding contrast with curves and the other is changing the color. But here was the original, a...
nd I just wanted to look like a slightly different time of year. You know where. It hadn't quite gone quite that far in color, but that's easy to do. Just isolate the Reds shifting the greens. Okay, so we've talked about hue and saturation adjustments. Now let's talk about a different kind of adjustment, one that I call a warm, cool adjustment. The reason I call it that is because we're gonna be presented with sliders. We could move around, and with all of those slaughters, if I move in one direction, I will make the image look warmer, more towards red, yellow, orange. If I move in the opposite direction, I'll make the image look cooler more towards green blue scion, that kind of thing. And that's what's common about all the adjustments. But it's a little different than hue, saturation and brightness, because hue, saturation and brightness is somewhat like how my brain thinks My brain says it's a dark red car. You know that's telling me the brightness, the hue and might be hinting at how colorful it is. And I described things in ways similar to hue and saturation and concept I don't describe them in warm, cool ways. Instead, this is based completely on the waiter. Eyes work in the way cover reproduction works in. So in order to use these and become good at them, we need to know a little bit about how your eyes work and a little bit about how things like your computer screen, your camera and everything else just generically creates and displays color. So you've all probably seen white light being sent through a prism and coming out the other side of the prism you get like the whole spectrum of light. I hope you've seen that this just represents that in that we're sending white light through the prism out the other side comes a spectrum. What that means is, white light is not like it's just white. It actually contains all those colors. It's just when you use those colors in there perfectly balanced where the blue can't over, dominate the red can't over dominate the green. When they're in balance, you get white and we'll learn that as we go through this, your eyes are on Lee, sensitive to three colors of light. That's all your eyes. We're capable of quote unquote seen on the physical level. And what that means is everything you've ever seen with your eyes could be described as a certain amount of red, green and blue, because that's the type of receptors you have in your eyes, simplifying a little bit. But in general, so any time we see something in Futter shop behind the scenes, it's usually creating it out of red, green and blue because that's what your eyes are sensitive to, and you can grab any image. And if you do a special technique that I've done, you would be able to pull it apart into the amount of red. The amount of green in the amount of blue it's made out of it just happens to be. When you combine red with green, you get a different color showing up. When you combine blue with the others, you get more color showing up. But that whole thing could be divided up into read green and blue could be a picture Here. I'll peel off if I can remember how a copy of the red so peel off a copy of the green, you know, peel off a copy of the blue. That's what all of your pictures are made out of. If I take those and I put them back together so they line up again, I should be back to the full color image. So behind the scenes, you might not be aware of it usually. But just know Photoshopped behind the scenes might not be showing you all the time, but your pictures air made out of red, green and blue in the whole reason for that is that that's all your eyes are sensitive to, and therefore that's all we need to use. If you're to Graham a microscope and put it up really close to your screen and magnifying, you'd see little specks of red, green and blue. Every little pixel it makes up your screen would just be different brightness levels of red, green and blue. It's all it needs your digital camera. If you were to tear it apart, look at the sensor and zoom up real close. It has little areas where it senses the amount of red, green and blue going into the camera, you know, so the world is an RGB world, you could say. So what do I need to think of that? We'll each color that you ever see in photo shop. Behind the scenes is made out of a certain amount of red, green and blue. And in here what? I have a special document where I have read in a little tab here to see how I will pull it out. That's red. I have green here in a little way where I could pull it out and I have blue. And if you put red, green and blue whether balanced, we have an equal amount of red, green and blue, you'll find out that you have no color showing up because no color can. One color is kind of evening out the other, and you end up with white. But each one of these colors has a formula of how it could be made in that formula is a certain amount of red, green and blue. And I could take these little things in the middle and just set them to the these percentages, and I would see exactly that color. In fact, I'll do that. I'll take the red, and if I have the number keys on my keyboard right now, I can control the percentage I'll bring it down to 70. I'll take the green. I'll bring it down to 60 protect the blue and bring down 20. Do you see how these colors match? Because I'm just varying the amount of red, green and blue we have, so you don't have to remember any of these numbers. All you have to know is every color you ever run into in photo shop has a formula for how much red, green and blue would be needed to make it. And this is what photo shop is dealing with all the time. And it's usually just trying to present you with an interface that gives you some adjustments that deal with this behind the scenes without letting you know it's happening like hue, saturation and brightness. It was nice of it to figure out how to make changes to these values without having to make me think about them. A couple things you should know that I consider to be essential when it comes to working with warm, cool adjustments. Here we have red, green and blue, and we have little color ramps here. We're using less and less of each one of those colors. Watch what happens when we use an equal amount of red, green and blue. You could call it a balanced him out. But if I put this on top of this and then I grabbed this and put it on top, you should remember in your head try to store this. That a balanced amount of red, green and blue where you have the exact same amount of red, green and blue. It makes gray balanced red, green and blue makes gray. If you can remember that and you can just know that somehow it looked like that was the case, Then you can partially understand color correction if you know that equal amounts of red, green and blue McRae, another thing that you should be aware of is something related to reproduction. And that is your printer doesn't have red, green and blue ink in it, does it? It doesn't. You buy ink you don't usually by red, green and blue. Instead you by scion magenta and yellow. Well, how does that relate? Well, what color here I have red, green and blue. Let's see, The problem is if I have red, green and blue. Um, if I combine any of those what I'm using ink, you get black and you it makes it difficult to reproduce things. So we really want to do is when we're printing. What we want is a color of ink that Onley absorbs red in nothing else. We want a color of ink that Onley absorbs green in nothing else in a color of ink that only absorbs blue in nothing else. Let's figure out what that would be. So let's see what it looks like if I take these three colors and I just take the read out. Whatever shows up when I take the read out is the color of ink that it would absorb red because green and blues left over here. Reds gone. So this is what's left over. So whenever you print with Scion Inc all scientific does its sole job in life is to absorb reading a red light. That's all it does. That's the only reason we use that color. Science is the exact opposite of red. Imagine you have a seesaw teeter totter or my two hands like this, and you have read in one hand you have science on the other there, the exact opposite of each other So if I increase the amount of red somewhere, I'm automatically needing less sigh in ink to do that. If I increase the amount of science somewhere, automatically absorbing more the red, they're the exact opposite of each other. Let's see what color would absorb green if I just pulled green out of here. Whatever is left over is what I would need, and that's magenta. The whole reason we use magenta ink in your ink jet printer is its sole job in life is to absorb green light. Then the blue is absorbed by yellow. That is useful information to know as you'll see when we start applying adjustment. But there's one more thing I'd like to talk about before we get into those adjustments. And so let's take a look at So remember when I mentioned that scion in red or opposites of each other? It's like a seesaw teeter totter. Well, every color you've ever seen, your lifetime has an opposite, and if you have a color wheel, you can figure out what those opposites are. Let's just do it for red, green and blue in here, and you'll see how it's done and you'll get the same answers we got a few minutes ago is faras. What colors absorb that. So if you come in here and you pick a color, let's say red, green and blue. All you need to do is draw a straight line from the color your thinking of to the center of a color wheel and then extended an equal distance beyond that center and you'll be sitting at the opposite color. So the opposite of red was Scion. The opposite of green was magenta, and the opposite of blue was yellow. It would be most useful if you could remember those opposites. I don't expect you to, though, so I want to give you some help in remembering and that all you need to do to remember him is open the info panel in the info panel with default settings. Usually you have RGB on the left seem like a in the right, and the opposites are directly across from each other. One side talks about light. That's what's used when you reproduce your image using light, look in your computer monitor and the other side zinc. That's what you use when you print it. But the opposites air directly across from each other, So the opposite of red was saying. In the opposite of green is magenta. The opposite of blue is yellow, so if you ever need to know the opposites, but you don't have them stored in your head, just open the info panel. It will remind you the opposites. Then there's just one more issue and that IHS If science, magenta and yellow are exactly the opposite of red, green and blue, then why the heck do we need black when you print well, there's a couple of reasons for the first is this Sure if I take science magenta and yellow and use them all together, one on top of the other, I get something that resembles black. It's actually a dark brown you get, but it looks pretty close to black compared to printing with black ink. But think about how much ink is used and how expensive that it might be. So if you total up the total amount of ink used right here, when would be 300% ink to make that? That's a lot of ink to pay for. Where is over here? I'm using 100% in black as the cheapest Think. It's not like black has to be precisely black, you know. But if yellow is off a little bit, magenta is off a little bit. Pictures don't look good. The black blacks easy to make. So it blacks the cheapest ink that I know of, and you're going to use a lot less of it for that. That's not the only reason that if you print text and the only print it was psy in magenta and yellow. What if that doesn't align? Precisely When you print it out, you'd get text. It looks like this. You've probably seen stuff like that before. When you see when registrations often a logo or something, you see this weird little halo around it? Well, instead of having text where if the registrations off the tiniest bit, you get those weird halos. If we print text with just black ink, then we have no problem with it. So that's why we want to use black ink as well. When we print so out of what we just talked about, you can forget most of it. The things that you want to remember are the following. Every color has an opposite. If I want to know the opposite of red, green and blue because it will be useful, I could open the info palette to see what's directly across in over years and years of doing that. Hopefully, one day it'll be in your head instead of the info pad. I. So six months from now your brain might magically tell you the opposite of them. The other thing is equal amounts or balanced amount of red, green and blue makes gray. If you can remember those things, every color has an opposite. I know how to figure out the opposite of red, green and blue, and equal amounts of red, green and blue makes gray. Then you know enough information to be overly useful in photo shop. Okay, let's take a look first. Let's see about the concept of every color Has an opposite. I'm going to select a small portion of this image where you can tell that this image hopefully is being lit by the I think it was the evening sound. The sun was about to go down, and the really warm light of the sun is falling on this rock, which is not giving in its natural color. Instead, we're getting the feel of the golden hour when the sun's going up or down, and I want to see if I can somehow absorb that warm feeling by forcing in the opposite because of every color has an opposite and I have too much of one color. Putting in its opposite should absorb that color, and as long as they don't put too much of it in, I'll absorb that car until it's all gone. And Onley. If I go too far, then will have absorbed all of that color and suddenly start noticing that I'm shoving in the opposite. So somehow we have to figure out what the opposite of this color is. Well, I could do that. All I'm gonna do is choose image adjustments. Invert doesn't that make things and negative into the opposite of what you had? So you see the color in there that's the opposite color. I could grab my eyedropper tool and click on this to grab that color, so that's the color and paint with where I could just remember it. I'll inverted again. To get back to normal just gives you the opposite again. Two opposites means the same as what you started with. Now let's see if we can somehow absorbed that coded by shoving the opposite in. I'm gonna go to the bottom of my layers panel going to create a new adjustment layer. And the type that I'm gonna use is one called find it Photo filter. Photo filter is supposed to act as if you're putting a colored filter in front of the lens of your camera. Therefore, whatever color that is should affect what you're seeing through the lens. So choose photo filter, and I'm going to choose color here. And I'm just gonna pick the color that I had seen earlier. Remember the color we saw? Wasn't it kind of a come in this range? Unfortunately, my foreground color no longer has it in there. Otherwise, I would have clicked on my foreground color to get it. So I'm approximating it. It's not gonna be precise, but it'll be close enough. Now we have a choice called density, and that would be how dark is the filter that you put in front of the lens of your camera. Well, the darker colored filter is the mawr. It will influence what you have. So here's density and let's see what happens when I bring this up as I bring it up. Do you see less and less of the warm feeling that's in there? Keep bringing up. If I got too far when I get rid of all the warmth and I keep going, then it might start looking like this color. But if I start with this, I can introduce the opposite color to try to absorb whatever I had too much off. Don't worry, you won't need to do it with a photo filter adjustment layer. This is just to show you a concept that every color has an opposite. So if you have too much of one color, you could push in the other. So this image, I don't think, looks all that good. I don't like it, and so I want to attempt to improve it. The way I'm gonna attempt to improve it is by looking at areas that should not contain color because usually when a picture does not look good, what's going on is there's a color cast. It means either there's some sort of color contaminating the picture. You don't know how it was introduced. Maybe your scanners, your bulb in your scanners getting old and it's turning yellowish, yellowish brown. Is it ages? That's making all your pictures look that color. Maybe it's the white balance setting in your camera wasn't set right? Maybe it's an old picture, and it's been stored for a long time. But it's faded over time, and as it does all that, the color shift around and we want to get the more consistent. Well, if we confined areas within our picture, that should be a shade of gray. Any shade of grey don't care how bright it ISS so anything from black to white and everything in between is long since a shade of gray. There's a very easy formula of how to make gray remember it balanced red, green and blue makes gray. So if we look at any areas and when we look at them, they are not balanced. You look at a gray area and the numbers are way off. There are not balanced. We'll just do an adjustment that makes him balanced, and in doing so, it's gonna be measuring what color is contaminating that area. That should have been gray. What we're really doing is measuring what color is messing up our entire picture by simply measuring it in an area where we have a simple formula for what should be there. And we could easily see how far off it ISS. Okay, so the first time I do this, I'll do it manually. No, you almost never have to do it manually. So you can turn your brain halfway off right now and just say, OK, he's going to do that. But I won't have to. Okay? I'm gonna go in here to curves in in curves. If I leave this menu right here, said toe RGB, it effects red, green and blue equally. And that only effects brightness. If I want to shift colors around, I need to choose these things. So all I'm gonna do is I'm gonna move my mouse into the picture onto something that I think should be gray. And I'm just gonna guess I don't know if I'll be right or not. Hopefully I will be. I'm just gonna move my mouse onto this part of the metal. That looks like it would be great. I'm gonna grab a pen in a post it and I'm just gonna write down in my info panel up here. The numbers that show up. You remember when we were in curves and I clicked on that menu? The choices that I had were red, green and blue. So that's the kind of readout I want in the info panel. Red, green and blue. So it matches the adjustment in using. So I'm just gonna write down 1 66 1 13 81 Okay, now, that's obviously off. They're not balanced. So I'm just gonna mentally try to calculate what balanced would be. I'm gonna try to just shoot all of them if I just kind of average those. Uh, I'm gonna guess I need about 1 I don't know. You could do the math by just adding the three together divide by three. Whatever that result is would be the average. You're welcome to do that, Mr Mathematician over here. But I'm just a visual guy, so I'm gonna make them all 1 If my numbers are off, it means it will be to brighter too dark, But it'll still be great. So anyway, I looked at what was in there. Let's see if I could make a change. I'm gonna go into curbs, and I'm gonna set this to read. I'm gonna click anywhere on the curve. I don't care where. Because only after I click can I work with these numbers? Input really means before output really means after. So before and after I type in How much red we used tohave. That's number I just got on the info panel. So 1 66 and for output, I'm gonna type in how much I think we need, Which, if you average them was 1 20 That's hilarious. That was, I think, Hillary here to green down here for input. First after click toe and a dot down here for input. I'm gonna type in how much green used to be in the picture. In for output. I'm gonna type in what? The average of the numbers Waas. And I'm gonna go here to blue, clicked at Adat anywhere and for input. I'm typing in 81 in for output 1 Okay, so all I did was I put my mouse on something that I thought possibly should be grey. I looked in the info palette of the numbers that were there, and I type those numbers in for input. I type what I thought I needed as an end result for output. You will not need to do that for this kind of thing. But let's see if it helped the picture at all. Here's before. Here's after time. All we did was we measured. What's wrong with our picture? By looking at an area where we know and easy formula for how to make it right? The easy formula is balanced. Red, green and blue makes gray. Now our challenge is how do we find gray things within most pictures? Because that's where tell us what's wrong with our picture. And if all I have is a picture of blue sky green grass and are no ocean, I don't know what should be grey, but there's one thing that could help us out. And that is, if you think for a moment, close your eyes just for a second and think, Have you ever seen anything that was red that is as bright as white? I know the answer is no unless you're on some weird drugs because you cannot have color show up when you get to as bright as white. Have you ever seen Yellow was Bright is white. Now you haven't because it's got to be darker in order to get color to show up. Have you ever seen red as dark as black? No. You can't have it as dark as black and still have color. You might be thinking, Where the heck is he heading with this? Well, as you get to the limits of brightness, the brightest in darkest areas, you can't have any color in order to have color it. Wouldn't it have to darken up that brighter you're thinking about or would have to brighten up the other in? So it just happens to be in general, the way imaging works is if you have an image that has the normal full brightness range, the brightest part of your picture will usually have no color. If it's a picture of a red apple, it'll have a really shiny highlight on it in the brightest part, and it won't be read. It's gonna have no color in the darkest part, will be a deep shadow in the deep Shadow will not be read. It will be close to black, but if there's a color contaminating the entirety of your picture. It's gonna contaminate all of that. And when you have one of those images like this one, is it started? You'll usually notice that the brightest part of your pictures not as bright as it could have been the darkest party pictures and not as dark as it could have been because color showing up in there instead. So what have we learned there? Well, we can cheat. We can look at the brightest partner picture if it doesn't have a balanced amount of red, green and blue. It's probably a screwed up picture where it's got a color caste messing it up. We could figure out exactly how much of it is contaminating that by looking at the numbers. How far off are they from being balanced? If we look at the darkest part of the picture, if it's balanced red, green and blue, there's no color contaminated. If, on the other hand, it's not balanced, there's a color contaminating that. It's probably contaminating the entire picture. So what we're gonna do is adjust the brightest area, the darkest area, and then, just to make it more precise, will look throughout the image and say, Is there anything I recognise that had recognizes a shade of gray? You know, a white shirt that's a shade of gray? Ah, a laptop like this one. You know, as long since the true shade of gray. It's not bluish, yellowish, pinkish or anything else. We can analyze what the numbers are. Make them balanced, and by doing so, we could fix our picture. That sound weird if you're not used to. The concept can be kind of weird, but we want to do it in a way that doesn't force us to do much. We want to make it simple and easy. And so let's do that. I'm gonna go in here and create an adjustment layer of curves, and we're going to use these eye droppers that are right here. Those eye droppers air designed for color correction when you click on the eyedropper and then you click on your picture. Whatever you click on, it looks at the amount of red, green and blue in it, and it shifts it until they're balanced. The only difference between the three eye droppers is you'll notice. One of Miss Full of Black one is full of gray, and one is full of white. The white one is designed for working on bright stuff, the black ones designed for working on dark stuff in the gray ones designed for working on anything in between. So all we need to do to color correct this picture is grab the white eyedropper. Click on the brightest part of the picture. Grab the black eye dropper. Click on the darkest part of the picture. Grab the middle eyedropper, click on anything it within the image that I think should be grey meaning. If you were to stand there under white light source and look at the scene, what would not contain color? I'm not certain, but the metal right here doesn't look like it's colorful. Maybe the lines on the side on the on the parking lot, maybe the white. That's in the sign that's here, all that kind of stuff. But let's look at the difference. After clicking on those three areas, I'll turn off the eyeball here before, after looking a little better. Does the concept make any sense? It's something is messing up our image, messing up the entirety of the image we need to somehow measure what color is messing it up by how much and the way we can do that is look for areas that shouldn't contain color. We know the formula for making that it's a balanced amount of red, green and blue in, so Photoshopped can figure out how to do that very easily. Just goes into curves for input. It types in what we used tohave for output. It types in whatever it needs to make him bounce. We'll get into more details on this in a few minutes because there are things we can do to make it easier to find the bright and dark areas and make it more precise. But that's the general concept of color correction. Yeah, Do you often refer to cement sidewalks or the parking area for the Grazer? Does there need to be a light gray er versus a rest does not matter. Okay, you'll find sense were already adjusting the brightest on the darkest areas. It will be most effective if you find a medium brightness, because then you're adjusting the general brightness of your mention. Three spots that are pretty spaced out. Where is if I click on like the white of the sign were already adjusting the really bright areas, so it's probably not gonna be that different. But if we get to a medium brightness of probably most effective, gotta be careful with some things, sidewalks are often brownish. It's just a hint of brown. You know, this kind of blacktop is often slightly bluish, and if you click on it, you take out that brown or blue shifts the image towards the opposite color. So it's better to find a white shirt the white lines painted on on here, where other things that you know to truly be a shade of gray. But try those other areas you just might need to find, too, in the end result will teeny bit because it might bring it a little bit too far towards the opposite color. Yeah, why do you have to do it in the three different areas? And normally, when you do white balance, you just choose one shade of white or gray, and then sure, white balance is available when your in camera raw it is great. We're gonna talk about White bounce briefly later on. This is for when you're done with camera. If it. White balance didn't do it enough. You need to do further adjustment. Or if you have a scanned image and for some reason you hate camera, you want to do it in photo shop. Then you need to do it in three areas. You'll find that white balance is almost magical when it comes to a raw image. Raw file format With JPEG Image It's not as magical, and you'll find that the colors don't look anywhere near as good when you do white balance on a J peg image in so with a J peg image, even after you've done white balance and camera, you might want to new MAWR by doing this technique in addition, but that students on why you need to do during the three place is surely if it's balanced up in the whites, and it would have balanced it across the whole picture. Not necessarily. You can have across color cast where you have a different color cast in the highlights than in the shadows and other things. So we're just trying to make it as precise as we can in the more areas we analyze, the more we can get that to be precise in part of it has to do with the way curves works. If you click in a bright area, Uh, let's see how I could describe this. Let me just talk about curves generically not having to a color If I make a change near the bright area of my picture and I just moved this a little bit, watch how much of an effect it has in the middle and at the bottom. If I move a little bit right here, do you see how extreme it is down here? I only wanted that tiny change in my highlights, but then it did way too much everywhere else. So in order to get this whole thing in the right position, moving it just near the highlights could cause the rest of the image to do way too much. But then, if I also do it somewhere near the dark part of the image like this, well, then it still could be quite off in the middle. So if I do it in the middle, then it's going to have control over the entire shape of the curve because it's got three dots distributed across the curve, doing it just on one of the extremes is too easy to get it to go way off on the other extreme. Don't if that makes sense or not, but it makes it so when we're doing it with curves, it's just going to be more precise to do three parts brightest, darkest in something in between. Um, so we need to figure out if some other stuff, um, we need to figure out How can you find the brightest in darkest areas so that you're not guessing, especially finding the darkest area not always easy. And how can we just be more precise with some of this stuff? So let's go back to curves. Just seemed, no, those eye droppers that you finding curves you'll also find in levels, and they do the exact same thing. So if you've ever done this with levels, you're doing the same technique. I prefer to do it in curves because I have more control. When I'm done, I can look at the individual curves, and I could tweak them if I find it's necessary. So I need to find where the bright and where the dark portion of this image are, So get this over on this side. So it's not in my way. And let's see what we can dio Just trying to get this so I can see what's going on. All right, Time to find him. Do you remember how we have these sliders at the bombing that force areas toe white and black? And you remember how it could show us where we forced areas toe white and black? You could hold option down. Remember that? Well, the first thing it turns white. Shouldn't that be the brightest part of the picture? First thing it turns black. Shouldn't that be the darkest part of your picture? So we can use that to show us where the stuff is now? I think I might have changed a setting last night when I was away from here. I just want to check. Yes, I just want to turn off a setting that usually wouldn't be on on your machines. But you remember what I could do is hold on the option key Ultima windows and I could grab the black slider and it would show me what part of my images black right now, nothing's black. And as they pulled this in, I'd start seeing areas show up. Well, what I want to do is hold on that option key. Pull this over and I want to look for the first area that turns black, the colored areas that we might have saturation clipping. So we're not talking about that part right now. We're looking for the first black. Pull it in and I'm not looking for a black speck or two single pixel. I'm looking for a blob. How do you define blob? Not a single pixel. You know something big enough to click on without having to be surgically precise? That enough? So I'm looking for black. I can see black. It's over near the left edge of my screen. It's in a dark, bluish area, and we're gonna put my finger on top of it right now. I don't if you guys can see it, but it's over in the far left within that bluish area. When I'm done, I need to move this slider that I was using back to its default position. Otherwise, that would have forced that area to black. And I don't want to do that. Then I'm gonna come over to the white slider. I'm gonna do the same thing. Hold on the option King click. Pull it in until I see white and I don't want to find a speck. I want to find a blob and I see a blob. It's touching the edge of the I think it's a clock tower, The one on the right, right near where the riff line edge ends. I can remember that spot. Now I know where to click with my black and white eye droppers. I'll grab the white eyedropper I'm gonna click right about Here is where I believe that Waas Then I'll grab the black eye dropper and I'm gonna click right where the other area Waas didn't make a dramatic change. In this particular case, it's not always dramatic. And then I'll grab the middle eyedropper and I look in the image and say, Is there anything that would be a shade of gray? I could click on the darker areas of any clouds that were in there because they're usually Gresh. But I think this sign walk is close to Gray. Might not be exactly, but it's close. Click. Ah, there. And so you see how working in the brightest in the darkest areas isn't always enough. That's that middle eyedropper. If you have more than one area, that might be great, click on it and then click on another area. Maybe this base super here. I'm just guessing at what should be Grey based on what things look like in the photo, and I can click multiple times in. Just finish with whichever one made the picture look the best. So let's see before and after I'll turn off the eyeball. Here's before here's after We're just measuring what's wrong with the color in areas that should be grey, because there's an easy formula for how to deal with that. That makes sense now. I don't know about you, but I'm not enjoying this process. So let's work with a picture of my lovely bride. This is Karen on our wedding day in Hawaii, and the color doesn't look right. I want to do something where Photoshopped is gonna deal with it for me in what it's gonna do is if it's so easy to find the brightest and darkest part of our picture to, you know, just going to curves and pulling those things. Couldn't Photoshopped do that couldn't figure out when it turns white when it turns black and it can figure out if it's one pixel or a little blob and figure out where those parts are and then can't it click on those for me? Would that be nice? Well, we can set it up so it does that I'm gonna have to change a setting quick. Because last night I messed with something. All they want to do is get it to it's default settings so you can ignore what I'm doing right now because I'm just setting it back to defaults. Then we'll go right back into it, okay? It looks like it is as default. So we're good. All right, in curbs. Do you see a button right here? I love things that say, Otto, love it. I'd rather be out shooting than in Feder shop, right? Well, the auto button, if I click on it, didn't seem to improve this picture. Much did it before. After now, I don't think it helped, but if I go to the side menu, there is a choice called auto options. One of them curves beside me, and that sets up with the auto button will do to your picture. In here, the default setting is enhanced brightness and contrast. I'd rather do that with curves because I want control when it does brightness and contrast, when it does come in. Correction. I just wanted to look right. I don't want to deal with it. So in here you'll find the choice of fine, dark and light colors. That means use that hidden feature within levels or curves to show me where the bright and dark parts are and remember where they are and then click on with those eye droppers. That's what that means down here. Do you see the choice called Clip? That means Should I look for a speck or a blob? Higher the number, the bigger the blob. All right, so if I set those 20 it would find a speck Is I increased them? It's gonna find larger and larger blobs, but the defaults there could be all right, then it's the middle eyedropper that often really gives me a big shift in the image and often really gives me the the end result that I'm looking for. There is with fine, dark and light colors. It's only going to use the black and the white eye droppers click on the brightest and darkest. How the heck can it find an area that should be grey? Well, what if it searches through the entire image and it looks for whatever color is closest toe already being gray? I mean, it looks at all the RGB numbers throughout your image and say is where the closest to being balanced. It's a computer. It can do that junk, right? Well, then it could click on that area with the middle eyedropper, but only if I turn on this check box that's called snap neutral. Mid tones bunk. Okay, so now it's gonna find the dark and light colors with my image. It's gonna find something close to gray and click on it. And because of these clips settings, it is going to make sure it's a blob and not a speck. I'm after I set that up. I could choose saves defaults so that now, every time I use auto, it's gonna remember all these settings instead of the old defaults. Click on OK, and let's just see what this looks like before and after. Here's before. Here's after It's not bad, right? Especially for the amount of work involved. You only have to set that up once now for the rest of eternity, unless your preferences get reset. Somehow, it'll remember those settings, and you can do a curves adjustment layer. Just hit the auto button or, if you don't need an adjustment layer because throw away the adjustment layer, just go to the image menu and choose auto color because we just set up the settings for auto Color said. Now when I choose auto color boom. So the question I would have is, Why the heck did you talk about all that other crap if I could just choose auto color? That's because auto color doesn't always work well. If you have or have a picture taken during the golden hour sunrise sunset kind of time using auto color will pull out all the color that was in the the sunrise or sunset, making it so it looks like there was white light instead of golden light. But if you do the eye droppers, what I do when I apply the eye droppers is I only use those eye droppers that help. If you ever click with one of the eye droppers, and you don't like the change it made, Then choose, undo and use the rest of the eye droppers. Just skip that one. What you'll find is during the golden hour, you'll want to skip the white eyedropper because the brightest part of your picture will be the golden sun, and when you click on it, it will pull the gold out of the sun and make it white sun, and you'll get rid of all of that nice, warm light. But that doesn't mean that you can't use a black eye dropper. Can you use a grey eyedropper? It only used the ones that help. If anyone ever doesn't help, don't use it. And if you ever apply auto color and you find the results are just okay, they're not amazing. You might decide Well, it wasn't good enough for this particular image. So then you come over here to curves. You hold down the option key, pulling the blacks to say, Where's the darkest part it happens to be? I think we near her hair and you pull in the other side and you find out where the brightest part would be and G. Do you see little marks on my image where those things are? Do you see something called number one and number two? Remember the color sampler tool? You could click on those areas so that you'd remember where they are. The color samples don't print out, and when you're done, you could go to the color sampler tool, which I should have done before. And there's a clear button at the top of your screen to clear him off. But you don't have to clear him off. You're never going to see him when printed. You're not gonna see him. When you blowed things to the Internet, you know you're welcome to leave him there. There's a little tip, and that is, if you're in curbs and you have the handle active, then there's a shortcut for adding one of those. If you move your mouse on top of your image and you hold shift click, you're gonna add a color sampler. The little hand tool in currents, I believe, has to be active. Then hold, shift and click and you'll Adam. If you go on top of one that already exists, you could hold shift to say, work on the color sampler and to get geeky, option to say delete it. Look at my mouse when I hold option. You seen scissors? Uh, but I doubt you're going to remember that unless you do that every day that you'd hold down those keys. But shift. I think I can remember. So what does that mean? That means when I'm using curves, I could hold on the option key. Pull this in until I confined the darkest portion of my picture. I can let go and go over there right away. Hold shift and click on it. Then I could do the same for the whites. Hold shift and go over and click on it before I use the eye droppers. I simply have to make sure that I reset these sliders back to their original positions because the only thing we were trying to use him for is not to actually perform the adjustment, but to just show us where those areas are. So in the end, we want him back to normal. Now, if I grabbed my eye droppers, Aiken grew the white eyedropper out here. I could do the black eye dropper right here. And when I grabbed the middle eyedropper. I can experiment. I can click here. I could try up here. I could try over here, I can try and anything that I think might be a gray. Not that if the color ever shifts in a really weird way, it means whatever you are clicking on was not a gray in your image shifts to the opposite of that color because it says, Hey, you're clicking on something is red You're telling me to pull out the red? Well, every color has an opposite, and if we pull out the red were automatically putting in its opposite. So when you click on something, if you get weird shifting color, know that that thing wasn't gray shouldn't be great on your ship. Color shifts towards the opposite, so I might find that I like this result better than auto color because I could click around with Grace liner and choose the best part. So I use auto color. Women hurry. You know, a client says, Here's 1000 pictures color. Correct them Go. It's a charity. You're not getting paid. Oh, okay. Not that I don't want to do high quality work for charity. It's just if it's 1000 pictures. But if it's this is my portfolio, I'm gonna use it for the next three years to try to get work I'm gonna do with slow way to get it, to be precise. So make sense. Only use those eye droppers than help. Now someone mentioned White Balance Camera. I want to mention how White Balance is almost magical when it comes to a raw file. But not on Jay Peak. Jay Peak. It's great, but it's nowhere near as good. So I'm gonna take this image. In fact, let me get in both. I can select two images and just say, opening camera Got to images over here. I don't know which is J Pagan, which is Rob. I glanced at him, But I'm gonna be able to find out just by looking at the results. I'll grab the white balance Eyedropper. It's the one that looks like a normal eyedropper turkey baster, and I'm gonna click right on. His chastity is wearing a white shirt, so click looks great. Now I'm gonna go to the next one. Same tool, same general area. Click and it doesn't look as good, So I'm assuming that's the JPEG. Let me switch between the two and his shirt should probably look pretty good in both looking everything else, like the color of the feather like thing coming out of his head, the color of his skin, the color of his reddish clothing. Here, look how nice and read the clothing is. Look how nice and yellow the feather is. Looking at his skin doesn't look too terrible. If I bring up shadows, you might be able to see it a little better. Uh, look at the J Peg. Though his skin looks read, his little rap here looks purplish. His thing on the top of his head doesn't quite look yellow compared to that one. You see the difference. So with a J peg. White balance in camera Raw is not as effective as it is a rafa on a raw file. It's almost magical how it completely fixes things. So what I would say is, if you're fed J pegs by other people, you might need to go through that color correction process with three eye droppers in addition to white balance. To make it look even better if you work on raw files one of the reasons to shoot raw is you can make dramatic, radical changes in camera rock to the color, and it doesn't degrade the quality of the image. And so I shoot raw 98% of the time. I'm not saying you should. I'm saying you should just see, Are there advantages to it that might talk you into doing that? Here. Do you see a tan line? I'd like to get rid of the tan line here. If you look close, she's been either biting her lip or something else. But you see that red nous around her, her lip. I want to get rid of that here. Thes guys were in Moscow there. Homeless folks. Did you see or read? Their skin is I want to shipped shift it. Um, here, do you see a panorama where one side looks different than the other on the sky? Or I have another example. Panorama here to see how purplish it is over here. And over here, it's quite different. I might want that purplish over here, um, that kind of thing in So those are the kinds of things I'd like to talk about before we do that I want to make sure we're kind of done talking about the generic basic color correction. There are a lot of other things you can do with the color correction as faras fine tuning it. I wanted to get into the basic concept and I don't know how much into the details. We're just gonna have time for. What I'm gonna do, though, is tomorrow when we're not having class, I'm going to sneak in here and I'm gonna record extra detail. And we'll put that up on the server for those of you that by the class so that we wouldn't have more time and have a little bit more detail. But we just I only have so much time right now. So anyway, questions about the color correction, the general concept, they're rolling in for eso shade, Kay said, Could you paint 50% gray in a new layer, use it as a sample for the great um, I drop her and get rid of it later? Um, no, the grave it's in your picture has to be part of the picture itself because let's say the reason why you have a color caste is you took a picture under tungsten lighting. Normal light bulb like a home in your camera wasn't set. Tungsten for white bounce. Your picture looks all yellow. The grey thing in my photo needs to be in the same lighting as the rest of the photo needs to be shot with the same camera in case your camera was off. War needs to be scanned on the same scanner so that whatever it is that screen up the picture is also screen up the gray. And so I can't just artificially put the grand not gonna help me. It's already gray. It's already any balance. Not gonna do a thing. Okay, so then also to speak Teoh somebody's question. They're asking in a mixed lighting event. Shoot with taking a picture with a white balance card helped one adjusting color in. Yes, it would. So if you use a gray reference, you can buy things like what I'm showing on screen right now. In these have measured graze. All these greys down this area here are measured, grazed by measured. I mean, this has been measured to make sure it's not bluish. It's not yellowish, it's not pinkish. It's truly neutral. Gray and therefore I could use this. If I shoot in raw format, I just click on one of these with white balance eyedropper, and I might be done if I need to go further than that. I could do my color correction clicking with the black eye dropper on this one. Clicking with the white eyedropper on. Well, probably this one over here exits even brighter, I think in clicking with the middle eyedropper and one of these middle ones, the one towards the middle. It would color correct the picture for me as long as this was photographed under the same lighting as my subject with the same camera that took the pictures with everything consistent of whatever it was done with that photo. You can't plot this in later needs to be in the original. Now it can always be in the first shot. And then you shoot 50 images under the same lighting, and only when you change to a different location with different kind of lighting set up. So I throw it in there again because then I can use the same setting on all the other pictures. So I would say any time the light changes. Pop this in the scene. Let the light is falling on your subject. Falling this and do that each time. This isn't the only one you can get. I actually like a little one. Fit it in my wallet. This is too big for my wallet, and this is a little more fragile. I like one that's made out of plastic, and it's called a wide bow card. Why? Bowel is short for white balance. It's W H I B A l just do a Google search on that. You can get one the size of a credit card, leave it in your wallet at all times, comes in a little tie vex sleeve like a FedEx envelopes made out of, and therefore you always pull it out. You can also get one the size of those little cards that all your grocery stores want to give you their frequent buying program exact same size that you leave it on your key chain. You could get 1 8.5 by 11 or eight by 10 and leave that your camera bag, you know, and therefore I what? That out. Throw in the scene and it works great, Karen loves me having it because I usually have it dangling from my camera bag or my belt. And she just takes pictures of me in whatever environment that we're shooting in. And she's got the little white, the great tag hanging from me. So she's got it to click on, Man, I want to Karen. Now we'll 11 quick question. Kind of related to general color adjustment. Workflow from Colorado Are the color adjustments you're making independent of each other? Or should they be done in a certain order? For example, should we just color balance before making any other color adjustments? Usually, I would do white balance right after opening the picture. If I noticed a problem with the color right away, and when I do the eye droppers, I would do the black and white ones first. Doesn't matter which order on those two. But the main thing is, I would do them before the middle one before the gray one. Um, but I would try to do color correction before I've done other adjustments to the image because any other adjustment might shift the colors around and make it so it's harder for it to figure out what was messing with the original. But if you don't think about it until later, you can always try it later. Just might not be quite as pure of an adjustment, and one more really quick question related to the cards Deed asked. Why do you need all of the other colors on the card when you're only using the white, gray and black, you don't need all the other colors. Those could be used for other things. You can actually use this to create a profile for your camera, meaning a description of how captures color where not only would color correct, but let's say that it found that when your camera captures this, it doesn't capture purples very well. Well, one of the squares is purple, and if you go through some special software that can turn this into a profile, it could analyze How did it reproduce? Purple in shifted to make it more accurate so but that's beyond the scope of what we want to talk about here, because you don't do that necessarily with what we're using and Photoshopped. But that's why you might want the other colors, but you don't have to the main thing is one shade of gray. That's a medium brightness for white balance is good enough for a lot of things, but more ideal. A black shade, Ah, white shade and a medium grey shade would be most ideal because we have three eye droppers to use in curves. Then we've got something to click on with all three. Cool, thank you just answered that question for a lot of people, including myself. You know, all those other colors do. All right, So Danielle, Danielle says, Ben, why can't you use the average filter than invert to find the color to balance the pictures? Color caste filings? Not that you can't what I could do in this picture. I think they're referring to this one to find the opposite. That would be a very good thing to do. I might come in here in select an area like this to say that the sky doesn't really have the same color of light hitting it. I could select this whole area here, and I could go to the filter menu under Blur. There's a choice called average, which most people don't use, because what it does is it blurs this area so much that it turns it into one solid color. When the heck would you need that? Well, that gives you the average of what's there. Average it all in until you get one color. Then I could come over here and choose invert boom. Right there is the opposite color, so and it's a nice, solid one. I don't have to pick between a bright and dark area and all that so I could do that would be a very nice thing to dio eso what you could do. Then it's just click on this and put it in your swatches palette because my foreground color got reset when I went in to what I use. I'm just going to start right here and now. I mean, she's undo a few times, just get back to my original, so I could now go to where is it? Photo filter. When it comes up, I can tell it my own color to use by clicking on this little square, and I could just grab it right out of the swatches panel right there. So I know precisely what the color is, and now use that to absorb all that warmth out. So, yeah, that would be a nice thing to use average. Yeah, So I have a good one here from Jill Adams, and she's referring to something that you started the segment off with. Eso says, Can you please enlighten me to the difference between RGB and the primary colors of red, yellow and blue that I learned as a kid that all the other colors air derived from I don't know where that yellow, red, yellow blue thing comes from a Sfar as that goes, I don't know the exact answer to that. All I know is your eyes can only see red, green and blue. The opposite of red, green and blue is signed magenta and yellow, and therefore, that's what everything in photo shop is based on and everything imprinting is based on. And I don't know the exact original origin of the one that is like whatever it was with yellow in with the red, green and blue in, Sometimes certain people describe Scion is blue. Sometimes that's what it could be in. Magenta is red. You know, that kind of stuff. It could be that there off a little bit, or they could be talking about different kinds of paints that mix in different ways, but I don't know exactly why. All I know is digitally in photo shop and in printing. This is how it works. I thought you need to know. Yeah, I wish I could go back to high school and say Wait a minute and bring up photo shop and say, Well, wait, but look at this, You know, in talking through that, but I don't know, Um, let's see here. It doesn't matter. Boyd Source ask. Doesn't matter if I use curves over color balance when trying to bring back color balance in an image. Well, talk about current services. Color balance. That's one thing. It's nice. If you go to image adjustments, you're gonna color balance in there. And remember how I said you have warm, cool adjustments? Let me just quickly get into this when I am in curves and actually wish I would have described this and surprised I didn't. When you're in curves, here's how the color part works. When this is set to RGB the little menu, you only affect brightness. If you set out to read, then clicking on this and moving up curses like a dimmer switch. Right, So moving up is gonna brighten, but we're Brighton using red light, so it's gonna brighten and make it look more red. It's red light. Bring it down is gonna darken because it's a dimmer switch and it's going to use less red. Well, if you have a cease, are a teeter totter and you take red in one hand, you lesson it that's gonna automatically bring in. It's opposite. I don't know if you remember the opposite of red, though. It's science you could find out by looking in the info panel. If I go too far, it's gonna pull start looking science. But this image was overly red, so it's looking good. If I got a green and I push it up, it'll get brighter and more green. If I bring it down, it'll get darker and towards the opposite of green, the opposite of green magenta. Well, you guessed already remembering that that's setting enough. You get a then if I go to blue, push it up, it's brighter and more blue. Push it down. It's darker and more of the opposite of blue, which is yellow. So if the image was two yellow. I could have pushed it up. You know that kind of stuff. So anyway, that's how it works in curves. If, on the other hand, I instead decided to use color balance it just tells me that relationship more directly. But we just looked at moving at one direction, makes it more red. Moving in the opposite direction makes it more scion. And with color balance you have to tell it What would you like to work on? The dark areas, the medium brightness areas or the bright areas in. Otherwise you have the same general controls here. Just a lot less control over it. I can't click on part of my image in, say, this area make less red or less blue with curves that can. But with this I have to say, OK, that area would be a shadow and it looks to read. So I'm gonna move this away from the word yet read. Okay, then I look at my highlights. Goto highlights and I say that I'm not sure what it's too much of, but I need more blue in it. So I moved this towards blue. It looks a little bit reddish in here to me so I could move it away from red. So you see how I can get some of the same changes. But for me, it's a little bit harder to really have control doing this. I find I'm more comfortable in here because it reminds me of the relationship between those colors. What they're opposites are. But having only the choice of shadows, midterms and highlights, I find to be a bit limiting. But if you feel comfortable in here and you like it, go for it. So I personally prefer curves. If you're overwhelmed curves though it just don't feel comfy in there. Feel comfy in there? Stick with it. Okay, so I just wanted Teoh chime in and go back to a couple questions ago, somebody was asking about the different schools of thought when it comes toe the RGB versus the light colors. So RGB is for lights and, um, are y V is for pigments. So red, yellow and blue are actual natural pigment colors. And then, yeah, red, green and blue are light colors, so they're two different well, but everything is when you talk about pigments, you can have pigments in your ink jet printer, which is similar to inks in. Usually that means cyan, magenta, yellow and why that makes sense. Therefore, the yellow. But then the science and magenta. I mean, I know use it with paints and things, but it should work the same as inks when it comes to combining them. So I still don't completely know. I know that just it's it comes from a lot of people describing painted pigments, but I just don't know in the physics of the way light works, why it's different. Well, speaking of ink, actually, that Segways into a next question illusion. Somebody in the chat room was saying, Is there a benefit to using an inkjet printer with C. M. Y and RGB, such as the Epson are 1800? Yeah, there is. The inks that we print with are not pure meaning that if I click on my foreground color and I type in like let's say as much red as you can get and none of the other colors click. OK, uh, actually, let me talk in two of these Where is take me a second? Okay, for instance, this is the color of science Inc that I'd like to print within a printing press to be able to reproduce images accurately if I click this little square. That's the actual color of scientific we print with on a printing press. It's not pure. It's not the exact color we want. And because of that, they're just impurities in the inks that make it so. It's not exactly what you need, uh, and so it makes it difficult to reproduce certain colors, especially blues like deep blues and a printing press, really hard and on something jets that could be really hard. So putting in those extra colors of ink tries to compensate for the impurity in the science magenta and yellow we print with. That makes them a little bit less than ideal, so we can extend the range of colors, weaken, reproduce by putting more than just saying magenta and yellow in that printer. So it's useful
Class Materials
bonus material with purchase
Ratings and Reviews
Shannon
As always, Ben surpassed my expectations. His easy style of sharing his experience is fun and inspiring. He is completely prepared and that makes his workshops flow smoothly. I feel like he's thoroughly comfortable with Photoshop. Thank you, creativeLIVE and Ben for bringing yet another terrific workshop to the masses.
a Creativelive Student
Wow, just watched the bonus content, loved it all, particularly the color theory basics! Thanks Ben for the extra effort and thanks CL!
a Creativelive Student
this sounds like help from heaven. I dearly wish i will be able to catch up with everything Ben has to teach!