Top Deck: Function Buttons, Microphones, Flash
Lesson 8 from: Olympus OM-D E-M5 Mark II Fast StartJohn Greengo
Top Deck: Function Buttons, Microphones, Flash
Lesson 8 from: Olympus OM-D E-M5 Mark II Fast StartJohn Greengo
Lessons
Course Introduction
04:48 2Olympus History and Product Overview
12:56 3Photography Basics
09:46 4Basic Controls and Touch Screen Demo
04:26 5Mode Dial: Auto, Art, Scene
11:30 6Mode Dial: Movie Mode
05:06 7Mode Dial: Program, Aperture Priority, Manual
14:18 8Top Deck: Function Buttons, Microphones, Flash
11:51Electronic View Finder
12:31 10ISO and White Balance
06:28 11Auto Exposure Lock, Info and Playback Buttons
13:30 12Focusing Options
03:50 13Super Control Panel: Flash Options and Image Stabilizer
08:39 14Super Control Panel: Sequential Shooting and Quality
10:29 15Super Control Panel: Auto Focus, Metering, and Aspect Ratio
08:29 16Left, Right, Front and Bottom Sides
11:57 17Lens Options
17:37 18Shooting Menu 1
10:35 19Shooting Menu 2
12:06 20Playback Menu
06:01 21Custom Menu A: Autofocus/Manual Focus
14:30 22Custom Menu B: Button/Dial/Lever
06:09 23Custom Menu C: Release/Drive Mode
08:09 24Custom Menu D: Display Items
15:44 25Custom Menu E: Exposure/Metering/ISO
13:15 26Custom Menu F: Flash Sync
02:34 27Custom Menu G: Quality/Color/White Balance
05:43 28Custom Menu H: Record/Erase
06:57 29Custom Menu I: Movie Mode
09:46 30Custom Menu J: Built-In EVF
03:45 31Custom Menu K: General Utility
06:06 32Setup Menu
11:17 33Camera Operation
13:20Lesson Info
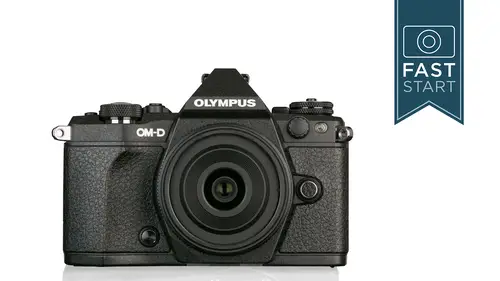
Top Deck: Function Buttons, Microphones, Flash
And let's just continue covering the top of the camera so there's a number of function buttons and they're labeled one two three four function number two button over here is what is known as a multi function button which it has a number of different things that it does and it is not easy to me a long time to figure out how to use this button and so what you're supposed to do is you I have to hold the button down and while it is being held down you can turn the back dial and that will allow you to go to a number of different modes here now a few of these air grate out on screen because they are features that you could turn on when you dive into the menu system so let me do a quick little live demo for you here in the back of the camera just so that you can see what's going on and so I have to press down on the function to button and as I turned the back button I can change between highlight shado control color creator magnify an image aspect now none of these are really critical to taki...
ng the best quality photos they're all way of tweaking your image or magnify I guess would help help you focus on your subject but none of them are controlling kind of true image quality so this is something that you may want to re program to do something else but right now it controls four things it can do up to six things or you can have it choose to do something beyond this customized control and so back on the keynote let's bring in there a little shortcut so if you do want to dive in to adjust that particular feature, there is something called multifunction settings in the custom menu under display and so the olympus menu is a little bit of a labyrinth there's there's a certain style to it and there's a lot of it is in what is known as the custom menu and will be getting into that the second half of class and so it's one button right now but I recommend adjusted to something else you want to do later on and over here on the left of your screen these air the options that you can have and there's a lot of them to choose from down in here. And so some people like to manually focus and leave it on magnify. Some people like to do hdr and they would prefer that button to do hdr than something else or controlling certain areas of the focusing you khun cet homme points in focusing where you want the focusing brackets to always be at or to return to with one press of a button and so too many options for us to go through all of them but there's a lot of fun little ways of customizing the camera so that on ly you know howto work your camera and so you'll find those controls under the button functions you khun re program what that button does and so we'll be talking more about that as we go through the rest of the camera and into the menu section next up is function but number four also known as thie hdr but that's the way it comes from the factory you can shoot hdr type images directly in camera which is kind of one of the newest things many of these cameras they're doing and so one of the things to note as you can see in the list on the right side of the screen here is normally it's going to be off we have two different hdr modes and we have five different bracketing modes where you're going to get a siri's of pictures anywhere between three and seven photos and this is for use in creating an hd our image in software after the fact so the camera only has two actual in camera hdr modes the other ones are used for assisting the hdr mode so you'll press down on the hdr button you'll turn the back dial to change the function on the camera so you gotta press one and turn the other to choose which one of these modes you want and so I was playing around with the hdr function hdr one is a very light hdr mode and what if you're not familiar with hdr it's trying to accommodate a wide exposure rage a lot of brights and darks in the same photograph what it typically does it holds back the bright so they're not quite as bright and it tries to lighten up the shadows and so I know looking at the uh this class on screen can be a little bit challenging for fine tuned details but hdr to the image on the right if you look under the dock you'll see a lot more information in that shadowed area compared to the other images especially in the water in the foreground and especially in the foreground right hand side you'll notice that there's a lot more it's a lot lighter in there and so it's tryingto lighten up those shadows as much as possible and so this is something that you do need to be a little bit careful with now there is a bracketing mode in here along with this there's kind of an eight it's it's kind of unusual there's a hd are bracketing mode and then there's a standard bracketing mode and they're doing essentially the same thing they're shooting a siri's of photos at different exposure adjustments now I believe in the hdr bracketing which we're looking at right here you have a little bit wider range of how far you can go because when you are shooting overexposed by six stops and under exposed by six stops you are really grabbing some pretty far reaching levels of light. And so these are a couple of the examples of the bracketing mode that you can use in this hdr function. And so play around a little bit with the hdr mode, but it is fairly limited, and once you have your hdr image, you can't really let me. You can adjust it like you can any other image, but I would. I would probably shoot raw in this case, because there's, a lot you can do if you shoot with the original raw image, and that was a question john that had just come in from allen in the chat room, he said. Is it possible to do hdr with high resolution mode, the forty mega pixel mode? I do not believe it is. I haven't tried to do that, I well, try tio, let me see if I can throw that camera quickly into that mode. I'm pretty sure, because that's just not gonna work out let's, take this, turn it. Here. Sorry, folks. Takes a bit of a moment to do this. Okay, so I got it set too high rez mode. Okay, so if I change it into hd, are does say that I'm shooting hdr. But it seems to have reverted to the hdr and it's not doing the high rez but I haven't tried it out in the field yet and now the camera's going process for the while and recommend alan going out there and trying it and living but I got the hdr results but it was not in the high rez shot no and so it looks like it kind of takes over from that so I think it's one or the other thanks all right so getting back to the top of the camera that is your hdr mode and so that button can of course be reprogrammed to do something else because it is a function button as well for those of you recording movies it does have dual microphones built in which will improve the quality of sound ever so slightly if you are shooting movies and you do want to get really good quality sound you should look into some of the many different options for external mikes so that you don't have noise from the cameras operation the focusing in on the lenses moving are you holding the camera getting that in the camera so getting a separate mike would improve that quality quite a bit the little indicator on the top of the camera is the focal plane indicator every once in a while this is needed in certain types of technical photography, macro photography or scientific photography where they need to measure to find out exactly where the sensor is and so that's the focal plane in the camera hot shoe has a little cover on it just to make it look nice and protected I guess and this is where you're going to hook up different flashing it it's the camera does not have a built in flash it does have one that is supplied with it and my first note on flashes flash is only good at a limited distance and so you are not going to illuminate the mountains in the distance this is good for subjects that are up fairly close to you the camera comes with this little f l l m three which it looks like it's kind of a big flash but this is the actual flash right here let me go ahead and attach it to the camera and the nice thing about this flash is that you don't have to put batteries in it doesn't use any batteries it uses the battery from the camera so it has all of that power sent up through the camera it's not very powerful it does have a little bit of a tilt and if you plan on using this bouncing it off of a low white ceiling the ideal white ceiling I can imagine for this type of power flash is going to be ever been in a small boat where there's this there's a white ceiling right there above your head that's the type of distance you wouldn't want it on a fourteen foot ceiling it's just going to lose so much power in that bouncing of it but it does allow you to do that which is kind of a nice little feature olympus makes a number of larger flashes I'm not going to go through all of them because ah lot of them are designed for previous cameras that just don't seem appropriate they'll work but they just don't seem appropriate if you said I really need something much more powerful the one that I would mainly look at is thie f l six hundred r and this one has a guide number of one hundred eighteen the little one here has a guide number of thirty so it is much more powerful and it will be able to recycle its flash much more quickly than this so you could shoot syriza photos much faster and if you do wanna bounce or swivel it it's going to have much more power to be ableto handle and do that muchmore effortlessly than the small little flash that comes with the camera it also will have its own battery source so it won't be draining the power of the cameras batteries at all but the little one is nice if you're going out with friends and it's night time and you know it's going to be dark and you need to add a little bit of fill light filling in those shadows so that you can see, the face is a little bit better. So it's. A nice little thing for them to throw in and his handy for, you know, filling in those face shots of people that are, I would say, within ten feet in front of you. Okay, what else do we have on the top of the camera? I think that pretty well covers most of it except for this final function three button this controls the live view as well as thie e v f controls on the camera and you can actually just tap this button and go back and forth between the live you and kind of the standard display mode let me see if I could throw this camera into a quick little demo of this and so we're looking at the back of the camera right now and we're going to press the button on it and it just it should switch us there I go to are kind of our standard control panel we're going to talk about this control panel here in a bit and so flipped that and we go back into our live you mode so this is turning on our live you now you can actually hold down this button and we can go in and basically is an immediate shortcut into our menu set section and we can turn the e v f auto switch on and off there's little auto switch I'll tell you about that tells you when you're getting close to the viewfinder and switches from this live you in the back to the screen on the for your eyes to look through the ivf and so that button can be reprogrammed if necessary but it's kind of nice depending on whether you want to look at the image on the back of the camera or in the viewfinder itself.
Class Materials
Bonus Materials with Purchase
Ratings and Reviews
a Creativelive Student
I had previously purchased the Fast Start for the earlier OM-D E-M5 model and found it invaluable. I was lucky to catch this E-M5 Mark II Fast Start when it was live and had my camera set up beautifully - until I updated the firmware recently and discovered how uncooperative the camera can be in the absence of the combination of settings recommended by John. So I bought the course, which enabled me to restore the camera to the optimal settings and gave me may "Aha" and light-bulb moments about things I'd forgotten or not understood the first time around. I am glad I now have this course so I can revisit it as needed. NOTE: There IS an option to save settings to the PC before updating firmware. I will be doing that in future!
a Creativelive Student
Excellent course. John's ability to patiently and throughly cover all elements of this detailed camera is impressive. He converts the stress level of learning a new camera to a fun level.
Susan Gutterman
I watched most of the live broadcast and just finished going through all of the modules with my camera. I learned so much!! My camera is customized to my preferences and I am now very comfortable shooting in M mode. My picture quality has already improved. John is an excellent instructor.
Student Work
Related Classes
Camera Guides