Lesson Info
6. Processing & Editing with Lightroom Mobile
Lessons
Lesson Info
Processing & Editing with Lightroom Mobile
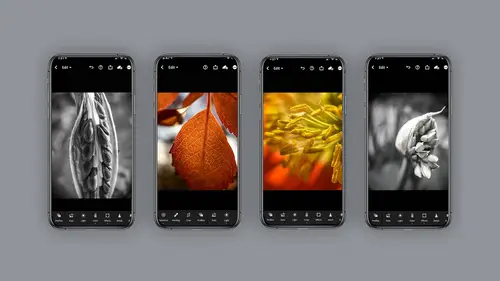
Let's take a moment and discuss processing. Now I'm going to use light room mobile for this editing or processing section but I want to be really clear. That is just my choice. There are many apps that you can do editing in and they often use the same language, let's say say lighting highlights, shadows, color clarity, sharpness, structure. So you pick the device or application that works best for you. I'm just going to use light ra mobile as the vehicle in which I talk about this especially for macro photography and the reason I like it is I shoot in light room and then I happen to be in the same application. So it's all quite seamless for me and when I say seamless, what I really am talking about is I can work on my phone shoot in process. I can then process on my ipad where I might have a bit more real estate and I could see a little better and heck fire can then process on my desktop if I prefer that so that I can even see more and use my stylist pen if I needed to. I could also pr...
ocess on the web, which I don't do often. But the larger real estate is really helpful and then heck fire, I go to Photoshop if I want to do a montage. So, light rooms worth the consideration. There are 15 editing modules inside the light room mobile app. I'm only gonna talk about a few of them for macro photography but there's a lot to dig in here if you're interested. There is a mobile photography boot camp that goes very in depth into each one of these. So let's first separate presets from shooting I. E. You can shoot through some presets or you can actually use presets once you've already shot a picture and apply a look to them. And then there's something called profiles, which also adds looks to your images. I call these the three piece, let's take a minute and discuss the lighting module inside the lighting module, you can expect the usual exposure contrast highlights, shadows, whites and blacks like you normally get. But there's also this great curve which is really wonderful. Let's take a look at the light panel. Often I will click auto when I first start just to see what light room wants to give me. And you can control the usual thing exposure. You can take your highlights down, which I often like to do with macro photography. Bring your shadows up. You can also darken your blacks or lighten your blacks will give you that faded look that presets often give you but check out this curve. This is where some beauty and some sophistication lies. You can change tone by clicking on the highlight, the mid tone or that. Bring the shadows up. But if you start clicking on the colors, you can actually add color up for red down for scion and the program will show you what you're getting, notice the line, turns the color of the curve, you're on green up for green down from magenta and blew up for blue down for yellow and you can really add a lot of yellow if you want to or bring just the highlights down. There's a lot of sophistication in here and control and then you have the modifiers down here which will allow you to adjust the mid tones, the highlights and the shadows in smaller increments. It's kind of like a fine tuner if you will check it out. The color panel looks pretty generic on first glance, you know, color temperature tint, vibrant saturation, that sort of thing. But when you look deeper you realize really the depth of this application light mobile. So you of course can change something to be black and white color grading here and you have mixed and inside the mix. If you dive even deeper, you have individual colors, you can adjust here. But then also you have targeted color adjustment which is absolutely amazing. Both hue saturation and luminous. Let's take a look at the color panel. So it's pretty generic. You slide over and click on the module for color, you can click on the black and white button if you like. You can change the tint or the temperature, you just scroll up to get to the hidden items that you can't see. And I mean this is pretty basic at this point, if you want to go down to saturation, you can make it black and white that way. Also just another method to do the same thing, but the good stuff is that when you scroll up and you click on color mix inside there, you can control, let's say the greens and take the saturation just out of the greens, or you can change the hue of the greens, you can go in the Science and take the saturation of Science or again change the hue of the Science. But what I really love is the color mix in here. You can click and hold and say, hey, any color in this area, reduce the saturation or change it to you, excuse me? Um if you click on the saturation and do the same thing, you can de saturate a multitude of colors at one time, pretty amazing. And you can also change the luminous, which means brightening it up. So click and hold and drag up and you can lighten, click and hold, drag down, you will darken and you can also again changed the saturation. So de saturate or darken, how cool is that? You click on the yellows and do the same thing, notice I'm on the saturation, so I'm de saturating yellow and then when you're done you have to click down in this panel now when you're in the black and white if you want those yellows or greens to be brighter, you can click on the luminous now and even further target your tone or luminescence Can you see how deep this one colour module is. If you press and long hold on the image, you can see the before and after again light room mobile is completely nondestructive at this point I'd like to remind you again, the other powerful quality of light room mobile is that you can use it across the desktop, phone, ipad or web. So this is what the color interface looks like across those different devices. So imagine the possibilities. Not only can you start this on the phone but because light removable is non destruct, you can open it up on your ipad and maybe fine tune your color work or heck fire go on your desktop where you have a lot of real estate, visual, real estate and even fine tune more or go all the way back to the beginning. Whatever you need to do the next section, I'd like to look at our effects and with macro photography, I think this is probably one of the most important modules given a focus and clarity and wanting to sharpen up your image as best as possible. So let's take a look. There are five main sections to this panel, texture, clarity. D. Hayes the lens vignette which I absolutely love and then green. However, within that you'll notice you have these little subsections like under the vignette, you have a feather, a midpoint roundness and highlights and I think in the panel it's not very obvious because when you scroll it all looks like the same hierarchy, but it's not. So just make note of that. Let's take a look at a typical edit. Initially I will crop my image so that I get the composition the way I like it and this is done with the crop tool pretty basic. And then I'll slide over to the color panel and I'll make it black and white if that's my intent. And on this one, I'm going to go to color mix and lighten up the purples and the magenta because the flower looks a little dark to me. And once I'm happy with that adjustment, I will go ahead and hit done and then slide on over to the effects panel where I can add some clarity and sharpness. So under effects, I'm going to click on clarity first and go ahead and bump the clarity up, which will give me some more structure and then I often will go to the D. Hayes and bump that up and when that happens, the blacks will often get a little heavy so a slide over to the lights real quickly and bump up the shadows and then navigate back to the effects where I can go ahead and add that then yet I love that lens vignette. I think it adds a little bit of something to it and you can play with the sub sliders midpoint feather roundness. I'm gonna darken up this vignette kind of heavy for a second. so you can actually see what the roundness does. It's a little hard to see when the vignette is subtle and the feather, for example, you can make a hard edge or very soft. Let's go ahead and bring that vignette back down to something a little more gentle. Anyway, it's pretty basic, little clarity. Sometimes I'll zoom in and check out the clarity and see how it's looking. You can reduce it or increase it and then sometimes I'll add textures. Sometimes the texture adds too much grain for me. It really depends on your image whether you're going to like to add texture or not. So while there's 15 other editing modules in light room mobile, I think for macro photography I the main ones are going to be looking at or first pass should be light color and then affects
Class Materials
Bonus Materials with Purchase
Ratings and Reviews
Lauryn
I loved this short class & how accessible Lisa made it. Although some of the recommended equipment does have a cost, I appreciated Lisa's take on what matters: fun in the process and final product (it's not always about investing in super-expensive equipment). I loved seeing the photo reels that she shared; it gave me lots of ideas for a project I am working on. A few suggestions toward composite photos and experimentation made this seem just like so much fun!
fbuser 692c9645
Another winner by Lisa Carney. This is my second class of hers and I really like her teaching style. She has a relaxed way of approaching the material and makes it fun and clear. She inspired me once again to purchase a few new tools including a macro lens and I'm glad I did. I'm looking forward to diving into more of her classes.
Mary Dawson
A wonderful class by a very creative and inspirational teacher. Thank you