HDR Exposure Tips
Lesson 7 from: Making and Editing Natural Looking HDR Images: Lightroom CCJared Platt
HDR Exposure Tips
Lesson 7 from: Making and Editing Natural Looking HDR Images: Lightroom CCJared Platt
Lessons
Lesson Info
HDR Exposure Tips
So I want to show you something then where I'm I'm using both. So you can also want an HDR panoramic situation. So when you're dealing with that again, you don't have to work on the images until you merge them and because we're gonna be raw the whole way. We don't have to worry about whether or not the adjustment needs to be made now or later, because it's still all raw, raw all the time. And so the first thing I'm gonna do is I'm gonna go to So here is the whole set is this? And if I show that to you, see that that's the desert southwest that's Ah, Monument Valley. And there's under normal over under normal over under normal over all the way to the other side. So then it's just a matter of going in and selecting the 1st 3 images and merging those is HDR. Then you're going to take the next three images and merge them is hdr and then go through the whole set That way, Once you've done that, then you're just gonna sort by the HD ours and merge them is a panorama. I still I'm not gonna ju...
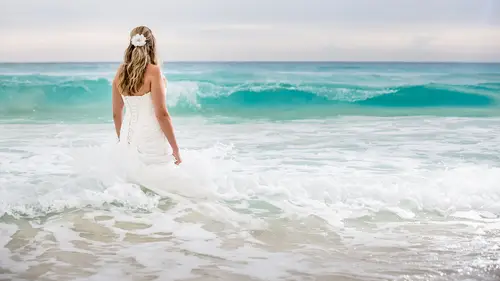
st anything. And then, finally, I will come up with a really huge raw file that is 32 beds, death HDR, and it's about six or eight images wide, all stitched together perfectly in HDR. It's gonna be huge. I'm not even attempted on this laptop because it would coffin sputter. But on my desktop I could do it quite nicely, so there's no reason for us to go through it. You understand the concepts, but now you're putting both of those together to confirm if you're using tiff, it's not as good as using a raw file, right, And their example is I use Nikon software if I want to edit the file in light room and Onley exports tiff. But that's not as good as using light rooms built in HDR, right? So just to confirm absolutely correct, yeah, if I have a choice between using Nikon software for some specific reason cause it's slightly better at working on a raw image from a Nikon and taking it to and then using that tiff to go in and merge some kind of ah hdr out of it. If I have a choice between that and coming to What someone might see is an inferior final, uh, image from light room because it's not Nikon making it. I'll take the inferior, not Nikon, working on their own files any day of the week in order to have that absolute raw file toe work on, because the bit death is mind blowing, how much information you have. And quite frankly, this is not something that's just for landscapes, either. So here's a situation where I have no lights with me. So I don't have any options other than so if if I wanted to shoot this photograph of this girl in this scene, and I wanted to make sure that I had the sky, which is blue here in this image, if I if I wanted to get this, there's no way I can get it without some kind of a light or an assistant or something. Toe hold a light or reflector something to get light in there, so I would have to brighten it up to about that level, and now I can get her. She's still a little bit too shaded and then at the Brighton her up a little bit. But once I did that and the skies already blown anyway. And so trying to go into the develop module and get back that beautiful blue sky that I had before, you know, I can't I can't do it like the best I get a little. I mean, I've taken the exposure down minus four, and at best I get a little bit of blue here, and I still get white over here, so there's just no way to do it. So then I have to just give up and say, Okay, well, I'm gonna expose for the girl. And if I'm gonna expose for the girl, I'm just gonna lose the sky entirely, which Okay, you know, that's that's a possible way to go. There's plenty of people out there that shoot like this all the time, and we've just come to accept that skies are white, you know, and it's OK because we're doing a bright airy, you know, happy shoot or whatever. So there's plenty of people that is shooting this way. But if I want instead, toe have it look like that. So now I've got the sky Got the blue sky I've got all this shadow here and I've got her perfectly exposed. Um, I need to do an HDR and so other with, other than carrying lights with me, which I love to do. But if you don't have them, then this is This is one way to go And so what? What happens then is we highlight all of those images and we go into our HDR, so go to merge photo merged HDR. And when we do that, we're going to use the ghosting. The ghosting is going to fix the fact that she's moving because she moves slightly in all those exposures. You can see her kind of sway a little bit, and I'm hand holding it, by the way. So I'm hand holding and swaying a little bit this way, and she's standing and swaying a little bit that way. And the trees, they're going a little bit like this all during this exposure. And so you would think that's not an HDR. You can't do that. But if you do the ghosting sale, the ghosting right now is just gonna get deal with that. If I do medium ghosting gotta wait for it. But if I do the median ghosting, it's going to start looking at other places around here, and it's going to start seeing some probably up in the trees and maybe a little bit right here on the crown of the head. See how that now that it's seeing that she's moving a little bit there. There's a little bit of movement here, and if I do hi, it's gonna even look for Mawr instances where there's ghosting and it's going to start working on those as well. So you just choose the right amount of ghosting and then you go ahead and merge it and then it's gonna fix some of those issues on the edge so on and I'll show you the difference. So if I go into this one here, this is the actual raw hdr raw. And if I zoom in there, do you see that line on the edge there? So that line on the edge is a result of Onley doing the low ghosting and so it doesn't capture this and it's moving and so it has a weird effect to it. But you can see over here that it's fine. There's nothing wrong with that side. There's nothing wrong with any of the other edges. It's just that one place. The hair must have been going like this. If I do that same one as a higher ghosting than that comes into play and becomes normal, it becomes that right? So that's the difference. And this is an ended up being the final file with, and it's actually a tiff file because I did some retouching on afterwards. So the only time this ever made it to a tiff was after all, the HDR. All the adjustments were done, and then I just wanted to do any kind of light retouching on her skin and things like that. And I'm very adamant that I only go to photo shop when absolutely necessary. And in this case there were some blemishes and stuff that I wanted to take care of that it was easier to take care of in photo shop. So but that's that's when I would go to photo shop. Um, so does that make sense like so hdr can look very nice. It doesn't have to look painterly. It can look like a really thing like a real photograph, um, or a lit photograph. Um, and it doesn't have to look like a painterly thing if you do it right. But remember, you have to think about your exposure. You have to think about your hissed A grams. You got to make sure that you're getting the right amount of images between all the exposures. Make sure that they're overlapping really well. When they overlap, there'll be much better than if there, if they're spread out on that, means the higher number. You get, the cleaner the file will be. But also the higher number you get, the more things can move. In this case, we did a rapid set of five exposures in order to get this hand held her moving, and we were still able to get it. But I wouldn't have wanted to go to seven because a I didn't need it and be I didn't want toe risk seven exposures as well. Um, something else to know about HDR. By the way, um, is that if you choose, um, let's say you did seven exposures, and if you chose toe, leave the darkest one out. Your overall HDR will be brighter exposed because it has more bright exposures to compare into the mix. If you chose to leave the brightest one out, then the whole overall HDR will end up being darker. It'll it'll initially. It'll start darker, so just keep that in mind if you find yourself having to grab the exposure knob and the shadow knob and bringing them all the way up. So in this case, here are the settings. If you have to bring the shadows, usually I bring him most of the way up anyway. But if you have to bring the shadows up and the exposures up to get the right exposure, chances are you're not. You need to start adding an extra bright exposure at the top of your HDR. If you find yourself always too bright and trying to pull it back down, chances are you need to add a darker exposure at the beginning of your HDR. Siri's some make sense, so you can. You can, just just by adding a bright one or a dark one, you can shift the whole exposure one way or the other. You could go both ways with it, but then you're gonna kind of land in the middle. But the key is to make sure that you again, all of your HDR is you need to make sure that when you're looking at that hissed a gram on the brightest exposure, there is no clipping on the shadow side of it. And then on the darkest exposure, there is no clipping on the right hand side and you can see right here. We just barely made it under there, so it's just barely coming under the clip.
Ratings and Reviews
JIll C.
Though I've already been using Lightroom for HDR's and Panos for a while, I gained some useful insight into techniques and workflow from this course. Jared teaches you what you need to know to make good images without getting too technical. He even showed examples of HDR portraiture, which I would never have attempted.
Shelly Fields
Attended a workshop with Jared through AZPPA many years ago. Loved him then, but even more so now. He is a thorough, articulate speaker. I highly recommend him.
user-1c544c
Having never used HDR or Panoramic techniques before, this was a great class for me. Jared made the concepts and steps very understandable. I need to get out and try some!!