Lessons
Class Introduction
01:39 2Location Scouting
02:59 3What is Macro Photography
02:09 4What Makes a Good Macro Photo
03:44 5Gear
11:20 6Preparing for Outdoor Macro
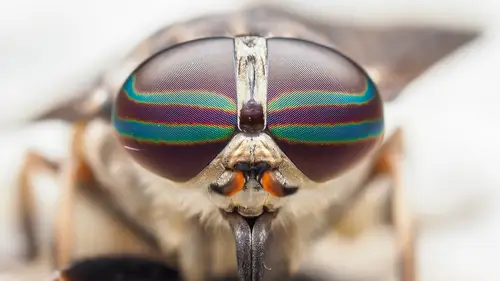
02:00 7Camera Settings
06:48 8How to Get Started With Macro
11:59Lesson Info
Camera Settings
As you prepare your camera for macro photography, you want to have a nice baseline of settings that set you up for success. I like to set up my camera with a custom setup on the mode dial, with good general settings for macro photography. Here on my Super Control Panel, on the OM-D E-M1 Mark II, I have quick access to a lot of common settings. I have ISO, white balance, shutter mode, what type of image quality I want to record, and a whole bunch of others. So let's start with ISO. For this camera, the native recommended ISO is 200, and that's where I shoot all my macro work. White balance I leave set to auto. Autofocus area, I use a single, small autofocus point, as opposed to the single, large autofocus point. I have my shutter mode set to sequential low, and I actually dial that back from the native default ten frames a second mechanical, down to five frames a second mechanical. That allows my flash to recycle, and I drop fewer shots. Down at the bottom of the screen, you'll see shut...
ter speed it 1/200 of a second, and aperture is F7.1. 1/200 of a second is fast enough to stop most movement, but also allows me the ability to go up or down a little bit to adjust my exposure. F7.1 is kind of a nice middle aperture that gives me enough depth of field for most of my work, but isn't so small that I'm cutting exposure and need more flash or more, slower shutter speed. Down at the bottom of the screen we have our shutter speed and aperture. When using a flash, my flash is limited to sync at 1/250 of a second. I take one step off of that to 1/200 of a second to give me the ability to go a little bit faster or a little slower, but a 200th is a great starting point to stop motion. Aperture set to F7.1, which is a middle of the road aperture where generally, I have a nice depth of field for the smaller subjects that's not limiting what's in focus all that much, but again, I can stop down my aperture a bit if it's appropriate for a scene. Back in the Super Control Panel, we'll go over to focus mode, for macro, I'm typically using manual focus. I move myself and my camera closer or further from the subject to get the focus I want. But, I still use autofocus from time to time for fast moving subjects like bees, or just to frame my shot when I lose my subject in the viewfinder LCD. What's great is I also have a button mapped to autofocus, manual focus, toggle, and I'll show you that as well. Face priority is turned off because we don't need it when we're shooting macro. And my metering is set to ESP. I do adjust to center-weighted for longer range shots, like dragonflies or butterflies, but for the really close up work I keep it on ESP. Next up we have image quality. The Olympus OM-D E-M1 Mark II allows me a variety of image quality settings. For macro, I use large superfine JPEG plus RAW. This allows me the flexibility of small files with JPEGs, but I also have the full, uncompressed RAW image that can let me really pull out details from shadows or highlights out of a RAW image. I like to keep my picture mode on natural. We have some other options with i-Enhance, vivid, muted, or portrait, but I find that natural gives me the most flexibility when I edit my photos. Next up, we have button function. What's great about this camera is I am able to map functions to buttons. I can override the default behavior of a button, I can utilize a function button to have quick access to things that are helpful to me when I'm shooting macro. So let's walk through my custom function buttons. First up, function one, here in the top right corner of the camera, that's right underneath my thumb. I have quick access to magnified focus assist, and when I'm focusing on a subject that's really tiny, I can magnify that subject at three, five, ten times, to make sure that I'm hitting the exact focus that I want. Function two is ISO and white balance, and that's up on the top of the camera, as is the record button, which I override to be a manual focus autofocus toggle. When I lose the subject in the viewfinder, or I have something that I can't take the time to manually focus, I'll click over and toggle to autofocus, and then when I'm ready I can go back to manual focus and move in and out to obtain focus appropriately. I use my AEL AFL button to turn on bracketing, and I have my bracketing set to do in-camera focus stacking. On the front of the camera, we have peaking and my 2x internal digital teleconverter. Peaking is another option in addition to focus assist that's really helpful to make sure the areas that you think are in focus are actually in focus. In addition to the settings I can change with the Super Control Panel, I change a couple of other settings for macro work. First, since I'm using auto white balance, I turn keep warm color off. Since I'm using a flash, I want to be able to see a bright exposure on my LCD regardless of the exposure that the camera is set to. For manual shooting, I'm turning live view boost to On1. With this setting, live view brightness will not reflect exposure settings and will be adjusted for optimal viewing. Brightness of the final image will differ. And what that means is what I'm seeing on the LCD is not the exposure that I will get, that exposure will be controlled with my flash. All of these customizations provide for a great baseline for general macro work the way that I shoot. Since I'm using these settings fairly often, I actually assign them to the C1 position on the mode dial. Regardless of what camera you use, these settings should provide a nice baseline for your work. If you happen to be an OM-D E-M1 Mark II shooter, you can download my settings from the download section on this class.
Class Materials
Bonus Materials with Purchase
Free Bonus Materials
Ratings and Reviews
Andrew Lamberson
I found the class both very informative and very motivational to get started in Macro photography. It is an entry-level class but it explains what you really need to know to be successful. I especially found the information on the value of using flash and how to modify your flash for it to be more effective especially helpful. I am an experienced wildlife photographer and have done some "Macro" with my telephoto lens, but this class motivated me to purchase a dedicated lens. I am really looking forward to spring and finding some good bugs!
Chris Baudec
Great presentation and great motivation in the post processing. I do wish that the would have been made available. After all, this is a Olympus sponsored event, and Oly settings are always welcomed.... and a tad difficult on the learning curve.
Gary Hook
Chris does a commendable job of explaining his techniques, reasons and potential pitfalls to avoid. Very thorough and much more enthusiastic about little bugs than I will ever be :-) but at the end one has a good concept on how to approach the task at hand. Nice closing with his practical examples of 'post' shoot production. One suggestion for inclusion would be some operating tips/techniques with a tripod/macro rail slider. His Olympus is way smaller/lighter than my Canon 5D so my hand holding will be at a minimum. Well done. Thank you