Lesson Info
29. The Slideshow Module
Lessons
Class Overview
05:48 2What Is Lightroom Classic?
03:18 3Lightroom Classic vs. Lightroom vs. Photoshop
07:34 4Shortcut Keys
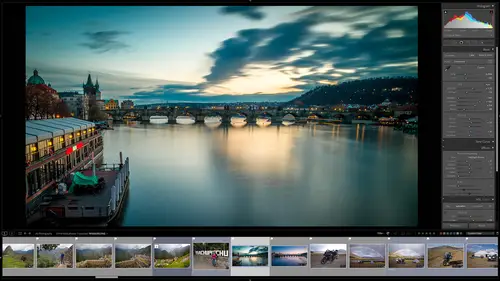
08:33 5An Overview of the Interface
11:48 6The Catalog System
09:34 7A Look Under the Hood
11:04 8Workflow and Presets
02:42Library Module Overview
07:44 10Library Module: Importing
50:13 11Library Module: Organizing Your Images
27:57 12Library Module: Picking Winners
20:18 13Collections and Collection Sets
23:52 14Develop Module Overview
11:14 15Develop Module: Global Changes
34:36 16Develop Module: Local Changes
42:37 17Virtual Copies
14:19 18Building A Develop Preset
14:38 19Exporting and Export Presets
32:32 20Creating a Watermark
17:53 21Creating an Import Preset
10:28 22Photoshop/Lightroom Integration
32:30 23Catalog vs Lightroom Preferences
21:35 24Managing Catalogs
30:08 25Tethered Shooting
14:37 26Publish Services
13:52 27The Map Module
12:32 28The Book Module
15:38 29The Slideshow Module
25:50 30The Print Module
20:15 31The Web Module
11:03 32Creative Cloud Integration
11:03 33Class Wrap Up
01:13Lesson Info
The Slideshow Module
The slideshow module is a fantastic module because you can show off your work, but it also will help you make money if you're a wedding photographer, an event photographer, any kind of photographer that is shooting some kind of happening a wedding or an event or a camp or a church event or something like that. And you have an audience that's going to see what you're doing on a maybe a big screen video projector or tv something like that. It's also great for educators to show what they're doing because you can show images, but you can also show data about those images in real time. It's just a great module. And so we're going to go first into the library module because we need to figure out which images we are going to show in our slideshow. And so what I've done is I have created a new collection called Karen. Here are a bunch of images of a photo shoot I did with the model in Colombia. Her name is Karen and we want to make a slide show of some of these images. Now, a lot of these imag...
es are black and white and I just love them. So what we're going to do is we're gonna refine these photos and just choose the black and white images. Now we're going to do that. I could do that manually by just going through and choosing the black and white images, but there's an easier way to do it. I'm gonna go to the metadata and I'm going to go to the treatment. So in the metadata you can choose all kinds of things. I'm going to choose treatment and I'm gonna choose black and white. So I can choose all the color ones or just all the black and white ones. So that is done for me now, down here in my filmstrip, I only see the black and white images from this photo shoot that have a flag attached. So I have refined those photos in the library module. Now when we zip over here to the slideshow modules, so I'm going to click on the slideshow module, you can see that we only have these black and white images of Karen, that's what we want to put in our slideshow. So how do we create a slideshow? We would go from left to right, like we do and all the other modules and this is gonna start to feel very familiar to you because we did a similar thing in the map module. So the left hand side, we have to choose the template that we're going to be using and so we can have a simple slide show that takes up most of the screen but notice this has a little star rating and my name up in the left hand corner, we can do a widescreen display so you can click on an image and sort of see a preview of how that would look. That looks pretty good. I like that. I have created a user template, this is what I use in my workshops when I'm teaching, I tether my camera to light room Classic and I have a second screen showing a slide show and as I shoot the images that come in automatically show up on the second screen with the exit data. So as I'm shooting at people like what camera settings did you use? Well, I use these settings and that automatically comes from the image itself. And so you can choose different things, but we want to show you how to set this all up and make a custom slideshow. So what we'll do here is let's go in and create a new template. So we're going to create something from scratch as template name is going to be essential training, essential training demo. I'm gonna put this in my user templates, that's fine and I'm going to create that. Okay, so by default it's just gonna take what I already created and it's going to copy that. So let's change this. So I'm gonna delete that thing. The first thing we want to do is figure out how the images are laid out on the screen so you can see these little lines here and what that does is it creates a little box that says images have to fit inside this box. So if I click on this, you can see that that image is inside the box. If I click on this, it's inside the box. If I click on this it's inside the box. and so it will automatically format the image to fit the box because these images all have different aspect ratios. And so that is going to help out just fine now, once we have that and you can see that we do that over here. Either by dragging these around or we can do that up here on the layout. So we have these guides that were showing and hiding, we can link all of these things. So if I link them, if I change one, it changes all of them. That makes sure that anything you do is going to make sure everything is centered on the screen. I like it to be a symmetrical. So I'm not going to link all those things. I'm just going to change maybe the top. So we have some more room on the bottom. I'm just gonna change the left hand side. So we have room on the left hand side and this will make more sense as we go forward. While we have so much room on the left hand side, we can just start to see how these images might appear on this entire screen, how this is going to show up. Now the aspect ratio of this is going to be determined by the screen you're presenting on. So I'm presenting on this screen you're seeing. It's a 16 x 9" screen. So that's why this is showing up in that way. Okay, so on the right hand side we have other options for the images themselves. Do we want to have a border? So notice we have this white border, I can turn that on or off. So I like it to be off. I don't want a border around this. I can also choose to zoom to fill the frame. Remember we have this box here and so if I say zoom to fill the frame, it's going to automatically zoom to fill the frame but it's going to choose the crop for you. I don't want that for these, so I'm not going to zoom to fill the frame, going to make sure we see the entire image. The other thing we can do is we can have a shadow that's cast and I sort of like the shadow but it's up to you, it's your own preference. And then you can modify how that shadow is showing up the opacity and the angle and all that stuff. I like how this looks right now, so I'm not going to do much more with that. And then this we've already talked about this is the layout. To show the guide helps you sort of show exactly where things are going to show up on the screen if I un show those guides that just hides them here, so you can get a better view of what this is gonna look like in the final outcome. There. Never shown when you do the actual slide show. So this is just for you to see or hide them as you're laying out the slide show. So I'm going to keep them for now so we can see what that is. Now. The other thing I said is this is by Nine because of the screen that I'm using, but it actually comes from this So you can use the screen. So that's what I thought was selected. And so that would be 16 x nine because it's the screen I'm using. Or you can manually select 16 by nine, which is widescreen or four by three, which is a more old school squarish screen from previous two. HD screens. And so most screens these days or 16 by nine. But if you have a screen that's not widescreen, it's most likely four by three, we're going to keep 16 by nine as our aspect ratio. Or you can just choose screen and that will match whatever screen you happen to be using. So that's what I thought was selected. My mistake. But that is what I normally have that set to. Okay, now here's the thing for event and wedding photographers. So pay attention. Event and wedding photographers. If you want to make some money at your events or wedding, our weddings. This next section is how you can do that. So imagine with me if you are shooting a wedding and you are tethered wirelessly or maybe you have an assistant that is helping you out. So you have a light room catalog set up on a laptop or some portable device. And as you're shooting that wedding, you're shooting the shots of the bride coming down the aisle and all this stuff before you're shooting this setup and the reception and the wedding. All the stuff that you do at a wedding, you're shooting the good stuff. And then maybe you have an assistant that is quickly going through your images as they're coming into light room because you're tethered wirelessly. Or maybe you're having your assistant coming, getting a new card and importing those at regular intervals. But during the wedding or during the event, you're importing images into light room Classic. You're calling those images. Your assistant is looking at those and and choosing them by hitting the pick. You've built out your presets already so that you're developing those images during the wedding or during the event. So you're not taking tons of time to create perfect images. You're using those presets that you already created to get some really close to perfect images in real time pretty much. And so the event has finished, the speaker is done. The awards have been handed out, the wedding is over, the bride and groom have kissed, and now it's off to the ballroom and at the ballroom, you have the wedding reception. And there's that delay of, who knows, half an hour to an hour before the bride and groom are ready to come into the wedding reception. Because you're as a photographer are doing all those photos. And this is when people are just sort of milling around and talking to each other and family members are getting to meet again and you're eating all this stuff. But imagine if you had a big video screen and a video projector, and all of a sudden, as people are coming in, there are already photos on that screen showing up, and there are some music playing, and on that screen you have branding, and so it says, you know, Kyle and jodi's wedding, and you can have something that says, you know, if you want to buy a wedding album, go to www. Dot my wedding albums dot com or whatever, or at your event, when the big award ceremony is over and people are going to the ballroom to have a nice beverage on a big screen with a video projector, there are photos of that event that just happened on a big screen, playing with your branding, guiding people to your website, telling them how to buy your products. That's what this module will do for you. So here is how you do that. So, we've already got the images in. We've used all of our presets to create these images very rapidly. We want to create an identity plate. So this identity plate right here says Mark Wallace, that is the most boring thing ever. That's not going to help you out. So what we can do is we can change this from a normal identity plate to something much better. So I'm going to use a graphical identity plate. So I'm going to go in here and I'm going to go to my logos, which is in my class materials and on news, Mark Wallace Essential Training. And I will say, okay, and now I have this logo up here and I can drag that out. And this is why I left the room over here, so I can put my logo up there because this can be any graphical element that you want. It can be your logo with text with your website with anything you want. It can be vertical, it can be round, it can be horizontal, it can be whatever you want. You can make this larger, you can make it smaller, you can make sure it always goes behind the image. So if it's really big you can go behind the image or it can go above the image, it's your choice. And so you can do a really nice layout of a slideshow module. This can be at the top left notice, it has this little dot here, so what it's saying is saying I want to anchor on the top left. Or it could be on the center or it can be on the right or it could be the middle, right or the right, lower left corner, or the middle or the lower left or the left middle. It's up to you. You can put this anywhere you want, but these little anchors that you saw are for specific information. And so if you're shooting a wedding event, wedding or an event and you are adding captions as you are uh inputting information, you can add those to your slide show. So I'm gonna put this back up here in the upper left hand corner and make it sort of large. So we have that. What if I wanted to add a caption of this photo or the name of the model or in the instance of a wedding, it would be the bride and groom walk down the aisle or whatever that is. I can add some text to this. So down here we have this little abc and it says add text to this slide so I can click on that and it's going to say, what do you want to add? So I can add a custom text or I can pull metadata caption date the equip sh in that equipment that I use the title of this. Or I can edit this. And once again we can go into our exit data and we can choose whatever we want. We can choose the artist, we can choose the title. We can choose the caption, whatever you want to put in here. So I don't have captions for this. So if I tried to do this, it would just show up blank. So let's do this. Let's try to put in um something that's non wedding. E but that's okay. We can put in here the exposure, I'll add the exposure and say done. And so for your purposes this might be the caption. It might be the title of the slide, It might be whatever you want it to be, it can be that. And so now you can choose where you want to put that. So I'm going to put this up here anchored on the left hand side, about like that. And so I can take this and you can change those things and so on the text overlay, you can see over here, you can change what color it is. You can make it blue or green or red or however you want to do that. We're going to keep it white because I think that looks pretty good. You can change the font so you can spend a lot of time making this something that is much more interesting than what I'm showing you right now. You can change the font face can do whatever you want. So we'll just make it sort of this goofy font face, something like that. Um I don't like this text is, it bothers me, so we'll just do um, what was it adobe clean? Yeah, there we go. We'll do that. It's a much better text so we can do something like that. Um so you can add multiple text elements, so I can add another text element. And I'm gonna go down here and say this is Mark's Groovy Demo, and so we have that, enter that and March, Groovy Demo is going to be on the lower right hand side of all of these slides, so no matter what comes up, you're seeing different things changing and notice this is crossing over our boundaries. So I might want to take this and make sure it only shows up right here. So this is a great thing to help you understand these boundaries and why you would have a box here and why you would add different elements and these can be anything you want by my products at this website. This is the title, you get the idea. Okay, those are called text overlays. That's what these are. And so whatever you change here affects all of those. You can also add a shadow, that's to the entire uh a slide show. I don't want that, that's gonna be just fine. Now, what about this background? Right now? The background is gray, I can make this background red and it's a gradient to make it bluish, can make it white, can make it anything I want. And so I don't want this color wash this gradient instead, I can use a background image, so I can choose anything from anywhere in my entire library. But what I'm gonna do is I'm just going to choose this image, drop it in and you can see it takes up the entire background. Maybe I'll do this one right here and you can see how that takes that up. Or maybe this guy right here, you can make any image the background of your slide show. So maybe let's do this guy right here and then let's make it not so opaque. So it's just sort of barely there, it's just a hint of that. And then here, instead of a color wash, which is a gradient, we can change the background color so we can make that white or black or grey or red or green or whatever colour we want it to be. So I'm going to make it a very dark grey so that keeps in tune with our monochromatic look, that looks pretty cool, do something like that. All right, so we have all of these different things. Obviously we would make this look much, much better, but you can see how we can add branding elements and calls to action and text that is dynamic and changes based on whatever is in the image, whatever images showing up, it's really cool to have a look at this. I think, yeah, let's do add that border. Let's do add that white board. I think that's going to help us out here. All right. So the other thing that we can do that's going to be a huge bonus is adding an intro and ending screen. So with the wedding reception or event, you might just want to have your slide show playing forever because you don't know when the bride and groom are gonna show up or you might not know when the festivities are going to end in the ballroom or you might have a set amount of time. So let's pretend we have a set amount of time. So I'm going to have an intro screen and I'm going to change this. So I'm going to use a graphical identity plate and again, I'm going to do Mark Wallace Essential Training. I'm going to say, okay, and I'm going to change this color to white and then I am going to make this much larger. Okay, so that is going to start the slide show and then it will go into these slides and in the ending screen, I'm going to change that to something much difference. I'm going to change that to Thanks for watching. It could be uh, it could, you could say by my stuff, you could change this to a call to action. I'm just going to say thanks for watching and that's how the slide show will end. Okay, so we have a beginning which is the intra graphic, we have a middle which are all of these slides with text that changes based on what you have. This could be anything, I suggest a caption or a title or description. And then we have an ending which is this ending screen says thanks for watching. Now we need to do one more thing and that is let's add some music. So I'm gonna go in here. Notice nothing happens when I click on this little plus. Why not? Because there's this tiny little switch here, you'll see these little switches all over the place. They turn on and off different effects. And so you probably will notice them in the library. I mean in the develop module it will turn on and off an adjustment brush or an effect or whatever. I need to turn on the audio and then they need to add some music. Somebody hit the plus button to add music and then I'm going to go over here to my light room hard drive and I have a bunch of songs that I can choose from. Now. This all of this music is from audio socket, It's one of the best places in the world to get music. You can get one month free by the way in the class materials. There's information on how you can sample this music for free for one month. So we're gonna use some of this music. Somebody's gonna give a listen to some of these songs to see which one is the best for this. Black and white. Yeah. Okay. That's just much too happy. That's sort of cool. And see in the middle of it. No, that's too much. I let this go. That's a little nice. I think there's one down here that's sort of yeah, much more relaxing. Okay, we'll use that and maybe this let me see if this one is also now we're gonna use Lhasa Renata. I think that's good. And so I will choose that song. Okay, that song is five minutes long. How many images do we have in our slideshow? We have 16 images. And those images are selected down here in our film strip. So how do we select which images are in our slideshow? Well, we can use all filmstrip photos, which is what I have right now. So all the images here in the filmstrip are going to be in our slideshow. Or I can say just the selected photos. So if I do that And I select, let's say three photos. There's only three photos in this instead of 16. Or I can say just the flagged photos. So if I have some photos in the filmstrip that are not flagged, they won't go in there. I'm going to say all filmstrip photos because I sorted them before we started creating this slideshow. So we have 16 photos. So based on what we have right now, it's an 18 2nd slide show, you can see that right here, shows how long this is. So how do we determine how long this slide show is? Well, we can go in here and say either make it manual, which means I would start the slide show and hit the right arrow and the right arrow and the right arrow. To change manually those slides or I can automatically change the slides. So we have some options here, we can sink these slides to music so they'll go with the beat to do that. If you check this and say, place light show, it takes quite a while For light room classic, to figure out how to sink the slides. I mean minutes, sometimes 10 or 20 minutes, depending on your computer. So I am not going to check that because we don't have that much time to hang out and let light room figure out its thing. What we can do is click this which is fit to music and it will automatically change the the duration of each song To last long enough to fill the entire song. I don't think anybody wants to see a picture for 17 seconds. So I'm going to just choose manually four seconds And I'm going to change these cross fades to 1/2. So they're gonna be nice. Slow cross fades. Maybe I'll make these 4. seconds, Something like that. So now I have this, we can look now, we're at a minute and 37 seconds, so maybe we'll speed that up a little bit. four seconds. Okay? And then we've got that. Then. Also if we have a video in this, we can have video showing up in our slideshow. You can choose if you want to balance and have the video, audio be dominant or the music be dominant are sort of balance between the two. I don't have videos in there, and then you can choose if you repeat the slide show or not, I'm not going to repeat it. I want to show you the beginning, the middle and the end. And then because I have too many photos here, it's going to take too long. I'm just going to select a few photos. So this is a much shorter slide show. So this is let's go down here and we're gonna do uh Four slides, so that's a 32nd slide show, and so we can see sort of what that is. Maybe I'll do these guys here instead of these guys here. There we go. So we have a 32nd slide show. That's pretty cool. Okay, so let me review this is one of my most exciting modules in Light Room Classic, because it allows you to in real time show people your images. You can add branding and calls to action dynamic text. That changes based on the metadata of the images that you have included in your slide show. And it's a great moneymaker for event photographers, wedding photographers, and a great teaching tool for educators. And so without further ado, we're gonna end this session by playing you this slide show. So let's do that right now, we're gonna go over here to Light Room Classic, I'm gonna hit play. It's going to prepare. And here we go. Yeah, yeah. Oh yeah,
Class Materials
Bonus Materials with Purchase
Ratings and Reviews
Karen Sessions
Great class - excellent content, excellent presentation. Thank you Mark, through this class, I finally understand the difference between Adobe Lightroom Classic, Lightroom and how they work together. And how excellent, there is so much more available to learn - photography essentials, lighting, Adobe products.
user-d55dc6
This is an excellent class to learn about Lightroom Classic. Since it's not the same as Photoshop, I found Lightroom Classic to be confusing and difficult to intuitively figure out. Mark Wallace is an expert and exceptional teacher for the program and I learned so much today in this free class presentation that I am planning to purchase the program so I can continue to have a solid understanding of Lightroom Classic basics. Thanks, Mark, for inspiring me to get back into computer photo editing with LR Classic!