Introduction to Lightroom and Photoshop for Architectural Photography
Lesson 1 from: Lightroom and Photoshop for Architectural PhotographyRandy Van Duinen
Introduction to Lightroom and Photoshop for Architectural Photography
Lesson 1 from: Lightroom and Photoshop for Architectural PhotographyRandy Van Duinen
Lesson Info
1. Introduction to Lightroom and Photoshop for Architectural Photography
Lessons
Introduction to Lightroom and Photoshop for Architectural Photography
09:28 2Curves Layer & Selections Color Correction
07:12 3Paint Brush Color Correction
07:56 4Available Light
13:12 5Luminosity Mask Color Corrections
05:10 6Light Painting Processing Exterior
08:45 7Light Painting Processing Interior
11:52 8Using Lightroom & Photoshop for Great HDR Images
07:14Lesson Info
Introduction to Lightroom and Photoshop for Architectural Photography
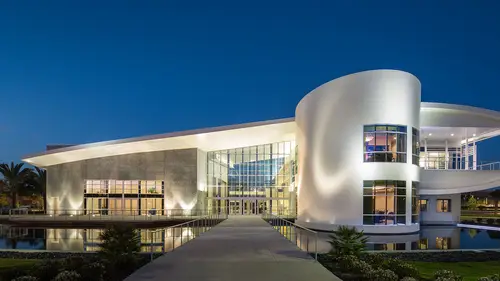
Hi! I'm Randy Van Duinen, and this is my class on architectural photography for Lightroom and Photoshop. In this class we're gonna discuss a bunch of different things. How to do color correction. How to light paint where with the one light light up the whole room and a whole building. So we're gonna show you how to put this all together. Do some color corrections and some other little tricks and tips. Do HDR photography the right way. So let's get going with this I got a lot to go over. So let's start out with Lightroom. So we want to get to this shot right here, but we're gonna start out with this image right here, and we're gonna go up to Development. And right over here, our module, and get right into it. I'm gonna open these guys right here so that you can have a little bit more image to see. Now the first thing I wanna do is I want to correct it. I was trying to do two photographs at the same time, and this one was a little bit off. So we're just gonna go up to the crop tool, and ...
just straighten that out. And that looks pretty good. I was using a tilt shift lens So it was, all the parallels are together, but this got off a little bit. So we wanna fix that first. We're gonna say done, and now we're gonna go through, and just go through the basic settings in Lightroom. And this is what I do every time. I start out in Lightroom, get as far as I can, and then I'll take images into Photoshop. So let's start right here with our texture and clarity. I always bring them up a bit. Clarity probably right around 35. That's almost always where I'm gonna start, and I'm also gonna bring my vibrance up. I find that helps a lot, and I start out with these sliders instead of exposure or anything else because I feel they make changes to the color and to the exposure. So I wanna get 'em 'bout where I'm gonna start out so I can use the rest of the sliders, and get the look that I want. So next I wanna do is set my black point. Now if you hold the Option key and click on the slider you can see right here it'll start telling you when you start the clip. So we're gonna come in here, and just bring it up a little bit. Now we're gonna set our white point. Again you can hold the Option key and start to bring it down we can see what we want there. I'm still clipping so I'm gonna bring the white all the way down, and then I'm gonna take my white the highlight slider and bring that down too, To right about there. Actually I'm gonna bring back the highlights a little bit. So now we have our basic exposure done, but what I wanna do is work on our color. This is a very white building. So I'm just gonna do is use the color picker here, and come over here to some place that I think will give us our neutral color. And that's probably pretty good right there. I'm gonna come down here a little bit more. Something like that. Yeah that looks really good. I like that color. That's kinda representative of what this area looked like when we shot it. So after we get that, I wanna come up here and just go ahead and bring up my shadows a little bit. I think the highlights, I mean the exposure could come down just a little bit. I think that's starting to look pretty good. I still think my whites are clicking a little bit. So I'm gonna bring my highlights down a little bit, and this is just a process that you do. I mean, you kinda look out there. You get an idea. You start working on it, and things start to change as you do it. Once I got that, I'll probably go and put a little contrast in it, right here. The next thing I wanna do is come down to my lens correction. I found that almost in all architectural photography you need to hit Remove Chromatic Aberration. I've been a Cannon shooter, a Sony shooter, and on both cameras, this is almost always the case. So I always do that right there, and then what I want to do now is just take this into Photoshop. So were gonna come up to Photo, Edit In, and we can just come down here and open it into Adobe Photoshop. Or if you want to use a keyboard shortcut is Command or Ctrl + E, and that will bring up the export window. It just brings it right in there because this is a raw file. So now we're in Photoshop, and we're gonna in our layers pallet, and what I wanna do is just do some basic retouching on here. So I'm gonna create a new blank layer. Actually that's a mask. Let's make a layer here, and come in here and I wanna scroll through and do a few things. This guy right here, I got these little, little guys comin' in from the trees. I wanna get rid of them. So I'm just gonna take my Clone Stamp tool, and make sure that I'm 100%, and we're gonna come up here and make it a little bit bigger, and just grab some areas right next to it, and just clone it out. Now you notice I'm on a layer, but yet I'm cloning this all out here. That's because I'm have this set right up here to Current and Below. A lot of times it's just the current layer. You wanna set it to Current and Below. That way you're not working and retouching on your image. So we start there and we can just go through and do this sometimes the spot healing brush is even better. Get a little bit bigger here on this. An option, it might be a little bit quicker to do it. Come on, come out here (click) and there we go. I'll retouch this. Then I wanna come in here, and I look around and see things that aren't right on it. That just gonna really start to bother me. So let's come up here, and look at this right here, and I want to go ahead and just get rid of this. I don't know what it is. Something on the building. It shouldn't be there. It's distracting. So I'm using the Healing Brush, and I'm just gonna come over here, and just take that out nice and easy. This light up here is distracting. So it's gonna take a little bit more work. So we're gonna go back to our clone stamp tool, come down here, and just pick a part right on the straight line, right here, that we can use. That way we can set it so that it's even with that line right there. Makes it a lot easier to retouch. So go ahead and get it away from there. Again, maybe, a little bit like this. Now I'm gonna use, I'm gonna come right over here, and grab the tip of this antenna, and just put it in line there. Just to kind of make it so it doesn't have that red color. Go back to my Healing Brush. Hold the Option or Alt key. Select here and take all this out. Just so that it blends in. You might have to do it a couple times because of the red that was in there from it , and there we go. One other thing I think I'd work on on this is right down here is this reflection of this light that they have going up, and again, Clone Stamp tool would be a great one to use. Just kinda select here, and I'm just kinda lining up that same spot, and start cloning that out like so, and then we have that out. I'd do the same over here too. I don't think you need to see me clone everything out, but I'd just start going through, and just picking out little distractions. Things that're on here that shouldn't be in there. Also, I think this is distracting right here. So I'm actually gonna go ahead, and grab my Lasso tool, and just select this area right here where I think it's a little bright. It's right in the front. It's taking away from the rest of the image. Once I've selected it, I'm gonna go and hold down the Q key to go in the Quick Mask Mode, and I'ma come up to Filters, Blur, Gaussian Blur, and I'm gonna set it for a large amount 'cause I want this to really come in here and not really be seen. So I want to be a nice, smooth transition. Click OK, go ahead and press the Q key again to get out, and just come up down here to our Curves layer. I use curves a lot, and I'm gonna go ahead and just start to darken that down a little bit so that it's not so noticeable. And that goes ahead, and really allows this to become the focus of the image. I might even on this shot here come up and grab the Crop tool, and just take a little bit of that sky out. There wasn't anything there. Say OK, and then that gives us our image, right there, and you can see how easy it is, and these are just simple cloning and healing brush things that make every image look better.
Ratings and Reviews
JennMercille
You really can do anything a thousand different ways in Photoshop! Randy broke down his processes with easy to understand instruction, and made it easy to see how and why you would choose different methods to create impressive architectural images in various situations. Great class!