Available Light
Lesson 4 from: Lightroom and Photoshop for Architectural PhotographyRandy Van Duinen
Available Light
Lesson 4 from: Lightroom and Photoshop for Architectural PhotographyRandy Van Duinen
Lessons
Introduction to Lightroom and Photoshop for Architectural Photography
09:28 2Curves Layer & Selections Color Correction
07:12 3Paint Brush Color Correction
07:56 4Available Light
13:12 5Luminosity Mask Color Corrections
05:10 6Light Painting Processing Exterior
08:45 7Light Painting Processing Interior
11:52 8Using Lightroom & Photoshop for Great HDR Images
07:14Lesson Info
Available Light
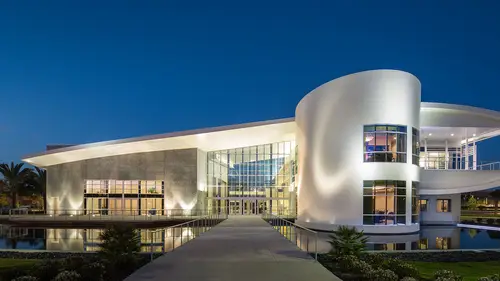
Now here's an image of Florida Polytechnic. It's a brand new college in Florida and with all my photography I go ahead and put a target in there so I can adjust the colors and make sure everything's right. These have already been adjusted but you can see here's my normal exposure, here's a brighter exposure, here's even a brighter exposure. And then I got some darker ones. I always do a bracket even if I'm not gonna use 'em. But what I found on here is that these lights back in the back area just were not bright enough so I wanna blend these guys all together. So let's select all three of those images. Then let's go to Photo, Edit in, and come down here all the way to the bottom and say Open as layers in Photoshop. Now what this will do is put all three layers inside Photoshop, stacked on top of each other and aligned. So we won't have to do any of that whatsoever. It'll do it all by itself and we'll be ready to go once it comes in. And hopefully it won't take too long. Okay we have ou...
r three images now. So what I wanna do is I want to reverse the order of these layers. Photoshop and Lightroom, the way they work, it almost always seems like they're in the wrong order. So if you come up to Layers, Arrange, and Reverse, it will reverse the order of all the layers at once so you don't have to go ahead and manually do that. Let's turn those off. So now what I wanna do is create some paths here. And we have curves and everything else. And so what we're gonna do is go ahead and grab our pen tool and I wanna work on this one right here so I'm actually gonna come in a little tighter while we work on it. And just wanna select the area I wanna work on and I'm going to click and drag this time. And I can, if I hold the, come on, click and drag. If I hold the Command tool I can move it around to get right where I want it. Come up here, click and drag, and the reason I'm dragging is that now I can make this curve right here. So when I come, I can drag and get it really quickly. I'm gonna do one at, we're gonna have to do four of these, so I'm gonna try to go quick through this for you so you're not sitting me make paths all day. And which one was I on? This one, so let's stop here. Come up here, click and drag, and we might have to adjust that a little bit. So let's by holding the Control key, I mean Command key, we can adjust the point so you get it nice and round to where we want it. Maybe a little bit higher on that one. And you can see how precise this is. When you're trying to work with a lot of very, windows or geometrical shapes, using a pen tool instead of trying to use a lasso tool is one of your best friends. Let's do the same thing right here. So I'm gonna do a path, click and drag, click and drag, hold the command key, and set it, click and drag again. Somewhere I hit, all right, here we go. And we'll come up to the top, click and drag, and connect, and then do some adjustments. Hmm, sometimes when you make a mistake like that just go back and reconnect and then do it. It's a lot quicker. All right so now we have our path, we're gonna come in here and just title this one Front. And I'm going to hold the Command or Control key and select it. I am gonna go into Select, Modify, Feather. Give it a two pixel feather. Go back to my layers and just get on this first layer right here. This is our next lighter layer. And all I'm going to do is just click on Create a new mask. And you can see right there how much even-er it is, is that a word, even-er? It is from the front to the back, just by going ahead and doing that. But we have these lines right here. So let's go ahead and we're on our mask, let's change our foreground color to white, get our brush, let's zoom in on this one, get it a little bit bigger, and let's do 30%. And start just kinda blending this in right where that line is so it blends into the shadow a little bit. We'll go 20% now. So we wanna bring in the reflections from the back area too. So we'll start here, actually 30 at the beginning to get it, go to 20% and bring it into the room a little bit. So you really can't see where it's going. Let me back out so you can take another look at it. And you can see right there. And if you think you've done too much, like I think I did over here, you know, just change your color to black and paint a little bit of it back so, I think it blends in a little bit better. All right I still think the back area, here, is still too dark. So again I'm going to come in tighter, take a look at it, then we do the same thing. I'm gonna take the pen tool and make a path. So we'll just connect down here, oops that's not where I wanna go. I can always check, change that when I get to it. So by holding the command key again I can just change these points around a little bit. Be a good idea if I connected 'em. All right now we can. So change that one to right up here, and this is probably down too far so let's just bring that up and bring this over a little bit, or actually bring that one out. So you can see it takes a little bit of work but it's well worth it when you start going through. Let's do the same thing over here. And I'm just gonna go really quick guys so we're not spending a lot of time on this. There we go, looks good. Let's name this one Back. Say okay, hold the Command or Control key, and select it. Again we're just gonna do the same thing but on a different layer. So we'll come to our layers, let's go to our brightest one, let's go ahead and again Modify, Feather, two pixels, and create a mask. Except I need to be selected on the layer that I want to use. There we go. So there's bringing in that back layer. That's probably too much so we can always take down the opacity until it starts to blend a little bit, like so. Good, I like how that's working. I'm gonna go ahead and blend these in, so I'm on my mask, with my paint brush tool and my foreground is white. We'll come in here, and just kinda paint this out. So that it blends in. And do it on the other side too. Now something else I noticed too is this hallway's a little dark so I'm gonna go back onto my first layer that we started with and with a big brush at 20%, I'm just going to paint in here a little bit. Actually make sure you're on your mask when you do this. Go here, and just paint on that 'til this lightens up a little bit more. That was a little too dark for me. All right, so that's looking good. Now my other next problem I see is there's some fluorescent lights in there again and it's really creating some green coloring that I don't like. So I'm gonna do like we just did in the last image, make a new layer, name it color, and I name my layers all the time. So many times I get into some files that are five gigs, and I have lots and lots of layers. So I really name all my layers so that I know what I'm working on. We're gonna change the blend mode to color. And what I'm gonna do is just select this color right here. I have my brush at 100%, and I'm gonna start with this area right here and just kind of correct that color right inside there. Then I wanna come over here and I'm probably gonna go down to 50%, a little bit smaller brush and just paint in these areas here where I think there's some contamination. Let's go over here, I know it's right in there, and right. So you can see there's before, I mean there's before, and there's after changing the color and it's really quick to do that, especially with something like this. Well now we've got it lit the way I want but I want to take out a few things. So we're gonna create a new layer and I'm gonna title this one Fix. And I'm gonna come over here and let's start with clone stamp tool and come right up here to these guys. They're kind of annoying, and they're in the way. So I'm gonna make a little bit bigger brush, hold the Option or Alt key, and go ahead and paint these all out. And if I think they're not blending in, I'm gonna hit my healing brush, again hold the Option key down, little bit bigger, and paint these guys out. Like so. I know there's another light right here. Let's just use the healing brush, take that out. And these lights are annoying, they're right on the edge of the shot, so let's take those out. And that looks pretty good. One last thing I have these little placards. And I just wanna get rid of them. So little bit bigger brush, pick a spot, right here, start down here, and take these out. And let's go to the other side and do the same. Since it's a symmetrical shot, we wanna make sure it's the same on both sides. Start here, hit the Option or Alt key, right on the bottom, and we'll go ahead and paint that out. And you can see that makes it a much cleaner shot. And so this is how you can do an ambient shot with no lighting. You can take, you know I always take a bracket exposure. I'm probably not gonna do an HDR, but I have the option if I want to. Or I can go ahead and put these all together and make a good image just from a bunch of different images having brighter and darker areas. So that's how I do my ambient lighting.
Ratings and Reviews
JennMercille
You really can do anything a thousand different ways in Photoshop! Randy broke down his processes with easy to understand instruction, and made it easy to see how and why you would choose different methods to create impressive architectural images in various situations. Great class!