Contemporary Portrait 1
Lesson 24 from: The Portrait Lighting Challenge: Natural vs StudioSue Bryce, Felix Kunze
Contemporary Portrait 1
Lesson 24 from: The Portrait Lighting Challenge: Natural vs StudioSue Bryce, Felix Kunze
Lessons
Day 1
1Class Introduction
13:10 2Shoot: Natural Light Portraits - Maisie
21:29 3Shoot: Natural Light Portraits - Katie
25:45 4Shoot: Natural Light Portraits - LaQuan
15:36 5Shoot: Studio Light Portraits - Maisie
39:40 6Shoot: Studio Light Protraits - Katie
14:39 7Shoot: Studio Light Portraits - LaQuan
16:49Shoot: Natural Light Nude Maisie
37:27 9Shoot: Natural Light Nude Continued Maisie & LaQuan
28:47 10Shoot: Studio Light Nude Maisie
36:05 11Shoot: Studio Light Nude Maisie & LaQuan
18:43 12Studio Light Q&A
24:57 13Review
31:13 14Shoot: Natural Light - Backlight
17:50 15Shoot: Studio Light - Backlight
34:57 16Shoot: Hollywood Glamour Shoot
42:51 17Shoot: Low Budget Hollywood Glamour
14:47 18Post Processing: Sue's Style
17:44 19Post Processing: Felix's Style
27:34 20Post Process Q&A
33:07 21Shoot: Studio Backlight and Lens Flare
17:48 22Shoot: Studio Light - Strobe
25:28 23Nude Boudoir Retouching
15:29 24Contemporary Portrait 1
09:57 25Contemporary Portrait 2
05:12 26Contemporary Portrait 3
04:40 27Film Noir Male Retouching
06:35 28Film Noir Boudoir Retouching
11:07 29Nude Male Retouching
03:48Day 2
Lesson Info
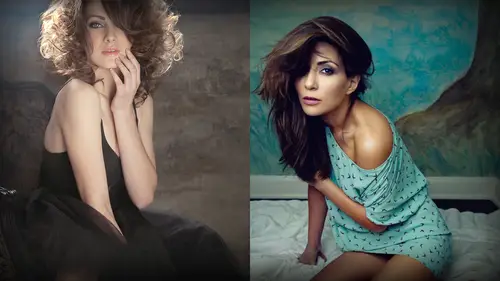
Contemporary Portrait 1
this is katie in natural light this is katie in the struggle light we have done an absolute beautiful match I'm very happy with this image I love how close they are uh catch lights are also strangely similar what I'm going to do as I thought that there was one little area that might trip me out the strobe being that I was shooting at uh hi shelagh speed would be a lot faster and so what I'm doing isn't I wondered if the sharpness off her skin and face I was going to be significantly better on the right image as opposed to six forty so natural light shut up forty which is a slow shelagh speak so I figured that the truth would be in the enlargement off her face and how much with the strobe beat me near and it's not a lot it is enough for you to notice it it is this definitely shopper but this is highly acceptable for me a supporter image like I said sharpness off each island is not my priority um I know that it is for a lot of people but it's just not for me so what I'm going to do is ju...
st quickly retouch this image and then take it into any in skin I'm going to always retouch with the face the size of my fist and the clone stamp the size of my probably small finger now or thumb now depending on what area I'm working on I don't blow the face right up and do poor for poor because I don't need to for portraiture some people definitely need two for you know commercial work but that's not how we retouch for porch chair we're going for a quicker to minute retouched to the face just basically nice smooth skin beautiful bright eyes good cala bella through the face any shadows that make it look not good like little bags those airlines khun go they don't belong on the face and it's just a general tidy up I cloned from all of the highlights up and out so I I do really not so clean up there there and there and then I clean up into here that and then they're any little bumps I just smooth them out and her little cheek bombs I'm just going to smoke those out perfect that's enough I don't need to do more then what I does uh kenny has a little scar here so I'm just going to lightly touch that okay let's move that and now there's a little bit of red around katie's eyes so I go to my brush till I use a lime green because thie opposite clue grid is grain on the colors victor I make sure my flowers at one percent not ten percent one and I give a little a brush off green around here red eyes just a pop the readout you can lam us that you could do that anyway like but I just don't want read eyes I got my dodge till I make sure my dodge towards a team percent I dodge around the iris I don't in the iris and judge around it but we don't want to make the eyes to white or the teeth to white because people don't like it and that's it so now I'm going to do exactly the same retouching to this image and excuse me I want my face to be about the size of my fist on screen so I'm not retouching too close and taking up too much time you can sit there and touch every pore and you do not need to because that's what they do for commercial work you don't need to do it before portraiture even sometimes though when it is just a big face shot if my client does by a very large image I will go back in we retouch it but you're only talking about saving three minutes of retouching it's not like I've wasted time I'm just preparing safe eighty files for my client to see and so after I smoothed down his little bumps don't joke away around we take off little things like that we're so close in tone with this image and I absolutely love that both strobe and natural and now that I'm going to open this into any skin five and I'm going to find a look that really suits us image I would like to find something that brings out the blue in her dress a little bit of blow maybe in the backdrop and maybe a little bit of blow in her eyes because it is a navy blue dress um so I'm not going to go to my go too so you know my color when I said d set rate and leave reds that would be my go to what that's going to do is make the blacks black the whites whiter in the red trader I like that but it's not look I want I want to try and pull some light three those blues so let's go through have a look at my sick and go to now I do like that because it makes her eyes just very gorgeous and oh it's so gorgeous I love that and let's just keep going I also like this okay gives me a nice tone but I'm dropping all the navy out when I go through my color um that's going to give me more reds and more magenta so I don't really want to go towards red and magenta I definitely like the warm tone because it does something with here that looks really good but I'm going to keep going because one of my favorites to play with is polaroid now a lot of people don't go into polaroid and if you do you can see here that the polaroid has some really big popping colors and this is one of my old time favorites yellowed and it's very painted lee and it's very beautiful but the first thing I do is take the dust and scratches off because uh the yellowed has dustin scratches and I don't want that um I absolutely love this filth this I'm going to apply it and then what I'm going today is I'm going to minimize that I'm going to apply it to my next image and then I'm going to pull up the background a little bit more because the yellowed is very dense and color I'm going to take it to fifty percent and I'm going to do both and it's only when you start adding the filters that you starting to see the difference between the images because when they were both fled they looked very similar but now it's picking up the subtleties of the light from the strobe to the natural life and then I'll drop that two fifty all right and then I'm kind of just going to decide right now I'm going to drop the stride one down to forty because it didn't need us much I'm going teo flatten both and I'm just one of paul I've got two choices here um one is I'm just going to create a lamb ask and turn off my top layer and I'm just going to lift up the blacks and my curves but just enough to see some separation between her dress and then I'm going to get back to my top player good in my race toll and just a race back this light here and it's very subtle uh you'll barely see it but it will make a difference I'll turn this layer off so you can see it like that and I love that that's where I'm gonna stay the one thing I'm going to do with this image off let me in lana said that they're exactly the same I'm going to turn off my top layer and going to lighten my bottom line right like that uh maybe not so much and then to my lab back on and a nice back dress inside and then I'm not gonna lose that nice light background all right and then I'm going to flatten both inside by so before I do save them I feel like the first thing I should do is bright not the eyes um both images can have a little bounce through the eyes and I'm just going to come into here just want a lighting around here team percent team percent dodge and the iris bring up but I keller team isn't dodge around the iris you know don't go out to the corners because the irs round and it should stay that way and it's just it gives the eyes such a beautiful lift and it's just enough to put that twinkle in yeah we already did that one okay so we'll save season will do a side by side and have a look at that
Class Materials
bonus material with purchase
Ratings and Reviews
Aliah Husain
I loved this course! I purchased it as a beginner photographer, unsure of whether to shoot natural or studio light and how to get the best results. After watching the course, I am fully confident in my ability to use both natural and studio lighting in my photography. And most importantly, I feel I have the knowledge base to be able to experiment with lighting in any situation. I am both grateful and inspired by these two amazing teachers sharing their technical knowledge and a personal piece of themselves. It is clear that they genuinely care about making their students better photographers. Thank you, Sue and Felix!!!
Geri
This is the best lighting class I've done, including several in-person ones. Covers so much, and the contrast between and dialogue about the two styles (natural vs studio) was so helpful. I didn't think there was anything at all negative about how Sue spoke with Felix, which a few reviewers said. Clearly she has great respect for him, which she sincerely says at one point, and explains why. Wonderful to see specifically how they both shape light. So many topics are covered. Loved Felix's clear and specific explanations about studio lighting. This class is worth every penny.
Wasabi Ben Kenobi
This was a fantastic introduction to studio lighting, and one of the best courses I've watched on Creative Live. I've only ever done natural light photos, but I want to learn more about studio lights because I'm creating a basement studio. I'm already a big fan of Sue's approach to portraiture. Now I'm a fan of Felix's soft lighting approach, too. In this course, he demonstrates how to replicate natural light portraits with a simple lighting setup. With a big scrim, a strobe or constant lamp, and v-flats, you can do so much! I'll be watching this course again.
Student Work
Related Classes
Portrait Photography